The Synonym Editor is available from Developer Studio. It provides the following tabs that enable you to view and manage synonyms: Field View, Segment View, List View, Modeling View, Text View, and Access File Text View.
x
Reference: Synonym Editor Main Attributes
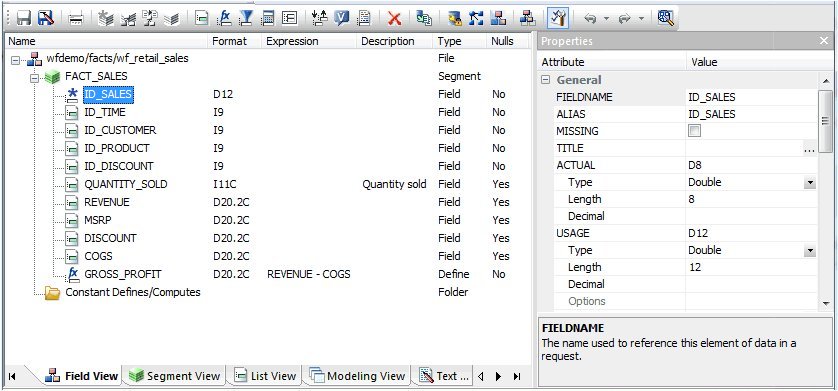
The Field View tab and Segment View tab show a hierarchy of segments and columns on the left with the attributes and values of the selected item in the Properties window, which displays by default on the right side of the tool.
Note: The attributes available depend on the type of synonym.
The Properties pane and the other available panes (Business View, Dimension Builder, or DBA) can be resized, positioned in different areas, or hidden by the available toolbar icons.
The following image is an example of an SQL data source with a key column selected.
Information about the selected attribute is displayed at the bottom of the Properties pane. In this case, an explanation of the FIELDNAME attribute appears.
The following objects may appear in the tabs.
|
Object
|
Name
|
Function
|
|---|
|

|
Synonym.
|
General icon used to indicate synonyms, visible on the left of the Field View tab. Provides information about the file name used and the application in which it resides.
|
|

|
Segment.
|
Indicates a segment in a synonym. The root or parent segment appears first in the tree.
|
|

|
Unique Segment (FOCUS/FDS and XFOCUS only).
|
Indicates a unique segment in a FOCUS/FDS or XFOCUS synonym.
|
|

|
Virtual Segment (Cross-Referenced).
|
Indicates a virtual or cross-referenced segment. The icon is dimmed.
This type of segment is applicable to FOCUS data sources.
|
|

|
Key Column.
|
Indicates a key column.
|
|

|
Column.
|
Indicates a general column.
|
|

|
Virtual Column (DEFINE).
|
Indicates a virtual or defined column.
For more information about virtual columns, see Adding Virtual Columns (DEFINE) in a Synonym.
|
|

|
Index Column.
|
Indicates that the native DBMS has an index for quick retrieval of values for this field.
|
|

|
Filter.
|
Indicates a Master File filter.
|
|

|
Compute Field.
|
Indicates a computed field.
|
|

|
Group.
|
Indicates a group.
This option is enabled when you select Options from the Tools menu. In the Options dialog box, click the check box for Support extended options.
|
|

|
Sort Object.
|
Indicates a sort object.
This option is enabled when you select Options from the Tools menu. In the Options dialog box, click the check box for Support extended options.
|
|

|
Style.
|
Indicates a style object.
This option is enabled when you select Options from the Tools menu. In the Options dialog box, click the check box for Support extended options.
|
x
Reference: Synonym Editor Toolbar
The Synonym Editor toolbar contains buttons that provide quick access to commonly performed functions. The behavior of the button is determined by the selected object. Therefore, certain toolbar buttons may be inactive.
|
Button
|
Description
|
|---|
|

|
Saves the edits made to the synonym.
|
|

|
Saves the edits made to the synonym to a new file (Save As).
|
|

|
Enables you to print the current view.
|
|

|
References segment from an existing synonym.
|
|

|
Enables you to add segments from an existing synonym.
|
|

|
Enables you to add segments through the Segment via Metadata Import option using the Create Synonym tool. This tool creates a synonym and includes it as a segment in the synonym from which the tool was launched.
|
|

|
Enables you to manually add segments, assigning values to segment attribute fields in the Synonym Editor.
Use this approach only if you are coding a new Master File, as you would for a FOCUS data source.
|
|

|
Adds a column field.
|
|

|
Adds a virtual column (DEFINE) field.
For more information about virtual columns, see Adding Virtual Columns (DEFINE) in a Synonym.
|
|

|
Adds a Master File filter.
For more information about filters, see Creating Filters in a Synonym.
|
|

|
Adds a COMPUTE field.
For more information about computed fields, see Adding Computed Fields (COMPUTE) in a Synonym.
|
|
|
Adds a group.
For more information about groups, see Adding Group Fields in a Synonym.
|
|

|
Inserts a variable in the segment.
|
|

|
Deletes the selected item.
|
|

|
Enables you to view and refresh sample data for the object.
|
|

|
Enables you to add DBA security to a Master File.
For more information about DBA security, see Applying Database Administrator Security.
|
|

|
Enables a parent and child hierarchy in Dimension Builder.
|
|

|
Enables you to create a Business View and a custom Master File that can use selected fields from the original synonym. In addition, you can customize field names, titles, and descriptions.
For more information about Business Views, see Creating Business Views.
|
|

|
Creates a default tree structure in the Business View and Dimension Builder panes based on existing segments and fields in the Master File.
|
|

|
Describes the attribute properties.
|
|

|
Enables you to undo or redo your actions.
|
|

|
Provides a window with a compressed view of the synonym. Only available from the Modeling View tab.
|
x
Reference: Synonym Editor Options Settings
When you click Tools from the menu bar and select Options, the Options dialog box appears, as shown in the following image. It enables you to set preferences and customize the look of Synonym Editor.
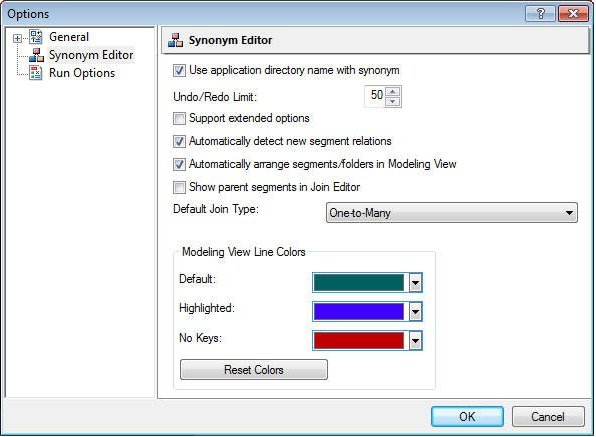
The Synonym Editor settings page has the following fields and options:
-
Use application directory name with synonym
-
If this check box is selected, an application directory name is used when you select a synonym name for both referencing an existing synonym and a transformation with db_lookup.
-
Undo/Redo Limit
-
Specifies the maximum number of undo/redo operations allowed in the Synonym Editor.
-
Support extended options
-
If this check box is selected, both the Sort objects and Styles folders appear when you edit a synonym.
-
Automatically detect new segment relations
-
When you create a new synonym in the modeling view of the Synonym Editor with the Automatically detect new segment relations option selected and select or drag tables into the work area (modeling view). The relationships (joins) will automatically be created for you based on the foreign key information in the access file.
-
Automatically arrange segments/folders in Modeling View
-
If you select or drag multiple or individual tables while in Modeling View, they will be automatically arranged for you.
-
Show parent segments in Join Editor
-
If this check box is selected, it controls whether or not columns in parent segments are displayed in the Join Editor for a cluster join or a synonym that references or includes, other synonyms.
-
Default Join Type
-
Sets the default Join type.
-
One-to-Many. This join indicates a multiple instance (one-to-many) type of join. At run time, each host record can have many matching records in the cross-referenced file. Join All is the default option.
-
One-to-One. This join indicates a single instance (one-to-one) type of join. At run time, each host record has, at most, one matching record in the cross-referenced file.
-
Modeling View Line Colors list box
-
Allows you to set colors for connector lines in the modeling view.
Default. Changes the color lines in the modeling view.
Highlighted. Changes the color of the highlighted lines in the modeling view.
No keys. Changes the color of lines with no keys in the modeling view.
-
Reset Colors
-
Restores the default colors.
x
Reference: Synonym Editor Format Options Settings
The Format pane is available from the Options dialog box. To open the Options dialog box, select Options from the Tools menu. Expand the General node, and select Format, as shown in the following image.
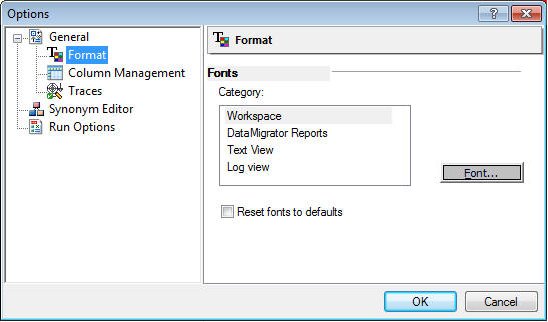
The Fonts section has the following fields and options.
-
Category
-
Allows you to set the font for text in the process flow workspace, reports, text views, and log views.
-
Font
-
Launches a dialog box for specifying font settings.
-
Reset font to defaults
-
Restores the default fonts.
x
Reference: Synonym Editor Column Management Settings
Column Management user preferences enable you to choose which columns to display on the grids for transformations, column selection, joins, and sorts. You can also set the column display order. The settings apply to all column-related dialog boxes.
The Column Management pane is available from the Options dialog box. To open the Options dialog box, select Options from the Tools menu. Expand the General node, and select Column Management, as shown in the following image.
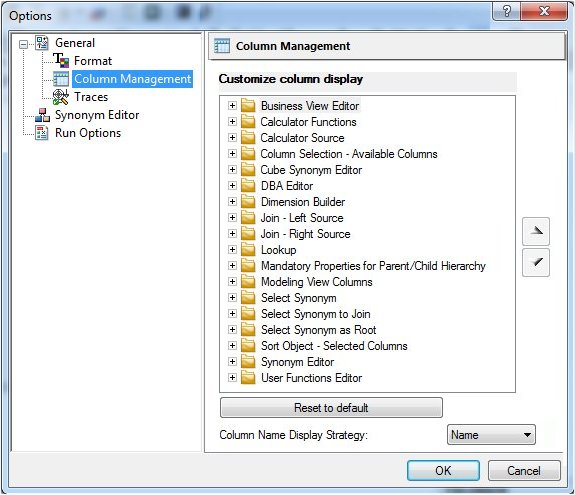
The Column Management pane has the following fields and options:
-
Customize column display
-
Lists the column-related dialog boxes that can be customized. Expanding a folder will display check boxes that can be used to add columns to each dialog box.
-
Reset to default
-
Restores the default values.
-
Column Name Display Strategy
-
Controls the information that appears in trees and grids. The available options are Name, Title, Description, and Alias. If no Title, Description, or Alias exists, the display will default to the Name.
Note: It is recommended that you use Title when working with Business Views.
Expand any of the available Customize column display options to see default settings. Not all columns are on every grid. The following columns can be added:
-
Alias
-
Assigns an alternative name for a column or the real column name for a DBMS synonym.
-
Application
-
Indicates the application where the synonym resides.
-
Belongs To Segment
-
Shows the parent segment.
-
Connection
-
Indicates the adapter connection name used.
-
Data Origin
-
Indicates the date the synonym was created.
-
Datetime Modified
-
Indicates when the synonym was last modified.
-
Description
-
Is a description or comments about the column.
-
Expression
-
Is the expression for the column.
-
Extension
-
Indicates the suffix (data source type) of the synonym.
-
Field Type
-
Indicates that a column is an index (I) or is read-only.
-
Format
-
Is the type and length of a column data as stored.
-
Function
-
Indicates the name of the function.
-
Has Foreign Keys
-
Indicates that the synonym includes foreign keys.
-
Index
-
Indicates an index column.
-
Join Conditions
-
Indicates the conditions for the join.
-
Join Parent
-
Indicates the parent of the join.
-
Join Strategy
-
Indicates strategy for the join.
-
Keys
-
Indicates the keys in the synonym.
-
Length
-
Is the column length.
-
Nulls
-
Indicates whether or not the column can contain null data.
-
Number of Segments
-
Indicates the number of segments in the synonym.
-
Order
-
Indicates the order of the column in the segment.
-
Prefix
-
Indicates a prefix for the column.
-
Primary Key Tables
-
Indicates the primary key for the synonym.
-
Property
-
Indicates whether the column is an attribute or a measure.
-
Real Table Name
-
Indicates the actual name of the table or the physical file name.
-
Reference
-
Indicates a reference for the column to an index column.
-
Scale
-
Is the maximum number of digits to the right of the decimal.
-
SCD Type
-
Used for processing slowly changing dimensions.
-
Segment
-
Indicates the parent segment.
-
Size
-
Indicates the size of the synonym.
-
Source
-
Indicates the source of the synonym.
-
SQL Conversion Notes
-
Indicates how SQL is converted.
-
Table
-
Is the synonym that contains the column.
-
Title
-
Supplies a title to replace the column name normally used in reports.
-
Type
-
Is the type of object in an application directory.
The following columns are available from each column display option. The default columns are shown in bold.
- Business View Editor.
Belongs to Segment, Format, Expression, Description, Nulls, Segment, Type, Length, Scale, Alias, Title, SCD Type, Field Type, Index, Order, Property, Reference.
- Calculator Functions.
Format, Description, SQL Conversion Notes.
- Calculator Source.
Table, Format, Description, Nulls, Prefix, Segment, Type, Expression, Length, Scale, Alias, Title, SCD Type, Field Type, Index, Order, Property, Reference.
You can change the display order of the columns by moving them up or down using the arrows.
x
Reference: Synonym Editor Traces Options Settings
Trace option settings enable you to configure tracing for the server, as shown in the following image.
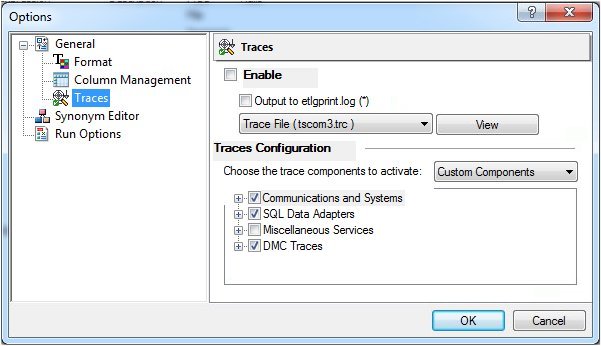
You can enable tracing for all components, default components, or a set of custom components. Trace output can be directed to the Web Console log (etlgprint.log), or to the tscom3.trc or connection.trc trace files.
x
Reference: Synonym Editor Run Options Settings
Run Options user preferences include determining the number of rows and columns to retrieve, as well as the default format when sampling data.
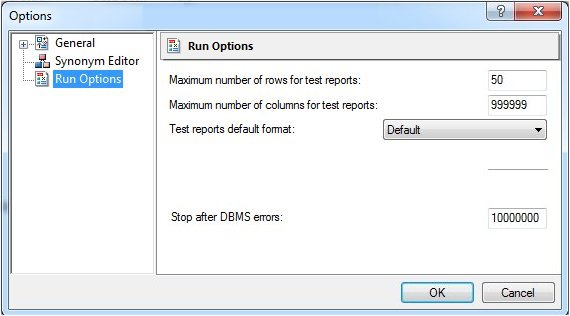
The Run Options settings window has the following fields and options:
-
Maximum number of rows for test reports
-
Sets the number of rows retrieved to produce sample data when testing transformations or SQL. The default is 50.
-
Maximum number of columns for test reports
-
Sets the number of columns retrieved to produce sample data when testing transformations or SQL. The default is to retrieve all columns (with a highest value setting of 999999).
-
Test reports default format
-
Sets the format of reports for retrieving sample data when testing transformations or SQL. The default is Default. There are seven report formats available:
-
Default. Formats numeric and date columns based on edit options in the synonym.
-
HTML. Produces the report in HTML format.
-
HTML - Plain Text. Produces the report in plain text format.
-
active report. Produces an HTML active report designed for offline analysis.
-
Excel. Produces the report in Excel format.
-
PDF. Produces the report in PDF format.
-
Unformatted. Does not apply formatting to numeric and date columns.
-
Stop after DBMS error
-
Sets the number of DBMS-related errors allowed before the server stops running the procedure.
x
Reference: Synonym Editor - Segment Context Menu
When you right-click a segment in the Synonym Editor, the following context menu appears. This menu is available from the Field View and Segment View tabs.
The following image is an example of an SQL data source with the root segment selected.
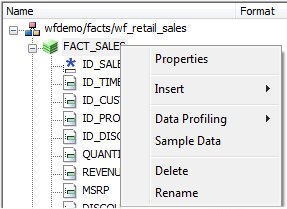
The following options are available:
-
Properties
-
Opens a pane showing the properties of the selected segment.
-
Insert
-
Enables you to insert one of the following:
-
Reference to Existing Synonym
-
Adds a reference pointer from the current synonym to an existing synonym. The selection list will show candidate synonyms. If you subsequently make changes to the source synonym, reopening the current synonym will reflect those changes.
-
Reference to Existing Synonym with Snowflake
-
Adds a reference pointer from the current synonym to an existing synonym. The selection list will show candidate synonyms as well as any synonyms that they reference.
-
Copy of Existing Synonym
-
Adds a static copy of an existing synonym to the current synonym. If you subsequently make changes to the source synonym, the current synonym will not reflect those changes.
-
Segment via Metadata Import
-
Enables you to create and add a new synonym to the current synonym through the Create Synonym tool.
-
Segment Manually
-
Inserts a synonym that must be coded manually.
-
Field
-
Inserts a general column to the segment.
-
Define
-
Inserts a virtual or defined column to the segment.
-
Filter
-
Inserts a filter to the segment.
-
Compute
-
Inserts a calculated value to the file.
-
Group
-
Inserts a group column to the segment.
-
Variable
-
Inserts a variable name that can be used for a Synonym/Access File parameter.
-
Data Profiling
-
Provides the characteristics of the data for a segment.
Data Profiling is available from the right-click context menu for all columns in the Master File hierarchy tree.
-
Sample Data
-
Displays sample data in the workspace for the selected segment or synonym.
Sample data is available throughout the Synonym Editor toolbar.
The following image is an example of the sample data that appears for a segment.
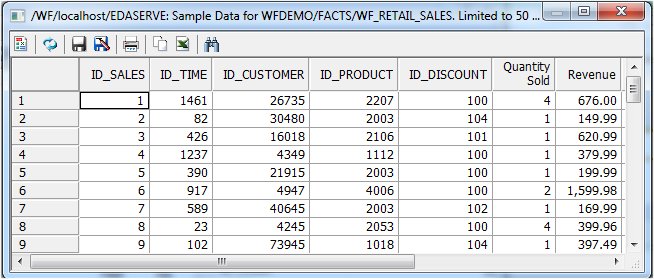
Note: Sample data is a great way to test the synonym for field data and to view the type of records returned. This can assist when performing Joins, testing connectivity to data sources, and so on.
-
Sample Data with parent key
-
Displays sample data for the selected segment joined to the parent segment. This option is only available when a child segment is selected in a multisegment synonym.
-
Delete
-
Deletes the segment.
-
Rename
-
Enables you to rename the segment.
-
Join Properties
-
Opens the Join Editor so that you can specify how the selected segment is joined to the parent segment. This option is only available when a child segment is selected in a multisegment synonym.
x
Reference: Synonym Editor - Column/Field Context Menu
When you right-click a column in the Synonym Editor, the following context menu appears. This menu is available from the Field View, Segment View, and List View tabs.
The following image is an example of an SQL data source with a column selected.

Note: The options that are available will depend on the data source.
The following options are available:
-
Properties
-
Opens a pane showing the properties of the selected column.
-
Insert
-
Enables you to insert one of the following:
-
Field
-
Inserts a general column to the synonym.
-
Define
-
Inserts a virtual or defined column to the synonym.
-
Filter
-
Inserts a filter to the segment.
-
Compute
-
Inserts a calculated value to the file.
-
Group
-
Inserts a group column to the synonym.
-
Variable
-
Inserts a variable name that can be used for a Synonym/Access File parameter.
-
Impact Analysis
-
Displays an Impact Analysis report for the particular column in the workspace. An Impact Analysis report identifies the procedures that access a Master File or field within a Master File. For detailed information on Impact Analysis, see Analyzing Metadata and Procedures.
-
Data Profiling
-
Provides the characteristics of the data for a column. Data Profiling is available from the right-click context menu for all columns in the Master File hierarchy tree.
-
Sample Data
-
Displays sample data in the workspace.
The following image is an example of the sample data that appears for a column.
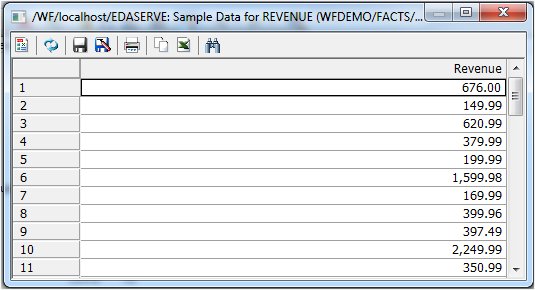
Note: Sample data is a great way to test the synonym for field data and to view the type of records returned. This can assist when performing Joins, testing connectivity to data sources, and so on.
-
Decompose Date
-
Decomposes date fields into virtual columns representing Year, Quarter, Month, and Day fields.
Note: Decompose Date is only visible for date fields.
-
Delete
-
Deletes the column.
-
Rename
-
Allows you to rename the column.
x
Reference: Synonym Editor - Field View Tab
The Field View tab shows a table with the available fields and segments.
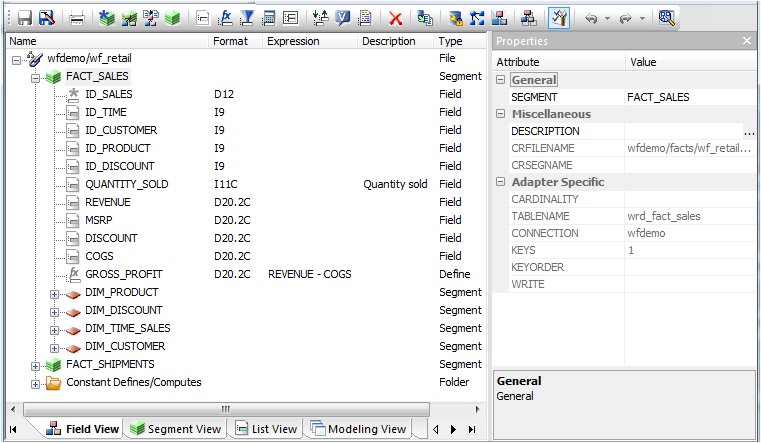
The following image is an example of a Microsoft SQL Server data source in the Field View tab.
The row below the toolbar menu, which includes the Name, Format, Expression, Description, and Nulls, enables users to right-click and drag to move a column to the right or left, changing the column order in the display grid. You cannot move the Name column. Users can also customize visible columns by right-clicking the row and selecting Customize, as shown in the following image.
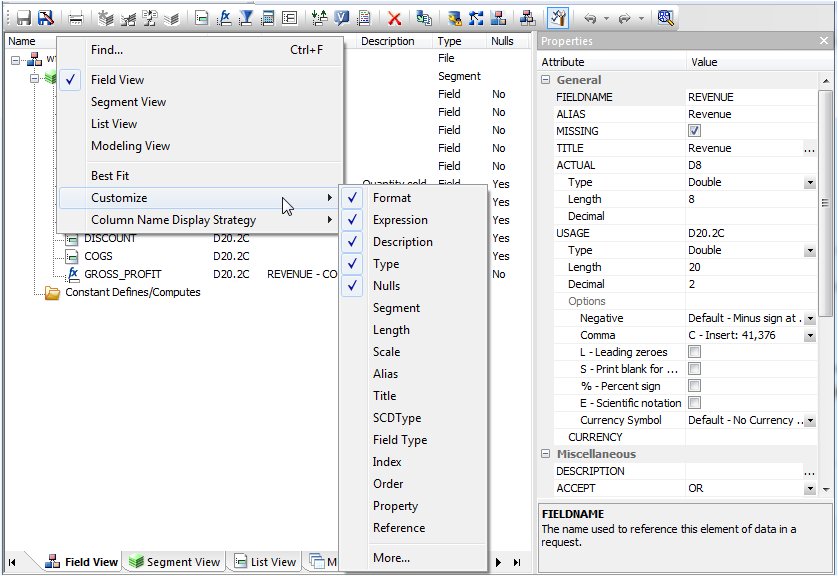
The same menu displays when you right-click in an empty space. From this menu, a user is also given an option that enables them to switch views. More, the last option, opens the Column Management section of the Options dialog box. For more information, see Synonym Editor Column Management Settings.
x
Reference: Synonym Editor - Segment View Tab
The Segment View tab shows the segments that the synonym contains.
The following image is an example of a Microsoft SQL Server data source in the Segment View tab.
x
Reference: Synonym Editor - List View Tab
The List View tab shows a list of objects on the left, with the attributes and values of the selected item on the right, as shown in the following image.
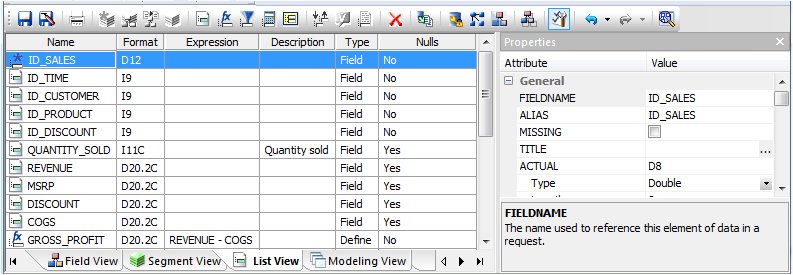
Note: When you right-click a column heading in the List View, a context menu provides options to sort the display based on ascending or descending column values. The display can be sorted by any column.
x
Reference: Synonym Editor - Modeling View Tab
The Modeling View tab shows a graphical representation of the synonym. Use the Modeling View to, create cluster joins, view join properties, and add or edit segments.
The following image is an example of an SQL data source in the Modeling View.
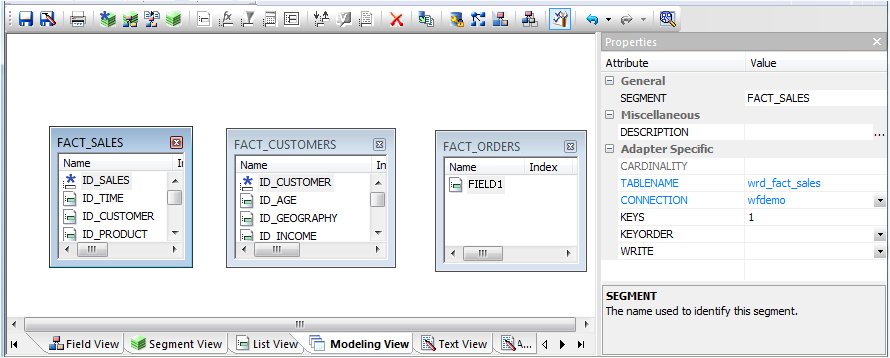
In the Modeling View, when you right-click in an empty space, you are presented with tasks permitted in this view, for example, Insert a Segment and Auto Arrange available synonyms. For more information about the Modeling View, see Enhancing Synonyms Using the Modeling View.
x
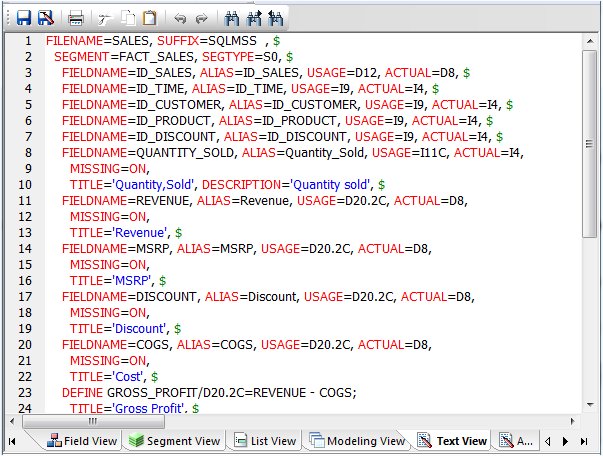
Reference: Synonym Editor - Text View Tab
This view opens the synonym in the editor.
You can print the Master File code by selecting Print from the File menu, perform search operations, and even make changes.
The following image is an example of a Microsoft SQL Server data source in the Text View tab.
x
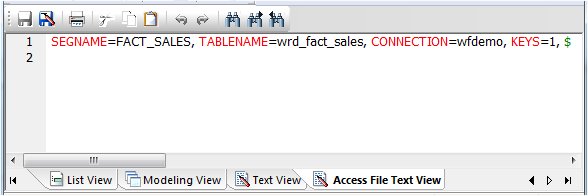
Reference: Synonym Editor - Access File Text View Tab
The Access File Text View tab shows the description of the Access File for a synonym, which is used to access the database.
Note: You can print the Master File code by selecting Print from the File menu, performing search operations, and making changes, if necessary.
The following image is an example of an SQL data source in the Access File Text View tab.