Selecting a Creation Tool

How to:

Reference:

You can create a procedure with one of the following tools:


Top of page

x
Procedure: How to Select a Creation Tool
  1. Open a project.
  2. Create a new procedure by doing one of the following:
    • Right-click the Procedures folder, select New, and click Procedure.

      or

    • Highlight the Procedures folder, select New from the File menu, and click Procedure.

    The Add Procedure dialog box opens, as shown in the following image.

    Procedure dialog box

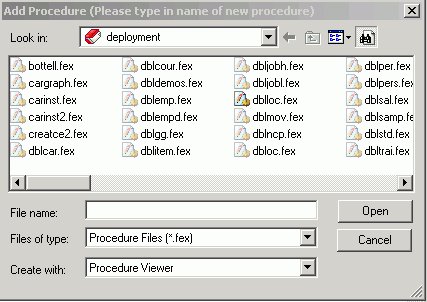
    The display box lists all the procedures currently visible in the project path, or all procedures that have been added to the project path (QTY_ALL.fex in the sample dialog box). Click the Displays all files in the project path button to toggle between the two displays.

  3. In the File name field, type a name for the new procedure. Do not include any spaces in the name or add an extension. Developer Studio automatically appends the extension .fex.
  4. In the Files of type drop-down list, accept the default, Procedure Files (*.fex).
  5. In the Create with drop-down list, select the creation tool:
    • Procedure Viewer provides a graphical environment for the creation of a generic procedure. For information, see How to Create a Reporting Procedure Using the Procedure Window.
    • Report Painter provides a graphical environment for the creation of a report procedure.
    • Composer enables you to design reports, and to coordinate and distribute layouts made up of multiple reports and graphs in a single file.

      For details, see the Creating Compound Reports With Document Composer manual.

    • Graph accesses InfoAssist, where you can transform almost any type of data into an effective chart that you can customize. For information, see the WebFOCUS InfoAssist User’s Manual.
    • SQL Report Wizard assists you with SQL passthru, which allows you to execute SQL code that retrieves data from an RDBMS. You can use the resulting extract file in Report Painter or InfoAssist. For information, see Using the SQL Report Wizard.
    • Text Editor provides a standard text editor, allowing you to create a procedure by entering commands. For information, see How to Create a Procedure With the Text Editor.
    • Define Function accesses the Define Function Wizard, where you can create a virtual field function.

Top of page

x
Reference: WebFOCUS Logon Dialog Box

When you access either the Projects folder or the WebFOCUS Environments folder and you need to access a secure server, a logon box displays, prompting you for an ID and password.

There is a check box option for remembering the ID or password. By default, it is not checked. If you check this box, your credentials will be stored and encrypted in the wfscom.wfs file, the local configuration file that is used to store information processed by the Developer Studio communication layer. For details about the wfscom.wfs file, see Managing the WebFOCUS Environment in the Developing Reporting Applications manual. If you decide to change the stored credentials later, you can do so from the WebFOCUS Environments Properties dialog box.


Top of page

x
Procedure: How to Create a Report Procedure With Report Painter
  1. Expand the folder that will contain the report procedure.
  2. Right-click the folder where you want to create the report procedure.
  3. Click New, and then click Procedure.

    The New Procedure dialog box opens.

  4. Type a name for the new procedure in the File name field, select Report Painter from the Create with drop-down list, and click Create.

    The WebFOCUS Table List dialog box opens and prompts you to select a Master File, as shown in the following image.

    WebFOCUS Table List

    The display box lists all the Master Files currently visible in the project path, or all the Master Files that have been added to the project.

  5. Select a Master File.
  6. Click OK.

    Report Painter opens.

    See the Creating Reports With Report Painter manual for more information.


Top of page

x
Procedure: How to Create a Reporting Procedure Using the Procedure Window
  1. In the Add Procedure dialog box, enter a name for the new procedure, then select Procedure Viewer, and click Open.

    The Procedure window opens, as shown in the following image.

    This window contains a default Comment component with two diamond objects on either side called component connectors. The Comment component does not contain any executable commands. At this point, you have created a procedure shell. You can now make this shell executable by adding components, such as a report or graph.

    Components are stored in a file with the extension .FEX.

  2. Click a diamond object and select a component, such as Report or Graph or use the toolbar buttons. For details on how to proceed, see Creating a Procedure Component.

Once you have created components, you can do the following with components.


Top of page

x
Procedure: How to Create a Procedure With the Text Editor
  1. In the Add Procedure dialog box, enter a name for the new procedure, select Text Editor, and click Open. The text editor opens, as shown in the following image.

  2. Enter the syntax for your procedure.

    See the Creating Reports With WebFOCUS Language manual for details on WebFOCUS syntax.

  3. Click the Save button on the text editor toolbar when you are done. See Editing Application Components as Text in Developer Studio, for details on the text editor.

Top of page

x
Reference: Add Procedure Dialog Box

Procedure dialog box

The Add Procedure dialog box contains the following fields and options:

Look in

Is the name of the project.

Procedure List Box

Lists the procedures associated with the selected project.

File name

Is the name of the procedure.

Files of type

Is the type of file.

Create with

Is the creation tool to be used. The options are:

  • Procedure Viewer
  • Report Painter
  • Composer
  • SQL Report Wizard
  • Graph
  • Text Editor
  • Define Function

WebFOCUS