How to: Reference: |
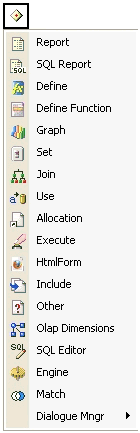
After creating a procedure shell, you can create components that make the shell executable. The Component Connector toolbar contains the available types of components. The Comment component is created by default and is not included on the toolbar.
Several of the components on the toolbar are usually placed in a specific order based on the logical flow of a procedure. These components are Set, Allocation, Use, Join, Define, and Report or Graph, in that order. The remaining components (Execute, Include, and Other) enhance the user interface and efficiency, and can be placed anywhere in the order of execution. However, Dimension must be placed before the Report component.
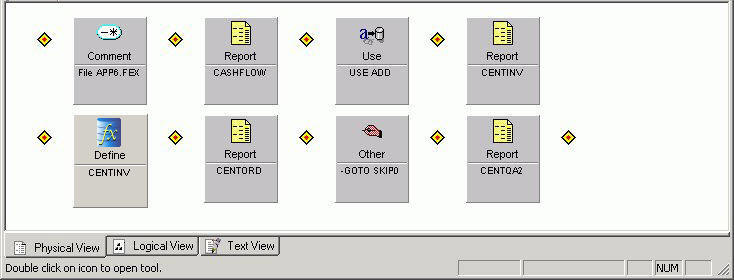
You can have one or several components in a procedure. The following image includes a Comment, four instances of a Report, a Use, Define, and Other components. Together these components make up the procedure named APP6.
You can include the following components in a procedure.
|
Component |
Description |
|---|---|
|
Report |
Creates a tabular representation of the data retrieved from a data source. A Report is placed after a Join and a Define. For details, see the Creating Reports Overview. |
|
SQL Report |
The SQL Report Wizard assists you with SQL passthru, which allows you to execute SQL code that retrieves data from an RDBMS. You can use the resulting extract file in Report Painter or InfoAssist. For details, see Using the SQL Report Wizard. |
|
Define |
Creates a temporary (virtual) field that is evaluated before a report is run. A Define is placed before a Report component. For details, see Creating Temporary Fields. |
|
Define Function |
Creates a virtual field function, which can be called in most of the same situations that are valid for Information Builders supplied functions. |
|
Graph |
Creates a graphical representation of the data retrieved from a data source. A Graph is placed after a Join and a Define. |
|
Set |
Customizes the Developer Studio and WebFOCUS environments, including the way reports and graphs display, report and graph content, data retrieval characteristics that affect performance, system responses to end user requests, metadata setup, and date manipulation. For details on the Set tool and parameters, see Customizing Your Environment in the Developing Reporting Applications manual. |
|
Join |
Defines a relationship between two or more data sources so that a report can use data from all of them at once. A Join is placed before a Define, and if there is no Define, it is placed before a Report component. For details, see Joining and Merging Data Sources. |
|
Use |
Provides flexibility in using a FOCUS data source. You can specify read-only access, treat multiple data sources as one, and request the use of data sources not stored in your current directory (whether elsewhere on your hard disk or on a network file server). For details on accessing FOCUS data sources, including techniques for maintaining Use commands, see Accessing a FOCUS Data Source in the Developing Reporting Applications manual. |
|
Allocation |
Assigns a temporary name to a file created and used by WebFOCUS. To preserve an extract file (created by the HOLD command) on the servers disk, you must issue a FILEDEF command to a specific location. Also, the Dialogue Manager -READ and -WRITE commands refer to files by names that must first be established with a FILEDEF command. For details on the Allocation Wizard, see Assigning a Logical Name With the Allocation Wizard. |
|
Execute |
Enables one procedure to call another. You can select a procedure to be called by the one you are editing. An Execute component can be placed anywhere in a procedure. For details on the Execute component, see Calling a Procedure From the Current One. |
|
HtmlForm |
Creates a text file you can use to add HTML code to the procedure currently being edited. HTML forms are used to launch applications in the web environment. Note: The Deploy Wizard guides you through the process of creating a configuration that manages the deployment of your project files, including HTML forms, to the web. For more information on the Deploy Wizard, see the Developer Studio Application Development Getting Started manual. |
|
Include |
Allows you to use a portion of a procedure if you store it separately. A separate, included procedure is treated as part of the procedure currently being edited. It enables the reuse of code, making projects easier to write and maintain. After an included procedure runs, control returns to the calling procedure. An Include component can be placed anywhere in a procedure. For details on the Include component, see Calling a Procedure From the Current One. |
|
Other |
Enables you to enter commands that connect other components. This feature is useful for writing code that does not have a graphical tool (such as Dialogue Manager). However, you can also use Other for any kind of manual coding, for example, to code a virtual field or a report. When used this way, the Other component automatically converts to the corresponding component type. An Other component can be placed anywhere in a procedure. For information on the Other component, see the Developer Studio Application Development Getting Started manual. For details on the WebFOCUS language, see the Creating Reports With WebFOCUS Language manual. |
|
Olap Dimensions |
Creates an OLAP hierarchy and dimensions based on data for multi-dimensional analysis without changing the Master File. The new logical view is saved as part of the procedure. A Dimension component applies to FOCUS data sources and relational tables. It must be placed before the Report component. For information on defining dimensions, see the Describing Data With Graphical Tools and the Describing Data With WebFOCUS Language manuals. Unlike the Dimension Builder (addressed in the Describing Data With Graphical Tools manual), the Dimension Tool, accessed through the Dimension component, does not show the graphical representation of a Master File, rather, it lists the fields. The process of creating a hierarchy is the same, drag-and-drop fields from the left pane to the right pane. |
|
SQL Editor |
Enables you to code SQL Passthru and highlights any SQL commands within the code. This editor also allows you to choose your connection engine and connection name from drop-down lists on the toolbar. For more information on the SQL Editor, see the Developer Studio Application Development Getting Started manual. |
|
Engine |
The Engine tool exposes the FOCUS ENGINE SET commands and enables you to enter ENGINE commands or connection attributes, and override parameters. Note: The Engine tool is only used to create ENGINE statements. You are responsible for having the knowledge of the ENGINE SET command or the Connection Attribute needed. For details, see the Using the Engine Tool. |
|
Match |
The Match Wizard enables you to merge two or more data sources, and specify which records to merge and which to sort out. The wizard creates a new data source, a HOLD file, into which it merges fields from the selected records. You can report from the new data source and use it as you would any other HOLD file. For more information on the Match Wizard, see the Developer Studio Application Development Getting Started manual. |
|
Dialogue Mngr |
Enables you to control the flow of your application with the use of variables. For more information on the Dialogue Manager, see Managing Flow of Control. |
|
Modify |
Changes or modifies data. There is no Modify tool but you can use the Other tool to create a Modify request by typing code, at which point the Other tool changes to a Modify component. For details on Modify, see Unique FOCUS Topics on the WebFOCUS Documentation CD. |
|
Comment |
Includes a comment for the project. This comment is not necessary and you can delete it if you wish. A procedure shell, when created, contains a default Comment component. Once you create an executable component for a procedure, the file name defaults as a comment in this component. For example, if you named the shell TEST, the default Comment component will contain the comment -* File TEST.FEX. For information on the Comment component, see the Developer Studio Application Development Getting Started manual. |
The corresponding tool opens. For details, see Component Types.
| WebFOCUS |