In this section: How to: Reference: |
Report Painter provides a variety of options that enable
you to customize the display of columns in your reports.
x
Procedure: How to Change a Column Title
By default, the column title is the field name or Title attribute
in the Master File, if specified. To change the column title on
the report:
-
Right-click
a column in the Report Painter window and choose Column
Title from the context menu.
The Title dialog box opens.
-
At the
cursor location, type the new column title.
-
Click OK.
The new title appears over the field in the report.
Note: Click the Default button
in the Title dialog box if you want to reinstate the default title
of a field.
x
Reference: Title Dialog Box
-
Title Window
-
Title Window displays the default
column title of the selected field. Highlight the text and type
the new column title.
-
Default
-
Reinstates the default title of a field.
x
Procedure: How to Change the Format and Edit Options of a Column
-
Select
the column in the Report Painter window.
-
Choose Format from
the Properties menu.
or
Right-click and select Format from
the context menu.
The Format dialog box opens.
For details, see Format Dialog Box.
-
Change
the format by selecting the appropriate option button in the Format
Types box.
-
Scroll
the list of edit options and select the one(s) you wish to change.
-
Click OK.
Note:
- Click the Default button
if you want to reinstate the default format or edit options.
- This feature
does not apply to sort fields.
x
Procedure: How to Assign a Background Color to a Column
-
Right-click
the column and select Options from the context
menu.
The Field Properties dialog box opens at
the Style tab.
-
Select
one of the following from the active object area drop-down list:
-
Column Data
-
Column Title
-
Column Title and Data
-
In the
Background Coloring area, click Single Color to
activate the Select Colors button. The Color
dialog box opens.
-
Select
a color and Click OK.
x
Procedure: How to Assign Alternating Background Colors to Rows Within Columns
-
Right-click
the column and select Options from the context
menu.
The Field Properties dialog box opens at
the Style tab.
-
Select Column
Data from the active object area drop-down list. (The
Alternating Colors button is only activated for this object area.)
-
In the
Background Coloring area, click Alternating Colors to
activate the Select Colors button. The Choose
Background Colors dialog box opens.
-
Click
a check box to activate the drop-down list next to it.
-
Click
the down arrow to open the drop-down list.
-
Select
a color.
Repeat this process for other rows you want
to assign colors to.
-
Click OK.
x
Procedure: How to Remove a Background Color From a Column
-
Right-click
the column and select Options from the context
menu.
The Field Properties dialog box opens at
the Style tab.
-
Select
one of the following from the active object area drop-down list:
-
Column Data
-
Column Title
-
Column Title and Data
-
In the
Background Coloring area, click None.
-
Click OK.
x
Procedure: How to Copy the Background Color From One Column to Another
You can copy the background color characteristics from one
column to another.
-
Select
the column(s) that you want to apply styling to by simultaneously
clicking your mouse and pressing the Shift key.
-
Select
the column that contains the styling you want to apply and keep the
Shift key pressed as you click it.
-
Select Match
Background Color from the Match All Styles drop-down
list on the Font toolbar.
To copy all formatting characteristics (including font, grid,
background color, and conditional styling) from one column to another,
click the Match All Styles option on the
Font toolbar.
x
Procedure: How to Set the Page Color for the Report
-
Select Styling from
the Report menu. The Report Options dialog box opens at the Style
tab.
-
In the
Graphical area, click the Set Page Color button.
-
Choose
a color and click OK.
x
Procedure: How to Customize the Virtual Screen Size for the Report
You may customize the virtual screen size for the report.
Note: Adjusting the
virtual screen size applies to the work area in the Report Painter
window. The report output is not affected by these settings.
-
Select Format from
the Report menu. The Report Options dialog box opens at the Format
tab.
-
Change
the virtual screen size height and width. (The minimum value is 612
x 792).
Note: The Virtual
Screen Size option appears for HTML Web Document (HTML), HTML Table
(HTMTABLE), Default, and User Styled report outputs.
-
Click OK.
x
Procedure: How to Justify a Report Column
You
can align alphanumeric and numeric report columns with either the
left or right column margin, or in the center by performing the
following steps:
-
Select
the column in the Report Painter window.
-
Click
the Left Justify, Center Justify, Right
Justify, or Default Justify button
on the Font toolbar.
-
Select Default
Justify if you want to reinstate the default column
alignment. By default, alphanumeric fields are left-aligned and numeric
fields are right-aligned.
x
Procedure: How to Increase Column Width
-
Left-click
the column to select it.
-
Position
the cursor on the right column border. The cursor will resemble a
small horizontal arrow.
-
Left-click
and drag the border to the desired column width.
Tip: To restore the default column width,
select Fixed Column Width from the Properties
menu.
x
Procedure: How to Wrap Data Automatically by Changing the Width of a Column
-
Right-click
the column in the Report Painter window and select Options from
the context menu.
The Field Properties dialog box opens at
the Style tab.
-
Select Wrap from
the Column Layout Width drop-down list.
-
Enter
a column width in the measurement unit specified.
-
Click OK.
Note: For HTML-styled report formats, ensure
that the Cascading Style Sheets options is selected on the Report
Options Features tab.
x
Procedure: How to Truncate Report Column Values
-
Right-click
the column in the Report Painter window and select Options from
the context menu.
The Field Properties dialog box opens at
the Style tab.
-
Select Truncate from
the Column Layout Width drop-down list.
-
Enter
a column width in the measurement unit specified.
-
Click OK.
To indicate that a field value has been truncated in the report
browser, Report Painter places an exclamation point (!) after every
alphanumeric and text field value and an asterisk (*) after every
numeric field value.
Note: For
HTML-styled report formats, ensure that the Cascading Style Sheets
option is selected on the Report Options Features tab.
x
Procedure: How to Compress a Column
-
Right-click
the column in the Report Painter window and select Options from
the context menu.
The Field Properties dialog box opens at
the Style tab.
-
Select Minimum from
the Column Layout Width drop-down list.
-
Click OK.
This is selected by default. Minimum width sets the width
of the column according to the widest value or heading in the field.
Note: For HTML-styled report formats,
ensure that the Cascading Style Sheets option is selected on the
Report Options Features tab.
x
Procedure: How to Set the Maximum Column Width
-
Right-click
the field in the Report Painter window and select Options from
the context menu.
The Field Properties dialog box opens at
the Style tab.
-
SelectMaximum from
the Column Layout Width drop-down list.
-
Click OK.
Maximum width sets the width according to the length defined
in the field format.
Note: To
apply this setting to HTML styled report formats, ensure that the
Cascading Style Sheets option is selected on the Report Options
Features tab.
x
Procedure: How to Set the Minimum Column Width
To remove extra blank space between report columns, select Styling from
the Report menu. Then select Minimum from
the Report Layout Width drop-down list. This is the default setting.
Since this may change
the width of the report at run time, the report may look different in
the Report Painter window.
Note: For
HTML-styled report formats, ensure that the Cascading Style Sheets
option is selected on Report Options Features tab.
x
Procedure: How to Stack Column Titles and Data Vertically to Decrease Report Width
You can stack columns over one another by performing the
following steps:
-
Right-click
the column in the Report Painter window and choose Options from
the context menu.
The Field Properties dialog box opens.
-
From
the General tab, select New Line (OVER) in
the Output box.
Note: OVER is not available for sort fields.
x
Procedure: How to Make a Column Invisible/Visible
To make a column invisible, right-click the column in the
Report Painter window and choose On from
the Invisible context menu. The field is grayed out in the Report
Painter window and will not be visible in the report output, but
may still be used in the report (for instance, as part of a calculation).
To make a column visible, right-click the field in the
Report Painter window and choose Off from
the Invisible context menu. The grayed background is removed and
the field is visible in the report output.
x
Procedure: How to Show/Hide an Invisible Column
Click the Show/Hide invisible fields button
on the General toolbar.
xDisplaying Pop-up Field Descriptions for Column Titles
You can have pop-up field descriptions display in an
HTML report when the mouse pointer is positioned over column titles.
Field description text displays in a pop-up box near the column
title using the default font for the report. Pop-up text appears
for report column titles including titles created with ACROSS phrases
and stacked column titles created with OVER phrases.
The pop-up text displayed for a column title is defined by the
Description attribute in the Master File for the corresponding field.
If a column title has no Description entry in the Master File, then
no pop-up box is generated when your mouse is positioned over the title.
x
Procedure: How to Display Pop-up Field Descriptions in an HTML Report
-
Open
a procedure in Report Painter.
-
From
the Report menu, select Features.
The Report Options dialog box opens.
-
In the
HTML options area, select the Pop-up Field Descriptions check
box.
Note: Pop-up Field
Descriptions are available for HTML Web Document (HTML), HTML Table
(HTMTABLE), Default, and User styled report formats.
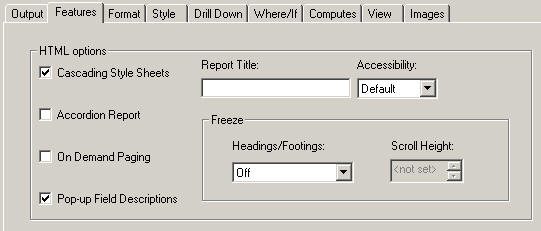
The following image shows part
of the Report Options dialog box with the Pop-up Field Descriptions
option enabled for this report.
-
Click OK to
close the Report Options dialog box and return to Report Painter.
x
Reference: Distributing Reports With Pop-up Field Descriptions Using ReportCaster
Distributing an HTML report containing pop-up field descriptions
with ReportCaster requires the use of JavaScript components located
on the WebFOCUS Client. To access these components from a report
distributed by ReportCaster, the scheduled procedure must contain
the SET FOCHTMLURL command, which must be set to an absolute URL
instead of the default value. For example,
SET FOCHTMLURL = http://hostname:port/ibi_html
where:
-
hostname:port
-
Is the host name and optional port number
(specified only if you are not using the default port number) where
the WebFOCUS web application is deployed.
- ibi_html
-
Is the site-customized web server alias
pointing to the WebFOCUS/ibi_html directory (where ibi_html is the
default value)
For more information about coding reports for use with
ReportCaster, see the Tips and Techniques for Coding a ReportCaster
Report section in your ReportCaster manual.