A calculated value is a temporary field that is evaluated
after all the data that meets the selection criteria is retrieved,
sorted, and summed. Calculated values are available only for the
specified report request.
Use the Computes tab to create a calculated value. You can access
the Computes tab only when you are creating reports in Report Painter.
x
Reference: Format Dialog Box
The Format dialog box enables you to
define the format of the output to be generated by a calculation.
Note: The
Format button is available in the Compute, Define, and RECAP dialog
boxes to define field formats for temporary fields and subtotal
calculations. Click the Format button to
open the Format dialog box.
For more
information about the RECAP dialog box in the Financial Report Painter,
see Creating Reports With Financial Report Painter in
the Creating Financial Reports manual.
Tip: You can also access the Format
dialog box from the context or Properties menu for a selected field
in the Report Painter window to change a field format.
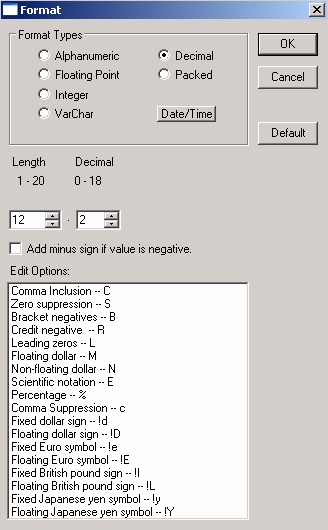
The Format dialog box has the
following fields and options:
-
Format Types
-
Specifies the format of the current field. The field type
can be alphanumeric, numeric, or date/time.
-
Date/Time
-
Opens the Date and Time Formats dialog box, where you can
assign date and time formats, and apply date and time display options.
For more information, see Assigning Date/Time Formats.
-
Length
-
Specifies the length, in characters, of a field. Enter a
number in the Length box, or click the arrow
buttons to specify a number.
|
Field Format
|
Length
|
|---|
|
Alphanumeric
|
1-4096 (default, 20)
|
|
Floating Point
|
1-9 (default, 7.2)
|
|
Integer
|
1-11 (default, 5)
|
|
VarChar
|
1-4096 (default, 20)
|
|
Decimal
|
20.18 (default, 12.2)
|
|
Packed
|
33.31 (default, 12.2)
|
|
Dynamic
|
Select a Format Field.
|
Note: For numeric fields, include
the decimal place in the length.
-
Decimal
-
Specifies the number of decimal places to the right of the
decimal point in a Decimal, Packed Decimal, or Floating Point field.
-
Add minus sign if value is negative
-
Check this option to display a minus sign to the right of
negative numeric data.
-
Edit Options
-
Adds display options to numeric field formats to control
how the field will appear on reports.
xAssigning Date/Time Formats
You can assign the Date/Time format to a field from
the Define, Compute, and Recap tools with the Date and Time Formats
dialog box. You may also apply the Date/Time (DT) expression in
a Where, Compute, and Define tool as a value or a function. This
section describes how to assign the Date/Time format, value, and
function with these graphical tools.
Tip: You can also insert the current date into an object
area in the Report Painter window.
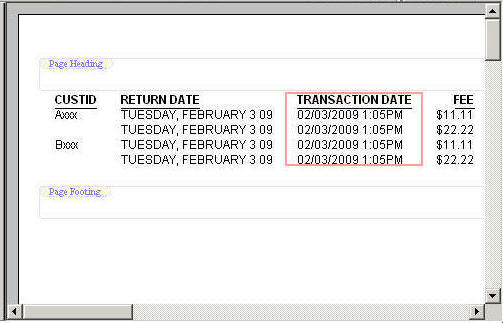
The following image is an example of the Report Painter with
sample data for a Date and Time field.
x
Reference: Date and Time Formats Dialog Box
Access the Date
and Time Formats dialog box by clicking the Date/Time button
in the Format dialog box, available from the Define, Compute, and
Recap tools.
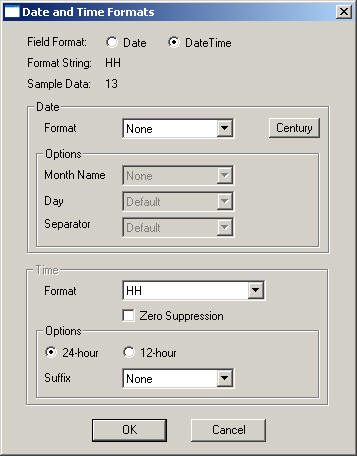
Note: The
Date and Time Formats dialog box enforces valid Date-only and DateTime
format combinations, based on the input entered and the field selected.
Some options may not be available for your selections.
-
Field Format
-
Displays the type of field being created or edited.
-
Date. Assigns
a Date format that represents a date or date component and enables
the Date-only options.
-
DateTime. Assigns
a DateTime format that represents a date and time, or date and time
component, and enables the Date and Time options.
Note: When
creating a new field, both formats are enabled, allowing you to
create either type of field format. When editing an existing field,
only one field format is enabled, enforcing a visual indication
of what type of field is being edited and indicating the applicable
options.
-
Format String
-
Displays the current format string in FOCUS syntax, updated
as changes are made in the dialog.
-
Sample Data
-
Displays a sample date and/or time value based on the current
date/time and current format string.
-
Date Options
-
Format
-
Lists all the valid date combinations for Year, Month, Day,
and so on. The options vary depending on the field format selected.
Note: The
default date format is None, from which you
can select a Day name option (for a Date
field format), or a Time format option (for
a DateTime field format).
-
Century
-
Opens the Century/Base dialog box, which enables you to set
Century and Base options added for Y2K.
- Century value assigns
the two-digit century value to control the century values of a field.
- Base year assigns
the two-digit base year to control the century values of a field.
-
Month Name
-
Displays the month name instead of a number for the field.
The options vary depending on the field format selected.
-
Day Name
-
Displays the day name with the date using translate options.
The options vary depending on the field format and the Month Name
selected.
Note: This option appears as Day when
the DateTime field format is selected. The options are Default (2-digit)
or Zero suppression (zero-suppressed) number
for a Day.
-
Prefix
-
When the Date field format is selected, the Prefix option
controls if the name appears before (default) or after the other
date options.
Note: Prefix is only available when a
Day Name is selected.
-
Separator
-
Displays the separator used in numeric dates.
- Default applies slashes
(/) as the separator.
- Blank applies blank
spaces as the separator.
- None applies no separators.
- Dash (--) applies
dashes (-) as the separator.
- Period (.) applies
periods (.) as the separator.
- Comma applies commas
(,) as the separator.
Note: The comma separator option
is available for DateTime field formats, in which a month or day
is followed by a year, and a Month Name is translated to a short
or full name.
- T applies the letter
“T” as the separator.
Note: The T separator option is available
for DateTime field formats (which is the U separator in the Master
File), and enables recognition and output of the ISO standard format,
where T is the delimiter between date and time.
For
more information about describing a Date-Time field in a Master
File, see the Describing Data With WebFOCUS Language manual.
-
Time Options
-
Format
-
Lists all the valid time combinations for hour, minute, seconds,
and so on, for a DateTime field format. The options vary depending
on whether the DateTime format contains date options versus time-only
options.
For more information about time formats, see the Using Functions manual.
-
Zero Suppression
-
Applies a zero-suppressed number, when the time format is
hour or minute. Zero suppressed is indicated by default, for example,
when AM/PM options are selected.
Note: Zero Suppression
is only enabled for Time-only formats.
-
24-hour
-
Represent the 24-hour time format.
-
12-hour
-
Represents the 12-hour time format.
-
Suffix
-
Options vary depending on the time hour selected.
x
Procedure: How to Assign a Date/Time Format to a Field
-
Select the
date field in the Report Painter window that you want to change.
-
Right-click
and select Format from the context menu.
or
Choose Format from the
Properties menu.
The Format dialog box opens.
-
Click the Date/Time button
on the Format dialog box.
The Date and Time Formats dialog box opens.
-
Use the
Format drop-down list to change the Date format.
Note: The Date and Time Formats dialog box enforces
valid Date-only and DateTime format combinations, based on the input
entered and the field selected. Some options may not be available
for your selections.
-
Optionally,
select the Date or DateTime options for the field.
For details about the available options, see Date and Time Formats Dialog Box.
-
Click OK to
close the Date and Time Formats dialog box.
-
Click OK to
close the Formats dialog box.
x
Procedure: How to Assign a Date/Time Format With the Define Tool
In
the Define tool window:
-
Click the Format button.
The Format dialog box opens.
-
Select the Date/Time button
from the Format Type section.
The Date and Time Formats dialog box opens.
-
Select Date as
the Field Format.
The Date section options are enabled.
Note: The
Date and Time Formats dialog box enforces valid Date-only and DateTime
format combinations, based on the input entered and the field selected. Some
options may not be available for your selections.
-
Select a
date format from the Format drop-down list.
When a date format is selected, the Format String
and Sample Date are displayed for the format selected.
-
Optionally,
you may select the Month Name, Day Name, Prefix, and Separator options.
-
Click OK.
The Date and Time Formats dialog box closes. The selected
format appears in the Date/Time Format section of the Format dialog
box.
-
Click OK to
close the Format dialog box.
Note: Administrators
and developers should note that date options set in a virtual field
will override date options set in the Master File or with a SET command.
x
Procedure: How to Assign a Date/Time Format With the Computes Tab
-
From the
Report Options Computes tab, click the Format button.
The Format dialog box opens.
-
Click the Date/Time button
in the Format Types section.
The Date and Time Formats dialog box opens.
-
Select a
Field Format, either Date or DateTime.
Note: The Date and Time Formats dialog box enforces
valid Date-only and DateTime format combinations, based on the input
entered and the field selected. Some options may not be available
for your selections.
-
Select a
date format from the Format drop-down list.
When a date format is selected, the Format String
and Sample Data are displayed for the format selected.
-
Optionally,
you may select the Month Name, Day Name, Prefix, and Separator options
for the Date field.
If the field format is DateTime, you may select the Month
Name, Day, Separator, Time Format, and Time Options.
For details
about the options in the Date and Time Formats dialog box, see Assigning Date/Time Formats.
-
Click OK to
close the Date and Time Formats dialog box. The selected format
appears in the Format box.
-
Click OK to
close the Format dialog box and return to the Computes tab.
Note: Administrators
and developers should note that date options set in a COMPUTE field
override date options set in the Master File or SET command.
x
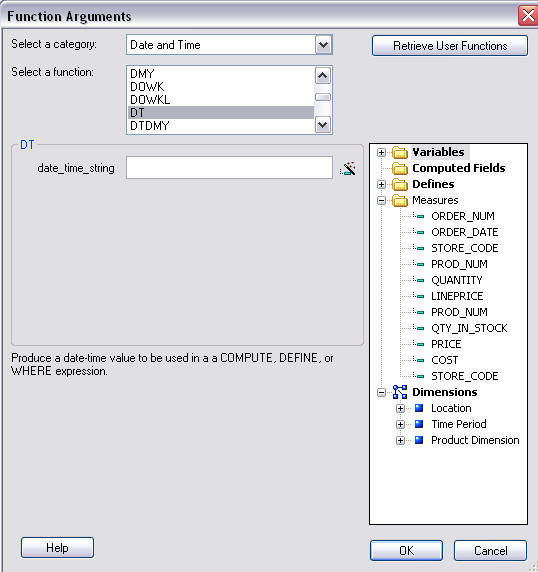
Procedure: How to Apply the Date/Time (DT) Function in Graphical Tools
In
addition to assigning the Date/Time field format, you may also apply
the Date/Time (DT) function to be used in a Compute, Define, and
Where expression. The Functions button, available from the Compute,
Define, and Where tools, opens the Function Arguments dialog box,
from which you can apply the DT function.
-
In Report
Painter, open the Compute, Define, or Where tool:
- Select the Define icon
from the Setup toolbar, or click Define from
the Report menu.
- Select the Computes icon
from the Setup toolbar, or click Computes from
the Report menu.
- Click the Where button
from the Where/If drop-down menu.
The selected graphical tool opens.
-
Click the Functions button.
The Function Arguments dialog box opens.
-
Select Date
and Time as the category.
-
Select DT as
the function.
The Function Arguments dialog box shows the date_time_string
field.
For
details about all of the available Date and Time functions, see Date and Time Functions in the Using
Functions manual.
-
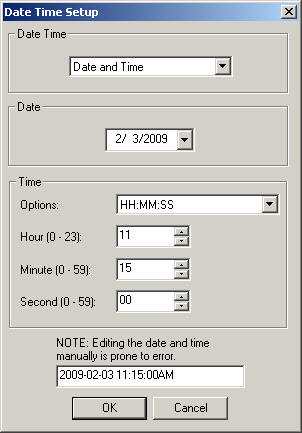
Click the Generate
a date_time string
 button,
located next to the date_time_string field.
button,
located next to the date_time_string field.
The Date Time Setup dialog box opens.
-
Select the
Date Time option.
Options are Date and Time, Date Only,
and Time Only. The dialog box options vary depending
on the Date Time option selected.
-
Select the Date drop-down
list to open the calendar and select a date.
The Date option is available when Date and Time, or Date
Only, is selected.
-
Select the
Time option from the drop-down list, and enter the Hour, Minute,
and Seconds.
Time options are available when Date and Time, or Time
Only, is selected.
The date_time_string is shown on the bottom of the
Date Time Setup dialog box as you select the options. The following
image is an example of the Date Time Setup dialog box.
-
Click OK to
close the Date Time Setup dialog box.
The date_time_string is shown in the Function Arguments
dialog box.
-
Click OK to
close the Function Arguments dialog box.
-
Click OK to
close the graphical tool.
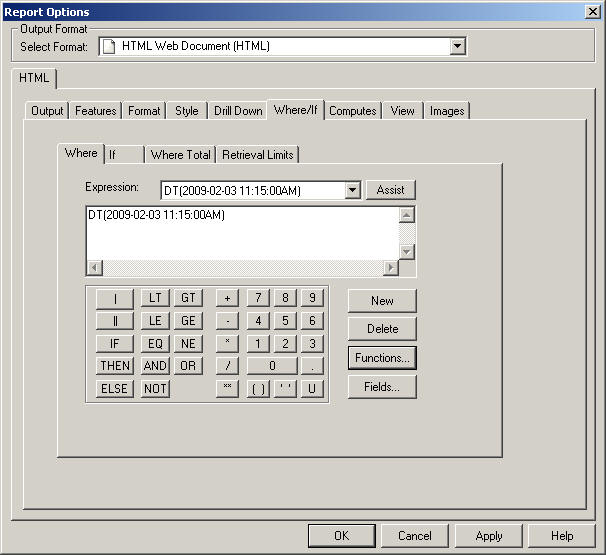
The
graphical tool shows the DT function in the expression. The following image
is an example of the Where tool with a DT function.
x
Procedure: How to Apply the Date/Time (DT) Value in an Expression
There
are multiple ways to apply the Date/Time (DT) value in an expression.
The Expression Builder, available from the Where tool, opens the
Value Builder dialog box, from which you apply the DT value. You
can also type the DT value in the Compute and Define tools.
-
To manually
type a Date/Time (DT) value in the Compute and Define expression:
-
In Report Painter, open the Compute or Define tool:
- Select the Define
button from the Setup toolbar, or click Define from
the Report menu.
- Select the Computes
icon from the Setup toolbar, or click Computes from
the Report menu.
The selected graphical tool opens.
-
In the expression window, manually type the Date/Time (DT) value.
For example:
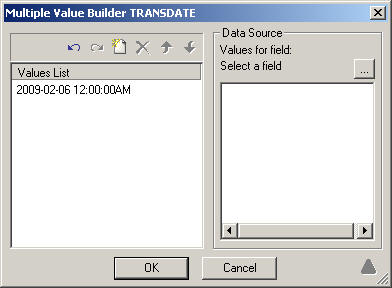
WHERE TESTDT EQ DT(2009-02-06 12:00:00AM);
-
To apply
the Date/Time (DT) value in the Where tool:
-
Click the Where button from the Where/If
drop-down menu.
The Expression Builder opens.
-
Double-click a Date/Time field name from the list on the left side
of the window to add it to the Column to filter column.
- Click the down arrow
in the Logical Relations column to select a relation from the drop-down
list.
- Click the down arrow
in the Compare Type column and select Value from
the drop-down list.
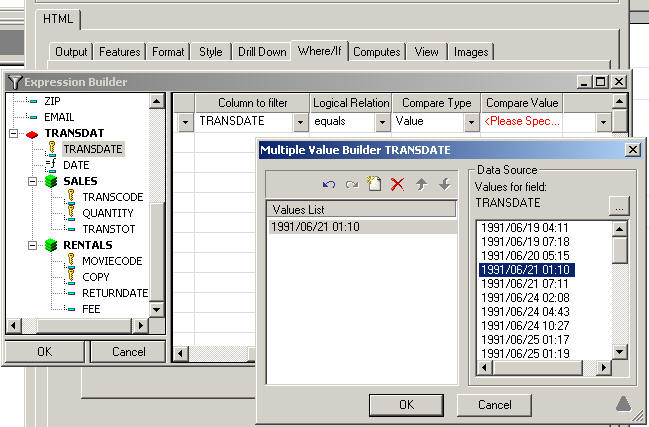
- Double-click the Compare
Value column.
The Multiple Value Builder dialog box
opens.
Note: From the Multiple Value Builder dialog
box, you can search the database for an actual Date/Time value,
or create the new Date/Time value with the Date Time Setup dialog
box.
-
To search the database for an actual Date/Time value:
-
To create the new Date/Time value with the Date Time Setup dialog
box:
- Click the Add
new item icon to open the Date Time Setup dialog box.
- Select the Date
Time option.
Options are Date and Time, Date Only,
and Time Only. The dialog box options vary depending
on the Date Time option selected.
- Select the Date drop-down
list to open the calendar and select a date.
The Date option is
available when Date and Time, or Date Only, is selected.
- Select the Time option
from the drop-down list, and enter the Hour, Minute, and Seconds.
Time
options are available when Date and Time, or Time Only, is selected.
The
date_time_string is shown on the bottom of the Date Time Setup dialog
box as you select the options. The following image is an example
of the Date Time Setup dialog box.
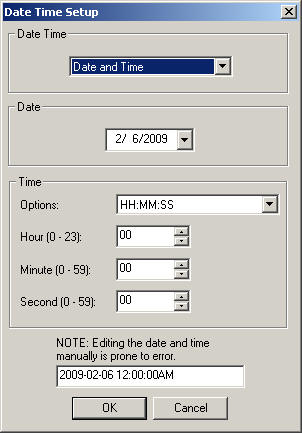
- Click OK to
close the Date Time Setup dialog box.
The following images shows
the Multiple Value Builder dialog box with Date/Time value retrieved
from the Date Time Setup dialog box.
-
Click OK to close the Multiple Value Builder
dialog box and return to the Expression Builder.
The Date/Time (DT) value appears in the Compare Value field
of the Expression Builder.
-
Click OK to close the Expression Builder.
The Date/Time (DT) value appears in the expression window.
-
Click OK to
close the graphical tool and apply the Date/Time (DT) value to the field.
xDisplaying Calculated Values
You can view calculated values directly in the Computes
tab.
x
Procedure: How to Display Calculated Values
In
the Computes tab, click the down arrow at the right of the Field
combo box, and select the desired field.
The
corresponding information appears in the Field combo box, the Format
box, and the expression box.
x
Procedure: How to Delete a Calculated Value
In
the Computes tab:
-
Click the
down arrow at the right of the Field combo box.
This action displays a drop-down list that shows all the
calculated values for this report.
-
Choose the
desired field.
This action displays the corresponding information in the
Field combo box, the Format box, and the expression box.
-
Click the Delete button.
The
field is no longer available.
xUsing Master File Computed Fields
Computed fields that are created in the Master File
are available in the field lists of Report Painter. This kind of
computed field is identified by being listed in the Master File
Computed Field folder of the field list and is differentiated from
the Defined fields and the other Computed fields.
You can use a computed field:
-
As a BY sort field. The
BY sort is automatically converted to a TOTAL field since calculated
values are calculated after data has been sorted and aggregated,
but before the report is displayed. Since sorting (BY) has already
been done, the phrase BY TOTAL is used to indicate that this sort
is performed after any BY sorting. This applies to calculated values
in the Master File and temporary calculated values.
-
In a WHERE TOTAL statement. When
you use calculated values for selection criteria, the WHERE is automatically
converted to WHERE TOTAL. This occurs because the WHERE TOTAL is
added after the data is retrieved and sorted, but before the report
is finalized. This applies to selection criteria created with calculated
values in the Master File and temporary calculated values.
-
As a SUM or DETAIL field.
-
In a page heading or footing. When
you include a computed field in a page heading/footing, the field
must exist in the report as either a BY sort field or a SUM/DETAIL
field. If you add a computed field to a page heading/footing and
the field does not already exist in the report, then it is automatically
added to the report.
Computed fields in the Master File appear in all field lists
in Report Painter except for the field lists in the Define Tool
and the Join Tool.
x
Reference: Support for Computed Fields in the Master File in Report Painter
The
following items are not supported when using Master File computed
fields in Report Painter:
- Prefix operators.
- Across sort
fields.
- Join statements
or Defined fields.
x
Reference: Calculated Value (Computed Field) Dependencies in Report Painter
These
dependencies apply to computed fields in the Master File.
When
you include a computed field in selection criteria or in a page
heading/footing, the field must exist in the report as either a
BY sort field or a SUM/DETAIL field. If you create selection criteria
with a computed field or add a computed field to a page heading/footing and
the field does not already exist in the report, then it is automatically
added to the report. The visible option is automatically deselected
in the Field Properties General tab so that the computed field does
not appear in the report output.
xUsing Master File Filters in Report Painter
Filters cannot be used in reports as regular fields
and they cannot be dragged to a report, including Headings or Footings.
However, if Filters are added to the report by manually editing
the code, they appear as regular columns in Report Painter and return
values of 0 (False) or 1 (True) at run time.
x
Procedure: How to Add a WHERE Statement Using a Filter Field in Report Painter
-
From the
Object Inspector in Developer Studio, select the Filter field from
the field list.
-
Right-click
and select Add filter to report from the
context menu.
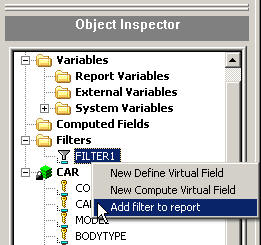
The
Filter icon changes to indicate that the Filter is being used in
the report request.
-
To remove
the WHERE statement for the Filter field, right-click the Filter and
select Remove filter from report from the
context menu.
Note: If multiple entries are added for this Filter,
they all get removed.
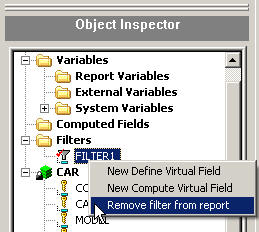
Note: If
the Filter applied gets modified through the Expression Builder,
or by manually changing the code to generate a complex statement,
it no longer appears in the Field Tree as an applied Filter and
it is not able to be removed from the context menu. This applies
to any code that is different from the default code.