WebFOCUS Repository Post-Installation Tasks

This section explains how to create the WebFOCUS Repository and verify the WebFOCUS Client configuration.

For NLS configuration information, review this section and then see the WebFOCUS Security and Administration manual.


Top of page

x
WebFOCUS Repository Table Creation

In this section:

How to:

As of WebFOCUS Version 8.0, a unified repository model (referred to as the WebFOCUS repository) has been implemented to provide streamlined data access for all your reporting, scheduling, security, and administrative requirements. Tables that are created for ReportCaster and accessed by the Distribution Server are now part of the WebFOCUS repository. The WebFOCUS Business Intelligence (BI) Portal, which enables end users to access WebFOCUS reports through a user-friendly web interface, stores and retrieves reporting content from the WebFOCUS repository.

The WebFOCUS repository can reside on the same system as the WebFOCUS Client or on a different system, and can be stored in any JDBC-compliant database for which a driver exists.

Since the WebFOCUS repository has been restructured as of WebFOCUS Version 8.0 and is different from previous WebFOCUS releases, you must create a new repository when migrating from earlier WebFOCUS versions. For more information on migrating existing ReportCaster data, see the Migration manual.


x
Procedure: How to Create the Repository Tables

To create the Repository tables:

  1. Navigate to the following directory:
    drive:\ibi\WebFOCUS80\utilities\WFReposUtil

    Note: During installation, if the Create WebFOCUS Repository check box is selected, then the installer will run the WFReposUtilCMDLine.bat file in CREATE_INSERT mode. If any errors occur during this process, you can view the WFReposUtilCMDLine.log file for details. If the Create WebFOCUS Repository check box is not selected during installation (in the case of an existing repository), then you must manually run the WFReposUtilGUI.bat file in DROP_CREATE_INSERT mode. Alternatively, you can run the WFReposUtilCMDLine.bat file in DROP_CREATE_INSERT mode.

  2. Double-click the WFReposUtilGUI.bat file. The GUI window appears. Click on the run mode drop-down list.

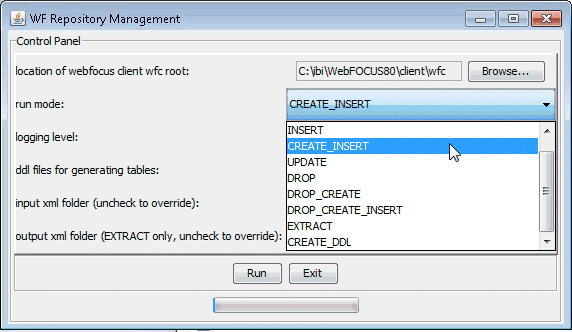
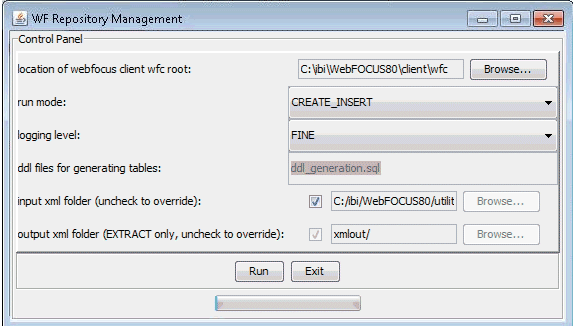
    The WF Repository Management dialog box opens, as shown in the following image.

  3. Select a run mode from the drop-down list, as shown in the following image.

    The following run modes are available:

    • CREATE
    • INSERT
    • CREATE_INSERT
    • UPDATE
    • DROP
    • DROP_CREATE
    • DROP_CREATE_INSERT
    • EXTRACT
    • CREATE_DDL
  4. Click Run.


x
Importing and Exporting the ReportCaster Configuration File

The ReportCaster configuration file (dserver.xml) is placed in a WebFOCUS repository table during installation. Changes to this file can be made using the ReportCaster Configuration tool and the WebFOCUS Administration Console. You can export the dserver.xml file from the WebFOCUS repository to your file system or import the dserver.xml file from your file system to the WebFOCUS repository.

To export the dserver.xml file to your file system, run the exportcfg utility, which is located in the following directory:

ibi\WebFOCUS80\ReportCaster\bin

The dserver.xml file will be exported to the following directory:

ibi\WebFOCUS80\ReportCaster\cfg

To import the dserver.xml file from your file system, copy the dserver.xml file to the following directory:

ibi\WebFOCUS80\ReportCaster\cfg

Run the importcfg utility, which is located in the following directory:

 ibi\WebFOCUS80\ReportCaster\bin

Top of page

x
ReportCaster Verification

In this section:

After the repository is created, you should test the WebFOCUS Client and the ReportCaster configuration.

If you have problems with the verification, see Troubleshooting WebFOCUS and ReportCaster.

Make sure you have carried out the procedures in the preceding chapters before starting the Distribution Server.

Before starting or testing the Distribution Server, components it communicates with must be started. These include the following:


x
Testing the WebFOCUS Client

This section describes how to test the WebFOCUS Client.


x
Procedure: How to Test the WebFOCUS Client
  1. Ensure the web and/or application servers are started and configured.
  2. Go to the following page using a browser:
    http://hostname:port/ibi_apps/

    where:

    hostname:port

    Are the host name and HTTP port of the web server or application server. For Tomcat standalone configurations, the default is hostname:8080. If you require SSL, use https instead of http.

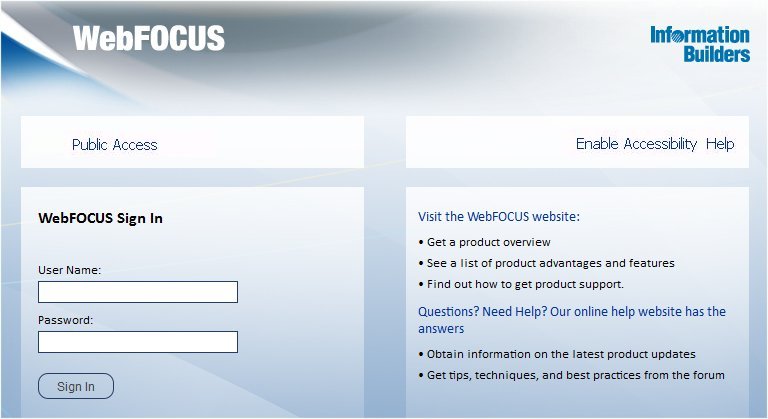
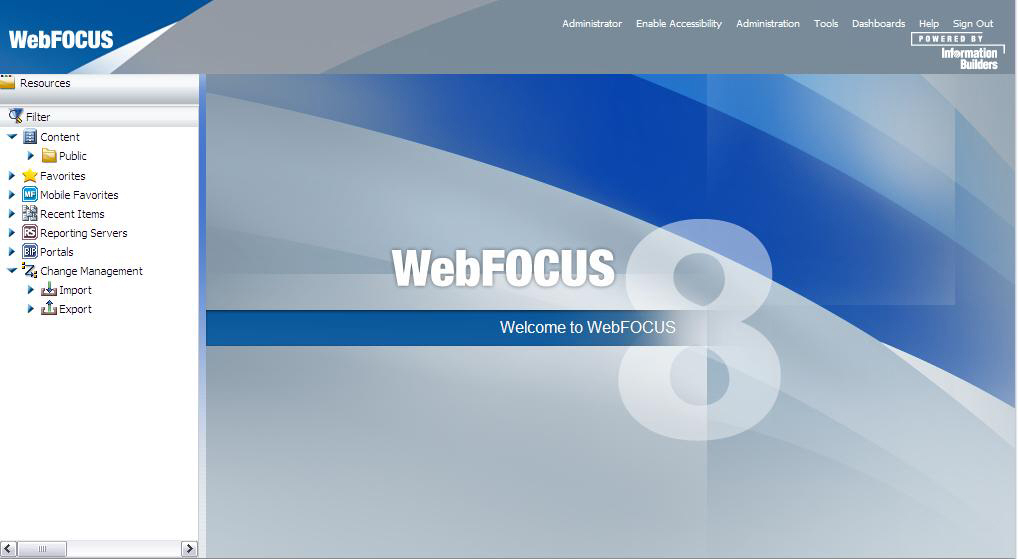
    The WebFOCUS Sign In page opens, as shown in the following image.

    Note: If you receive a page not found error, ensure that your application server is started and that you have deployed the WebFOCUS application. For more information on configuring your application server, see Installing the WebFOCUS Client.

  3. Enter the following default credentials:
    • User Name: admin
    • Password: admin

    Note: If you receive an invalid user name or password error, ensure that the WebFOCUS repository has been created and contains initial table data.

  4. Click Sign In.

    The WF BI Portal page displays, as shown in the following image.

    You can change the default credentials using the Security Center facility. Click Administration from the top menu, and then Security Center. For more information, see the WebFOCUS Security and Administration manual.


x
Testing, Starting, and Stopping the ReportCaster Distribution Server

This section describes how to test, start, and stop the ReportCaster Distribution Server.


x
Procedure: How to Test the WebFOCUS Repository Connectivity Settings

To verify, change, or test the Repository connectivity settings:

  1. Log into the WebFOCUS Administration Console and expand the Configuration tab in the left pane.
  2. Confirm that the Repository configuration settings are correct, as follows:
    1. Under the Configuration tab, expand Application Settings, and then click Repository.

      The right pane displays the Repository database parameters.

    2. Review the settings and make changes, if needed.
    3. Click Save.
  3. Restart ReportCaster and the Distribution Server, as follows:
    1. Under the ReportCaster tab, click Utilities, Restart ReportCaster.

      A confirmation window opens.

    2. Click OK.
  4. Check the status to verify that ReportCaster is running in full function mode by clicking Utilities under the ReportCaster tab, then ReportCaster Status.

    The status appears in the right pane and should read:

    The Distribution Server is running in Full Function mode


x
Verifying ReportCaster

After the ReportCaster Distribution Server is started, test the ReportCaster configuration by accessing ReportCaster interfaces.


x
Procedure: How to Verify ReportCaster Distribution Server Startup
  1. Start the ReportCaster Distribution Server and all related components, if they are not started.
  2. Log in to the WebFOCUS Business Intelligence (BI) Portal.
  3. Click Sign In from the top menu.

    The Sign in to WebFOCUS dialog opens.

  4. Enter a valid user name and password, and click Sign In.
  5. Click Tools from the top menu and select ReportCaster Console.

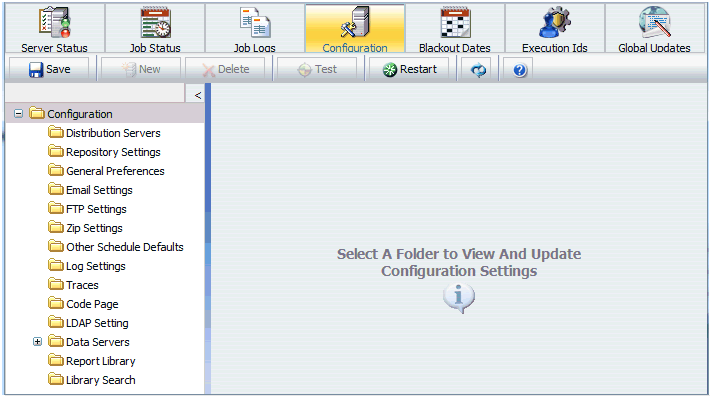
    The ReportCaster console page opens, as shown in the following image.

    If the page does not appear, ensure your web and/or application servers are running. Ensure the ReportCaster web application has been deployed to your application server. If applicable, ensure your web server can route requests to the application server.

    If you receive the following errors:

    • Unable to communicate with the Distribution Server to obtain
      configuration information. Please confirm that the Distribution Server
      is started and that the values of the Distribution Server server
      host and port are correct.

      Ensure the Distribution Server is started and your application server CLASSPATH includes the JDBC driver for your repository. For Tomcat, you can set CLASSPATH using the Tomcat Configuration window, as explained in How to Set CLASSPATH for the Repository Tables.

      The full path of the JDBC driver file or files, including the file name, must be in CLASSPATH. The directory containing the driver file or files is not sufficient. If you change the CLASSPATH variable, you must restart the application server.

    • ReportCaster cannot communicate with the WebFOCUS Repository. 
      Check that the Application Server is properly configured with the
      correct JDBC driver.

      Both the distribution server and the application server need to communicate with the WebFOCUS repository. Check that the application server is configured to use the WebFOCUS repository JDBC driver.

  6. Click the Configuration tab to access the ReportCaster Server Configuration tool.

    The ReportCaster Server Configuration interface appears.

    Changes made to the configuration may not take effect until you restart the Distribution Server and application server.

    When this interface opens, it ensures that ReportCaster web components can communicate with the Distribution Server. If you receive a connection error, see ReportCaster Troubleshooting Tips.

  7. Select the Security Settings folder.
  8. Click the Administrator button to the right of the Administrator Settings folder.
  9. Provide and confirm a password for the admin user ID and click OK. ReportCaster user IDs are normally stored in the WebFOCUS Repository. However, for security reasons, the Administrator user is controlled from this interface and not stored in the repository.

    Note: If your web server requires HTTPS and you use Report Library, you must update URLs using the ReportCaster Server Configuration interface. For Report Library, select the Report Library folder and modify the Default Library URL for Email Notification setting to use HTTPS instead of HTTP.

  10. Click Save and then click OK.

    A message appears telling you to restart ReportCaster for the changes to take effect.

  11. Click OK.
  12. Click the Restart button on the toolbar to restart ReportCaster.
  13. Optionally, instead of using the Restart button, stop the Distribution Server and then restart it to ensure your new password or any other configuration changes take effect. Also, restart the application server.

Top of page

x
ReportCaster Configuration

In this section:

ReportCaster configuration parameters are managed within the ReportCaster Console Configuration tab. For additional ReportCaster configuration information, see the ReportCaster manual.


x
Configuring the Memory Available for the ReportCaster Log Report

The size of the ReportCaster log report is limited by the amount of memory available to the Java VM. When the memory of the Java VM is exceeded, a Java OutOfMemoryException error occurs.

To control the size of the log report, you can set the following ReportCaster Server Configuration tool parameters:


x
Configuring the Heap Size for the ReportCaster Distribution Server

If the ReportCaster Distribution Server experiences a Java out of memory error, you must increase the amount of memory (heap size) available to Java on the Distribution Server. This is done by passing parameters on the Java command line, as follows:

java -Xms<initial heap size> -Xmx<maximum heap size>

For example,

java -Xms256m -Xmx512m

In addition:

You must restart the Distribution Server to enable this change.


x
Configuring ReportCaster Failover and Workload Distribution

The Distribution Server Failover feature allows you to configure a backup Distribution Server that can resume ReportCaster operations when there is an interruption (planned or unplanned) in the primary Distribution Server service. The primary Distribution Server is monitored to verify it is operational. If there is an interruption in service, the failover Distribution Server is triggered to take over the role of the primary server.

The Workload Distribution feature allows ReportCaster to distribute scheduled jobs across multiple Distribution Servers, providing an efficient and fast way to process large numbers of ReportCaster schedules. Multiple Distribution Servers can be installed on one or more hosts. One instance is designated as the Workload Manager, while the other are designated as Workers. The WebFOCUS Repository will be shared by the Workload Manager and the Workers. Workload Distribution is set up through the ReportCaster Configuration tool. All servers will share one set of configuration information, and the Workload Manager will push any configuration changes to the Workers.

For your application of ReportCaster, you can configure either or both Failover and Workload Distribution. The following procedure includes instructions to configure both, but notes when to skip to the appropriate steps if you are only configuring one or the other.


x
Procedure: How to Configure Distribution Server Failover

To configure distribution server failover:

  1. Open the ReportCaster Console and click Configuration in the top pane.
  2. Click the Distribution Servers folder in the left pane.
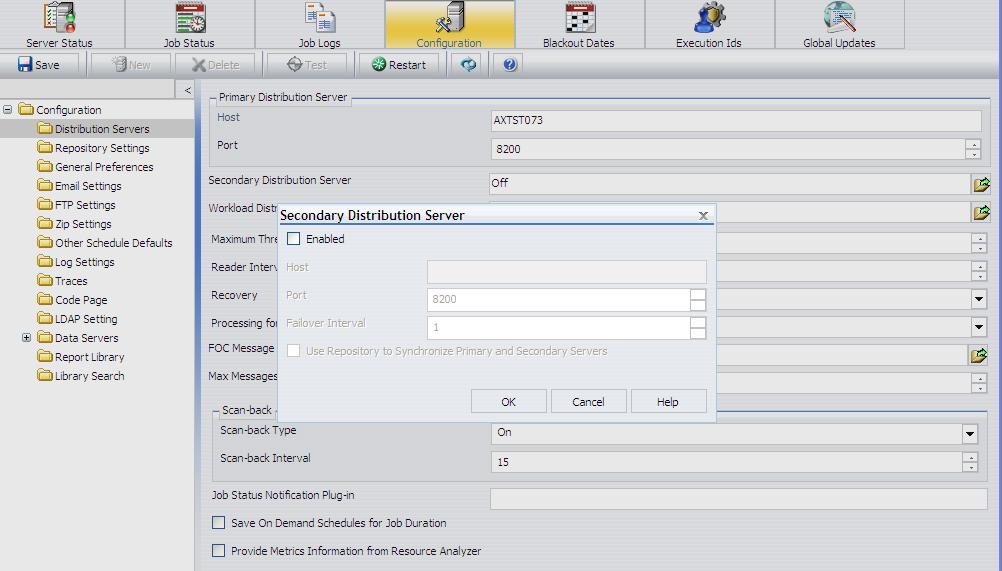
  3. Click the button to the right of the Secondary Distribution Server field.

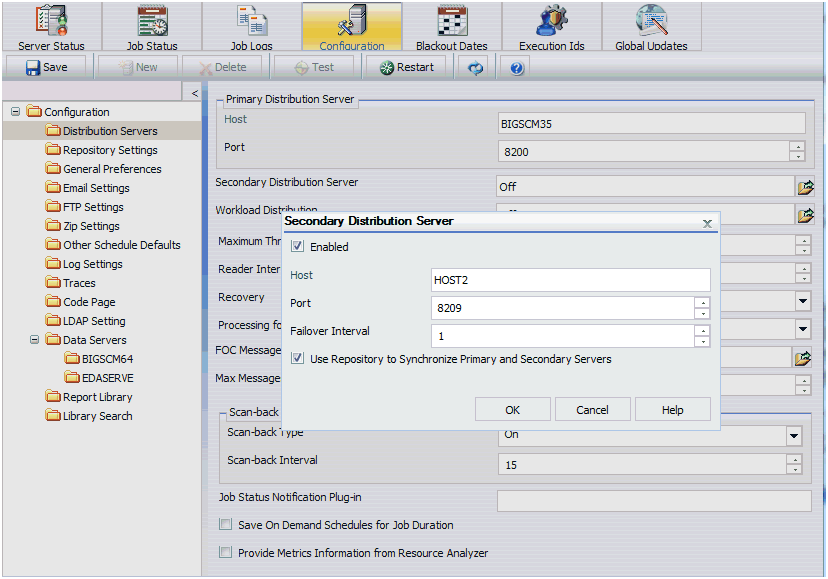
    The Secondary Distribution Server dialog box opens, as shown in the following image.
  4. Select the Enabled check box.

  5. Enter the hostname and port number of the Secondary server.
  6. Click OK.
  7. Click Save and then OK when you are prompted to save.
  8. Install the Distribution Server on the specified host with the specified port number for that host.


x
Procedure: How to Configure Workload Distribution

To configure workload distribution:

  1. Open the ReportCaster Console and click Configuration in the top pane.
  2. Click the Distribution Servers folder in the left pane.
  3. Click the button to the right of the Workload Distribution field.

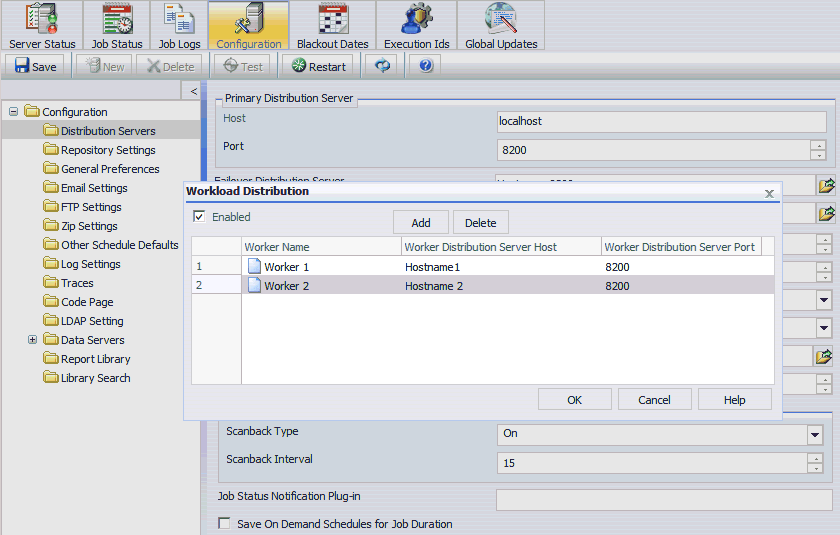
    The Workload Distribution dialog box opens, as shown in the following image.

  4. Select the Enabled check box.

  5. Click Add.
  6. Enter the name, hostname, and port number of the Worker Distribution Server.

    Repeat this step for each Worker Distribution Server instance that you want to add.

  7. Click OK.
  8. Click Save and then OK when you are prompted to save.
  9. Install the Distribution Server on each of the specified hosts with the specified port number for that host.


x
Changing the Custom Template for the Scheduling Tool

The SchedulePreferences.xml file contains the Custom and Standard template information as well as template information for the Schedule button feature available in Developer Studio.

  1. Locate the SchedulePreferences.xml file in the \ibi\WebFOCUS80\config\caster directory. On UNIX, this directory is /ibi/WebFOCUS80/Config/caster.
  2. Make a copy of the file for backup purposes before you begin.
  3. Open the SchedulePreferences.xml file in a text editor. The Custom template consists of the information under the SchedulePreference element containing the <id>Custom<id> tag. When changing the scheduling options associated with the Custom template, modify only the information associated with this element. This is the SchedulePreference element for the Custom template:
    <SchedulePreference __cn="ibi.broker.api.data.preference.schedule.SchedulePreference">
       <id>Custom</id> 
       <name></name>
       <description></description>
    .
    .
    .
    </SchedulePreference>

    Important: Do not modify the information in the SchedulePreference element containing the <id>Standard<id> tag

    <SchedulePreference __cn="ibi.broker.api.data.preference.schedule.SchedulePreference">
       <id>Standard</id> 
    .
    .
    .
    </SchedulePreference>

    The Custom template lists all available distribution methods, report output formats, task types, scheduling intervals, notification options, and some other properties of a schedule. By removing an entry from the Custom template, an administrator can limit the scheduling options available to the user of the scheduling tool.

    Note that some options may already be limited by the global settings in the ReportCaster configuration tool. Therefore, even if an entry is not removed from the Custom template, the option controlled by that entry may not be available in the scheduling tool.

  4. After you have finished editing the SchedulePreference.xml file, save your changes and restart the application server. When the Custom template is applied to the scheduling tool, the options available will reflect the changes made to the Custom template.

    Note:

    • The Custom template is not applied by default.
    • For information on enabling the Custom template in Dashboard, see the Managed Reporting manual.
    • You can also apply the Custom template when the scheduling tool is used outside the Dashboard. For more information, see the WebFOCUS Security and Administration manual.

See the following examples for ways to modify the Custom template.


Example: Limiting the Available Formats

In this example, only EXL07, EXL2K, HTML, and PDF will display as available report output formats in the scheduling tool. Other formats (<formatItem>) have been deleted from the Custom template.

<taskPreference __cn="ibi.broker.api.data.preference.schedule.TaskPreference">
   <show>true</show>
   <collapsed>false</collapsed>
   <formatItem>EXL07</formatItem>
   <formatItem>EXL2K</formatItem>
   <formatItem>HTML</formatItem>
   <formatItem>PDF</formatItem>
   <taskType>TaskWFServerProcedure</taskType>.
.
.
<taskType>TaskWFServerProcedure</taskType>


Example: Limiting the Available Distribution Methods

In this example, only Email and Library will display as available distribution methods in the scheduling tool. Other methods (<methodItem>) have been deleted from the Custom template.

</destinationPreference>
<methodItem>EMAIL</methodItem>
<methodItem>LIBRARY</methodItem>
<storageLibraryPreference __cn="ibi.broker.api.data.preference.schedule.StorageLibraryPreference">


Example: Limiting the Available Tasks

In this example, only Standard Reports and My Reports will display as available tasks in the scheduling tool. Other tasks (<taskType>) have been deleted from the Custom template.

<formatItem>SVG</formatItem>
<taskType>TaskStandardReport</taskType>
<taskType>TaskMyReport</taskType>
<alertType>AUTO</alertType>


Example: Limiting the Available Scheduling Intervals

In this example, only Daily, Weekly, Monthly, and Custom periods will display as available intervals in the scheduling tool. Other intervals (<timeInfoTypeItem>) have been deleted from the Custom template.

<timeInfoPreference __cn="ibi.broker.api.data.preference.schedule.TimeInfoPreference">
   <show>true</show>
   <collapsed>false</collapsed>
   <timeInfoTypeItem>DAY</timeInfoTypeItem>
   <timeInfoTypeItem>WEEK</timeInfoTypeItem>
   <timeInfoTypeItem>MONTH</timeInfoTypeItem>
   <timeInfoTypeItem>CUSTOM</timeInfoTypeItem>
   <secondaryRunInterval>true</secondaryRunInterval>
</timeInfoPreference>
WebFOCUS