How to: |
Follow this procedure to install Developer Studio.
Note: You must be an administrator to the Windows machine to run the installation.
You may receive the Developer Studio installation on CD or through an Internet download.
-
Execute
the installation program:
- For a CD installation, insert the installation CD in the CD drive and follow the instructions on the screen. If the installation program does not start automatically, run the Setup.exe application in the root directory of the CD.
- For a downloaded installation, run the downloaded file and respond when prompted to unpack files needed during the installation. When the files are unloaded, the actual installation begins.
The installation begins with a Welcome window.
-
Click Next at
the Welcome window.
The License Agreement appears.
-
Click Yes if
you accept the License Agreement.
If an earlier version of Developer Studio is already installed, you will be prompted to either Update or perform a Full Install.
If you choose Update, the installation begins immediately after selecting the existing version that will be updated, and your older version is replaced. When updating, be sure to reload the web application.
The following image shows the Setup Type dialog box with the Update selection highlighted.
When the Update option is selected (this is the default), the Select existing install to update section displays the installations of Developer Studio that are detected and can be upgraded.
Note: For more information on upgrades, see Upgrade Installation Requirement.
If you choose Full Install, you will be prompted for the product serial number and installation/configuration options.
The following screen shows the Software Registration dialog box.
You are also prompted for the product serial number if no earlier version of Developer Studio is found.
-
Type
the product serial number when prompted and click Next.
The serial number can be found on the back of the CD case. It is based on your license agreement and controls the software edition that is installed.
Note: If you wish to use Visual Discovery or a network installation, ensure you have the correct license.
If you type a valid serial number, the Registration Confirmation window appears.
-
Click Yes to
accept the Registration Confirmation.
A window appears, describing Developer Studio requirements.
-
Review
the requirements and click Next.
The Select Program Folder window opens, as shown in the following image.
You can change the Program Folder name by adding a suffix. Changing the default name will also change the folder name where Developer Studio will be installed. For example, if the default folder name is WebFOCUS 80 Developer Studio, the product will be installed in a directory with the name ...\DevStudio80.
-
Accept the default program folder, or specify a new one, and
click Next.
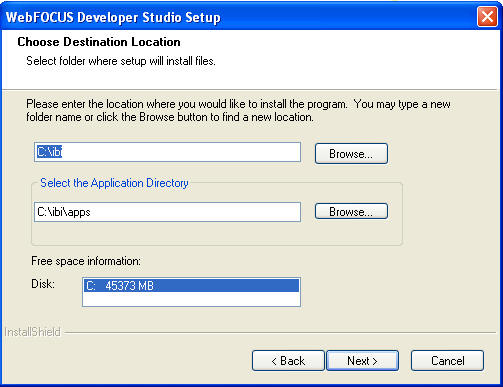
The Choose Destination Location window opens, as shown in the following image.
-
Specify the following locations, or accept the default values:
-
Product Installation Directory. This contains the software
executable files. The new software will be placed in this directory.
Accept the default value or click Browse to select a different directory.
-
Application Directory. This contains the sample applications
that come with the product.
Accept the default value or click Browse to select a different directory.
- Disk. If there is more than one disk or shared folder to which the software can be installed, select the one on which you want to install.
-
Product Installation Directory. This contains the software
executable files. The new software will be placed in this directory.
-
Click Next.
A list of components and options appears, as shown in the following image.
The following installation options appear. If an option is already installed or unavailable, it is grayed out:
- WebFOCUS Developer Studio. When selected, this installs the Developer Studio development environment. This is required.
-
Java 2 SDK, SE 1.6.0_25. When
selected, this installs Java components needed for Developer Studio.
If Java SDK 1.6 or higher is not already installed, you must install
this SDK.
Note: This option is not enabled if version 1.6.0_25 or higher is already installed.
-
Apache Tomcat 7.0.33. When
selected, this installs Apache Tomcat for use as the web or application
server.
Note: This option is not enabled if a supported version of Tomcat is detected.
The following configuration options appear:
- Use WebFOCUS configuration. This option is visible if WebFOCUS is detected on the same PC. When selected, the installation continues and will not allow customizable configurations. In this case, Developer Studio will use the WebFOCUS Configuration.
- Configure Apache Tomcat 7.0.33 stand-alone. When selected, this configures the detected or installed Apache Tomcat version for use with Developer Studio as both a web and application server. This can also be manually configured, as explained in Configuring the Web Server or Application Server.
- Configure Apache Tomcat 7.0.33 connector (plug-in) for Microsoft IIS. When selected, this configures Apache Tomcat as the application server, configures IIS as the web server, and configures communications between IIS and Tomcat. IIS must be installed to use this option. This can also be manually configured, as explained in Configuring the Web Server or Application Server.
- Advanced Configuration. When selected, this configures the aliases and context roots created during the installation and provides optional settings to customize them. Customizing the available options ensures they are different from the aliases and context roots used by WebFOCUS or an earlier version of Developer Studio in case you select the option to have multiple installations.
-
WebFOCUS Quick Data. This
option installs an Excel Add-In that allows developers to create
WebFOCUS reports directly from Microsoft Excel. Developers create
reports using InfoAssist, and output is displayed in the active Excel
Workbook.
Enabling this option through Developer Studio provides a single-user license applicable only to the Developer Studio user and functions against the local Developer Studio environment or against licensed WebFOCUS environments.
This feature must be licensed separately for use in multi-user WebFOCUS environments. This also applies when Developer Studio and WebFOCUS are installed on the same PC. For additional information, see Technical Memo 4717: Using WebFOCUS Quick Data Add-in.
-
WebFOCUS RStat. WebFOCUS RStat
is a statistical modeling workbench embedded in Developer Studio.
It allows you to perform common statistical and data mining tasks,
and develop models that can be deployed as scoring applications
on every platform. RStat enables data miners and Business Intelligence
developers to collaborate with the same tools used to access, manipulate,
or transform data, develop predictive models, and create and deploy scoring
applications along with associated reports to any worker within
their organization.
WebFOCUS RStat includes:
- Intuitive user interface in Developer Studio to access the most widely used statistical and data mining models: decision trees, neural networks, linear and logistic regressions, random forests, support vector machine, boosting, association rules, K-means, and hierarchical clustering.
- Ability to prepare the data. For example, extract it from any data source, manipulate and transform fields to prepare data for analysis, and perform the modeling in Developer Studio.
- Access to a simple web form so that you can, with the click of a button, generate scores and predictions without having to know anything about data mining and modeling.
- Ability to perform common data exploration tasks and various distribution tests in order to determine the most appropriate modeling technique.
- Ability to explore the data visually with a robust set of charts and interactive visualizations.
- Incorporate predicted values and scores into any WebFOCUS report so that users can benchmark their intuitions and expert opinions to ensure that they have taken all factors into consideration when making decisions.
- RStat is extensible through scripts and open source to leverage the numerous packages developed by industry experts and scientists to perform highly complex analyses and rapidly deploy applications.
For additional information on WebFOCUS RStat, please see the Using WebFOCUS RStat for Predictive Analytics manual available from the Information Builders Technical Documentation library site.
The WebFOCUS RStat software is not included in the Developer Studio package. You can download WebFOCUS RStat from the Customer Support site.
The configuration options are not available if WebFOCUS is detected and you choose to use the WebFOCUS Configuration, if you perform a network installation, or if you install the Managed Reporting Developer edition or Report Developer edition. If WebFOCUS is detected, Developer Studio uses the existing WebFOCUS environment. For a network installation or Managed Reporting Developer edition, you must connect Developer Studio to a WebFOCUS environment after installation.
To manually configure a different application server, deselect the configuration options and refer to Configuring the Web Server or Application Server.
-
Select
the components you wish to install and configure, and then click Next.
The Start Copying Files window appears.
-
Review
the summary of tasks that will be performed during the install at
the Start Copying Files window and click Next to
begin the installation.
The installation may take some time.
- Click Finish to complete the installation.
Note: If you choose the Tomcat connector (plug-in) option and receive a message that says Unable to Create Filter, some manual configuration is required. To do this, open the Internet Services Manager, right-click your website, and choose Properties. On the ISAPI Filters tab, determine if a Jakarta or ServletExec filter appears. If neither appear, click Add and add the isapi_redirect.dll file using the filter name Jakarta. For more information, review the remainder of this chapter and then see Configuring Microsoft IIS to Use the Tomcat Connector (Plug-in). Also, be aware that you cannot use the Tomcat plug-in if ServletExec ISAPI is installed.