How to:
Reference: |
A simple program installs the Tomcat plug-in and configures the default IIS website that uses the plug-in. After installing the plug-in, you can change the IIS websites that uses the plug-in if needed. If you chose to configure the Tomcat plug-in when installing Developer Studio, the plug-in should be installed in the directory:
<catalina_home>\Jakarta Isapi RedirectorThe installation program is self-explanatory and prompts you for the location in which to install the connector.
Note: If you manually install the connector a workers.properties.minimal file appears instead of a workers.properties file. The files are the same except for their names.
The Developer Studio or Tomcat Connector installation program performs the following steps. You normally do not need to manually perform these steps, however, you should be aware of them in case you need to troubleshoot. In addition, if you need to change the IIS website that uses the plug-in, you may need to perform some manual configurations.
- The plug-in
is installed by default in the following location:
<catalina_home>\Jakarta Isapi Redirector - The following
table shows the registry settings that are created under:
HKEY_LOCAL_MACHINE\SOFTWARE\Apache Software Foundation\
Jakarta Isapi Redirector\1.0
Value Name
Value Data
extension_uri
/jakarta/isapi_redirect.dll
log_file
<catalina_home>\Jakarta Isapi Redirector\
log\isapi_redirect.log
worker_file
<catalina_home>\Jakarta Isapi Redirector\
conf\workers.properties
worker_mount_file
<catalina_home>\Jakarta Isapi Redirector\
conf\uriworkermap.properties
The following image shows those settings in the registry.

- A Virtual Directory
(alias) with scripts and executable permissions is created under the
default IIS website.
Alias
Path
/jakarta
<catalina_home>\Jakarta Isapi Redirector\bin\If you wish to use the plug-in with a different website, create this Virtual Directory under that site.
- The following
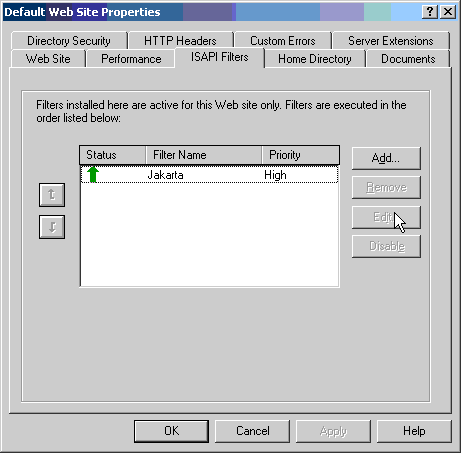
file is added to the default website as an ISAPI Filter.
<catalina_home>\Jakarta Isapi Redirector\bin\isapi_redirect.dllIn some environments, WebFOCUS does not successfully add this and you must do it manually. You can confirm or add this by right-clicking your website in the Internet Services Manager, choosing Properties, and selecting the ISAPI Filters tab. If the jakarta filter does not appear, as it does in the following image, click Add and add it.

If you wish to use the plug-in with a different website, create this filter under that site as well or instead.
Note: If Developer Studio installed the Tomcat Connector, you can manually uninstall it by removing the registry settings, ISAPI Filter, Virtual Directory, and Jakarta Isapi Redirector directory. If you ran the Tomcat Connector installation utility, you can uninstall it using Add/Remove Programs in the Control Panel.
The following file installed with the Tomcat Connector tells IIS when to route requests to Tomcat:
<catalina_home>\Jakarta Isapi Redirector\conf\uriworkermap.properties
-
In a
text editor, open uriworkermap.properties.
Tip: If this file appears odd in Notepad use WordPad. However, if you use WordPad ensure the file is saved as Text.
-
Confirm
that the following line appears and manually add it if it does not appear:
/ibi_apps/*=ajp13w
This line tells IIS to send requests for ibi_apps to Tomcat. If you changed the default context root, substitute accordingly. The /ibi_apps/* context can only appear once.
- Save and exit the editor.
- Restart IIS. Any changes require restarting IIS.
Note: The workers.properties file tells IIS where the Tomcat host and port are located. This is a different port (8009) than the port used for HTTP (8080). If you changed the default ports, edit this file accordingly.
If you are not using Windows 2003 Server, you can proceed to Verifying the Configuration.
On Windows 2003 Server, you must create a Web Services Extension for the Tomcat plug-in.
-
Open
the Internet Services Manager. You can access this from the Start
menu by selecting Run and typing the following:
inetmgr
The Internet Information Services window appears when you press Enter.
- Expand your host name on the left, right-click Web Service Extensions, and select Add a new Web service extension.
-
In the
Extension name field, type:
jakarta
- Check Set extension status to allow.
-
Click Add and
browse to select the isapi_redirect.dll file. For example:
<catalina_home>\Jakarta Isapi Redirector\bin\isapi_redirect.dll - Click Open and then OK to close windows and return to the main Internet Services Manager window.
- Ensure the Jakarta-Tomcat web service extension status is set to allow.
- Restart IIS.