In this section: |
You can install the WebFOCUS Quick Data add-in in one of the following ways:
- While installing a WebFOCUS desktop product, such as App Studio and Developer Studio. The full App Studio and Developer Studio editions include the Quick Data component, which can be installed and used with the App Studio or Developer Studio environment or with a WebFOCUS environment that is licensed for Quick Data.
- Manually distributing the Quick Data add-in file. If you have WebFOCUS with a licensed version of Quick Data, you can distribute the Quick Data add-in file to the machines that will use Quick Data. When using this installation method, you must also enable the Quick Data add-in from Excel.
If the Administrator has provided a WebFOCUS environment in which you can work, as defined in a configuration file, you can begin using Quick Data, as described in Using the WebFOCUS Quick Data Add-in. If a WebFOCUS environment is not yet set up for you, you must manually define the WebFOCUS connection parameters, as described in Manually Defining Web Server Connection Settings.
The following topics provide the installation procedures for both methods, and explain how to manually define the WebFOCUS connection parameters.
You can install the Quick Data add-in with a WebFOCUS desktop product, by selecting the WebFOCUS Quick Data check box in the WebFOCUS Developer Studio or App Studio Setup window, as shown in the following image.
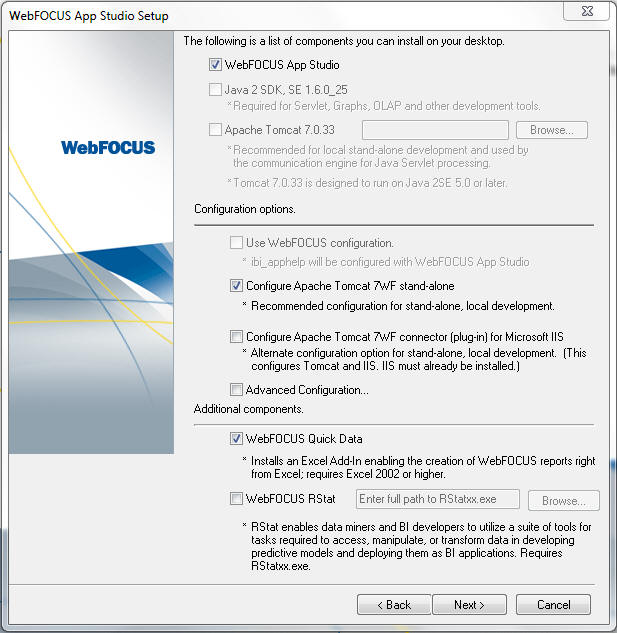
When you continue the WebFOCUS desktop product installation, your selection will automatically place the WebFOCUS Quick Data add-in in the proper location, where it can be detected and used by Excel.
Note:
- Enabling the WebFOCUS Quick Data option through a WebFOCUS desktop product provides a single-user license applicable only to this desktop product user. Quick Data interacts with the local desktop product environment or with a licensed WebFOCUS environment.
-
You must separately license WebFOCUS Quick Data when it is used in multi-user WebFOCUS environments, and when a desktop product and WebFOCUS are installed on the same computer.
Whenever you need to install the Quick Data add-in without simultaneously installing a WebFOCUS desktop product, such as App Studio or Developer Studio, you can distribute the files that run the Quick Data add-in directly to those computers that will use it.
-
Copy the
wfquickdata.xla add-in file and the configuration file, wfquickdata.cfg,
located in one of the following directories:
- Windows environments
Drive:\ibi\WebFOCUS8x\utilities\quickdata\directory - Unix environments
usr/ibi/WebFOCUS8x/utilities/quickdata
- Windows environments
-
Add the
two files to the following directory on the machines that use Quick
Data.
C:\Users\userid\AppData\Roaming\Microsoft\AddInswhere:
- userid
Is the name of the user logged on to the PC.
After the WebFOCUS Quick Data add-in file is in the proper directory, you must open Excel and select the WebFOCUS Quick Data option in the Add-Ins dialog box, as described in the following procedure.
Use the following steps to enable the Quick Data add-in in Excel 2013.
- Launch Microsoft Excel 2013.
- Click the File tab, click Options, and then click Open.
- From the Excel Options dialog box, click Add-Ins.
-
From the
Manage list on the Manage Add-Ins page, click Excel Add-ins,
and then click Go.
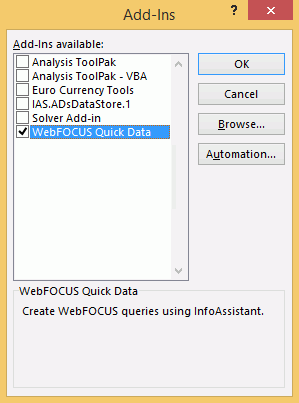
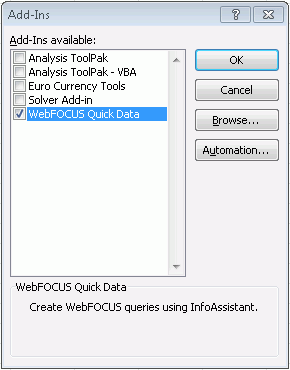
The Add-Ins dialog box opens, with WebFOCUS Quick Data as an add-in option, as shown in the following image.
Note:
- If WebFOCUS Quick Data is not listed in the Add-Ins dialog box, ensure that the add-in file is installed and placed in the correct directory.
- If the Quick Data add-in was installed in a different directory, use the Browse button in the Add-Ins dialog box to locate it.
-
Select the WebFOCUS
Quick Data check box and click OK.
The dialog box closes, and the Add-Ins tab appears on the ribbon.
-
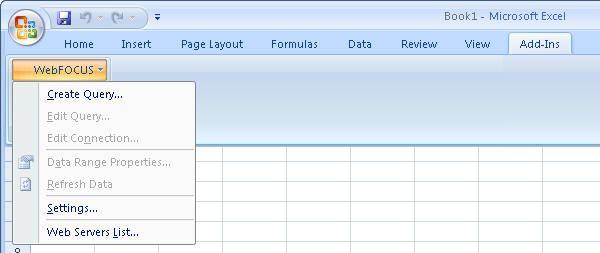
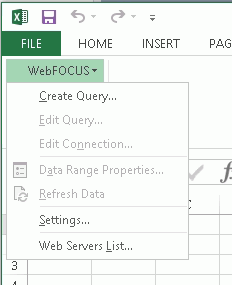
Click the Add-Ins tab to view
the new WebFOCUS menu, as shown in the following image.
Use the following steps to enable the Quick Data add-in in Excel 2010.
- Launch Microsoft Excel 2010.
- Click the File tab, click Options, and then click the Add-Ins category.
-
In the Manage
dialog box, click Excel Add-ins, and then
click Go.
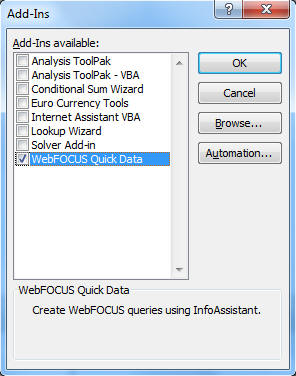
The Add-Ins dialog box opens, with WebFOCUS Quick Data as an add-in option, as shown in the following image.
Note:
- If WebFOCUS Quick Data is not listed in the Add-Ins dialog box, make sure that the add-in is installed and placed in the correct directory.
- If the Quick Data add-in was installed in a different directory, use the Browse button in the Add-Ins dialog box to locate it.
-
Select the WebFOCUS
Quick Data check box, and then click OK.
The dialog box closes, and the Add-Ins tab appears on the ribbon.
- Click the Add-Ins tab to view the new WebFOCUS menu.
Use the following steps to enable the Quick Data add-in in Excel 2007.
- Launch Microsoft Excel 2007.
-
Click the
Microsoft Office Button
 .
.
- In the Excel Options dialog box, click Add-Ins.
-
From the
Manage drop-down list, click Add-ins, and
then click Go.
The Add-Ins dialog box opens, with WebFOCUS Quick Data listed as an add-in option, as shown in the following image.
Note:
- If WebFOCUS Quick Data is not listed in the Add-Ins dialog box, make sure that the add-in is installed and placed in the correct directory.
- If the Quick Data add-in was installed in a different directory, use the Browse button in the Add-Ins dialog box to locate it.
-
Select WebFOCUS
Quick Data, and click OK.
The dialog box closes, and the Add-Ins tab appears on the ribbon.
-
Click the Add-Ins tab to view the new WebFOCUS menu,
as shown in the following image.