How to: Reference: |
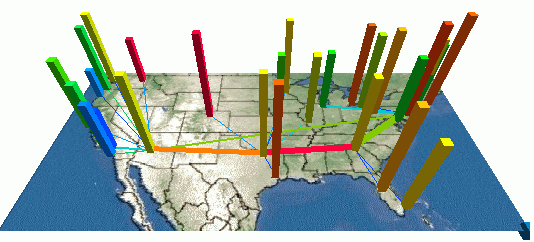
When analysis of information with a geographical or spatial component is required, a data constellation can also be presented as a map by associating the nodes on the constellation with map images, and geo-code data, such as countries, cities, and zip codes with latitude and longitude coordinates. Data constellation maps are helpful when you need to distinguish regional variations in specific attributes or determine links between specific locations. As with standard data constellations, the height, shape, size, and color of nodes and links on a constellation map can be manipulated to represent other data relationships or characteristics.
The following image shows an example of a data constellation map.
WebFOCUS Visual Discovery includes complete maps of the world, as well as the United States, Canada, and Mexico, with geo-code data for countries, over 400 worldwide cities, and U.S. zip codes. You can find the maps supplied with Visual Discovery in the visdis directory installed with Developer Studio. For example, on Windows, the default directory is \ibi\DevStudio81\ibi_html\visdis\Maps.
Custom maps, such as floor plans and other spatial images, can also be supported by using bitmap images as a base with associated geo-code data. You can also:
The data constellation component supports image maps and vector maps. A vector map is created from a table of data that specifies a series of detailed latitude and longitude coordinates that are used to plot a geographical area. Vector map data can be specified in place of, or in addition to, an image map. One advantage of a vector map is that you can color and extrude the actual map elements. For example, you can color code countries on a world map to reflect population. Maps can also be placed on a sphere to produce a globe.
From the Placement tab, you can overlay an image on the display and position the nodes (bars) according to the x-value and y-value of the map image (for example, longitude and latitude values).
The image you use for the map should be generated by a map program for specific latitude and longitude. The image should be generated with Mercator Projection (most common map programs have this).
What is Mercator Projection? Since the Earth is round and we want to create a flat 2D image, there will be some sort of distortion. Different projections are developed to solve the distortion problem and Mercator is one of them. If a different projection is used, the data points will not be mapped correctly because of the distortion. For example, a city in Florida may appear in the ocean.
The image is defined by: lower left corner Longitude,Latitude and upper-right corner Longitude,Latitude.
For more information, see Data Constellations.
Note:
_dummynode1_        _dummynode2_
_dummynode1_        _dummynode2_
Add the map image and the coordinates for longitude and latitude. The image must be in BMP or JPEG (extension .jpg or .jpeg) format. For more information on image requirements, access Visual Discovery online Help and search for the applicable JavaScript API topics.
In the Position File input area, three distinct parameter strings are required, each separated by a space, as follows,
longfield,latfield 'imagepath' minmax1~ minmax2where:
Are the actual field names in the data source for the fields that contain the X,Y (longitude and latitude) coordinates for the nodes, respectively. The fields longfield and latfield are case-sensitive.
Is the full path of the map image. Use the Browse button to enter this value.
Are the minimum X and Y (lower-left corner of the map) and maximum X and Y (upper-right corner of the map) values, separated by a tilde (~) and a space.
Longitude,Latitude 'C:\ibi\apps\session\usMainlandDark.jpg'
Longitude,Latitude 'C:\ibi\apps\session\usMainlandDark.jpg' -125.5,23.5~ -67,50
The following image shows the Data Constellations tab in the Visual Discovery Properties dialog box.
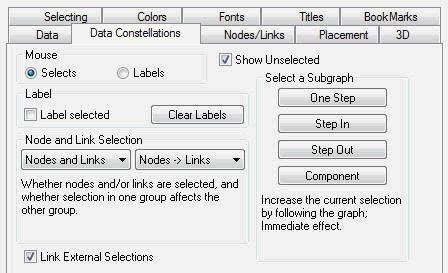
Uses the mouse to select data.
Uses the mouse to label nodes and links.
When the mouse is used to label items, fields in the Label section can be used.
Labels the selected items.
Removes all labels.
Enables you to show nodes and links in your graph.
Options available from the drop-down menu are Nodes Only, Links Only, and Nodes and Links. Available options in the linking area are No Linking, Link Both Ways, Nodes -> Links, and Links -> Nodes. For more information, see Nodes/Links Tab.
Propagates links to other visualization components.
Shows unselected data in gray. If Show Unselected is not checked, unselected data is omitted from the display.
To add unselected data, either turn on Show Unselected in the Properties dialog box or use the right mouse button menu in the view and choose Select All.
Increases the selection by including nodes at the other end of the currently selected links. One Step is the same as performing both Step Out and Step In simultaneously.
Increases the selection by including nodes on incoming links from the currently selected set.
Increases the selection by including nodes on outgoing links from the currently selected set.
Increases the selection by including all nodes that are reachable from the current selection (the component).
The following image shows an example of the Nodes/Links tab in the Visual Discovery Properties dialog box.
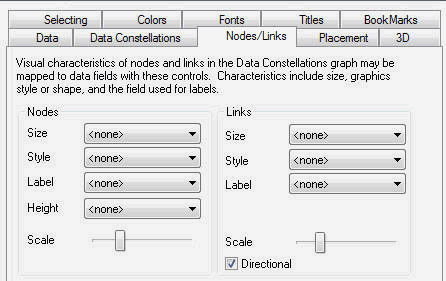
Sets the node Size, Style, Label, Height, and Scale properties for the nodes in your data constellation.
Sets the link Size, Style, Label, Scale, and Directional properties for the links in your data constellation.
For more information, see How to Set Up Nodes and Links.
The following image shows the Placement tab in the Visual Discovery Properties dialog box.

The name of a file that contains saved positioning information. If supplied, this file will be read and those positions used for the data visualization nodes. Use Browse to find the placement position file. The complete path to the file can also be typed in the Position File field.
Reads an existing position file.
Writes or saves the positioning of a graph.
Enables you to select a field to weight the link by.
Specifies the position of the nodes. You can position nodes as a hex grid, angular tree, circular shape, top-down tree, map, or globe. If you choose a map, you must specify the longitude and latitude values in the Position File field.
Improves the placement by exchanging nodes between current positions. When hex grid placement is used, swapping nodes may further improve the placement, based on moving strongly attracted nodes closer together. Strength of attraction is based on the assignment of a numeric field to a link as the link weight.
Because graph improvement can be time-consuming, use the slider to specify a certain length of time, in seconds, for swapping to occur.
Improves the placement by moving nodes that are strongly connected closer together.
When hex grid placement is used, another improvement can be made after swapping, by moving nodes closer together off the initial grid, based on the strength of attraction.
Use the slider to specify the length of time to move, in seconds.
Readjusts the space between nodes if the Move option places them too close. Use the slider to specify the length of time to readjust, in seconds.
Stops the placement process, keeping the last positioning.
The pop-up menu appears when you right-click a Visual Discovery control in the analytical dashboard. These options do not appear when you are developing a component in HTML Composer.
Shows unselected data in gray. If Show Unselected is not checked, unselected data is omitted from the display.
To add unselected data, either turn on Show Unselected in the Properties dialog box, or use the right mouse button menu in the view and click Select All.
Enables you to select nodes and/or links that appear in your graph.
Options available from the pull-down menu are Nothing, Nodes, Links, or Nodes and Links.
Determines how selection is propagated between nodes and links.
Options available from the pull-down menu are No Linking, Nodes to Links, Links to Nodes, Both Ways. Finer characteristics of nodes and links are defined in the Nodes and Links tab.
Displays labels for the selected data.
Adds or removes arrowheads showing the direction of the link.
Adds or removes the label for the selected node or link.
Changes the action that occurs when you press the Shift + Ctrl + RMB (right mouse button) keys.
Changes the shape of the glyphs.
Reverses the previous action. You may repeatedly undo actions retained in the history file for your current session by selecting Undo over and over again. A description of the previous action appears on the pop-up menu. If you have performed no action, Undo is not available for selection and no action appears to the right of the word Undo.
Restores the previous undo action. If you have performed no action, Redo is not available for selection and no action appears to the right of the word Redo.
Selects all of the items in the graph. When you choose Select All, any previous selections are ignored. Selection state returns to the original setting.
When selected, all of the items become unselected. All items appear in the unselected color (gray, by default) or are hidden in the graph (if hide unselected is active).
Reverses the selection state of items. Selected items become unselected and unselected items become selected.
Excludes (temporarily removes) items from the graph.
Restores the items you excluded. If you accidentally excluded the unselected, this menu option restores those excluded items.
Enables you to save the graph to a GIF or JPEG file.
Enables you to copy the selected component and paste it to another file.
In 3D mode in run time, glyphs are drawn from the height to the floor, allowing nodes to be treated like a bar chart on a plane.
Enables you to display or suppress the label text. When you right-click a glyph (node or link), this option changes from Label Item, to the text that identifies the selected node or link. For example, if you right-click a node that represents data for Dallas, this option appears as Label Node “Dallas.”
Takes you to the collection of tabs available for the respective visualization component. Common tabs include Data, Selecting, and Colors.
| WebFOCUS |