The alignment grid aligns fields and text within report headings and footings with precision. You can align text and fields in all types of headings and footings (report heading/footing, page heading/footing, and subheading/subfooting).
Alignment grid is supported for reports in HTML, PDF, Excel 2000, and Excel 2007 output formats.
The alignment grid appears as a dotted grid line around each individual item in a heading or footing and shows how these items actually appear in your report output. Using the alignment grid and Alignment Properties, you can justify items, select item width, select decimal alignment, and add and remove items. Items refer to the cells in the grid.
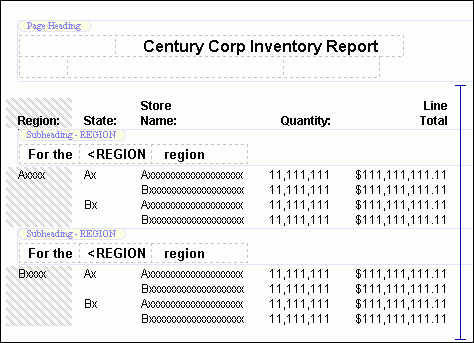
The following image shows a portion of Report Painter with a report that has alignment grids in the Page Heading and Subheadings.
Note: You can change these properties at any time.
Note: For a complete description of alignment options, see Alignment Grid Options.
To align an embedded field in a heading or a footing:
The alignment grid appears as a dotted grid line around each individual item in the heading or footing.
Note: A tooltip appears when the mouse is hovered over the embedded value.
The Alignment Properties dialog box opens.
You can move or copy an item using your mouse or keyboard.
To move or copy an item using your mouse:
To move or copy an item using the keyboard:
Note: Only contiguous selections of items can be moved or copied.
To delete:
The following shortcut keys are supported when using the Alignment Grid. The first column provides the action and the second column provides the key combination.
|
Action |
Key Combination |
|---|---|
|
Undo |
Ctrl+Z |
|
Redo |
Ctrl+Y |
|
Cut |
Ctrl+X |
|
Copy |
Ctrl+C |
|
Paste |
Ctrl+V |
|
Select All |
Ctrl+A |
The following apply when using the alignment grid in Report Painter:
When the alignment grid is enabled in Report Painter, additional alignment grid options are accessible from the Properties menu or from the right-click context menu in Report Painter. The alignment grid options include Grid Options, Cell Options, Alignment Properties, and Merge options.
To enable the alignment grid, click Alignment Grid from the Properties menu or select Alignment Grid from the right-click context menu within a heading or footing. The alignment grid appears as a dotted grid line around each individual item in a heading or footing.
The following image shows the alignment grid options from the Properties menu in Report Painter.

The following image shows the same alignment grid options from the right-click context menu of a heading or footing.

The following alignment grid options are available:
Opens the Properties dialog box for the heading or footing at the Style tab.
Note: Although the alignment grid is supported for reports in HTML, PDF, Excel 2000, and Excel 2007 output formats, Grid Options may vary depending on the report output.
Opens the Properties dialog box for the heading or footing at the Style tab.
Note: Although the alignment grid is supported for reports in HTML and PDF output formats, Cell Options may vary depending on the report output.
Select from the Clear submenu to clear formats or contents for the item in the alignment grid.
Selects all items in the grid.
Deletes all items and removes the alignment grid.
Select from the Insert submenu to insert items and lines in the alignment grid.
Select from the Delete submenu to delete items and lines in the alignment grid.
Opens the Alignment Properties dialog box.
The following image shows the Alignment Properties dialog box with the default options.

Enter the width between the selected items. The default is one inch between items.
Select the justification for the alignment grid. Options are left, center, or right. Left is the default justification.
Decimal alignment specifies how far in from the right side of a column you want to place your decimal point. With this specification, you can locate the decimal point in the same position within a column, regardless of the number of decimal places displayed to its right. The measurement will be a portion of the width you have specified for this item.
Note: The Decimal alignment option is disabled when Justification is selected.
Merges selected horizontal items into one cell in the alignment grid.
Alignment grid shows or hides the grid.
When the alignment grid is enabled from the Properties menu in Report Painter for an empty subheading or subfooting, the Insert Alignment Grid dialog box opens. To enable the alignment grid for an empty subheading or subfooting:
or
The Insert Alignment Grid dialog box opens, as shown in the following image.

The Insert Alignment Grid dialog box options are:
The Align with Data option automatically aligns the alignment grid with the data columns in the report. This option is automatically selected for Excel 2000 and Excel 2007 output formats.
Note: For PDF and HTML output formats, selecting Align with Data disables the Number of items per line and Default item width options.
Enter the number of lines to be created for the alignment grid. The default is 3 lines.
Enter the number of items, or cells, to be created for the alignment grid. The default is 4 items per line.
Enter the default width between all cells. The default is one inch between items.
Select the default justification for the alignment grid. Options are left, center, or right. Left is the default justification.
Decimal alignment specifies how far in from the right side of a column you want to place your decimal point. With this specification, you can locate the decimal point in the same position within a column, regardless of the number of decimal places displayed to its right. The measurement will be a portion of the width you have specified for this item.
Note: The Decimal alignment option is disabled when Default justification is selected.
The alignment grid appears as a dotted grid line within the heading or footing object. The additional alignment grid options are accessible from the Properties menu or from the right-click context menu of the heading or footing object in Report Painter.
How to: |
When using a heading or footing in Report Painter and enabling the Alignment Grid, you can align your border settings to the headings and footings with Grid Options and Cell Options.
Alignment grid is supported for reports in HTML, PDF, Excel 2000, and Excel 2007 output formats and aligns fields, text, and borders within report headings and footings with precision. With Alignment Grid enabled, Grid Options and Cell Options provide further styling options for the alignment items. Items refer to the cells in the grid.
Note: You can align text, fields, and borders in all types of headings and footings (Report Heading and Footing, Page Heading and Footing, and Subheading and Subfooting).
The Align with Data option automatically aligns the alignment grid with the data columns in a PDF or HTML report.
Note: You can align text, fields, and borders in all types of headings and footings (Report Heading and Footing, Page Heading and Footing, and Subheading and Subfooting).
Note: You can also select Alignment Grid from the right-click context menu within a heading or footing.
The alignment grid appears as a dotted grid line around each individual item in a heading or footing and shows how these items actually appear in your report output.
The Properties dialog box opens for the heading or footing at the Style tab.
Note: Enabling the Align with Data option overrides any justify settings that are set from the Font toolbar (Left Justify, Center Justify, Right Justify, or Default Justify). The Align with Data check box is not available for Excel 2000 and Excel 2007 formats.
The following image shows a PDF report with a subheading for the Product column with Center Justify.

The following image shows the same PDF report with the Align with Data option enabled. Note how the subheading aligns with the data column.

To create borders for the entire alignment grid or for all the cells within the grid, enable the Border all cells in the grid option.
Note: You can align text, fields, and borders in all types of headings and footings (Report Heading and Footing, Page Heading and Footing, and Subheading and Subfooting).
Note: You can also select Alignment Grid from the right-click context menu within a heading or footing.
The alignment grid appears as a dotted grid line around each individual item in a heading or footing and shows how these items actually appear in your report output.
The Properties dialog box opens for the heading or footing at the Style tab.
The Borders dialog box opens. By default, the Make all borders the same option is selected. Optionally, you may specify border settings for the top, bottom, left, and right borders, or keep the default settings.
Note: This option is off by default, as shown in the following image.

This creates borders for the entire alignment grid. If Make all borders the same option is unchecked, the border options are applied only for the cells within the grid.
The border options appear in the Report Painter window.
The following image shows a PDF report with a subheading for the Product column with border settings for all the cells within the alignment grid.

You may set the border for a selected cell in the alignment grid with the Cell Options.
Note: You can align text, fields, and borders in all types of headings and footings (Report Heading and Footing, Page Heading and Footing, and Subheading and Subfooting).
Note: You can also select Alignment Grid from the right-click context menu within a heading or footing.
The alignment grid appears as a dotted grid line around each individual item in a heading or footing and shows how these items actually appear in your report output.
The Properties dialog box opens for the heading or footing at the Style tab.
The Properties dialog box opens for the heading or footing at the Style tab.
The Borders dialog box opens. By default, the Make all borders the same option is selected.
OFF to turn borders off.
LIGHT to apply thin border lines.
MEDIUM to apply medium border lines.
HEAVY to apply thick border lines.
The following image shows the Borders dialog box for Cell Options for a PDF report.

This creates borders for the selected cell in the alignment grid.
The following image shows a PDF report with a subheading for the Product column with border settings for the cell in the alignment grid.

You may span columns and set the align object options for the selected cell in the alignment grid with the Cell Options. This option is available for a PDF or HTML report.
Note: You can align text, fields, and borders in all types of headings and footings (Report Heading and Footing, Page Heading and Footing, and Subheading and Subfooting).
Note: You can also select Alignment Grid from the right-click context menu within a heading or footing.
The alignment grid appears as a dotted grid line around each individual item in a heading or footing and shows how these items actually appear in your report output.
The Properties dialog box opens for the heading or footing at the Style tab.
The Align Object dialog box opens.
Note: The default cell spans one column.
Options are Left, Right, or Center. Left is the default justification for the span column cell data.
The following image shows the Align Object dialog box with the default selections for span column.

The following image shows a PDF report with a subheading for the Product column with the default span columns settings. The selected cell spans one column and is left-justified.

The following image shows the same PDF report with the align object options set to span three columns and is center-justified.

How to: |
You can align decimal points when the data being displayed has varying numbers of decimal places. The ability to align heading content in a multi-line heading based on width and justification values has special benefit in reports that contain data with different numbers of decimal places. For example, if a figure is in dollars, it is formatted with a decimal point and two places for zeroes. If in Swiss Francs, it is formatted with a decimal place and four zeroes and if in Yen, the decimal is at the end with no zeroes. In addition, sometimes the currency does not vary, but the number of digits of decimal precision varies.
You can also use the Alignment Grid to align decimals in headings and footings with precision. For more information, see Aligning Fields and Text in Headings and Footings.
By aligning the decimal points in a vertical stack, you can more easily read and compare numbers.
The technique uses a width specification for the item that contains decimals, combined with a variation on standard left/right/center justification to achieve the proper decimal alignment. For more information, see Using Headings, Footings, Titles, and Labels in the Creating Reports With WebFOCUS Language manual.
To determine the width of a heading or footing item:
The alignment grid appears as a dotted grid line around each individual item in the heading or footing.
The Alignment Properties dialog box opens.
Decimal alignment specifies how far in from the right side of a column you want to place your decimal point. With this specification, you can locate the decimal point in the same position within a column, regardless of the number of decimal places displayed to its right. The measurement will be a portion of the width you have specified for this item.
Note: The Decimal alignment option is disabled when Justification is selected.
The measurement will be a portion of the width you have specified for this item. For more information, see Using Headings, Footings, Titles, and Labels in the Creating Reports With WebFOCUS Language manual.
| WebFOCUS |