Adding ReportCaster Schedule Capability to HTML Composer
You may create a control that
adds a schedule button in HTML Composer. A schedule button enables
you to schedule a report, or graph, using ReportCaster. Once you have created the
schedule, you can access the ReportCaster
HTML
User Interface to edit and maintain information about the schedule.
Note: The Schedule option
is only available in HTML Composer if your WebFOCUS environment is licensed to
use ReportCaster.
Only procedures referenced in HTML Composer are able to be scheduled.
When referencing an existing procedure
with parameters in HTML Composer, the schedule button is automatically
added. You may also manually create schedule buttons for your report
or graph.
x
Procedure: How to Add or Disable the Schedule Button for Controls
Controls appear when you reference a report or graph with
parameters. HTML Composer automatically adds a control, Run button,
Reset button, and Schedule button for the parameters in your layout,
if your WebFOCUS environment is licensed to use ReportCaster.
The Form
settings dialog box sets when the schedule button appears with the controls.
The Schedule button is selected by default.
To change the default behavior:
-
Select Options from
the Window menu.
The Developer Studio Options dialog box opens.
-
Select the HTML
Page tab.
-
Click
the Form Settings button.
The Form settings dialog box opens.
-
Deselect
the Add schedule button.
Note: If you deselect this option, you have
the ability to manually add a schedule button. For more information,
see How to Manually Add a Schedule Button.
x
Procedure: How to Add a Schedule Button to a Referenced Existing Procedure With Parameters
This procedure provides instructions on how to automatically
add a schedule button to an HTML page for a referenced procedure
in the layout.
-
From
HTML Composer, select New Report or New
Graph from the Insert menu.
The cursor changes into a crosshair.
-
Drag
the crosshair to create a report (or graph) object and adjust it
to the size you want.
-
Right-click
the object and select Reference existing procedure from
the context menu.
The Get source file dialog box opens.
-
Select
an existing report or graph with parameters and click Open.
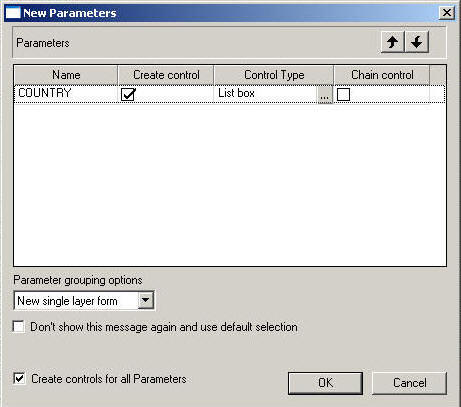
The New Parameters dialog box appears, as
shown in the following image.
-
Click OK to
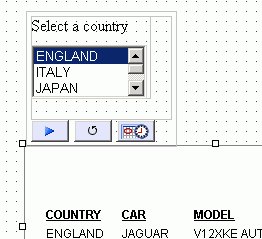
add the new parameters and the controls to the HTML page.
The Run, Reset, and Schedule buttons appear
with the parameters on the HTML page.
-
Optionally,
select the schedule button on the HTML page to view or edit the
properties. The properties appear in the HTML Composer Properties window.
-
Double-click
in the Title properties value field to set
the title of the schedule page window.
The default title for the schedule page window
is domain\standard reports\folder\foldername.
You may change this to the text of your choice.
-
Optionally,
you may launch the Hyperlink properties for the schedule button
to change the template for the schedule page.
For more information about changing
the template for the schedule page, see How to Change the Default Template for the Schedule Page.
x
Procedure: How to Manually Add a Schedule Button
This procedure provides instructions on how to manually add
a schedule button to a HTML page. This is useful for adding new,
or additional, schedule buttons to a report or graph that has already
been referenced to the HTML page, or if you are referencing a report or
graph without parameters.
-
From
HTML Composer, select a control from the Controls or Components
submenu of the Insert menu. You may insert a push button, image,
or hyperlink as a schedule button.
-
If inserting a push button as a schedule button:
-
If inserting an image as a schedule button:
- From the Insert
menu, select Components, then click Image.
The
cursor changes into a crosshair.
- Drag the crosshair
to add the image object.
The Get source file dialog box opens.
- Select an image
and click Open.
The image is added to the
HTML page. You may adjust the image object to the size you want.
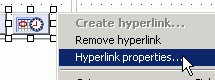
- Right-click
the image object from the HTML page and select Create hyperlink from
the context menu.
The Hyperlink Properties dialog box opens.
-
If inserting a hyperlink as the schedule button:
-
From
the Hyperlink Properties dialog box, select the New button
to add a request to execute.
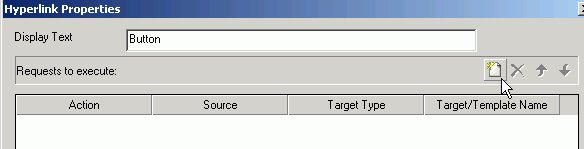
Note: The
Display Text field on the Hyperlink Properties dialog box is only
available when inserting a push button or hyperlink as a schedule button.
-
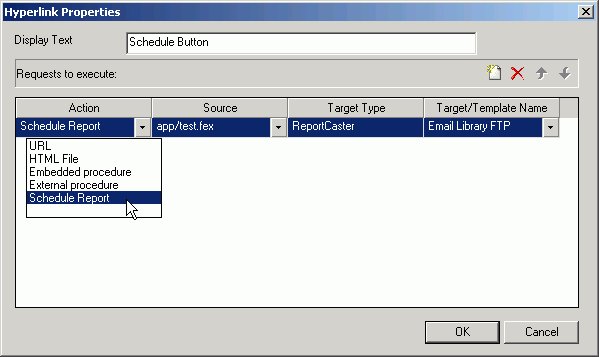
Select
the Action, Source, and Target/Template Name:
- Select Schedule
Report from the Action drop-down list.
- Select the Source drop-down
list to select the source of your Schedule Report.
The Source
drop-down will only list the referenced procedures in the layout.
- The Target
Type option is disabled and defaults to ReportCaster when the Schedule Report action
is selected.
- The Target/Template
Name defaults to Email Library FTP when the Schedule Report action
is selected.
For more information on changing the template for
the schedule page, see How to Change the Default Template for the Schedule Page.
-
Click OK to
close the Hyperlink Properties dialog box.
The schedule button, image, or hyperlink
is added to the HTML page.
-
Optionally,
select the schedule object to view or edit the properties. The properties
appear in the Properties window of HTML Composer.
-
Double-click
in the Title properties value field to set
the title of the schedule page window.
The default title for the schedule page window
is domain\standard reports\folder\foldername.
You may change this to the text of your choice.
x
Procedure: How to Change the Default Template for the Schedule Page
This procedure provides instructions on how to change the
template for the schedule page by using the Hyperlink Properties
dialog box. This is the template that appears when the schedule
page is run from the report output.
-
Right-click
a schedule button, image, or hyperlink from the HTML page and select Hyperlink
properties from the context menu
The Hyperlink Properties dialog box opens.
-
Select the Target/Template Name drop-down
list to change the default template for the schedule.
The options are:
- Email Library
FTP - This is the default template.
- All
- Email
- Library
- FTP
- Printer
- Report Library
- Managed Reporting
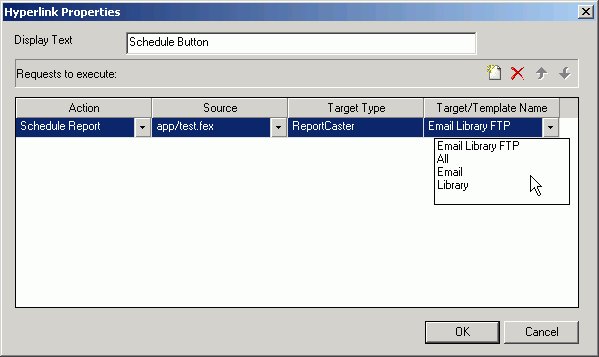
Note: The template
names represent the type of distribution option for the schedule
in ReportCaster.
-
Click OK to
close the Hyperlink Properties dialog box.
The selected template appears when the schedule
page is run from your report output.
x
Reference:
ReportCaster Schedule Page
When
you run your report, select the parameters (if applicable), and
click the schedule button. The ReportCaster schedule page appears.

Tip: To change the schedule
template that appears at run time, use the Hyperlink Properties
dialog box to change the Target/Template Name.
The
report and the selected parameters are scheduled to ReportCaster. From ReportCaster, the values entered or selected
are stored with the schedule information.
You must have the Schedule user privilege to submit the schedule.
For more information about scheduling
and distributing report output, see the ReportCaster manual.