ReportCaster Enhancements
ReportCaster is a scheduling and distribution application that
centralizes the execution and distribution of WebFOCUS reports,
the contents of URLs, and files. ReportCaster supports multiple
administrators and provides a single point of control for managing information
distribution within an organization.
xLogging Capability for Utilities
Each utility will create a utility_name.log file
in the ...ibi/WebFOCUS8x/ReportCaster/log directory, where utility_name is
the name of the utility. When using the Release 8.1 Version 05M
Upgrade installation, see the WebFOCUS Upgrade Considerations manual
for post-installation information.
xRestricting Distribution of Reports to the Report Library
You can restrict the distribution of a report (.fex),
through scheduling, to the Report Library only. To enable the functionality,
right-click the report in the Resources tree and click Properties.
The Properties dialog box displays, as shown in the following image.
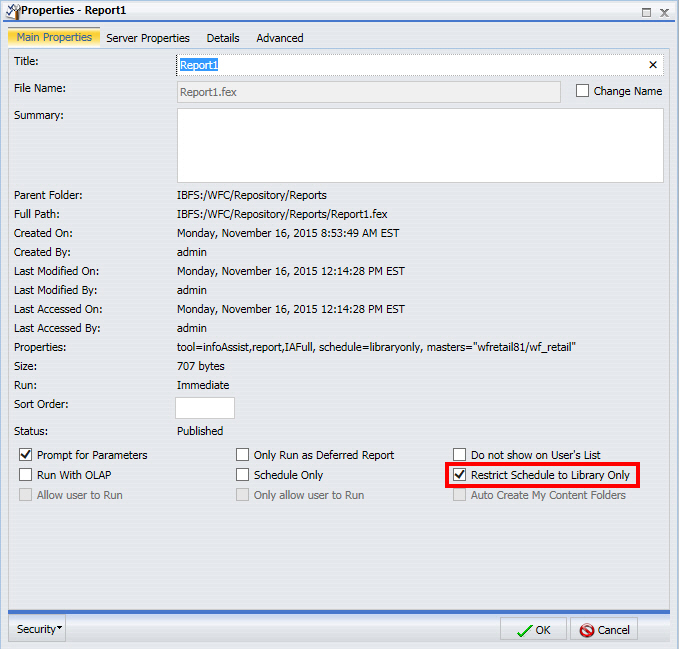
The Restrict Schedule to Library Only option sets the distribution
restriction when creating a schedule. The Distribution Server continually
evaluates and enforces the distribution restriction to the library
(for those reports that are restricted) by not distributing the
report.
xDistribution Server Processing Uses IBFS System
As of
Release 8.1 Version 03, the Distribution Server processing uses
the IBFS system to submit scheduled jobs to a Reporting Server so
that the processing for interactive and scheduled requests is consistent,
including support for WebFOCUS group security. This consistency
in processing includes the Distribution Server using the Reporting
Server, referred to as Data Server in the ReportCaster configuration,
host, and port definitions defined in the WebFOCUS Client configuration.
All other Data Server definitions required for Distribution Server
processing, including the Maximum Threads setting that defines the number
of scheduled jobs the Distribution Server can be submitted to a
Reporting Server, remain in the ReportCaster configuration. Select
the Data Server option in the tree of the ReportCaster Console Configuration
tab to create and maintain the Data Servers defined in the ReportCaster
configuration.
Due to the integration of Reporting Server (Data Server) definitions,
a different host and port cannot be defined for a Data Server in
the ReportCaster configuration tool. A future release will provide
the ability to define alternate Data Server host and port values
for scheduled jobs. Contact Customer Support if you would like to
be updated when the ReportCaster alternate Data Server host and
port functionality is available.
xAddition of Internal Variables
As
of Release 8.1 Version 03, two new internal variables have been
added. The first variable, &DSTSCHEDID, is an ID that uniquely
identifies the schedule. The second variable, &DSTSCHEDDESC,
is the title (description) of the schedule. For more information
on all ReportCaster internal variables, see ReportCaster Variables in
the ReportCaster manual.
xShowing Only Folders with Content
In
the ReportCaster Explorer, two new icons have been added to control
the display of folders. The Show only folders with content option
allows you to display only folders that contain content. This option
is shown in the following image.

If you have selected the option to Show only folders with content
and subsequently want to restore the display of all folders, click Show
all folders, as shown in the following image.

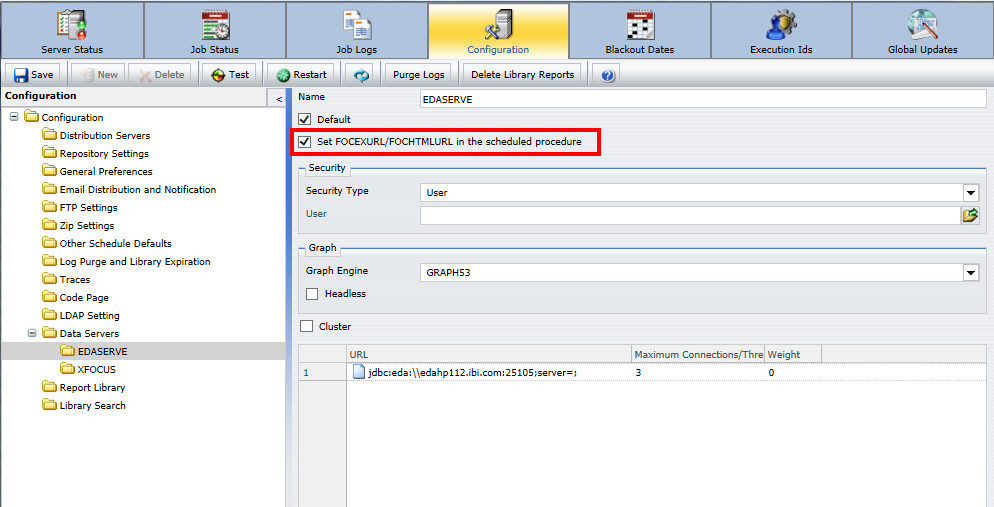
xControlling the Setting of the FOCEXURL and FOCHTMLURL
A
new configuration setting, Set FOCEXURL/FOCHTMLURL in
the schedule procedure, has been added in the ReportCaster
Configuration tool. This setting is selected, by default, and is
highlighted in the following image. If this setting is not selected,
the Distribution Server will not set the value of FOCEXURL or FOCHTMLURL
for a scheduled procedure. Therefore, when cleared, if FOCEXURL
or FOCHTMLURL is already set in the edasprof.prf file, this setting
remains in effect, unless it is overridden in the scheduled procedure.
For more information on the FOCEXURL and FOCHTMLURL settings,
see the Developing Reporting Applications manual.
xSpecifying Multiple Distribution Methods and Tasks in a Schedule
In ReportCaster, a single Advanced Schedule can contain multiple
tasks and distribution methods. For example, you can create a multi-task
schedule that has two or more email distributions. This allows the
distribution of a multi-task schedule to be changed by switching
which distribution will be enabled for use, rather than deleting
the existing distribution and creating a new one.
Note:
- Only one enabled distribution
method is allowed when a schedule contains more than one enabled
task. All other distribution methods must be disabled.
- Only one enabled task is allowed when a schedule contains more
than one enabled distribution method. All other tasks must be disabled.
x
Procedure: How to Add Multiple Distribution Options in a Schedule
-
In the Advanced
Scheduling tool, select the Distributions tab.
-
Click the New drop-down
list and select a distribution method.
Populate all required fields for the selected
method.
-
Click the New drop-down
list and select another distribution method.
Populate all required fields for the selected method. The
multiple distribution methods that you have selected display, as
shown in the following image.
You can select additional methods, or complete your schedule
creation process.
x
Procedure: How to Add Multiple Tasks in a Schedule
-
In the Advanced Scheduling tool, select
the Tasks tab.
-
Click the New drop-down list and
select a task type.
Populate all required fields for the selected task. For
specific guidance on creating tasks, see the Creating a ReportCaster
Schedule in the Advanced Scheduling Tool chapter in the ReportCaster manual.
-
Click the New drop-down list and
select another task.
Populate all required fields for the selected tasks. The multiple
tasks that you have selected display, as shown in the following
image:
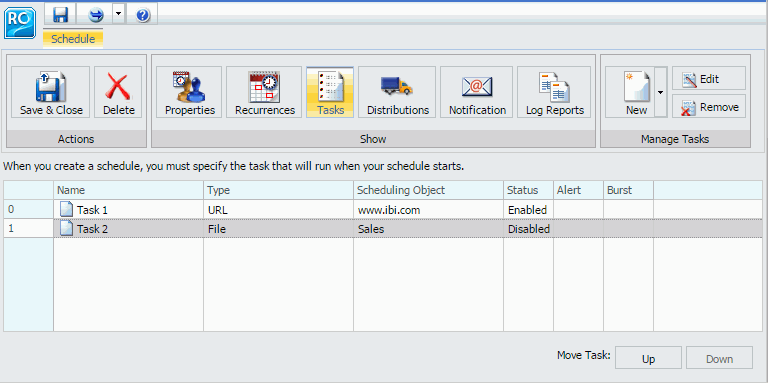
You can create additional
tasks, or complete your schedule creation process.
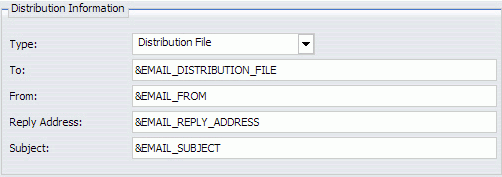
xCreating Schedules With Parameterized Settings
You
can use parameters (amper variables) to populate fields in the Basic
and Advanced Scheduling tools. The following image shows an example
of the email distribution option. These include, but are not limited
to: Save As, Email Zip file name, and Zip file name.
Note: You can use parameters (amper variables)
when specifying settings in a schedule. These parameters can be
system variables, such as &DATE or any amper variable for which
a value is returned by the Reporting Server when the scheduled procedure
is run. If a value for a parameter specified in a schedule is not
returned by the Reporting Server when the procedure or procedures
run, the schedule will fail with a No report to distribute error.
For more information on using parameters, see Distribution
Options in the Advanced Scheduling Tool in the ReportCaster manual.
xEnabling or Disabling Distribution Server Traces
Distribution
Server traces can be enabled or disabled from the Server Status
tab of the ReportCaster Console. To turn Distribution Server traces
on or off, click the View Trace button, and
click Turn On Trace or Turn Off
Trace, as shown in the following image.
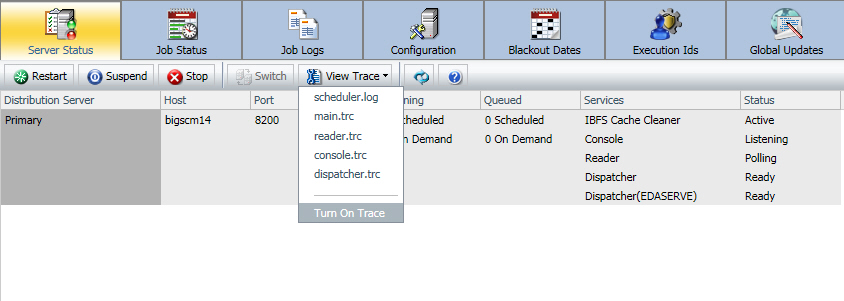
Note: This option tracks traces for the Distribution
Server separately from Job traces. You do not need to turn on job
traces to see distribution server traces.
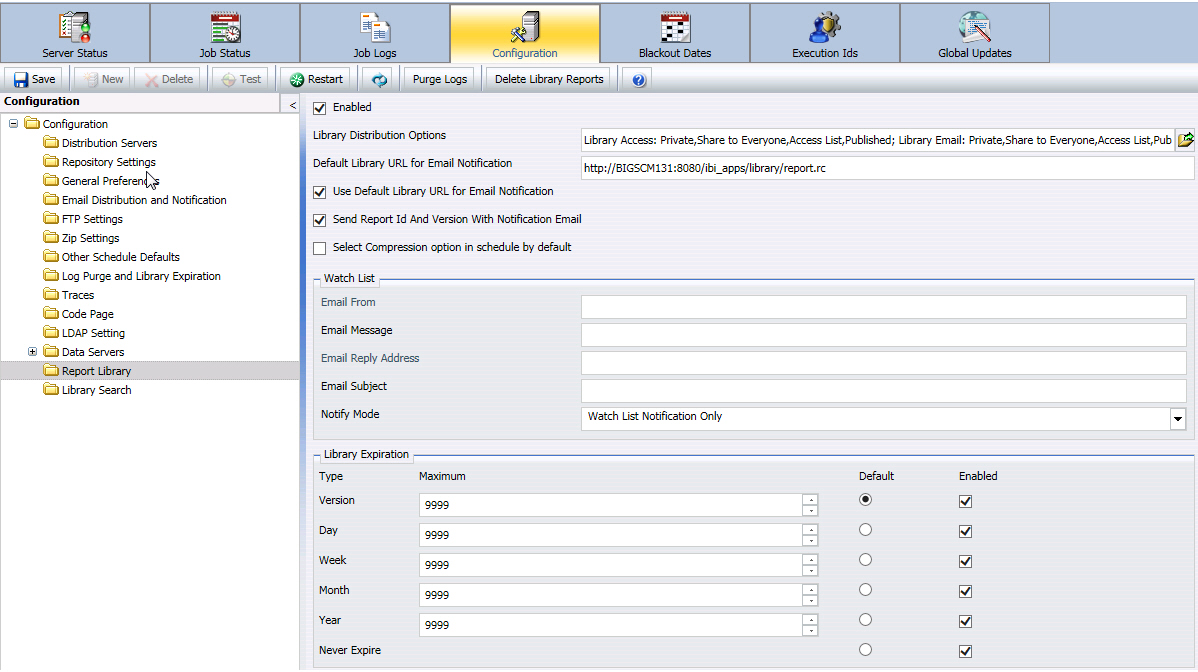
xSetting Default Library Expiration Options
You can
set default Library Expiration options in the Report Library folder,
which is located on the Configuration tab of the ReportCaster Console.
The default settings control the expiration of library reports,
and allow you to specify a number of versions, days, weeks, months
or years by which library reports can be set to expire. You can
also disable the option for Never Expire, which controls the option
to select this setting when scheduling a report using the Report
Library option.
All Library Expiration options are enabled by default, as shown
in the following image.
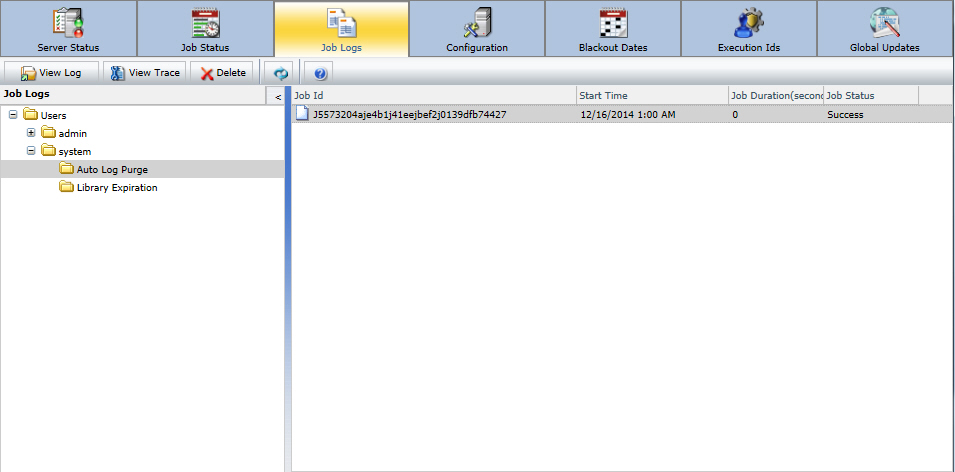
xView Logs and Traces for Daily and On-Demand Log Purge and Library Expiration Jobs
You
can view log and trace information for the daily and on-demand Log
Purge and Library Expiration jobs. You can view purge logs and traces
using the Job Logs tab in the ReportCaster Console. You can view
log and trace information, open job logs, delete job logs, refresh
job logs, or access related help for job logs on the Job Logs tab.
To access a listed job for which you want to view logs or traces,
click the Auto Log Purge folder or the Library
Expiration folder, which are located in the system folder.
Once you select a job, click View Log or View
Trace, as shown in the following image.
xUpdating Global FTP Password for All Schedules
Changing
the password of an FTP user applies to all schedules that use that
user ID for that FTP server and schedule owner.
xPurging Logs and Deleting Library Reports
As of Release
8.1 Version 03, you can perform an on-demand purge of your logs
using the Purge Log option on the toolbar of the ReportCaster Configuration
tab in the Administration Console. You can also specify a number
days (past) from which to purge logs.
The Delete Library Reports option, which is adjacent to the Purge
Log option on the toolbar of the ReportCaster Configuration tab,
provides the on-demand capability for deleting expired library
reports. You can accept the default, which is to purge expired library reports,
or select the option to Purge all Library Reports Older
Than, which allows you to specify a date for which all
reports prior to this date will be deleted. You can use the drop-down
menu to enable a calendar, or enter the date manually.
Both Purge Logs and Delete Library Reports offer the ability
to specify an option for traces: Default Traces, No Traces, or Trace
On.
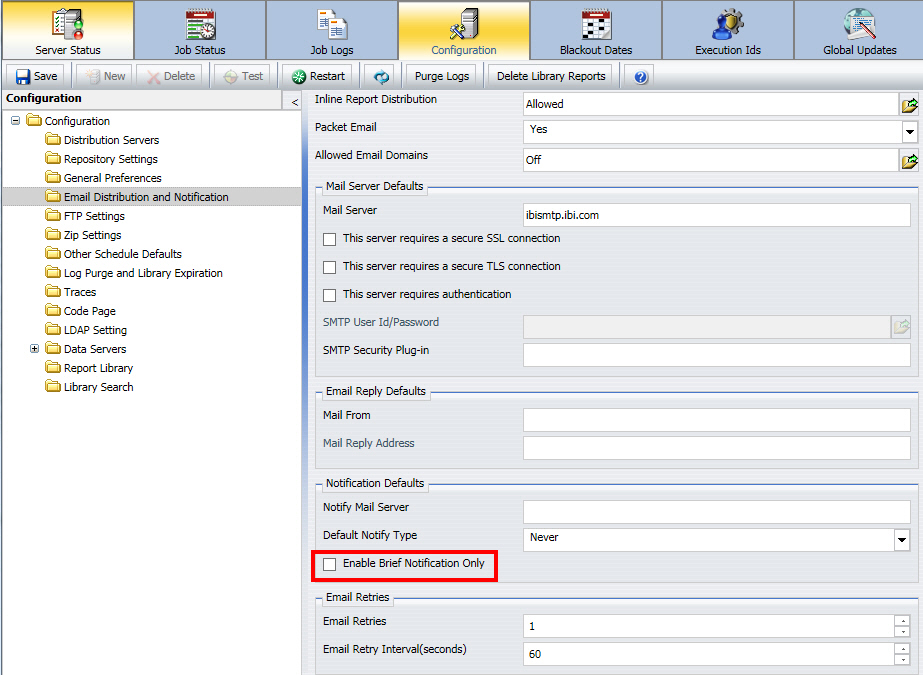
xEnabling Brief Notifications
As of Release
8.1 Version 03, the Enable Brief Notification Only check box is
available in the Email Distribution and Notification folder, under
ReportCaster Configuration.
This setting controls whether Full Notification is available
as a scheduling option. When this check box is selected, you can
only select the Brief Notification option when you schedule a report.
Note: If a schedule is created before Full Notification
is disabled, when the schedule executes, a Brief Notification will
be sent, and a warning will be displayed in the schedule log.
The Enable Brief Notification Only check box is shown in the
following image.
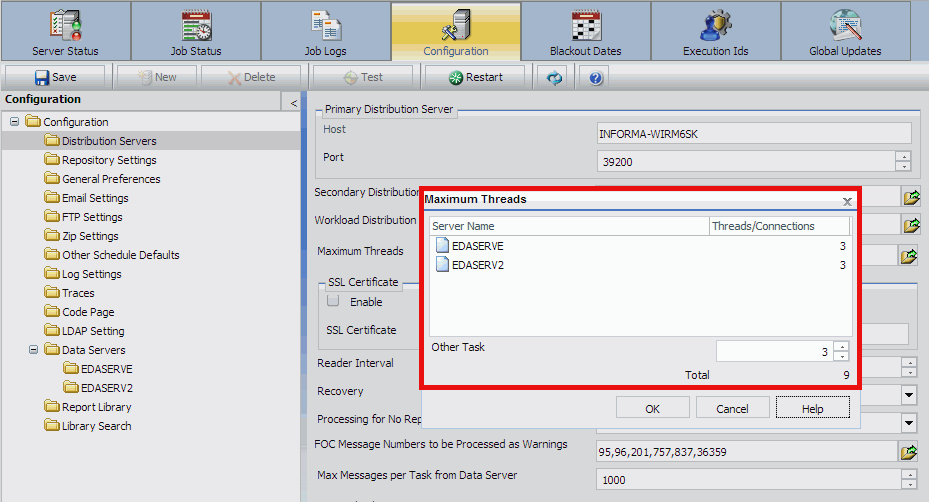
xSeparate Job Queues for Each Data Server
The Distribution Server now has separate job queues
for each Reporting Server, as well as an additional queue for tasks
that do not require a Reporting Server. Therefore, there will always
be at least one job thread available for each Reporting Server, in
addition to at least one thread for non-server based jobs. No one
Reporting Server can have all of the available job threads consumed
by jobs associated with that server.
Each Reporting Server is allocated job threads equal to the total
number of connections available for that Reporting Server. The Maximum
Threads setting is now the total number of threads for each Reporting
Server, in addition to the number of threads allocated for remaining
tasks.
x
You can publish schedules from the tree in ReportCaster.
A published schedule will be visible to all users with access to
the folder in which it resides. The right-click options that appear
on the schedule will depend upon the privileges of the user that
is signed in. For example, a user with the Run privilege will be
able to run the published schedule. When a published schedule runs,
it runs as the creator of the schedule and not as the signed in
user that initiated the run.
x
Procedure: How to Publish a Schedule
-
In the tree,
select a schedule that you want to publish.
-
Right-click
the selected schedule and select Publish.
The schedule is published.
xGroup Ownership of Schedules
You can create group owned schedules from the tree in
ReportCaster. A group owned schedule will be visible to all users
within the selected group that can access the folder where the schedule
is located.
The right-click options that appear on the schedule will depend
upon the privileges of the user that is signed in. For example,
a user with the Run privilege will be able to run the group owned
schedule. When a group owned schedule runs, it runs as the creator
of the schedule and not as the signed in user that initiated the
run.
x
Procedure: How to Create a Group Owned Schedule
-
In the tree, select a schedule for which you want to establish
group ownership.
-
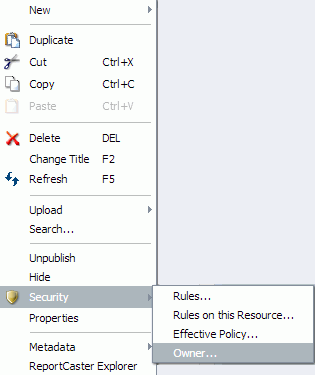
Right-click
the selected schedule.
-
Select Security and
then click Owner, as shown in the following
image.
-
On the Set Owner dialog box, click Group,
as shown in the following image.
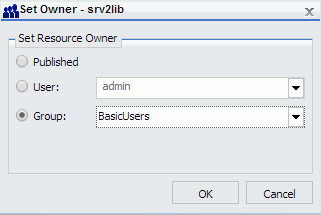
-
Select a
group from the drop-down list.
-
Click OK.
xEncrypting and Securing ReportCaster Communications
You can encrypt the communication between the ReportCaster
application and the ReportCaster Distribution Server with an SSL
Certificate. To enable this functionality, click Configuration on
the ribbon in the ReportCaster Console and select the Distribution
Servers folder, as shown in the following image.
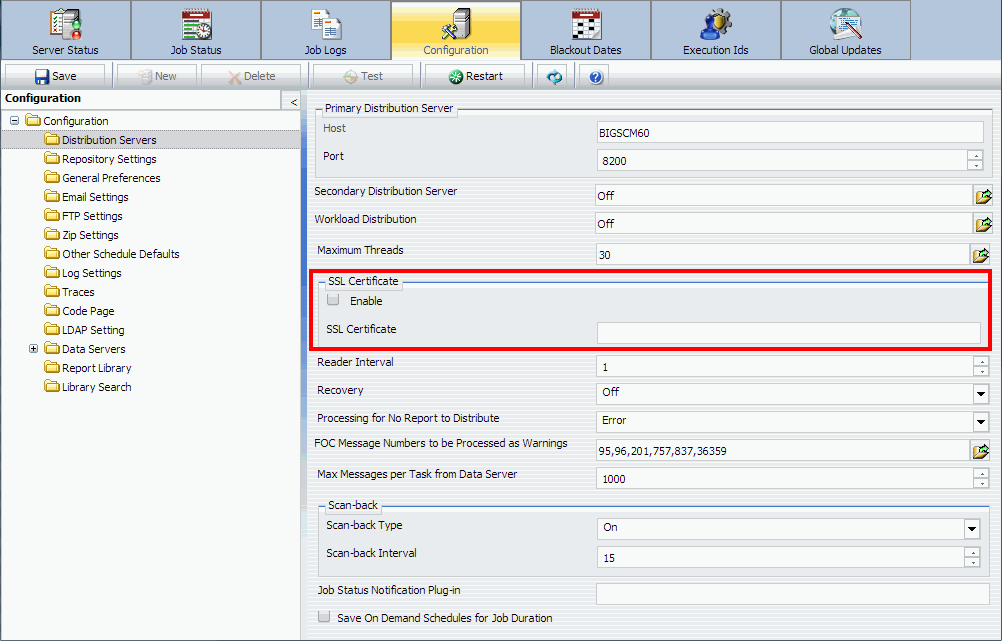
You can use the following information to configure your SSL Certificate:
-
Enable. Select
this check box to encrypt the communication between the ReportCaster
application and the ReportCaster Distribution Server. After enabling
secure communication and saving the changes, you must manually restart
the ReportCaster application and the ReportCaster Distribution Server.
-
SSL Certificate. A
default SSL Certificate is supplied by the installation procedure.
You can optionally replace the default certificate with your own certificate
by replacing the default value in the tool.
x
Two new formats have been added
to ReportCaster:
- PPTX
for PowerPoint 2010 (*.pptx).
- PPTX
Template for PowerPoint Template 2010 (*.pptx).
Note: These
formats use the Open XML format.
The formats are available in the Basic
Scheduling tool, the Advanced Scheduling tool, and the API. These
formats are disabled by default. However, you can enable them by accessing
the General Preferences Settings folder in the Configuration tool
of the ReportCaster Console.
xViewing Trace Information in the ReportCaster Console
A View Trace button has been added to the Server Status,
Job Status, and Job Logs tabs in the ReportCaster Console. This
function enables administrators to view trace information in the
scheduler.log, main.trc, reader.trc, console.trc, and other trace files.
xVersioning Added for Scheduler.log Files
When multiple scheduler.log files are created on the
same day, ReportCaster creates a unique file for each instance,
using a date and time stamp. The following format is used: scheduler_DD-MM-YY_HH-MM-SS.
The scheduler.log trace files are always created in the /ibi/WebFOCUS82/ReportCaster/log
directory.
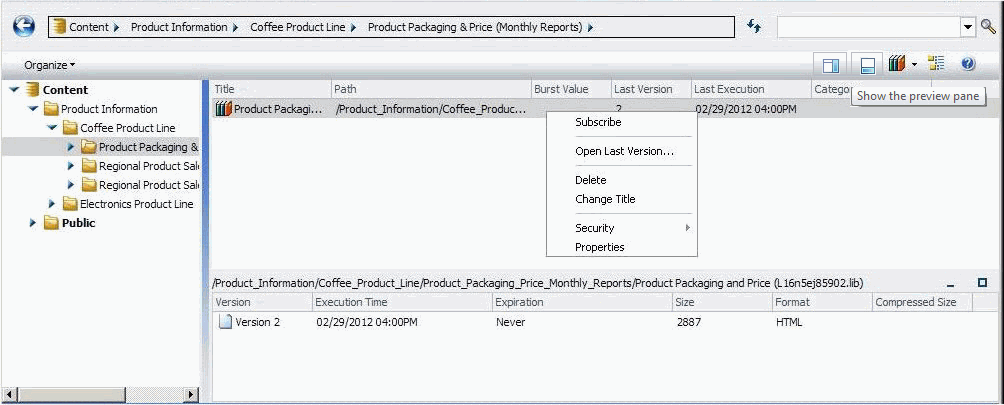
xNew View Options on the ReportCaster Explorer Toolbar
The ReportCaster Explorer toolbar has been modified
to include two new icons: Show the preview pane and Show version
list pane. When a Library report is selected in the ReportCaster
Explorer pane listing, you can click the Show version
list pane icon to view the available versions of the
report at the bottom of the dialog box. When you click the Show
preview pane icon, the selected report will be previewed
in the right pane that displays. The following image shows the ReportCaster
Explorer with the versions and options available for the Product
Packaging and Price Library report.
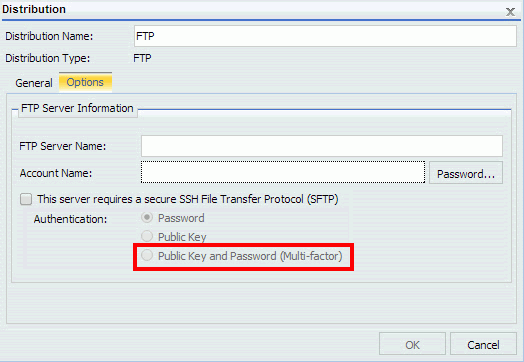
xSFTP with Multi-Factor Authentication
In the Distribution dialog box, Multi-factor authentication
has been added for FTP Server distribution. When customizing settings
for FTP Server information, you can select the Public Key and Password
(Multi-factor) authentication option. This option indicates that
the server requires authentication with a user ID and password.
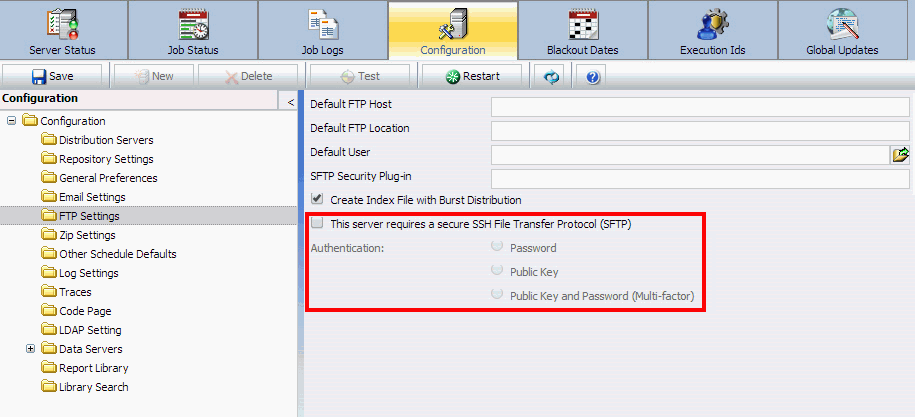
xConfiguring the Default FTP Server for SSH (SFTP)
You can configure your default FTP Server to use the
SSH File Transfer Protocol (SFTP) in the FTP Settings folder in
the ReportCaster Configuration tool, as shown in the following image.
xDisabling Tasks Within a Schedule
When working with an existing schedule, you can disable
one or more tasks within that schedule. You can also create a new
schedule with multiple tasks and then disable one or more of those
tasks, as needed.
xUnsubscribing Users From Library Reports
An administrator can unsubscribe other users from a
library report. This feature allows administrators to globally override
watch list settings created by other users.
For Windows, this feature can be enabled by running the unsubscribe.bat
file, located in the \ibi\WebFOCUS81\ReportCaster\bin directory.
For UNIX, this feature can be enabled by running the unsubscribe
shell script, located in the /ibi/WebFOCUS81/ReportCaster/bin directory.
xRemoving Trailing Spaces From Distributed Reports
You now have the option to remove trailing spaces from
reports distributed in a text format. Activating this setting makes
text reports display in a more compact format by reducing the overall
text width.
Your administrator needs to add the following setting to the
Administration Console Custom Settings text box: IBIWF_trimreport=YES.
You can also apply this setting to affect specific report formats,
for example, IBIWF_trimreport=WP.