Your next step is to enable end users to write the data that they type in this form to the data source. They do this by clicking a button that says Add at the bottom of the form. You add the button to your form and write the Maintain Language source code that inserts the data into the data source.
x
Now that you have created a button that the end user will click, you must create the code to run when the end user clicks the button.
You put this code in a function. A function is a series of commands in a procedure grouped together as a unit of control. A function accomplishes some small task, such as calculating values, extracting data from a data source to place in a data source stack, or writing information to a data source.
x
Procedure: How to Write a Function
-
In the Project Explorer, select the Start procedure.
-
Right-click Start. In the shortcut menu, click New. Then click Function (Case) in the submenu.
-
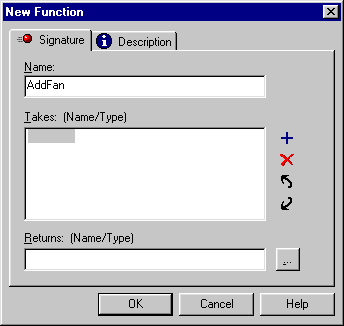
In the New Function dialog box, give your function the name AddFan, as shown in the following image.
-
Click OK.
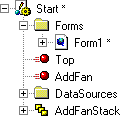
Your new function appears in the list of components of the Start procedure, as shown in the following image.
-
Double-click AddFan.
WebFOCUS Maintain opens the source code for your function in the Procedure Editor.
xAbout the Procedure Editor
Underlying many of the graphical elements of your WebFOCUS Maintain project is Maintain language source code.
You can edit this source code directly using the Procedure Editor.
Take a brief look at the source code for the Start procedure, compared with the components that you have added so far in the application development process.
Note: The text in your window may wrap differently.
|
|
MAINTAIN FILE fannames $$Declarations Case Top
Infer fannames.CUSTOMER.SSN into AddFanStack;
Winform Show Form1;
-* Replace the Winform Show command with the
following code
-* to display your form in a non-persistent state
-* Winform Show_And_Exit Form1;
EndCase Case AddFan
EndCase END |
The Start procedure starts with the line
MAINTAIN FILE fannames
and ends with the keyword
END
All WebFOCUS Maintain procedures start with the keyword MAINTAIN (which must be typed in uppercase) and end with the keyword END (also uppercase). When you create a procedure, WebFOCUS Maintain puts these two keywords in for you automatically.
The second and third words, FILE fannames, tell WebFOCUS Maintain what data sources this procedure is going to access. If you look in the list of project components, you see a Data Sources folder and, under this, the fannames data source.
Following this line is a comment line beginning with $$. If you have syntax coloring turned on, you can tell that this is a comment (green is the default color for comments, although you may have a different setting). Turn syntax coloring on and off using the Editor tab in the Options - Maintain Development Environment dialog box (in the Tools menu, click Environment options). This comment line is automatically generated when you create a procedure.
This particular comment, $$Declarations, is generated automatically by WebFOCUS Maintain when you created the procedure. If you create any variables, WebFOCUS Maintain places their source code after this comment.
The next line, Case Top, begins the definition of the Top function. This definition takes up several lines and ends with the keyword EndCase. The first statement, which begins with Infer, defines the AddFanStack data source stack.
The next line of the Top function
Winform Show Form1;
is the code that displays Form1 at run time. This code was generated automatically when you created the procedure.
The next three lines begin with the characters -* and are also comments. They contain an alternate piece of code for opening a form:
Winform Show_And_Exit Form1;
This code opens Form1 and then exits the application while still displaying Form1.
The final two lines before the END keyword that ends the procedure
Case AddFan
EndCase
are what define the function you just created. You are going to add some code to this function using the Language Wizard.
x
Procedure: How to Build Maintain Language Code Using the Language Wizard
-
Ensure that your cursor is in the line between Case AddFan and EndCase.
-
Right-click in the Procedure Editor window.
-
From the shortcut menu, select Language Wizard.
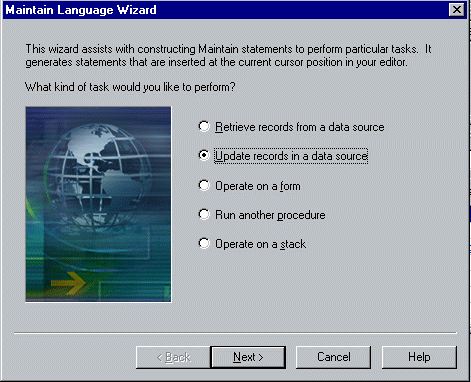
The Maintain Language Wizard opens. The Maintain Language Wizard helps you build Maintain language source code without typing the syntax yourself.
The first Language Wizard window asks you to specify, in general, what kind of task you want to accomplish.
-
Select Update records in a data source, as shown in the following image.
-
Click Next.
Now that you have specified the general task you want to perform, the Language Wizard narrows down the task further. Notice that after each task, there is a word in parentheses. This is the name of the Maintain Language command that executes that task. Notice also the box at the bottom of the window contains the Maintain language code being generated by the Language Wizard. As you move through the Language Wizard, you see more code.
-
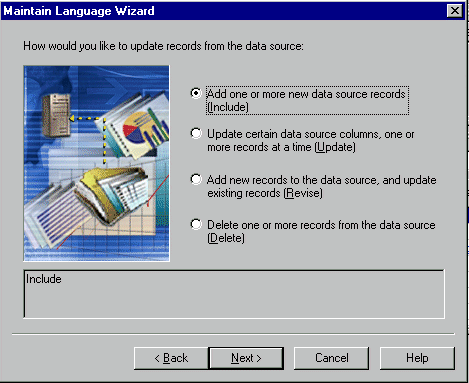
Select Add one or more new data source records (Include), as shown in the following image.
-
Click Next.
Now that you have specified which command to use, the Language Wizard asks you to supply the parameters for that command. In this case, you must tell it which data source is being updated and from where.
You first specify which data source is being updated.
Note: The Available fields list contains the data sources that you are using in this procedure, not the list of data sources in the project.
-
Expand the fannames data source.
-
Expand the CUSTOMER segment.
-
Copy the SSN field into the Fields to update box by clicking SSN and then clicking the right arrow button
 , or by double-clicking SSN. Notice that, as with stacks, all the other fields in the CUSTOMER segment are also copied, as shown in the following image. This is because the Maintain language assumes that if you are adding new data source records to a data source, you want to write information into all the fields in a segment. For more information, see Stacks and Implied Columns.
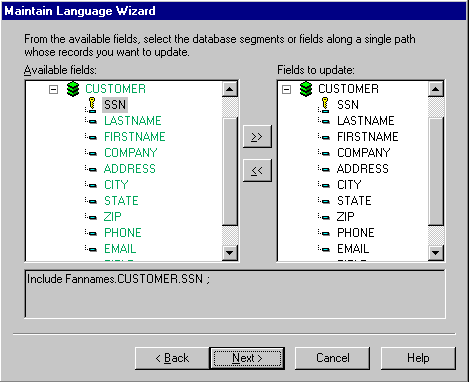
Notice that the Maintain language box at the bottom now reads:
Include fannames.CUSTOMER.SSN;
-
Click Next.
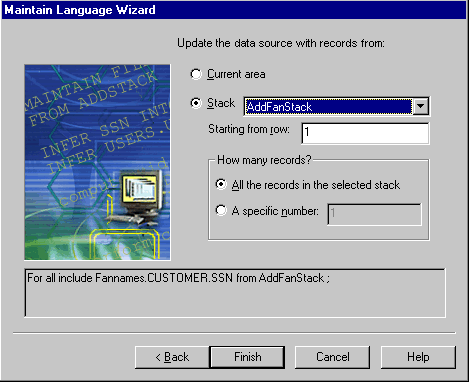
Your final step is to indicate where this data is being written from, which in this case, is AddFanStack.
-
Select Stack.
-
Choose AddFanStack from the list.
-
Leave the 1 in the Starting from row field and select the All the records in the selected stack option, as shown in the following image.
Notice that the Maintain language box at the bottom now reads:
For all include fannames.CUSTOMER.SSN from AddFanStack;
-
Click Finish.
WebFOCUS Maintain places the source code that the Language Wizard generated in between the Case AddFan and EndCase lines.
xAssigning the Function to the Add Button
Now that you have written the code that inserts end user data into the data source, you need to designate that when the end user clicks the Add button, this function is performed. You do this using the Event Handler editor.
An event is something that an end user performs, such as opening a form, clicking a button, or moving to a field. When you open the Event Handler editor, you see a list of controls on the form and another list of events that can happen to that control, such as clicking, double-clicking, and so on.
Select a combination of a control and whatever happens to it. Then, in the box below, type the code for what should happen when this event occurs.
x
Procedure: How to Assign a Function to an Event
-
Double-click the Form1 form in the Project Explorer to display the form.
-
In the Form Editor, double-click the Add button to open the Event Handler editor.
Notice that AddButton is selected in the list of controls.
-
In the list of events, select Click. Notice the code that appears in the Event Handler editor:
Case OnAddButton_Click
EndCase
-
Make sure you can see both the Event Handler editor and the Project Explorer.
-
Drag the AddFan function from the Project Explorer into the Event Handler editor between
Case OnAddButton_Click
and
EndCase
The Event Handler editor looks like the following:

-
Close the Event Handler editor.
-
When WebFOCUS Maintain prompts you to save your procedure, click Yes.
-
Deploy and run your application to see how it looks.
-
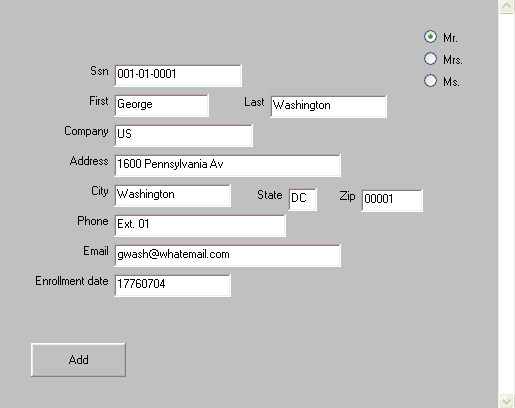
Add your name to the fannames data source. You are now included in the WebFOCUS FanClub application, as shown in the following image.
-
Close the application before continuing the tutorial.
 on the Control palette.
