By defining a Business View of a Master File, you are creating
an alternative view of the Master File and can limit the fields
available or create a subset of fields from the original Master
File. Fields can be grouped into meaningful folders. Field names,
titles, and descriptions can be customized for each Business View.
Fields in a Business View are organized into folders. Each folder
contains a group of fields. The fields in a folder can come from
different segments in the original Master File. The Business View
may contain existing fields and can include existing custom fields
for DEFINE, COMPUTE, and Filters. Custom fields are associated with
a specific segment in the original Master File and are subject to
the same rules as real fields. A report can reference fields from
multiple folders if they all lie along a single path in the original
Master File.
When opening a Master File in the Synonym Editor and clicking
the Business View button on the toolbar, a Business View pane opens
inside the Synonym Editor where Business View attributes can be
added. Adding Business View attributes at this point would update
the Master File by inserting the Business View attributes at the
end of the file, and once the file is saved, the Business View becomes
the active view when the file is used for reporting.
If you do not wish to turn your Master File into a Business View,
it is recommended that you save the Business View using a different
name or preferably start by creating a new Master File by selecting New,
then Synonym via Synonym Editor. Then, insert
a reference to an existing synonym and continue to build the Business
View. In this case, the Business View points to the cross-referenced Master
File, and all of the actual fields and security information comes
from the referenced file when the Business View is used in WebFOCUS
tools (such as Joins and Defines) and in reports.
Note: Impact Analysis searches Business Views in addition
to FOCUS procedures. This enables you to see if changes in the
original Master File will impact fields used in the Business View.
For detailed information on Impact Analysis, see Analyzing Metadata and Procedures.
You may create a Business View for an existing Master File by
using the Synonym Editor.
x
Procedure: How to Create a Business View Using the Synonym Editor
-
From the Projects or Data Servers area, navigate
to the Master Files folder where you want to create the Business View.
-
Right-click
the Master Files folder and select New, then Synonym
via Synonym Editor.
-
Provide
a unique name for the new file and click Open or Create if
in the Data Servers area.
-
While in
the Field View tab of the Synonym Editor, right-click the file name
in the upper-left corner, select Insert,
and then Reference to Existing Synonym.
-
From the
Insert Reference to Existing Synonym dialog box, select the synonym
for which you want to create a Business View. For
FOCUS multisegment files, you have the option to select the segment
you want to reference.
The referenced file is added to the new synonym and
its fields are visible in the left frame.
-
Select Business
View from the Tools menu to open the Business View pane.
You can also click the Business View icon from the Synonym Editor.
Note: A Business View Master File may contain only
one root folder.
Tip: Select Properties from
the Tools menu to open the Properties pane and view additional information
for items selected in the Business View pane. Use the Properties
pane to change titles, descriptions, or field names. Items that
cannot be edited are grayed out.
-
In the Business
View pane, right-click the file name and select Create
Default Business View or New Folder.
The Create Default Business View option duplicates
the segments and fields that are available in the Master File. You
can reorganize the view as necessary. The New Folder option
creates a root folder to which you can add fields from the Master
File on the left pane by selecting them and then dragging them inside
the folder. You can create additional folders to create the structure
you want.
-
To add additional
folders for the Business View, right-click the Business View root
folder that was created in the Business View pane and select New Folder.
Note: Multiple subfolders can be created and folders
may be empty for organizational purposes.
-
Select fields from the Master File
on the left and drag them to the appropriate folder in the Business
View pane. Press the Shift or Ctrl key while selecting multiple
fields.
Note: If needed, fields may be duplicated by placing
them in multiple folders, but any given folder may contain a field
only once.
The selected fields appear in the Business View
pane.
-
Select the Save or Save As icon
to save the Business View as a Business View Master File.
Note: The Business View Master File may be saved
in a different application than the main files.
x
Procedure: How to Alternatively Create a Business View Using the Synonym Editor
It is
recommended that you create a Business View using the Synonym Editor
as outlined in How to Create a Business View Using the Synonym Editor. However, the following is
an alternative way to create a Business View using the Synonym Editor.
-
From the Projects
or Data Servers area, navigate to the Master Files folder where
you wish to create the Business View and highlight the Master File
to be altered.
Note: You may create a Business View anywhere
that you can select a Master File.
-
Double-click the Master File or select Edit
in Synonym Editor from the File menu.
The Master File opens to the Field
View tab in the Synonym Editor.
Note: When opening a Master File in the Synonym
Editor, the tool opens to the last tab selected when the Synonym
Editor was last accessed.
-
Select Business
View from the Tools menu. You can also click the Business
View icon from the Synonym Editor.
The Business View pane opens.
Note: A Business
View Master File may contain only one root folder.
Tip: Select Properties from
the Tools menu to open the Properties pane and view additional information
for items selected in the Business View pane. Use the Properties
pane to change titles, descriptions, or field names. Items that
cannot be edited are grayed out.
-
In the Business
View pane, right-click the file name and select Create
Default Business View or New Folder.
The Create Default Business View option duplicates
the segments and fields that are available in the Master File, and
you can reorganize the view as necessary. The New Folder option
creates a root folder to which you can add fields from the Master
File on the left pane by selecting them and then dragging and dropping
them inside the folder. You can create additional folders to create
the structure you want.
-
To add
additional folders for the Business View, right-click the Business View
root folder that was created in the Business View pane and select New Folder.
Note: Multiple subfolders can be created and folders
may be empty for organizational purposes.
-
Select fields from the Master File
on the left and drag and drop them to the appropriate folder in
the Business View pane. Press the Shift or Ctrl key while selecting
multiple fields.
The selected fields appear in the Business View Tree tab.

Note: If
needed, fields may be duplicated by placing them in multiple folders,
but any given folder may contain a field only once.
-
Select
the Save or Save As icon
to save the Business View as a Business View Master File.
When you use the Save As option and
you are working with FOCUS files, you will need to specify a DATASET
in the Master File that points to the data file.
If you use
the Save option, the Business View will be saved inside the current Master
File and the Business View will be visible when the Master File
is opened in reporting tools.
Note: The Business View
Master File may be saved in a different application than the main
files.
-
Select Close from
the File menu to close to the Synonym Editor.
x
Reference: Usage Notes for Business Views
- When creating a Business
View using a referenced Master File:
- The detailed information
about fields, such as USAGE and ACTUAL formats or indexes remain
in the referenced Master File.
- All information about
Cluster Master Files remain in the referenced Master File.
- DBA attributes specified
in the referenced Master File are respected by the Business Views
- When a Master
File contains more than one field with the same name, as can occur
when files are joined, the BELONGS_TO_SEGMENT attribute identifies
which instance of the field name is being referenced in the Business
View.
- Folders can
be empty for organizational purposes. For example, Region can have empty
folders called North, South, East, and West.
- You can issue
an SQL SELECT command against a Business View. However, a Direct
SQL Passthru request is not supported against a Business View.
- Business Views
support alternate file views and fully qualified field names.
- The SEG. operator
against a Business View folder displays all of the fields in that folder,
not all of the fields in the real segment.
- Requests against
a Business View cannot reference any fields or segments not in the
Business View.
- All HOLD formats
are supported against a Business View.
- All adapters for non-FOCUS data sources support
retrieval requests against a Business View.
- Business Views
are not supported with data source maintenance commands, such as
Maintain or REBUILD.
- The referenced Master
File or the Master File currently being used to create the Business
View, may contain Defines, Computes, Filters, and other fields for
use in the Business View.
x
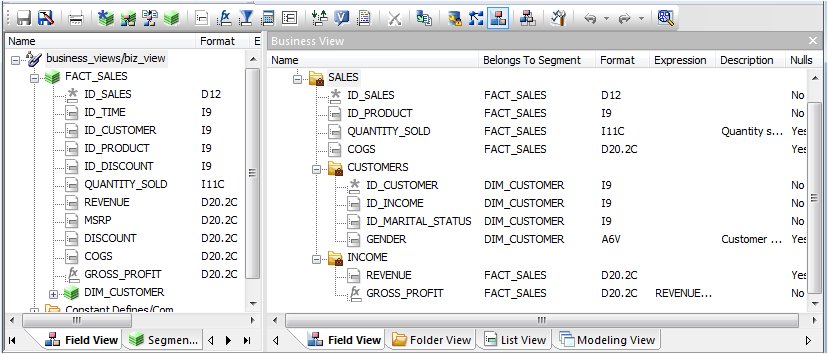
Reference: Using a Business View Master File
When you
use the Business View Master File with WebFOCUS tools and reports, the field
formats, descriptions, and titles will be retrieved from the original
Master File, unless they are customized and a title and description
is available through the Business View.
You may access the
Business View Master Files from all development areas of Developer Studio.
In the Projects, Data Servers, or Repository area:
The
Table List shows all available Master Files, including the Business
Views that are available. The Description column shows a description
from the Master File or the Business View file.
The following
image is an example of a Business View Master File in the WebFOCUS Table
List, that appears when creating a report in the Data Servers area.
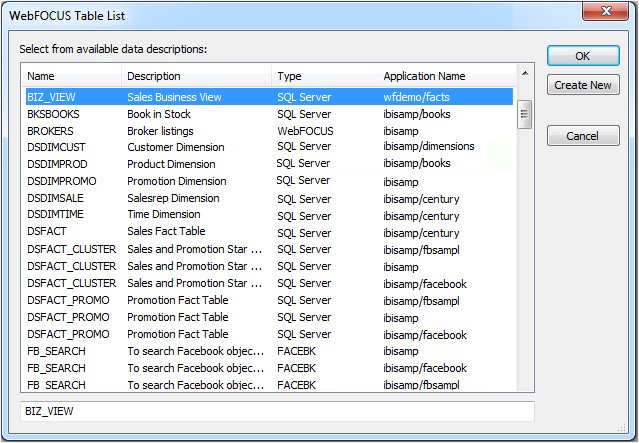
This
is also available in the Projects area, however, the Table List
does not show remarks in the Projects area.
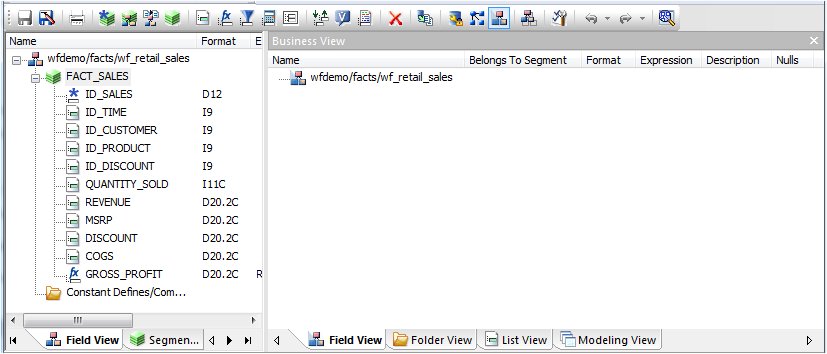
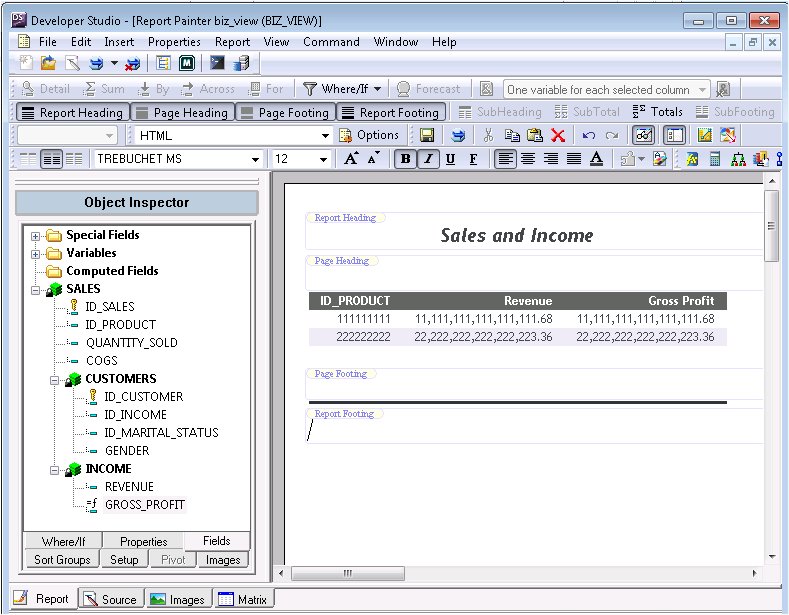
In Report Painter:
When using a Business
View Master File in Report Painter, only fields from the Business
View are shown in the Fields list.
The
following image is an example of a Business View Master File in
Report Painter.
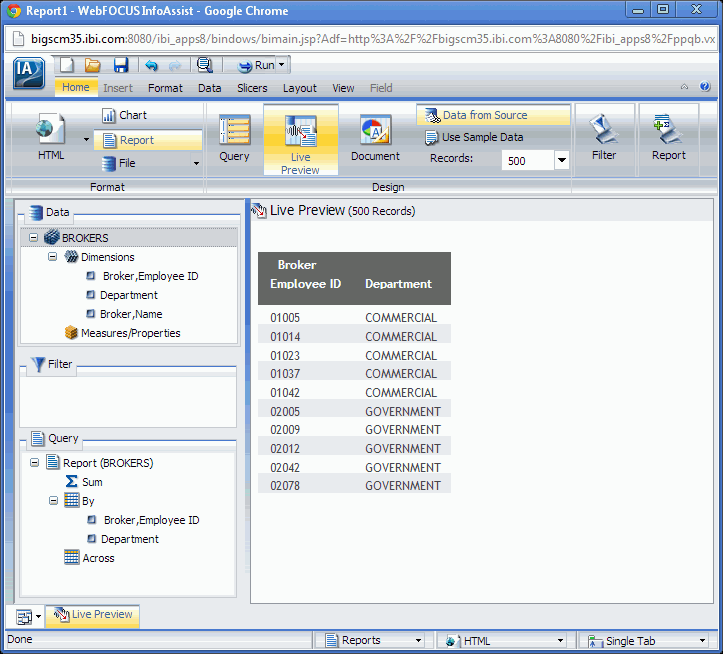
In InfoAssist:
When
using a Business View Master File in InfoAssist, only fields from
the Business View are shown in the Fields list.
The following
image is an example of a Business View Master File in InfoAssist.