How to: |
In the first window of Update Assist, you select the segment and fields you want to update.
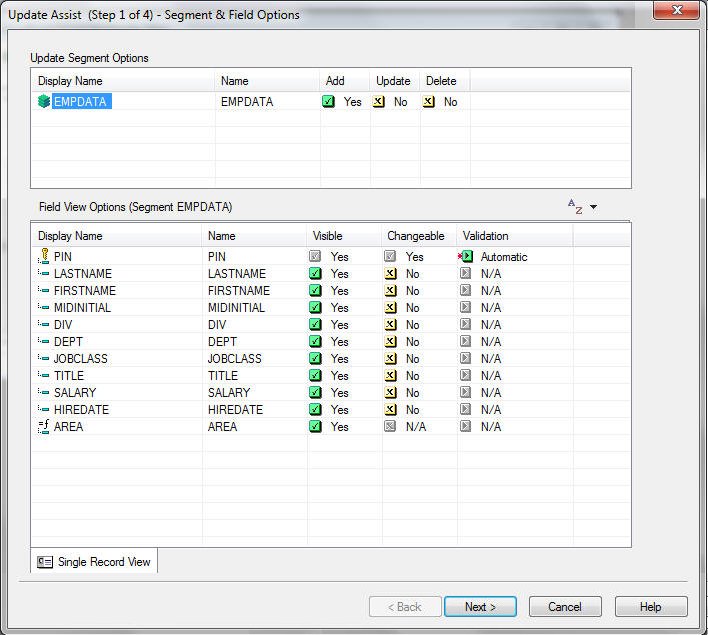
Note: Update Assist is only available with a single segment Master File. The following image shows the Segment and Fields window.
This window contains the following fields and options:
Contains the segment you selected. In order to enable changes to any of the fields in a segment, select the Add, Update, or Delete options.
Contains the fields in the segment that you selected in the Update Segment Options section. Once you have enabled changes to the segment as a whole, you can set change options for each individual field in the segment.
Is how the field name is displayed on the form.
Is the name of the database field.
Determines whether the field is visible to the user.
Determines whether the user can change the field. This option is available only if Add or Update was selected in the Update Segment Options section.
Note: A key field cannot be changed.
Tip: You can select multiple fields and then click once to change the Visible or Changeable settings.
Applies a validation technique which verifies the value a user enters in the field. This option is available only if Changeable is set to Yes.
The options for Validation are:
Automatic. The default validation option, validates the user entry against the field format defined in the Master File. This automatically supports validation for Alphanumeric, Numeric (including Floating Point and Integer), and Date formats. The validation is performed using client-side JavaScript and does not require the server to validate the data.
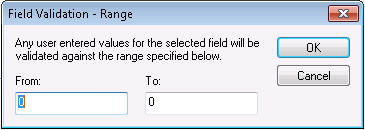
Range. Allows you to define a numeric range between which data is valid for the field. See How to Use a Range to Validate a Field. This option is best used for numeric fields.
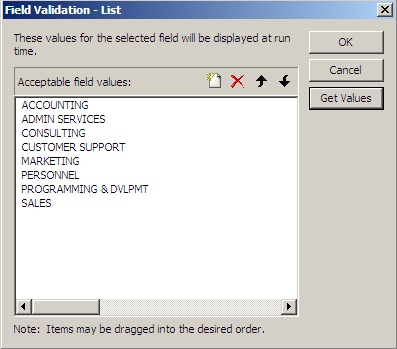
Static List. Allows you to supply a list of valid values from which the user selects at run time. When Static List is selected, the Field Validation - List dialog box opens. To retrieve a list of all values currently in the database, click the Get Values button. You can edit this supplied list. For details, see How to Use a Static List to Validate a Field.
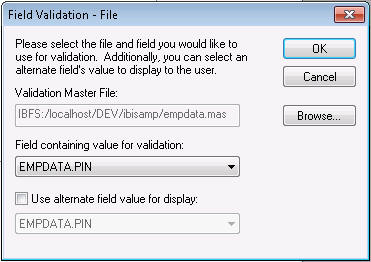
Dynamic List. Allows you to supply a list of valid values for the field that are retrieved from a specified data source at run time. When Dynamic List is selected, you are prompted for the Master File and field from which to retrieve values. For details, see How to Use a Dynamic List to Validate a Field.
None. Does not perform a validation.
Required field. Specifies that the user must supply a value for the field.
You can easily rename a segment or field as it is displayed to the user (this is called the Display Name).
You can change the order of the fields as they appear in the window.
 .
.
Note: This does not affect the order of the fields in your application. In the application, the fields are sorted according to their order in the Master File.
When you choose the Range option to validate a field, Update Assist opens the Field Validation - Range dialog box. You use this option with numeric fields to specify a range of values for any information the user enters. The Field Validation - Range dialog box is shown in the following image.
When you choose the Static List option to validate a field, the Field Validation - List dialog box opens. Use this option to specify a static list of values that the user can select from a pull-down list. The Field Validation - List dialog box is shown in the following image.
 , type
the text for the value, and press Enter.
, type
the text for the value, and press Enter.
 .
.
 and the move
item down in the list buttons
and the move
item down in the list buttons  .
.
Note: When populating a Static list, make sure you scan the data source for all possible values and enter them into the list. If you leave a value off the list that is in a current record and that record is selected for update, the value for the bound column will change to the first item on the Static List.
Tip: If a field is not required and you want to give your user the option to leave it blank, put an empty entry in as the first item in your Static list.
When you choose the Dynamic List option to validate a field, you specify a field in the data source that contains the possible values. At run time, a list of values is retrieved from that data source and the user can then select one of these values from a drop-down list.
The real power of Dynamic Lists is that you can add items to the lists in your Update Assist applications without having to make changes to the form code of the application. Static lists require you to edit the forms in your Maintain application using the Maintain Development Environment. For example, if you choose to use a flat file as the source of items in your lists, you can simply add items to the flat file or export a new flat file from your data source to change the list. You do not need to change a line of application code.
| WebFOCUS |