Managing Essbase Metadata

In this section:

When the server accesses a data source, it needs information on how to interpret the data stored there. For each data source the server will access, you create a synonym that describes the structure of the data source and the server mapping of the Essbase data type.


Top of page

x
Creating Synonyms

How to:

Reference:

x

Synonyms define unique names for each Essbase application.database combination that is accessible from a server. Synonyms are useful because they hide location information and the identity of the underlying data source from client applications. They also provide support for extended metadata features of the server such as virtual fields and additional security mechanisms.

Using synonyms allows an object to be moved or renamed while allowing client applications to continue functioning without modification. The only modification required is a redefinition of the synonym on the server. The result of creating a synonym is a Master File and Access File.


x
Procedure: How to Create a Synonym

To create a synonym, you must have previously configured the adapter. You can create a synonym from the Applications or Adapters pages of the Web Console.

  1. From the Web Console menu bar, click Applications.

    The Applications page opens.

  2. Click the New button and select Synonym from the drop-down menu.

    The Select adapter to configure or Select connection to create synonym pane opens.

  3. Click a connection for the configured adapter.

    The first of a series of synonym creation panes opens.

  4. Enter values for the parameters required by the adapter as described in the synonym creation parameters reference.
  5. After entering the parameter values, click Create Synonym.

    The Status pane indicates that the synonym was created successfully.

The synonym is created and added under the specified application directory.

Note:


x
Reference: Synonym Creation Parameters for Essbase

The following list describes the parameters for which you will need to supply values, and related tasks you will need to complete in order to create a synonym for the adapter. These options may appear on multiple panes. To advance from pane to pane, click the buttons provided, ending with the Create Synonym button, which generates the synonym based on your entries.

Select a database

Select one or more databases from the list.

Make alias fields

Select the Make alias fields check box if you wish to create fields that expose the values in your alias table. The alias table can provide meaningful field values or field values in a specific language.

Aggregate

This option enables you to control summing on non-aggregated fields in an Essbase request.

Select Measure

This option enables you to limit the number of fields in the Master File.

  • Select none to create a single data value representing the cube measures.
  • Select a dimension to create a separate numeric measure field for each member in that dimension.

    Note: If you select a dimension, you can select an additional dimension for grouping the measures.

Select Measure Group

If you selected a dimension to expose the measures, you can optionally select an additional dimension for grouping those measures.

Note: You can then select specific members to create as groups.

Measure Group members

If you selected a Measure Group, you can now select specific members for which to create groups.

  1. Click the Select Measure Group members check box.
  2. Click Next.

    A list of Scenario members displays.

  3. Check the members that you want to create as groups. Check the Scenario Name check box to create groups for all members.

Synonym field name processing options:

Validate

Select the Validate check box if you wish to convert all special characters to underscores and perform a name check to prevent the use of reserved names. (This is accomplished by adding numbers to the names.) This parameter ensures that names adhere to specifications. See Validation for Special Characters and Reserved Words for more information.

When the Validate option is unchecked, only the following characters are converted to underscores: '-'; ' '; ' \'; '/'; ','; '$'. No checking is performed for names.

Make unique

Select the Make unique check box if you wish to set the scope for field and group names to the entire synonym. This ensures that no duplicate names are used, even in different segments of the synonym. When this option is unchecked, the scope is the segment.

Synonym Name

To change the default name, type the name of the synonym.

Application

Select an application directory. The default value is baseapp.

Prefix/Suffix

If you have tables with identical table names, assign a prefix or a suffix to distinguish them. For example, if you have identically named human resources and payroll tables, assign the prefix HR to distinguish the synonyms for the human resources tables. Note that the resulting synonym name cannot exceed 64 characters.

If all tables and views have unique names, leave the prefix and suffix fields blank.

Overwrite Existing Synonyms

To specify that this synonym should overwrite any earlier synonym with the same fully qualified name, select the Overwrite existing synonyms check box.

Note: The connected user must have operating system write privileges in order to recreate a synonym.


Example: Creating a Synonym

To generate a synonym for the application Sample and database Basic, enter the following information on the Create Synonym panes of the Web Console or the Data Management Console:

  1. From the displayed list, select the row that contains the Application Name Sample and the Data Base Name Basic, then click the Next button.
  2. Accept the default for Measure.
  3. Click Create Synonym. The synonym is created and added under the specified application directory (baseapp is the default).

    A status window displays a message indicating that the synonym was created successfully.

  4. Open the baseapp application folder in the navigation pane and click the synonym Basic.
  5. Choose Edit as Text from the menu to view the generated Master File, then choose Edit Access File as Text to view the corresponding Access File.

Generated Master File

FILENAME=SAMPLE, SUFFIX=ESSBASE, $
  SEGMENT=BASIC, SEGTYPE=S0, $
$  DIMENSION: Year
 DIMENSION=Year, CAPTION='Year', $
  HIERARCHY=Year, CAPTION='Year Levels', HRY_DIMENSION=Year,
     HRY_STRUCTURE=STANDARD, $
    FIELDNAME=YEAR, ALIAS=History, USAGE=A4, ACTUAL=A4,
      WITHIN='*Year', PROPERTY=UID,  $
    FIELDNAME=QUARTER, ALIAS=Quarter, USAGE=A8, ACTUAL=A8,
      WITHIN=YEAR, PROPERTY=UID,  $
    FIELDNAME=MONTH, ALIAS=Month, USAGE=A9, ACTUAL=A9,
      WITHIN=QUARTER, PROPERTY=UID,  $
  HIERARCHY=Year2, CAPTION='Year Parent-Child', HRY_DIMENSION=Year,
      HRY_STRUCTURE=RECURSIVE, $
    FIELDNAME=YEAR_MEMBER, ALIAS=Year, USAGE=A4, ACTUAL=A4,
      WITHIN='*Year2', PROPERTY=UID,  $
    FIELDNAME=YEAR_CAPTION, USAGE=A9, ACTUAL=A9,
      REFERENCE=YEAR_MEMBER, PROPERTY=CAPTION,  $
    FIELDNAME=YEAR_PARENT, USAGE=A4, ACTUAL=A4,
      REFERENCE=YEAR_MEMBER, PROPERTY=PARENT_OF,  $
    FIELDNAME=YEAR_PARENTCAP, USAGE=A9, ACTUAL=A9,
      REFERENCE=YEAR_MEMBER, PROPERTY=CAP_PARENT,  $
    FIELDNAME=YEAR_LVLNO, USAGE=I2L, ACTUAL=I4,
      MISSING=ON, ACCESS_PROPERTY=(INTERNAL),
      TITLE='Year_LVLNO LEVEL_NUMBER',
      REFERENCE=YEAR_MEMBER, PROPERTY=LEVEL_NUMBER,  $
    FIELDNAME=H_T_D, ALIAS='H-T-D', USAGE=A16, ACTUAL=A16,
      REFERENCE=YEAR, PROPERTY=TIMESERIES,  $
    FIELDNAME=Q_T_D, ALIAS='Q-T-D', USAGE=A16, ACTUAL=A16,
      REFERENCE=QUARTER, PROPERTY=TIMESERIES,  $
    FIELDNAME=M_T_D, ALIAS='M-T-D', USAGE=A16, ACTUAL=A16,
      REFERENCE=MONTH, PROPERTY=TIMESERIES,  $
$  DIMENSION: Measures
 DIMENSION=Measures, CAPTION='Measures', $
  HIERARCHY=Measures, CAPTION='Measures Levels', HRY_DIMENSION=Measures,
   HRY_STRUCTURE=STANDARD, $
    FIELDNAME=MEASURES, ALIAS='Gen1,Measures', USAGE=A8, ACTUAL=A8,
      WITHIN='*Measures', PROPERTY=UID,  $
    FIELDNAME=GEN2_MEASURES, ALIAS='Gen2,Measures', USAGE=A9, ACTUAL=A9,
      WITHIN=MEASURES, PROPERTY=UID,  $
    FIELDNAME=GEN3_MEASURES, ALIAS='Gen3,Measures', USAGE=A17,
      ACTUAL=A17, WITHIN=GEN2_MEASURES, PROPERTY=UID,  $
    FIELDNAME=GEN4_MEASURES, ALIAS='Gen4,Measures', USAGE=A18,
      ACTUAL=A18, WITHIN=GEN3_MEASURES, PROPERTY=UID,  $
  HIERARCHY=Measures2, CAPTION='Measures Parent-Child',
   HRY_DIMENSION=Measures, HRY_STRUCTURE=RECURSIVE, $
    FIELDNAME=MEASURES_MEMBER, ALIAS=Measures, USAGE=A17, ACTUAL=A17,
      WITHIN='*Measures2', PROPERTY=UID,  $
    FIELDNAME=MEASURES_CAPTION, USAGE=A18, ACTUAL=A18,
      REFERENCE=MEASURES_MEMBER, PROPERTY=CAPTION,  $
    FIELDNAME=MEASURES_PARENT, USAGE=A17, ACTUAL=A17,
      REFERENCE=MEASURES_MEMBER, PROPERTY=PARENT_OF,  $
    FIELDNAME=MEASURES_PARENTCAP, USAGE=A18, ACTUAL=A18,
      REFERENCE=MEASURES_MEMBER, PROPERTY=CAP_PARENT,  $
    FIELDNAME=MEASURES_LVLNO, USAGE=I2L, ACTUAL=I4,MISSING=ON,
      ACCESS_PROPERTY=(INTERNAL),TITLE='Measures_LVLNO LEVEL_NUMBER',
      REFERENCE=MEASURES_MEMBER, PROPERTY=LEVEL_NUMBER,  $
$  DIMENSION: Product
 DIMENSION=Product, CAPTION='Product', $
  HIERARCHY=Product, CAPTION='Product Levels', HRY_DIMENSION=Product,
   HRY_STRUCTURE=STANDARD, $
    FIELDNAME=PRODUCT, ALIAS='Lev2,Product', USAGE=A7, ACTUAL=A7,
      WITHIN='*Product',PROPERTY=UID,  $
    FIELDNAME=FAMILY, ALIAS=Family, USAGE=A11, ACTUAL=A11,
      WITHIN=PRODUCT,PROPERTY=UID,  $
    FIELDNAME=SKU, ALIAS=SKU, USAGE=A18, ACTUAL=A18,
      WITHIN=FAMILY,PROPERTY=UID,  $
  HIERARCHY=Product2, CAPTION='Product Parent-Child',
   HRY_DIMENSION=Product, HRY_STRUCTURE=RECURSIVE, $
    FIELDNAME=PRODUCT_MEMBER, ALIAS=Product, USAGE=A7, ACTUAL=A7,
      WITHIN='*Product2',PROPERTY=UID,  $
    FIELDNAME=PRODUCT_CAPTION, USAGE=A18, ACTUAL=A18,
      REFERENCE=PRODUCT_MEMBER, PROPERTY=CAPTION,  $
    FIELDNAME=PRODUCT_PARENT, USAGE=A7, ACTUAL=A7,
      REFERENCE=PRODUCT_MEMBER, PROPERTY=PARENT_OF,  $
    FIELDNAME=PRODUCT_PARENTCAP, USAGE=A18, ACTUAL=A18,
      REFERENCE=PRODUCT_MEMBER, PROPERTY=CAP_PARENT,  $
    FIELDNAME=PRODUCT_LVLNO, USAGE=I2L, ACTUAL=I4,
      MISSING=ON, ACCESS_PROPERTY=(INTERNAL),
      TITLE='Product_LVLNO LEVEL_NUMBER',
      REFERENCE=PRODUCT_MEMBER, PROPERTY=LEVEL_NUMBER,  $
$  DIMENSION: Market
 DIMENSION=Market, CAPTION='Market', $
  HIERARCHY=Market, CAPTION='Market Levels', HRY_DIMENSION=Market,
   HRY_STRUCTURE=STANDARD, $
    FIELDNAME=MARKET, ALIAS='Gen1,Market', USAGE=A6, ACTUAL=A6,
      WITHIN='*Market', PROPERTY=UID,  $
    FIELDNAME=REGION, ALIAS=Region, USAGE=A7, ACTUAL=A7,
      WITHIN=MARKET, PROPERTY=UID,  $
    FIELDNAME=STATE, ALIAS=State, USAGE=A13, ACTUAL=A13,
      WITHIN=REGION, PROPERTY=UID,  $
  HIERARCHY=Market2, CAPTION='Market Parent-Child', HRY_DIMENSION=Market,
   HRY_STRUCTURE=RECURSIVE, $
    FIELDNAME=MARKET_MEMBER, ALIAS=Market, USAGE=A13, ACTUAL=A13,
      WITHIN='*Market2', PROPERTY=UID,  $
    FIELDNAME=MARKET_CAPTION, USAGE=A13, ACTUAL=A13,
      REFERENCE=MARKET_MEMBER, PROPERTY=CAPTION,  $
    FIELDNAME=MARKET_PARENT, USAGE=A13, ACTUAL=A13,
      REFERENCE=MARKET_MEMBER, PROPERTY=PARENT_OF,  $
    FIELDNAME=MARKET_PARENTCAP, USAGE=A13, ACTUAL=A13,
      REFERENCE=MARKET_MEMBER, PROPERTY=CAP_PARENT,  $
    FIELDNAME=MARKET_LVLNO, USAGE=I2L, ACTUAL=I4, MISSING=ON,
      ACCESS_PROPERTY=(INTERNAL), TITLE='Market_LVLNO LEVEL_NUMBER',
      REFERENCE=MARKET_MEMBER, PROPERTY=LEVEL_NUMBER,  $
$  DIMENSION: Scenario
 DIMENSION=Scenario, CAPTION='Scenario', $
  HIERARCHY=Scenario, CAPTION='Scenario Levels', HRY_DIMENSION=Scenario,
   HRY_STRUCTURE=STANDARD, $
    FIELDNAME=SCENARIO, ALIAS='Gen1,Scenario', USAGE=A8, ACTUAL=A8,
      WITHIN='*Scenario', PROPERTY=UID,  $
    FIELDNAME=GEN2_SCENARIO, ALIAS='Gen2,Scenario', USAGE=A10,
      ACTUAL=A10, WITHIN=SCENARIO, PROPERTY=UID,  $
  HIERARCHY=Scenario2, CAPTION='Scenario Parent-Child',
   HRY_DIMENSION=Scenario, HRY_STRUCTURE=RECURSIVE, $
    FIELDNAME=SCENARIO_MEMBER, ALIAS=Scenario, USAGE=A10, ACTUAL=A10,
      WITHIN='*Scenario2', PROPERTY=UID,  $
    FIELDNAME=SCENARIO_CAPTION, USAGE=A10, ACTUAL=A10,
      REFERENCE=SCENARIO_MEMBER, PROPERTY=CAPTION,  $
    FIELDNAME=SCENARIO_PARENT, USAGE=A10, ACTUAL=A10,
      REFERENCE=SCENARIO_MEMBER, PROPERTY=PARENT_OF,  $
    FIELDNAME=SCENARIO_PARENTCAP, USAGE=A10, ACTUAL=A10,
      REFERENCE=SCENARIO_MEMBER, PROPERTY=CAP_PARENT,  $
    FIELDNAME=SCENARIO_LVLNO, USAGE=I2L, ACTUAL=I4,
      MISSING=ON, ACCESS_PROPERTY=(INTERNAL),
      TITLE='Scenario_LVLNO LEVEL_NUMBER',
      REFERENCE=SCENARIO_MEMBER, PROPERTY=LEVEL_NUMBER,  $
$  DIMENSION: DATA
  SEGMENT=DATA, SEGTYPE=U, PARENT=BASIC, $
    FIELDNAME=DATA_VALUE, ALIAS=DATA_VALUE, USAGE=D20.2, ACTUAL=D8,
      MISSING=ON, TITLE='DATA_VALUE', $
$  DIMENSION: ATTR
  SEGMENT=ATTR, SEGTYPE=U, PARENT=BASIC, $
    FIELDNAME=CAFFEINATED, ALIAS=Caffeinated, USAGE=A17, ACTUAL=A17,
      REFERENCE=SKU, PROPERTY=UDA,  $
    FIELDNAME=OUNCES, ALIAS=Ounces, USAGE=A9, ACTUAL=A9,
      REFERENCE=SKU, PROPERTY=UDA,  $
    FIELDNAME=PKG_TYPE, ALIAS='Pkg Type', USAGE=A8, ACTUAL=A8,
      REFERENCE=SKU, PROPERTY=UDA,  $
    FIELDNAME=POPULATION, ALIAS=Population, USAGE=A15, ACTUAL=A15,
      REFERENCE=STATE, PROPERTY=UDA,  $
    FIELDNAME=INTRO_DATE, ALIAS='Intro Date', USAGE=A21, ACTUAL=A21,
      REFERENCE=SKU, PROPERTY=UDA,  $
$  DIMENSION: UDA
  SEGMENT=UDA, SEGTYPE=U, PARENT=BASIC, $
    FIELDNAME=MARKET_UDA, ALIAS=Market, USAGE=A13, ACTUAL=A13,
      REFERENCE=**Market, PROPERTY=UDA,  $

Generated Access File

SEGNAME=BASIC, SERVER=EDASOL28, DBNAME=Basic, APPLNAME=Sample, $
 TIMEDIM=YEAR, $
    SHARE=300-30, PARENT=Diet, DIM=Product, $
    SHARE=200-20, PARENT=Diet, DIM=Product, $
    SHARE=100-20, PARENT=Diet, DIM=Product, $

x
Reference: Managing Synonyms

Once you have created a synonym, you can right-click the synonym name in the Adapter navigation pane of either the Web Console or the Data Management Console to access the following options.

Option

Description

Open

Opens the Master File for viewing and editing using a graphical interface. If an Access file is used it will be also available.

Edit as Text

Enables you to view and manually edit the Master File synonym.

Note: To update the synonym, it is strongly recommended that you use the graphical interface provided by the Open option, rather than manually editing the Master File.

Edit Access File as Text

Enables you to view and manually edit the Access File synonym.

Note: This option is available only when an Access File is created as part of the synonym.

Sample Data

Retrieves up to 20 rows from the associated data source.

Data Profiling

Data Profiling provides the data characteristics for synonym columns.

Alphanumeric columns provide the count of distinct values, total count, maximum, minimum, average length, and number of nulls.

Numeric columns provide the count of distinct values, total count, maximum, minimum, average value, and number of nulls.

Refresh Synonym (if applicable)

Regenerates the synonym. Use this option if the underlying object has been altered.

Data Management

Followed by these options, if applicable:

Recreate DBMS Table. Recreates the data source table. You are asked to confirm this selection before the table is regenerated. (Note that the table will be dropped and recreated. During the process, data may be lost.)

Delete All Data. Deletes all existing data. You are asked to confirm this selection before the data is deleted.

Drop Table. Drops the table so that it is removed from the DBMS.

Insert Sample Data. Inserts specified number of sample records, populating all fields with counter values.

Show/Modify Data. Opens a window that shows the data in the data source with buttons you can click to insert values, filter values, reload the data source, and customize the view.

Reorganize. Recreates the data source table preserving original data.

Note: This option is not available in the Web Console.

Impact Analysis

Generates a report showing where this synonym is stored and used, with links to the synonym instances. Impact Analysis reports enable you to evaluate changes before they are made by showing which components will be affected. See the Server Administration manual for details about Impact Analysis reports.

Dependencies Analysis

Generates a report showing information about the synonym and other synonyms and objects that are referenced within it.

Copy

Copies the synonym to the clipboard.

Delete

Deletes the synonym. You are asked to confirm this selection before the synonym is deleted.

Cut

Deletes the synonym and places it on the clipboard.

Privileges

Shows the security subjects on the server and the privileges they have to this synonym.

Properties

Displays the properties of the synonym, including physical location, last modified date, description, and privileges.


x
Reference: Using Default Field Names

The default field names that are used are taken from the generation names, if available, in the outline. Otherwise, they take the format

FIELDNAME=generationnumber_dimensionname						

where:

generationnumber

Is the generation number within the dimension (for example, GEN2).

dimensionname

Is the name of the dimension.

For example, if the outline has a SCENARIO dimension, the first field name would be FIELDNAME=Scenario to represent the highest generation, the second field name would be FIELDNAME=GEN2_SCENARIO, and so on down the dimension hierarchy. For an illustration, see Creating a Synonym.


x
Reference: Access File Keywords

Keyword

Description

SERVER

Essbase Server name.

DBNAME=database_name											

Indicates access to the specified database within an application.

APPLNAME=application_name 

Indicates access to the specified application, which can contain one or more databases.


x
Parent/Child Support

The parent/child view in the Master File enables you to make requests using a member without having to know the generation to which the member belongs. The fields that provide this functionality are:

DIMENSION_MEMBER

Is the declaration for the field that contains the dimension members. It represents members of product at all levels of the dimension.

DIMENSION_CAPTION

Is the declaration for the field that contains the label displayed on reports for DIMENSION_MEMBER (this is the Essbase alias).

DIMENSION_PARENT

Is the declaration for the field that contains the parent of DIMENSION_MEMBER.

DIMENSION_PARENTCAP

Is the declaration for the field that contains the label displayed on reports for DIMENSION_PARENT (this is the Essbase alias).

The following is a sample of the parent/child view in the Master File:

FIELDNAME=SCENARIO_MEMBER, ALIAS=Scenario, USAGE=A10, ACTUAL=A10,
      WITHIN='*Scenario2',
      PROPERTY=UID,  $
    FIELDNAME=SCENARIO_CAPTION, USAGE=A10, ACTUAL=A10,
      REFERENCE=SCENARIO_MEMBER, PROPERTY=CAPTION,  $
    FIELDNAME=SCENARIO_PARENT, USAGE=A10, ACTUAL=A10,
      REFERENCE=SCENARIO_MEMBER, PROPERTY=PARENT_OF,  $
    FIELDNAME=SCENARIO_PARENTCAP, USAGE=A10, ACTUAL=A10,
      REFERENCE=SCENARIO_MEMBER, PROPERTY=CAP_PARENT,  $


Example: Using the Parent/Child View in the Master File

In the first request, Actual is explicitly identified with the generation GEN2_SCENARIO:

TABLE FILE BASIC
PRINT DATA_VALUE
WHERE GEN2_SCENARIO EQ 'Actual'
END

In the second request, which takes advantage of a parent/child view, Actual is represented as a member of the Scenario dimension. It is not necessary to know which generation it falls under.

TABLE FILE BASIC
PRINT DATA_VALUE
WHERE SCENARIO_MEMBER EQ 'Actual'
END

Both requests yield the same output:

DATA_VALUE = 105,522.00

Top of page

x
Support for User-Defined Attributes

A User-Defined Attribute (UDA) in Essbase enables you to select and report on data based on a common characteristic. You can include UDAs in report requests. For each dimension with UDAs in an Essbase outline, synonym creation generates a UDA field name under a segment called UDA in the Master File.


Example: Reporting From a UDA Segment

The Sample Master File contains the following UDA segment:

$ DIMENSION: UDA
  SEGMENT=UDA, SEGTYPE=U, PARENT=BASIC, $
    FIELDNAME=MARKET_UDA, ALIAS=Market, USAGE=A13, ACTUAL=A13,
      REFERENCE=**Market, PROPERTY=UDA,  $

When referencing UDAs in a request, you must also reference a member of the dimension that contains the UDA. In this example, STATE is a member of the MARKET Dimension in the Master File.

TABLE FILE BASIC
PRINT DATA_VALUE BY STATE
WHERE MARKET_UDA EQ 'New Market'
END

The output displays the values only for the states that have the UDA 'New Market' as a common characteristic:

STATE      DATA_VALUE
---------  ----------
Colorado     7,227.00
Louisiana    2,992.00
Nevada       4,039.00

Top of page

x
Describing Attribute Dimensions in the Master File

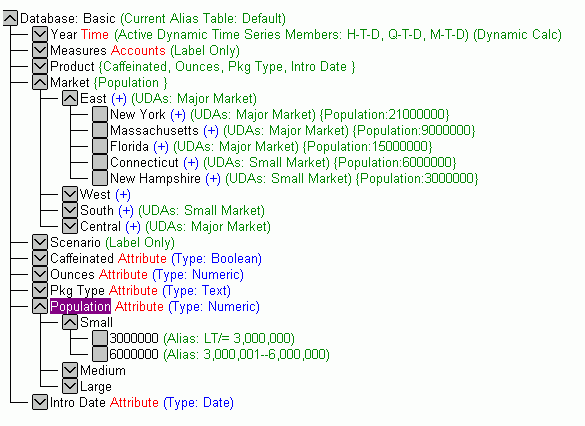
An attribute dimension is identified by the word Attribute, which appears next to the Dimension name in the Essbase outline. Attribute dimensions are usually associated with standard Essbase dimensions. For example, in the following outline, Population is an Attribute dimension associated with the standard dimension Market.

The standard dimension serves as the base dimension for the associated attribute dimensions.


Example: Generating Attribute Dimensions

Synonym creation generates a Master File that contains an ATTR (attribute) segment, which defines attribute tagged dimensions.

The following is a portion of the Master File BASIC. Notice that Market is the base dimension with which the attribute dimension Population is associated.

FILENAME=SAMPLE, SUFFIX=ESSBASE ,$
  SEGMENT=BASIC, SEGTYPE=S0, $
>.
>.
>.
$  DIMENSION: Market
 DIMENSION=Market,CAPTION=Market, $
  HIERARCHY=Market,CAPTION=Market Levels, 
     HRY_DIMENSION=Market,HRY_STRUCTURE=S, $
    FIELDNAME=MARKET, ALIAS='Gen1,Market', USAGE=A6, ACTUAL=A6,
      WITHIN='*Market', PROPERTY=UID,   $
    FIELDNAME=REGION, ALIAS=Region, USAGE=A7, ACTUAL=A7,
      WITHIN=MARKET,PROPERTY=UID, $
    FIELDNAME=STATE, ALIAS=State, USAGE=A13, ACTUAL=A13,
      WITHIN=REGION,PROPERTY=UID, $
  HIERARCHY=Market2,CAPTION=Market Parent-Child,
      HRY_DIMENSION=Market,HRY_STRUCTURE=R, $
    FIELDNAME=MARKET_MEMBER, ALIAS=Market, USAGE=A13, ACTUAL=A13,
      WITHIN='*Market2', PROPERTY=UID,  $
    FIELDNAME=MARKET_CAPTION, USAGE=A13, ACTUAL=A13,
      REFERENCE=MARKET_MEMBER, PROPERTY=CAPTION,  $
    FIELDNAME=MARKET_PARENT, USAGE=A13, ACTUAL=A13,
      REFERENCE=MARKET_MEMBER, PROPERTY=PARENT_OF,  $
    FIELDNAME=MARKET_PARENTCAP, USAGE=A13, ACTUAL=A13,
      REFERENCE=MARKET_MEMBER, PROPERTY=CAP_PARENT, $
.
.
.
  DIMENSION: ATTR
  SEGMENT=ATTR, SEGTYPE=U, PARENT=BASIC, $
    FIELDNAME=CAFFEINATED, ALIAS=Product, USAGE=A17, ACTUAL=A17,
      REFERENCE=SKU, PROPERTY=UDA,  $
    FIELDNAME=OUNCES, ALIAS=Product, USAGE=A9, ACTUAL=A9,
      REFERENCE=SKU, PROPERTY=UDA,  $
    FIELDNAME=PKG_TYPE, ALIAS=Product, USAGE=A8, ACTUAL=A8,
      REFERENCE=SKU, PROPERTY=UDA,  $
    FIELDNAME=POPULATION, ALIAS=Market, USAGE=A15, ACTUAL=A15,
      REFERENCE=STATE, PROPERTY=UDA,  $
    FIELDNAME=INTRO_DATE, ALIAS=Product, USAGE=A21, ACTUAL=A21,
      REFERENCE=SKU, PROPERTY=UDA,  $

The corresponding Access File contains any two-pass calculated members, as well as members with the following consolidation properties: (-0, (/), (*), (%). In addition, it contains the names of any shared dimension members. For an illustration, see Reporting Against Attribute Tagged Dimensions.

SEGNAME=BASIC, SERVER=edasol29, DBNAME=Basic, APPLNAME=Sample, $
 TIMEDIM=Year, $
 MEASURE=Measures, $
 MEMBER=COGS, AGGREGATE=NO, $
 MEMBER=TOTAL_EXPENSES, AGGREGATE=NO, $
 MEMBER=PROFIT_%, AGGREGATE=NO, $
 MEMBER=PROFIT_PER_OUNCE, AGGREGATE=NO, $
  SHARE=300-30, PARENT=Diet, DIM=Product, $
  SHARE=200-20, PARENT=Diet, DIM=Product, $
  SHARE=100-20, PARENT=Diet, DIM=Product, $

Example: Reporting Against Attribute Tagged Dimensions

This example uses data defined in the sample Master and Access Files in Generating Attribute Dimensions.

Note that using an Attribute Dimension as a BY field in a request is only supported with the MDX adapter (ENGINE ESSBASE SET MDX ON).

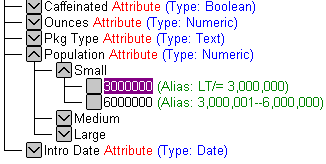
The following request references the Population attribute dimension in the ATTR segment of the Master File. The request also references a member of the Population attribute dimension, 3000000. Market is the base dimension for the Population attribute dimension.

The BY phrase in the request references STATE, which falls within the 3rd Generation (GEN=3) of the Market dimension. This reference is consistent with the following image in the Essbase outline.

The outline names the Base dimension (Market) and identifies the generation (GEN3) that you must reference within that Base dimension when you create an Essbase request using the specified member (3000000) of the Population attribute dimension.

TABLE FILE BASIC
PRINT DATA_VALUE
BY STATE 
WHERE POPULATION EQ '3000000' 
END

The output is:

STATE           DATA_VALUE
-------------   ----------
Iowa              9,061.00
Nevada            4,039.00
New Hampshire     1,125.00
New Mexico          330.00
Utah              3,155.00

The next request generates a message because the generation of the referenced field, REGION, falls within the 2nd generation of the base dimension, Market, as shown in the previous outline.

TABLE FILE BASIC
PRINT DATA_VALUE
BY REGION 
WHERE POPULATION EQ '3000000'
END

As a result, the request displays the following message:

(FOC43271) Small_3000000 is not an associated attribute of any requested 
column

Top of page

x
Describing Measure Groups in the Master File

How to:

Measure groups in Essbase can be represented in two ways to the server: as normal dimensions or as pseudo accounts dimensions. If they are to be described as normal dimensions, the synonym creation process generates field descriptions for the dimension. If you wish to describe them as pseudo accounts in order to generate the measure group in place of the accounts dimension segment, use the SET SCENARIO command. You must issue the SET SCENARIO command before the synonym is created.


x
Syntax: How to Generate a Measure Group

If you wish to generate the Scenario dimension to be used in place of the accounts dimension segment, issue

ENGINE ESSBASE SET SCENARIO DIM dimension_name [member_name|ALL] FOR synonym						

where:

dimension_name

Is the measure group name.

When used in the SET SCENARIO command, dimension_name is case-sensitive and must match the case in the Essbase outline.

member_name

Specifies a member name in the measure group to be used to generate a field for every measure intersection. When used in the SET SCENARIO command, member_name is case-sensitive and must match the case in the Essbase outline.

ALL

Indicates that all members of the measure group are used to generate the Master File. ALL is the default value.

synonym

Is the Master File name for one application.database combination.

Note: You can issue the SET SCENARIO command multiple times to specify that a number of members from the measure group be used in the generation of the Master File. Once this command has been issued, you can create a synonym to generate the Master File name.

For each Measure group/Accounts member intersection, a field is generated in the Master File. If this multiplicity effect causes the Master File that is generated to be invalid (due to the total length of the fields), synonym creation fails and displays the following message:

Total actual or usage exceeds 32768 To cut down,try SET SCENARIO

If you receive this message, you will need to issue fewer SET SCENARIO commands to limit the scope of the Master File with regard to the number of measure groups used.


Top of page

x
Describing the Measures Dimension in the Master File

How to:

Reference:

The SET MEASURE command enables you to set or change the Accounts tagged dimension without having to change the outline in the Essbase Database Server. With this setting, the adapter produces an actual field name for every member of the named dimension in the Master File rather than producing the dimension in terms of generations. You must issue the SET MEASURE command before the synonym is created.


x
Syntax: How to Set or Change the Measures Dimension in the Master File

To set the Accounts tag for a dimension, issue

ENGINE ESSBASE SET MEASURE dimension_name FOR synonym						

where:

dimension_name

Is the name of the dimension to be interpreted as an Accounts tagged dimension when generating a synonym.

Generates a Master File in which the Accounts Tagged dimension is represented as generations.

synonym

Is the Master File name for one application.database combination.


Example: Using the SET MEASURE Command

The following command displays the actual member names of the measure group (for ACTUAL, BUDGET, or VARIANCE), rather than displaying fields like SCENARIO or GEN2_SCENARIO, in the Master File.

ENGINE ESSBASE SET MEASURE Scenario FOR SAMPLE


x
Reference: Limiting the Number of Fields in a Master File

SET MEASURE can be set to NONE. With this setting, all of the dimensions are interpreted as non-Accounts dimensions in the Master File and represented as generations.

In addition, a segment called DATA is added to the Master File. This segment contains a field called DATA_VALUE, which enables you to display the values of the Measures dimension although the actual member names are not present in the Master File.


x
Syntax: How to Limit the Number of Fields in a Master File
ENGINE ESSBASE SET MEASURE NONE FOR SAMPLE

where:

NONE

Generates a Master File in which the Accounts tagged dimension is represented as generations.


Example: Reporting Against a Master File With a Limited Number of Fields

If SET MEASURE has been set to NONE, you can display the values of the Measures dimension although the actual member names are not present in the Master File. The following is a sample DATA segment, which includes the field DATA_VALUE, against which you can report.

$  DIMENSION: DATA
  SEGMENT=DATA, SEGTYPE=U, PARENT=BASIC, $
    FIELDNAME=DATA_VALUE, ALIAS=DATA_VALUE, USAGE=D20.2, ACTUAL=D8,
      MISSING=ON, TITLE='DATA_VALUE', $
TABLE FILE BASIC
PRINT DATA_VALUE
BY PRODUCT
END

The output is:

PRODUCT             DATA_VALUE $
-------------       -------------------
Product             105,522.00

Top of page

x
Changing the Default Usage Format of the Accounts Dimension

How to:

All dimension descriptions in the Master File, except for the accounts dimension, have the USAGE format of alphanumeric. The default format of the accounts dimension is D20.2. You can change this default using the SET CONVERSION command.


x
Syntax: How to Change the Default Usage Format of the Accounts Dimension
ESSBASE SET CONVERSION format PRECISION n m						

where:

format

Possible values are:

FLOAT which indicates that the command applies only to double precision floating point columns.

DECIMAL which indicates that the command applies only to decimal columns.

n

Is the precision. It must be a valid number representing the maximum value for precision for the data type.

m

Is a valid number representing the maximum value for scale for the data type.

If you do not specify a value for scale, the current scale setting remains in effect. If the scale is not required, you must set m to 0 (zero).


WebFOCUS