Sampling consists of the following steps, each of which
will be described in detail:
- Selecting
the sampling technique to be executed:
- Random
- Numeric Stratified
- Categorical
Stratified
- Defining the
sampling parameters. For each of the sampling techniques, identify the
population size to be sampled and then use either of two available
modes to determine the optimal sample size:
-
Calculate Sample Size. Define
values for the factors in determining the sample size in a sample
calculator to automatically determine the recommended sample size.
-
Specify Sample Size. Enter
a fixed population or sample size to be used in the extract calculations.
- Executing
the report.
To confirm the number of records included in the sample
extract, you can run the procedure with the Message Viewer on. This
provides both the selected output and the messages confirming the
sample that was extracted. For information on how to turn the Message
Viewer on, see How to Set Message Viewer On.
x
Procedure: How to Extract a Sample Using Random Sampling in App Studio
To extract
a sample using random sampling functionality:
-
In the Report
canvas, add the fields to be included in the sample extract.
-
On the Modeling
tab, in the Modeling group, click Sampling.
The Sampling dialog box opens.
-
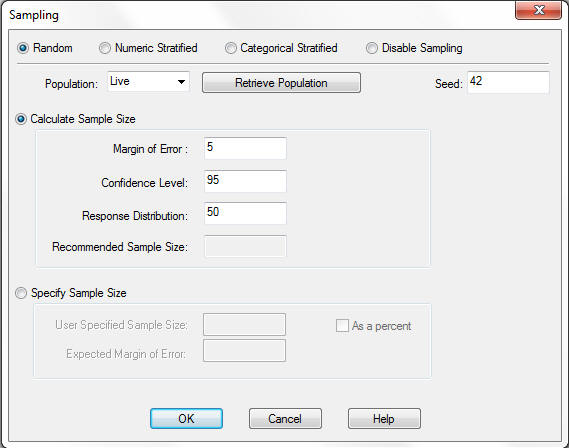
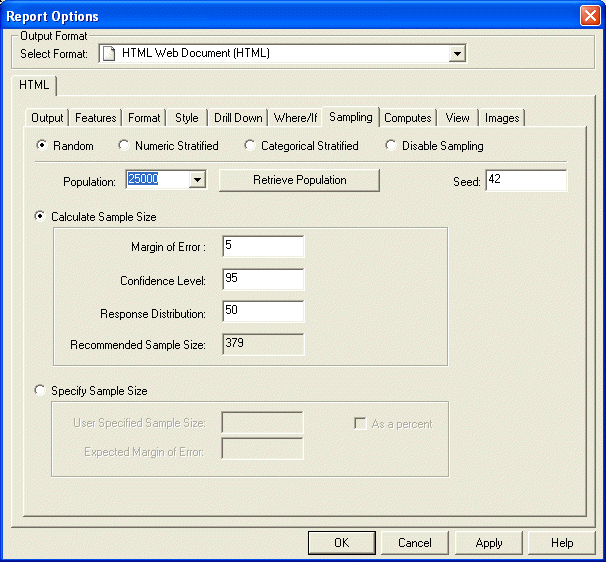
Select the Random radio
button for the sampling technique, as shown in the following image.
-
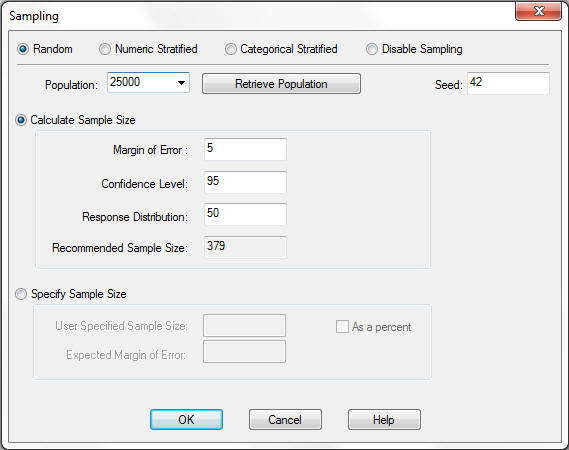
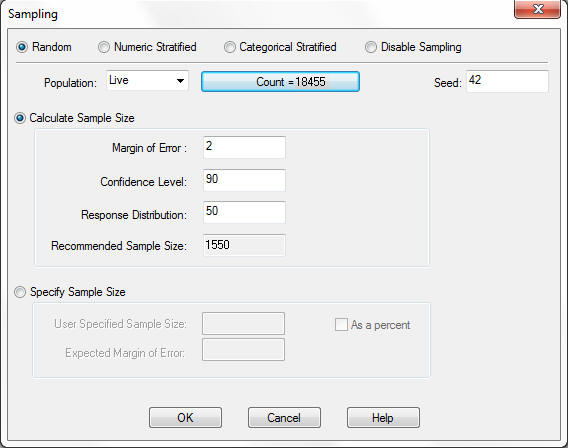
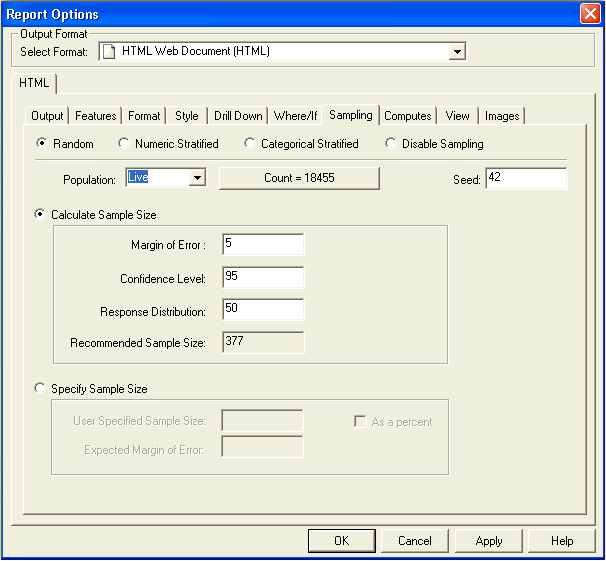
Identify
the population size by clicking the Retrieve Population button
to retrieve the current total record count. The current record count
will be displayed on the retrieve button, as shown in the image
below. The sample size within the calculator will automatically
be updated with the recommended sample size for the population size
based on the defined margin of error, confidence level, and response
distribution.

-
Using the
Population drop-down list, define which population will be used
to determine the sample size.
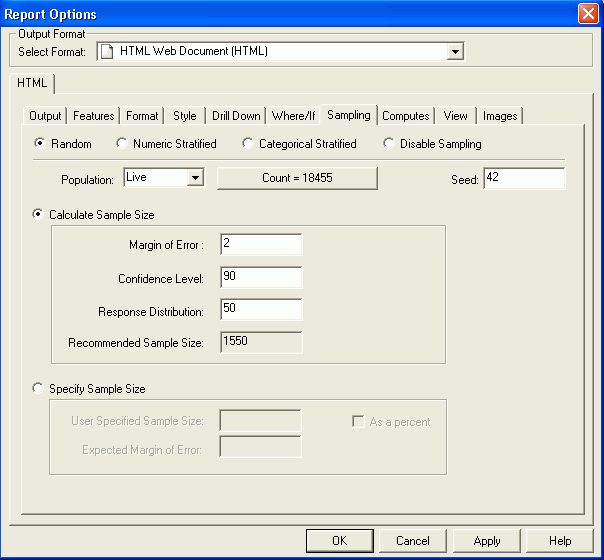
-
Live. Select Live from
the Population drop-down list to cause the total record count to
be recalculated at run time. Live is the default value.
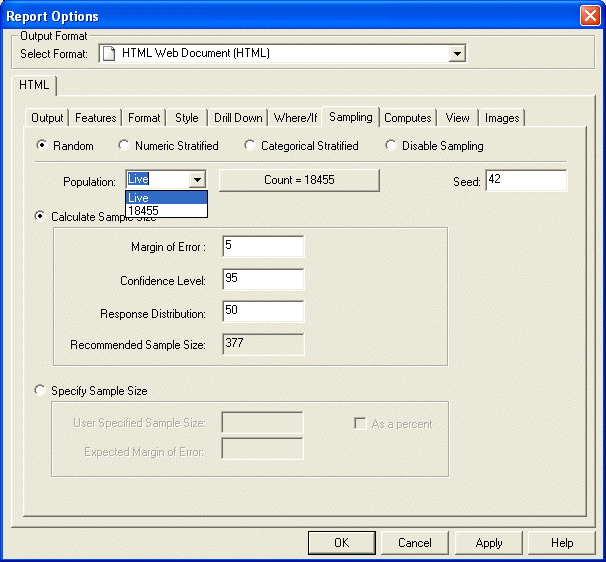
-
Design-Time Count. When
you retrieve the population size during design time using the Retrieve
Population button, the value identified is added to the population
drop-down list. You can select this as your population size for
the run-time execution. Use this if you are certain the population
will not change between executions or if an estimate is sufficient
for your circumstances.
-
User-defined Count. Enter
any value for population by typing a numeric value into the Population
list box. Note that the Recommended Sample Size automatically updates
as you type new values for the population size, as shown in the
image below.
-
Define the
seed value by using the default seed value or by typing a new value
into the Seed input box to be used to generate the random sample.
-
Select how
the sample size will be defined by selecting one of the following
options:
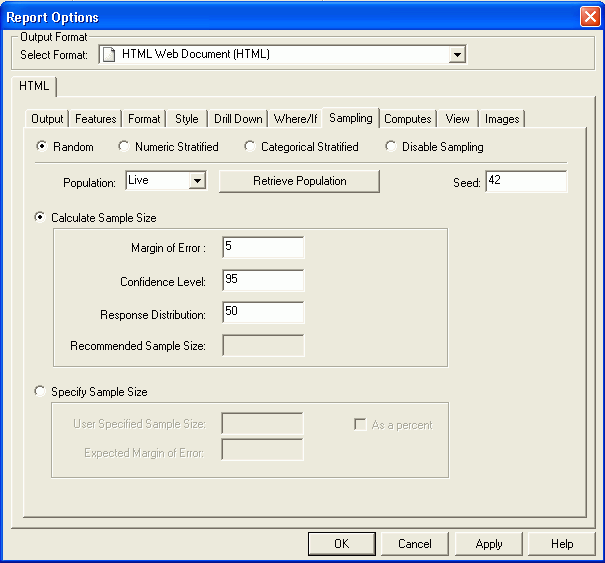
Calculate Sample Size
-
Click the Calculate Sample Size radio
button to activate the sample calculator.
-
Use the provided default values or type new values for:
- Margin of Error (default
value is 5).
- Confidence Level
(default value is 95).
- Response Distribution
(default value is 50).
The Recommended Sample Size will
be calculated and displayed, as shown in the image below.
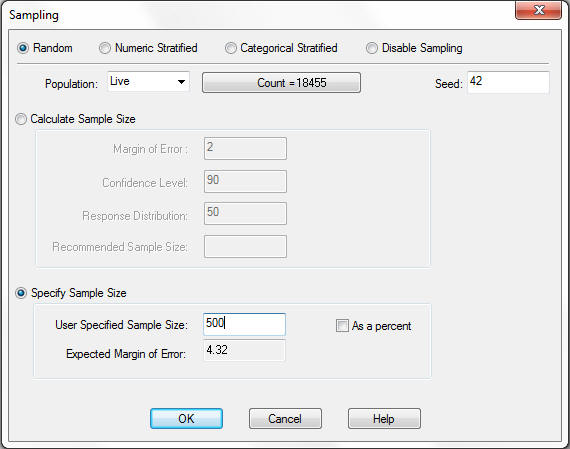
Specify Sample Size
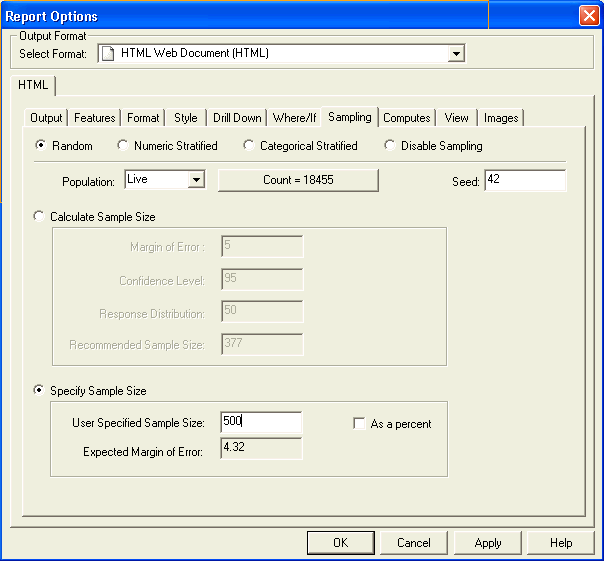
Click the Specify
Sample Size radio button to specify a user-defined sample
size.
- To specify the sample
size as a count, type a numeric value into the User Specified Sample
Size input box.
The Expected Margin of Error, based on the identified
Population size and your specified Sample size, will be displayed,
as shown in the image below.
- To specify the sample
size as a percent, click the As a percent check
box, and enter the User Specified Sample Size as a number between
1 and 100 to represent the percentage of the overall population to
be used as the sample.
The Expected Margin of Error based on the
identified Population size and your specified Sample size will be
displayed.
-
To execute
the extraction with the defined random sampling, close the Sampling
dialog box by clicking OK and run the report.
x
Procedure: How to Extract a Sample Using Random Sampling in Developer Studio
To
extract a sample using random sampling functionality:
-
Using Report Painter, add the fields to be included in the sample
extract to the Report Painter window.
-
Either select Sampling from the Report
menu or click the Options button on the output
format toolbar.
- If you choose Sampling from
the Report menu, the Report Options dialog box opens to the Sampling
tab.
- If you click
the Options button on the output format toolbar,
the Report Options dialog box opens to the Output tab and you need
to select the Sampling tab.
-
Select the Random radio button for the sampling
technique, as shown in the following image.
-
Identify the population size by clicking the Retrieve Population button
to retrieve the current total record count. The current record count
will be displayed on the retrieve button, as shown in the image
below. The sample size within the calculator will automatically
be updated with the recommended sample size for the population size
based on the defined margin of error, confidence level, and response
distribution.
-
Using the Population drop-down list, define which population
will be used to determine the sample size.
-
Live. Select Live from
the Population drop-down list to cause the total record count to
be recalculated at run time. Live is the default value.
-
Design-Time Count. When
you retrieve the population size during design time using the Retrieve
Population button, the value identified is added to the population
drop-down list, as shown in the following image. You can select
this as your population size for the run-time execution. Use this
if you are certain the population will not change between executions
or if an estimate is sufficient for your circumstances.
-
User-defined Count. Enter
any value for population by typing a numeric value into the Population
list box. Note that the Recommended Sample Size automatically updates
as you type new values for the population size, as shown in the
image below.
-
Define the seed value by using the default seed value or by
typing a new value into the Seed input box to be used to generate
the random sample.
-
Select how the sample size will be defined by selecting one
of the following options:
Calculate Sample Size
-
Click the Calculate Sample Size radio
button to activate the sample calculator.
-
Use the provided default values or type new values for:
- Margin of
Error (default value is 5).
- Confidence
Level (default value is 95).
- Response Distribution
(default value is 50).
The Recommended Sample Size will
be calculated and displayed, as shown in the image below.
Specify Sample Size
Click the Specify
Sample Size radio button to specify a user-defined sample
size.
- To specify
the sample size as a count, type a numeric value into the User Specified
Sample Size input box.
The Expected Margin of Error, based on
the identified Population size and your specified Sample size, will
be displayed, as shown in the image below.
- To specify
the sample size as a percent, click the As a percent check
box, and enter the User Specified Sample Size as a number between
1 and 100 to represent the percentage of the overall population to
be used as the sample.
The Expected Margin of Error based on the
identified Population size and your specified Sample size will be
displayed.
-
To execute the extraction with the defined random sampling,
close the Sampling dialog box by clicking OK and
run the report.
x
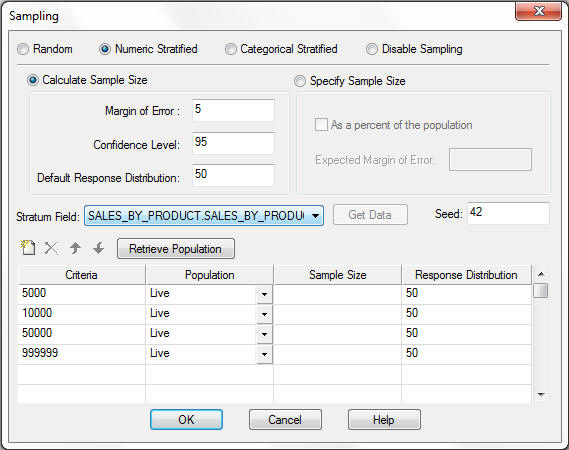
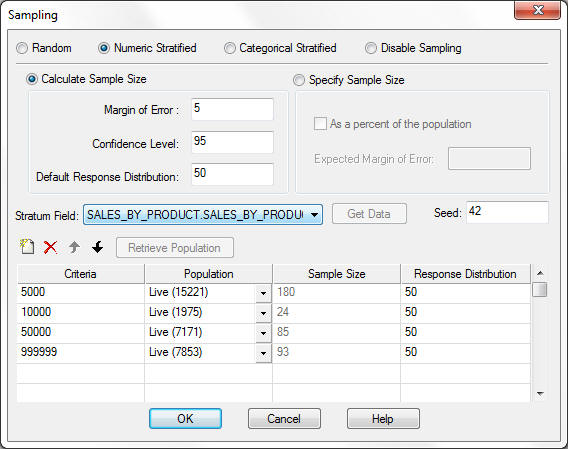
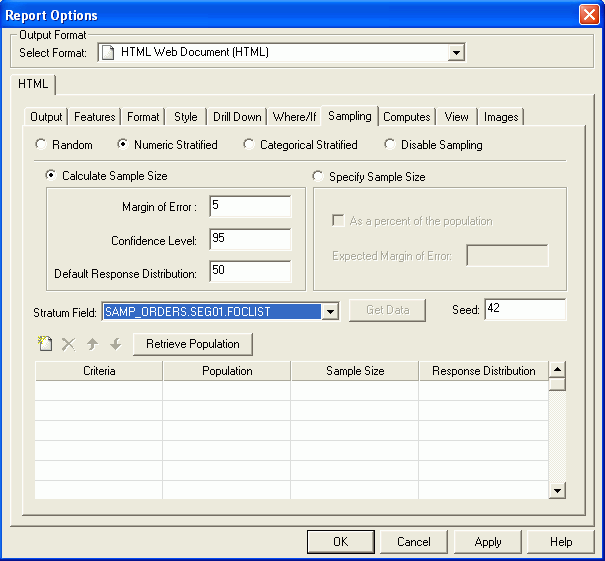
Procedure: How to Extract a Sample Using Numeric Stratified Sampling in App Studio
To extract
a sample using numeric stratified sampling based on user-defined
ranges of a numeric field within the data:
-
In the Report
canvas, add the fields to be included in the sample extract.
-
On the Modeling
tab, in the Modeling group, click Sampling.
The Sampling dialog box opens.
-
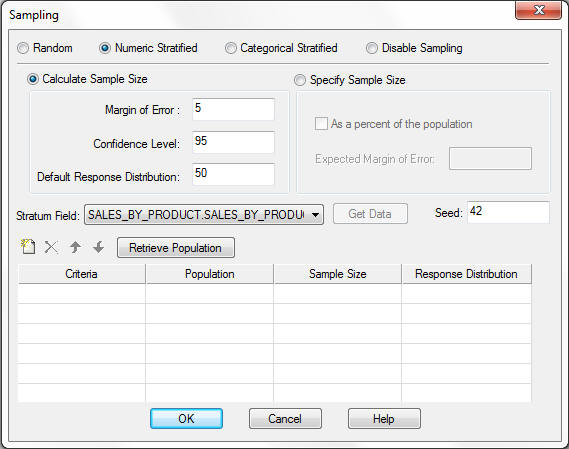
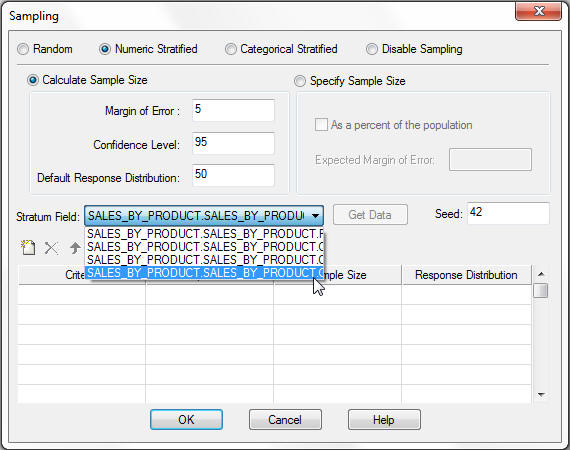
Select
the Numeric Stratified radio button for the
sampling technique, as shown in the image below.
-
From the
list of available numeric fields in the current report, select the field
to be used to define the stratum criteria, as shown in the following
image.
Each
stratum or group is defined by the upper limit for the data value
of the current field. Strata are selected in the order they are
defined. Therefore, the criteria must be entered in ascending order.
In the example below, we will divide our population into four strata
based on the values for Profit.
|
Strata
|
Criteria Value Entered
|
Who Qualifies
|
|---|
|
Stratum 1
|
5000
|
-∞ Profit ≤ 5000
|
|
Stratum 2
|
10000
|
5000 < Profit ≤ 10000
|
|
Stratum 3
|
50000
|
10000 < Profit ≤ 50000
|
|
Stratum 4
|
999999
|
50000 < Profit ≤ 999999
|
Note:
- Numeric strata criteria
must be entered in ascending order to return the correct results.
- Any data values that
fall outside of the defined criteria ranges will not be included in
the sample selection.
-
Use the
strata toolbar to manage your strata criteria. The strata toolbar is
shown in the following image:
-
Once your
strata are defined, click the Retrieve Population button
to identify the record count and calculate the recommended sample
size for each defined stratum, as shown in the following image.
-
For each
stratum, you can choose from the following options to define the
overall population from which to select your sample.
-
Live. Select
Live from the population drop-down list to cause the record count
to be recalculated at run time. Live is the default value.
-
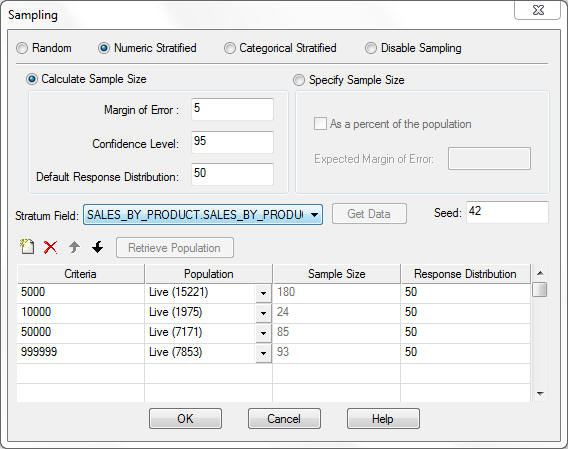
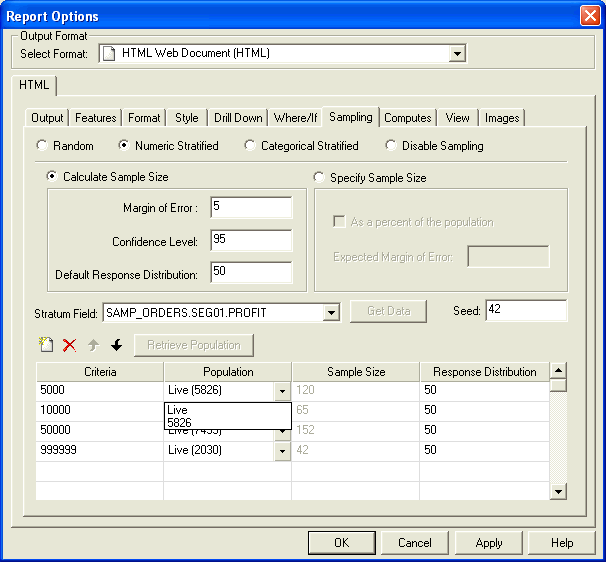
Design-Time Count. When
you retrieve the population size during design time using the Retrieve
Population button, the value identified is added to the population
drop-down list, as shown in the following image. You can select
this as your population size for the run-time execution. Use this
if you are certain the population will not change between executions
or if an estimate is sufficient for your circumstances.
-
User-defined Count. Enter
any value for population by typing a numeric value into the Population
list box. Note that the Recommended Sample Size automatically updates
as you type new values for the population size.
-
Select how
the sample size will be defined by selecting one of the following
options:
Calculate Sample Size
-
Click the Calculate Sample Size radio
button to activate the sample calculator. By default, the Calculate
Sample Size radio button is selected and the sample calculator is active.
-
Use the provided default values or type new values for:
The Recommended Sample Size will be calculated
and displayed, as shown in the image below.
Specify Sample Size
Click the Specify
Sample Size radio button, as shown in the following
image.
By default, each of the stratum sample sizes is set
to the value of 1, which is the minimum value allowed.
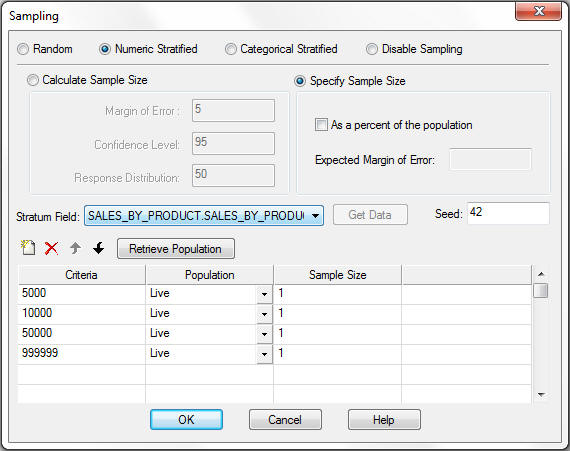
The
sample size can be specified as a count or as a percentage of each
stratum population.
- To specify the sample
size as a count, type a numeric value into the Sample Size cell
in the Strata grid for each stratum in your sample, as shown in
the following image.

- To specify the sample
size as a percent, click the As a percent of the population check
box. Within the Stratum grid, type a numeric value between 0 and
100 to represent the percentage of the total records in the current stratum
that should be included. This number should represent the proportion
of the individual stratum, not the overall population.
Note: Click
the Retrieve Population button to refresh
and calculate the Expected Margin of Error based on the identified
Population size and your overall strata sample sizes.
-
To execute
the extraction with the defined Numeric Stratified Sampling, close
the Sampling dialog box by clicking OK and
run the report.
x
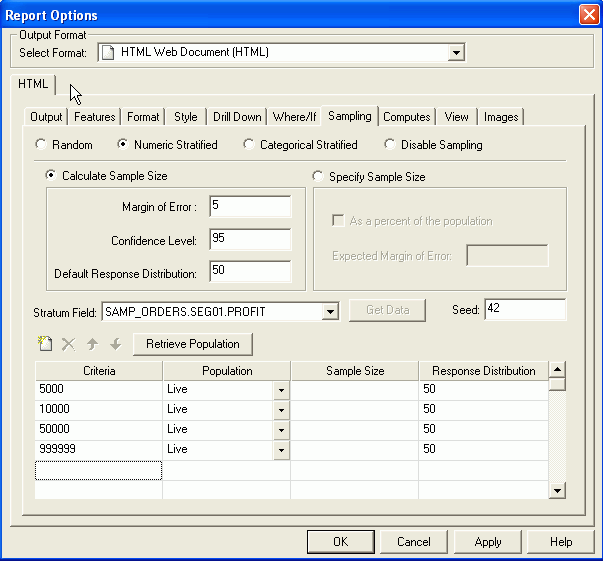
Procedure: How to Extract a Sample Using Numeric Stratified Sampling in Developer Studio
To extract
a sample using numeric stratified sampling based on user-defined
ranges of a numeric field within the data:
-
Using Report Painter, add the fields to be included in the sample
extract to the Report Painter window. Be sure that the field you
will be using to define the strata is included in the report.
-
Either select Sampling from the Report
menu or click the Options button on the output
format toolbar.
- If you choose Sampling from
the Report menu, the Report Options dialog box opens to the Sampling
tab.
- If you click
the Options button on the output format toolbar,
the Report Options dialog box opens to the Output tab and you need
to select the Sampling tab.
-
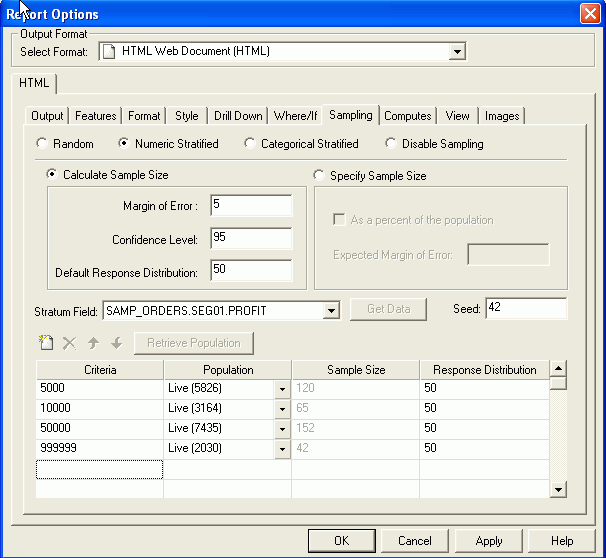
Select the Numeric Stratified radio
button for the sampling technique, as shown in the image below.
-
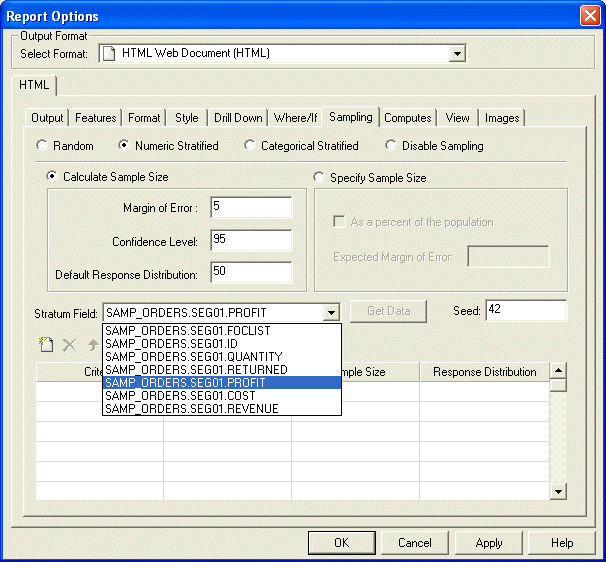
From the list of available numeric fields in the current report,
select the field to be used to define the stratum criteria, as shown
in the following image.
Each
stratum or group is defined by the upper limit for the data value
of the current field. Strata are selected in the order they are
defined. Therefore, the criteria must be entered in ascending order.
In the example below, we will divide our population into four strata
based on the values for Profit.
|
Strata
|
Criteria Value Entered
|
Who Qualifies
|
|---|
|
Stratum 1
|
5000
|
-∞ Profit ≤ 5000
|
|
Stratum 2
|
10000
|
5000 < Profit ≤ 10000
|
|
Stratum 3
|
50000
|
10000 < Profit ≤ 50000
|
|
Stratum 4
|
999999
|
50000 < Profit ≤ 999999
|
Note:
- Numeric strata
criteria must be entered in ascending order to return the correct
results.
- Any data values
that fall outside of the defined criteria ranges will not be included in
the sample selection.
-
Use the strata toolbar to manage your strata criteria. The
strata toolbar is shown in the following image:
-
Once your strata are defined, click the Retrieve Population button
to identify the record count and calculate the recommended sample
size for each defined stratum, as shown in the following image.
-
For each stratum, you can choose from the following options
to define the overall population from which to select your sample.
-
Live.
Select Live from the population drop-down list to cause the record
count to be recalculated at run time. Live is the default value.
-
Design-Time Count. When
you retrieve the population size during design time using the Retrieve
Population button, the value identified is added to the population
drop-down list, as shown in the following image. You can select
this as your population size for the run-time execution. Use this
if you are certain the population will not change between executions
or if an estimate is sufficient for your circumstances.
-
User-defined Count. Enter
any value for population by typing a numeric value into the Population
list box. Note that the Recommended Sample Size automatically updates
as you type new values for the population size.
-
Select how the sample size will be defined by selecting one
of the following options:
Calculate Sample Size
-
Click the Calculate Sample Size radio
button to activate the sample calculator. By default, the Calculate
Sample Size radio button is selected and the sample calculator is active.
-
Use the provided default values or type new values for:
The Recommended Sample Size will be calculated
and displayed, as shown in the image below.
Specify Sample Size
Click the Specify
Sample Size radio button, as shown in the following
image.
By default, each of the stratum sample sizes is set
to the value of 1, which is the minimum value allowed.
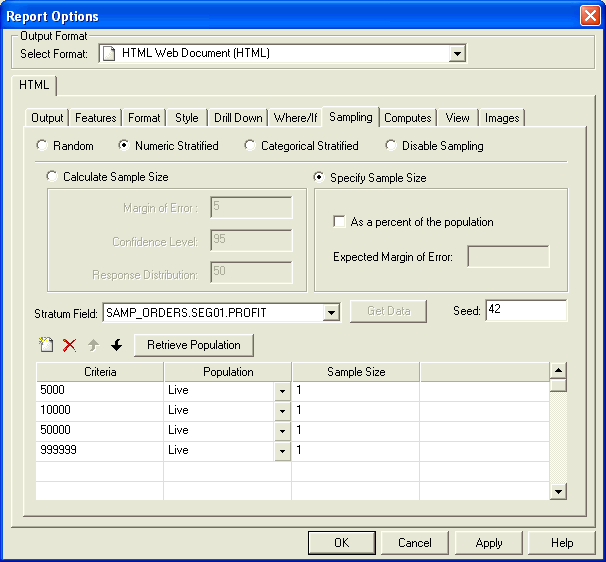
The
sample size can be specified as a count or as a percentage of each
stratum population.
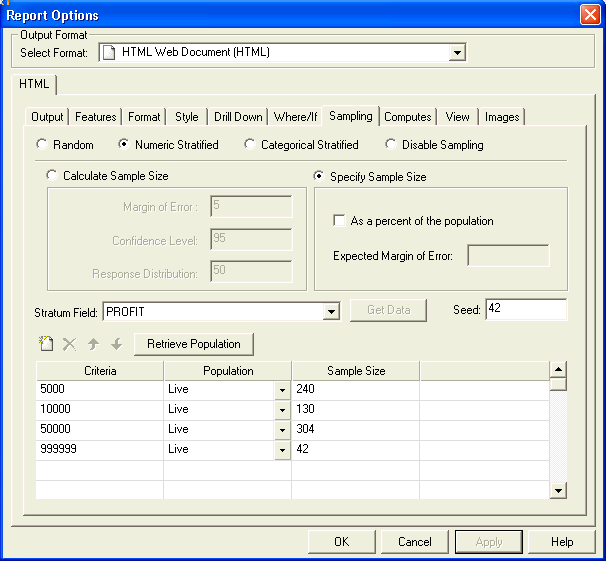
- To specify
the sample size as a count, type a numeric value into the Sample
Size cell in the Strata grid for each stratum in your sample, as
shown in the following image.
- To specify
the sample size as a percent, click the As a percent
of the population check box. Within the Stratum grid,
type a numeric value between 0 and 100 to represent the percentage
of the total records in the current stratum that should be included.
This number should represent the proportion of the individual stratum,
not the overall population.
Note: Click the Retrieve
Population button to refresh and calculate the Expected
Margin of Error based on the identified Population size and your
overall strata sample sizes.
-
To execute the extraction with the defined Numeric Stratified
Sampling, close the Sampling dialog box by clicking OK and
run the report.
x
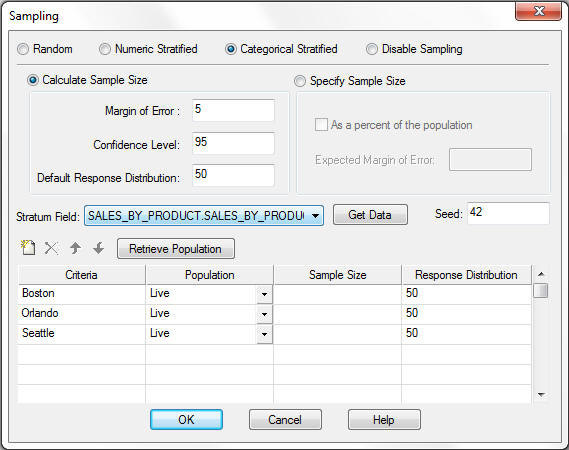
Procedure: How to Extract a Sample Using Categorical Stratified Sampling in App Studio
To extract
a sample using categorical stratified sampling based on alphanumeric
categories within the data:
-
In the Report
canvas, add the fields to be included in the sample extract.
-
On the Modeling
tab, in the Modeling group, click Sampling.
The Sampling dialog box opens.
-
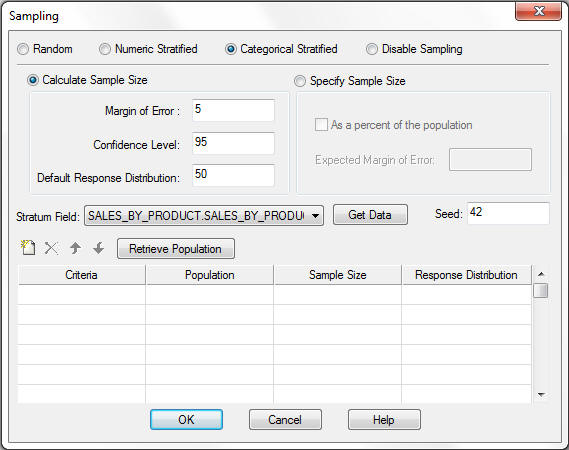
Select the Categorical
Stratified radio button for the sampling technique,
as shown in the following image.
-
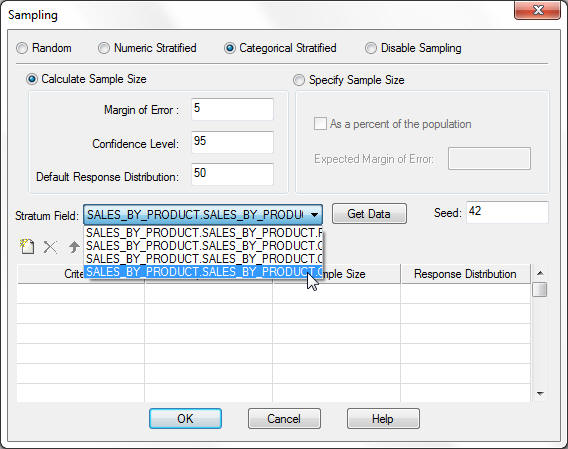
From the
list of available fields in the current report, select the field
to be used to define the stratum criteria.
Note that all fields (character and numeric) that you selected
for your report are available within the Stratum Field drop-down
list.
-
Click the Get
Data button to retrieve the values of the field selected.
This retrieves all available values for your stratum field and makes them
available for selection as your stratum criteria.
-
Use the
strata toolbar to manage your strata criteria. The strata toolbar is
shown in the following image:
-
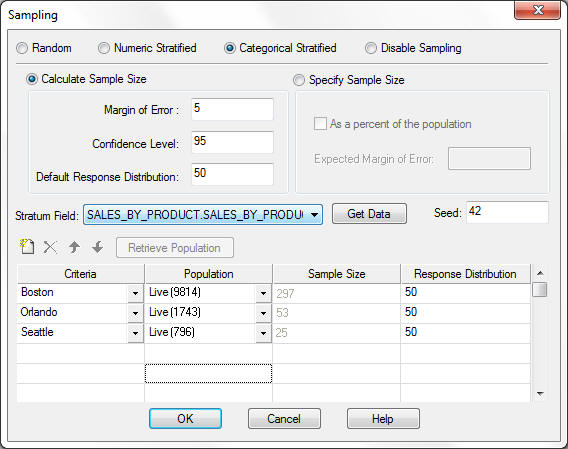
Click the Retrieve
Population button to identify the record count and calculate
the Recommended Sample Size for each defined stratum.
-
For each
stratum, you can choose from the following options to define the
population to use to extract your sample.
-
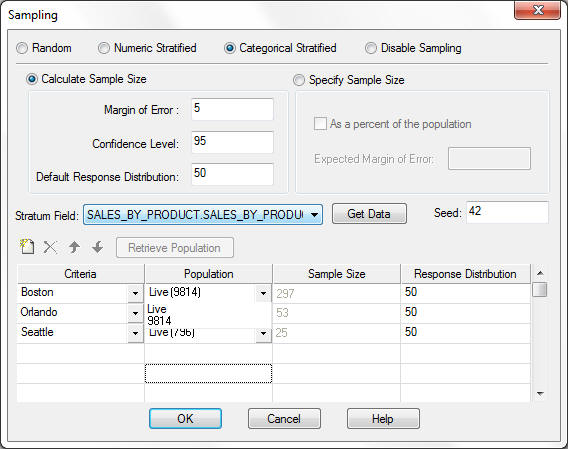
Live. Select Live from
the population drop-down list to recalculate the record count at
run time. Live is the default value.
-
Design-Time Count. When
you retrieve the population size during design time using the Retrieve
Population button, the value identified is added to the population
drop-down list, as shown in the following image. You can select
this as your population size for the run-time execution. Use this
if you are certain the population will not change between executions
or if an estimate is sufficient for your circumstances.
-
User-defined Count. Enter
any value for population by typing a numeric value into the Population
list box. Note that the Recommended Sample Size automatically updates
as you type new values for the population size.
-
Select how
the sample size will be defined by selecting one of the following
options:
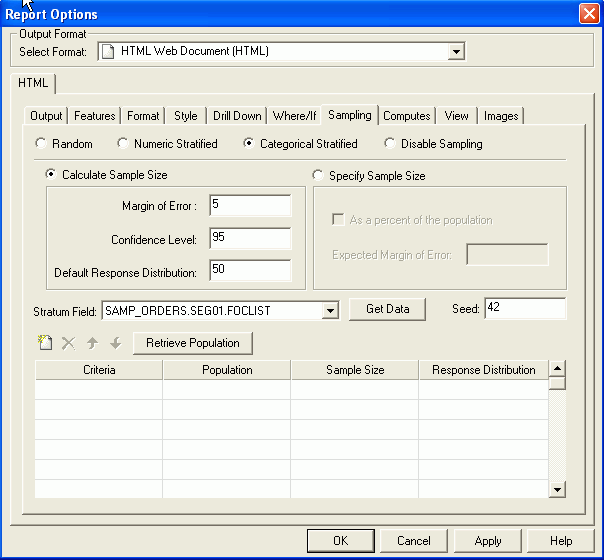
Calculate Sample Size
-
Click the Calculate Sample Size radio
button to activate the sample calculator. By default, the Calculate
Sample Size radio button is selected and the sample calculator is
active.
-
Use the provided default values or type new values for:
The Recommended Sample Size will be calculated
and displayed, as shown in the image below.
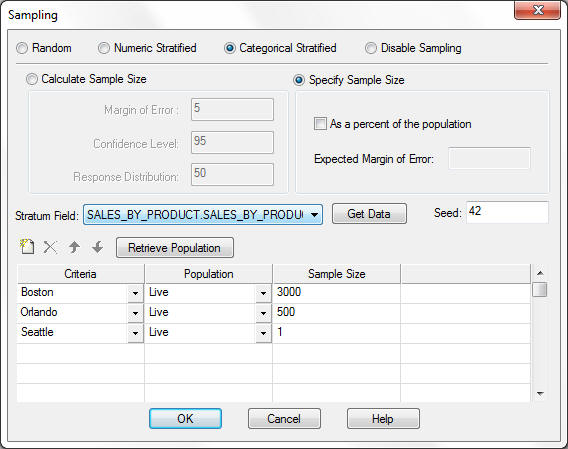
Specify Sample Size
Select the Specify
Sample Size radio button, as shown in the following
image.
By default, each of the stratum sample sizes is set
to the value of 1, which is the minimum value allowed.
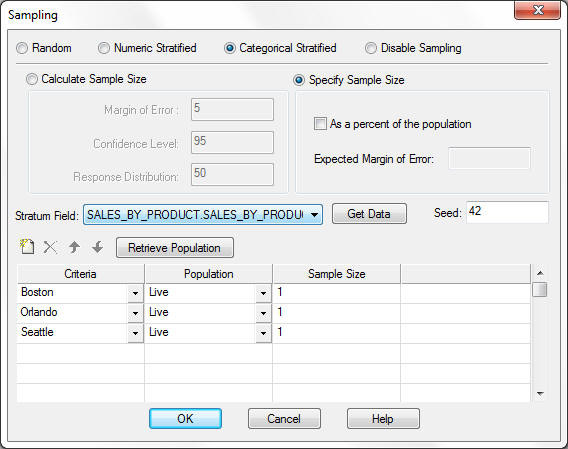
The
sample size can be specified as a count or as a percentage of the
overall population.
-
To execute
the extraction with the defined Numeric Stratified Sampling, close
the Sampling dialog box by clicking OK and
run the report.
x
Procedure: How to Extract a Sample Using Categorical Stratified Sampling in Developer Studio
To extract
a sample using categorical stratified sampling based on alphanumeric
categories within the data:
-
Using Report Painter, add the fields to be included in the sample
extract to the Report Painter window. Be sure that the field you
will be using to define the stratum is included in the report.
-
Either select Sampling from the Report
menu or click the Options button on the output
format toolbar.
- If you choose Sampling from
the Report menu, the Report Options dialog box opens to the Sampling
tab.
- If you click
the Options button on the output format toolbar,
the Report Options dialog box opens to the Output tab and you need
to select the Sampling tab.
-
Select the Categorical Stratified radio
button for the sampling technique, as shown in the following image.
-
From the list of available fields in the current report, select
the field to be used to define the stratum criteria.
Note that all fields (character and numeric) that you selected
for your report are available within the Stratum Field drop-down
list, as shown in the following image.
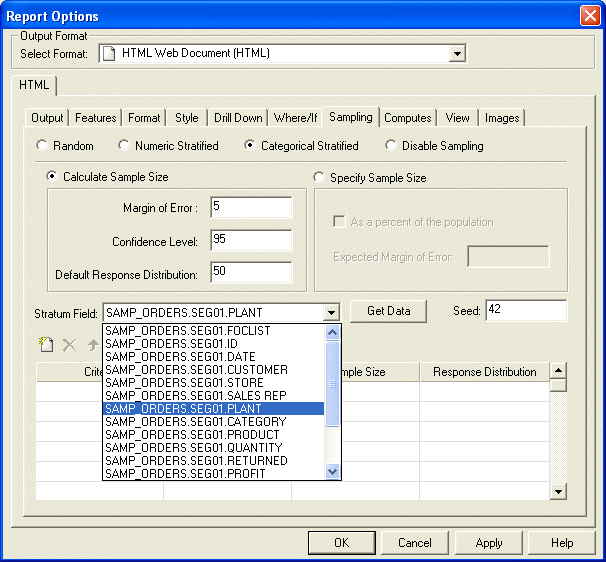
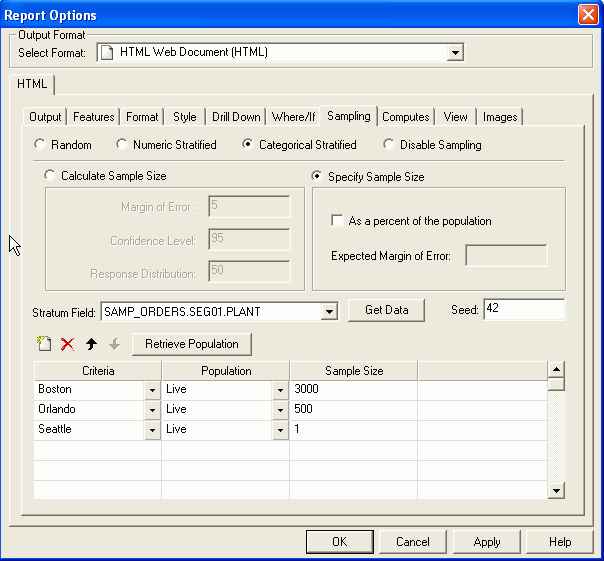
The
image below shows that the Plant field was selected to be used to
define the stratum criteria.
-
Click the Get Data button to retrieve
the values of the field selected. This retrieves all available values
for your stratum field and makes them available for selection as
your stratum criteria.
-
Use the strata toolbar to manage your strata criteria. The
strata toolbar is shown in the following image:
-
Click the Retrieve Population button
to identify the record count and calculate the Recommended Sample
Size for each defined stratum, as shown in the following image.
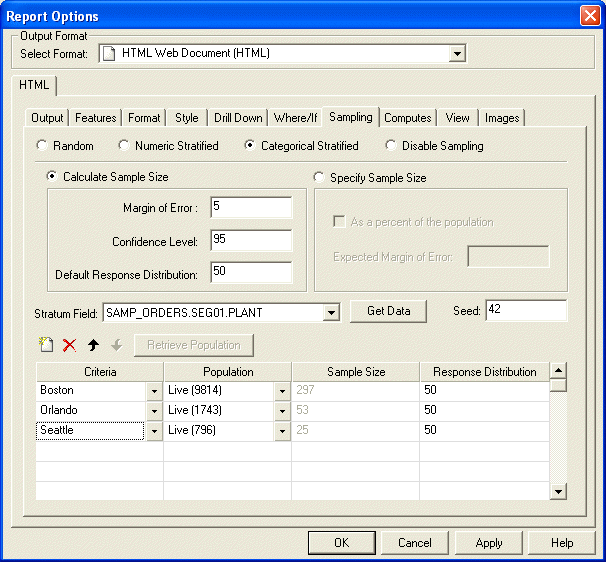
-
For each stratum, you can choose from the following options
to define the population to use to extract your sample.
-
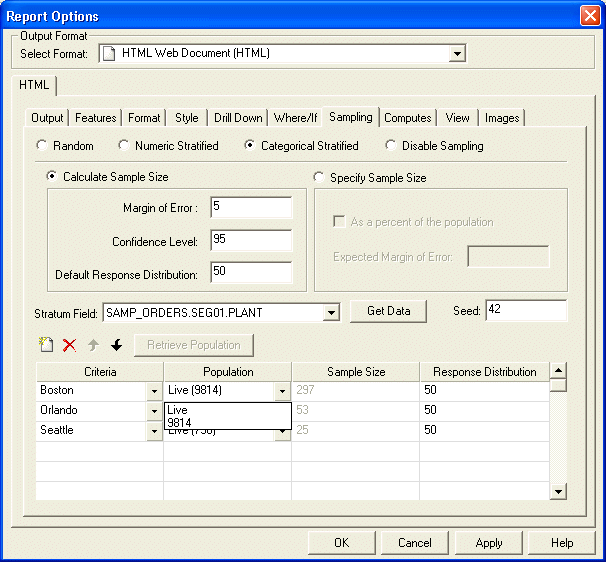
Live. Select Live from
the population drop-down list to recalculate the record count at
run time. Live is the default value.
-
Design-Time Count. When
you retrieve the population size during design time using the Retrieve
Population button, the value identified is added to the population
drop-down list, as shown in the following image. You can select
this as your population size for the run-time execution. Use this
if you are certain the population will not change between executions
or if an estimate is sufficient for your circumstances.
-
User-defined Count. Enter
any value for population by typing a numeric value into the Population
list box. Note that the Recommended Sample Size automatically updates
as you type new values for the population size.
-
Select how the sample size will be defined by selecting one
of the following options:
Calculate Sample Size
-
Click the Calculate Sample Size radio
button to activate the sample calculator. By default, the Calculate
Sample Size radio button is selected and the sample calculator is
active.
-
Use the provided default values or type new values for:
The Recommended Sample Size will be calculated
and displayed, as shown in the image below.
Specify Sample Size
Select the Specify
Sample Size radio button, as shown in the following
image.
By default, each of the stratum sample sizes is set
to the value of 1, which is the minimum value allowed.
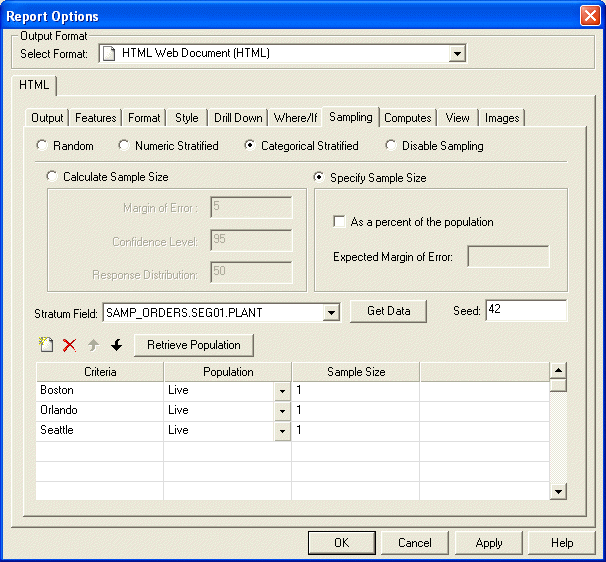
The
sample size can be specified as a count or as a percentage of the
overall population.
-
To execute the extraction with the defined Numeric Stratified
Sampling, close the Sampling dialog box by clicking OK and
run the report.
x
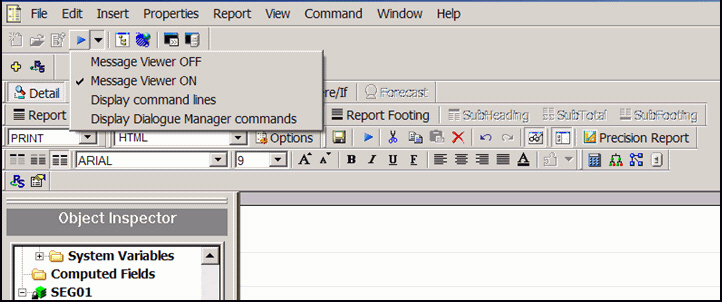
Procedure: How to Set Message Viewer On
To
confirm the number of records included in the sampled extract, you
can run the procedure with the Message Viewer on. This provides
both the selected output and the messages confirming the sample
that was extracted.
In App Studio, select Message Viewer ON
from the Run menu within the Application menu, as shown in the following
image.
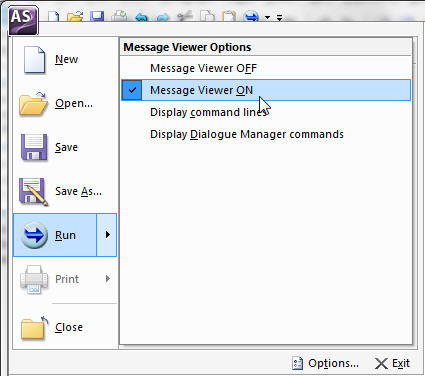
In
Developer Studio, select Message Viewer ON from the Run drop-down
menu, as shown in the following image.
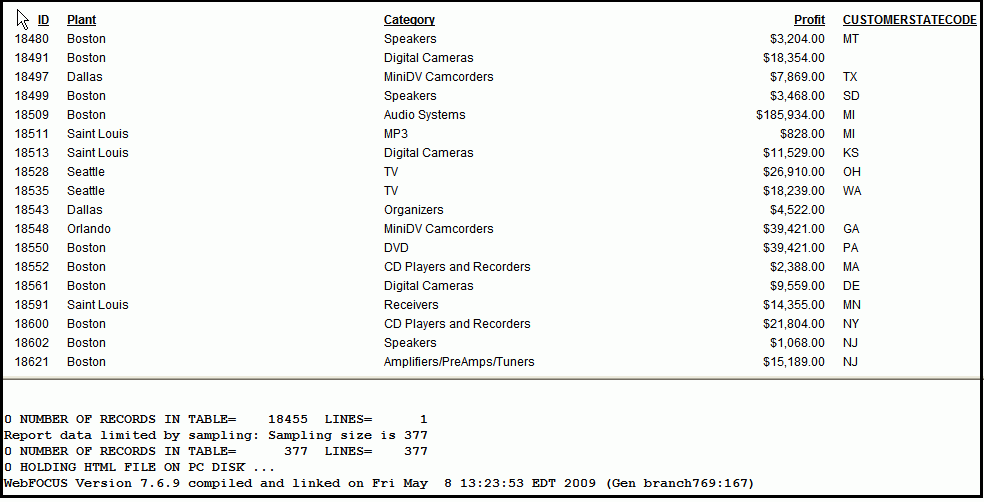
This
provides both the selected output and the messages confirming the
sample that was extracted.
The image below shows the output
from the random sample defined in How to Extract a Sample Using Random Sampling in Developer Studio.
x
Procedure: How to Disable Sampling
By
default, sampling is set to disabled. To select a sampling technique,
change the state of the Sampling radio button.
Important: To remove sampling
definitions that you have previously defined, change the Sampling
technique back to Disable Sampling. The current
sampling definitions are retained in the current procedure (fex),
until you save the procedure, but not used during report execution.
Once you save a procedure with sampling disabled, any previously
defined settings are removed.