You can apply custom styling to specific areas of a
report. When creating a report in InfoAssist, you can perform the
following styling customization.
x
Procedure: How to Perform Field-Level Styling in a Report
You
can style data, column titles, or both, in the report output for
the selected data source field.
-
Create a
report.
-
In the Query Design pane, select a data source field.
The Field tab appears on the ribbon.
-
In the Style group, click one of the following:
-
Data Style. Styles
only the data for the selected data source field.
-
Title Style. Styles
only the column title for the selected data source field.
-
Data + Title. Styles
both the data and the column title for the selected data source
field.
-
Select any of the following styling options that are available
in the Style group.
-
Font. Opens
a drop-down list, which you can use to change the font.
-
Font size. Opens a drop-down list, which you can use
to change the font size value.
-
Font color. Opens the Color dialog box, where you can
select the font color.
-
Style Reset. Resets all settings to the default settings
from the template.
Note: Reset only works while the Report
Style dialog box is open. Once you click OK,
all changes are committed. To undo global styling after it has been
committed, you must use the Undo command on the Quick Access Toolbar.
-
Bold. Applies bold font formatting to the selected text.
-
Italic. Applies italic font formatting to the selected
text
-
Underline. Underlines the selected text.
-
Justify Left. Aligns the text to the left of the canvas.
-
Justify Center. Aligns the text to the center of the
canvas.
-
Justify Right. Aligns the text to the right of the canvas.
-
Background color. Click the button to open the Color
dialog box, where you can select the background color for the report.
-
Click OK.
The report is styled accordingly.
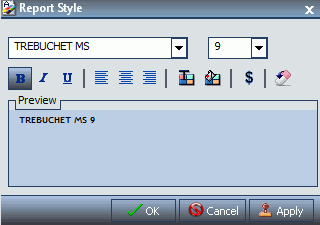
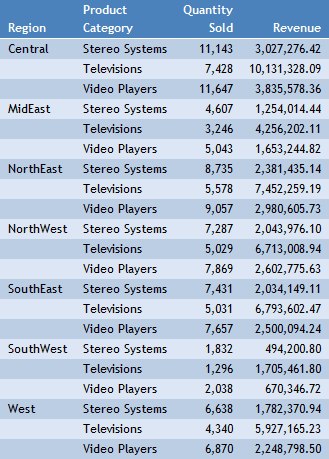
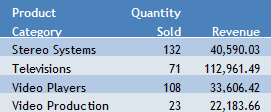
The following image shows a report with the default formatting
and the Revenue data column selected for styling.
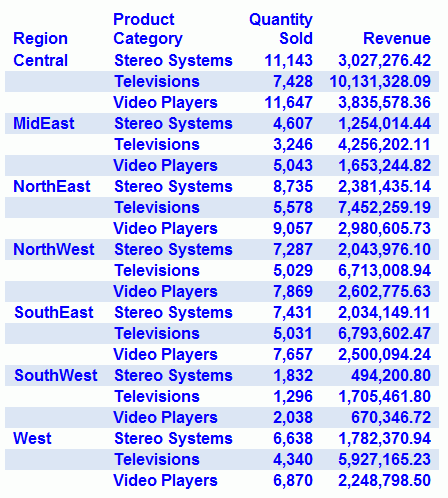
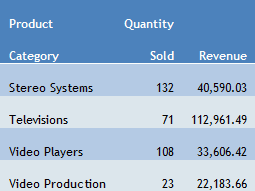
The
following image shows the Revenue data column styled to display
the American dollar sign ($) as the currency symbol.
x
Procedure: How to Add Headings and Footings to a Report
You
can make a report more meaningful by adding headings and footings.
Headings and footings supply context and key information about a
report, such as its purpose and audience. Headings and footings
also provide structure, helping you navigate to the detail sought.
They enhance visual appeal.
In this procedure,
you will add and style a report heading and page heading. The procedure
uses sample values, but you can supply values that apply to your
own, reports.
Headings and Footings are available in Query
Design view, Live Preview,
and Document view.
-
Create
a report.
-
On the
Home tab, in the Report group, click the Header & Footer button.
The Header & Footer dialog box opens.
-
Click
the tab for the heading or footing element that you want to add.
For a report, you can add a report heading, page heading,
page footing, or report footing. By default, the Report Header tab
is selected. In this procedure, accept the default.
-
Click
inside the design area of the dialog box, and type the text for
the heading.
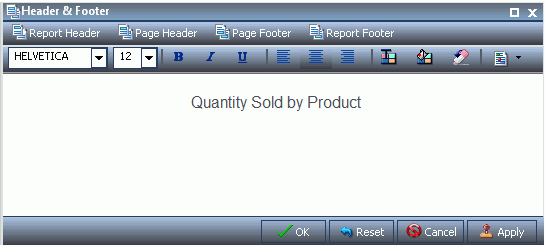
For example, the text for a sample report heading might
be Quantity Sold by Product.
-
Using
the styling ribbon, apply styling to the report heading text.
For example, click the arrow next to the font field, and
click HELVETICA. Click 12 for
the font size.
The sample report heading with the selected
styling values is shown in the following image.
-
Click Apply to
save the changes you have made so far, without closing the dialog
box.
-
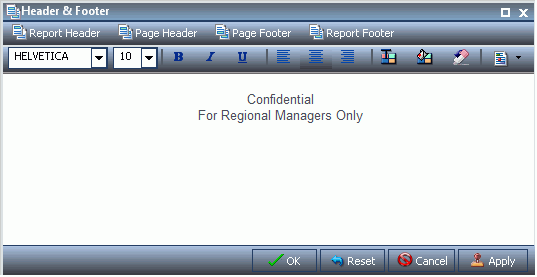
To add
a page heading, click the Page Header tab.
In this procedure, you are going to add one of the supplied
quick text options.
-
Click
the last button
 (Insert
preformatted text content for headers/footers) on the
right of the styling ribbon, and click Confidential in
the list.
(Insert
preformatted text content for headers/footers) on the
right of the styling ribbon, and click Confidential in
the list.
-
Change
the font and font size. For example, change the font to HELVETICA and
the size to 10.
You can add your own text before or after the supplied
text, for example, For Regional Managers Only.
-
Click OK to
save the report heading and page heading and close the Header &
Footer dialog box.
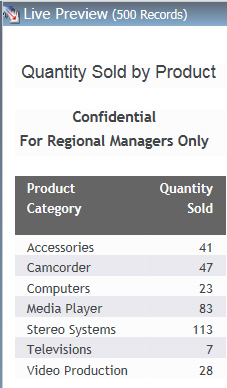
The report heading and page heading that you added and
styled are shown in Live Preview in the following image.
-
To make
changes, to either the report, or page heading, right-click the heading
and click Edit. You can also double-click
on the header to open the Header & Footer dialog box.
x
Procedure: How to Apply Traffic Light Conditional Styling to a Report (By Constant)
You
can apply traffic light conditional styling to data for a selected
measure field. By default the report displays the values that satisfy
the first condition in green, and the values that satisfy the second
condition in red.
-
Open a report
in Live Preview.
-
Open the
Traffic Light Condition dialog box in one of the following ways:
-
Ribbon: Select
a field on the report, and then on the Field tab, in the Display
group, click Traffic Lights.
-
Right-Click Menu: Right-click
a field on the report, point to More, and then click Traffic
Light Conditions.
The Traffic Light Condition dialog box opens.
-
From the
Relational Operators drop-down menu below the field name, click
a relational operator.
The options are:
- Equal to
- Not equal to
- Greater than
- Less than
- Greater than or equal
to
- Less than or equal
to
-
In the field
to the right of the Relational Operators drop-down menu, click the
down arrow for the Type drop-down menu.
The Type menu opens.
-
In the Type
drop-down list, click Constant.
-
Enter a
value in the Value field.
or
-
From the Get Values drop-down menu, select one of the following
values: All, First, Last, Minimum, Maximum, or From File. The value that
you select appears in the Get Values field.
-
Select the value in the Get Values field. The value that you selected
appears in the Value field.
-
Click OK.
The value that you selected appears in the field to the
right of the Relational Operators drop-down menu.
-
Click the Style button.
The Style menu opens.
-
From the Style menu, click the Color button.
The Color dialog box opens.
-
Select a
color.
-
Click OK.
The color appears in the Preview box.
-
Click the Drill
Down button.
The Drill Down dialog box opens.
-
In the Drill
Down dialog box, specify each of the following:
- Drill down to a report
or a webpage
- URL of the webpage
- An alternate comment
- Target (New Window,
Same Window)
- Parameters that you
want to use (Name, Value)
-
Click OK to
close the dialog box.
-
Click the New button
to set traffic light conditions for additional fields.
x
Procedure: How to Apply Traffic Light Conditional Styling to a Report (By Field)
You
can apply traffic light conditional styling to data for a selected
measure field. By default the report displays the values that satisfy
the first condition in green, and the values that satisfy the second
condition in red.
-
Open a report
in Live Preview.
-
Open the
Traffic Light Condition dialog box in one of the following ways:
-
Ribbon: Select
a field on the report, and then on the Field tab, in the Display
group, click Traffic Lights.
-
Right-Click Menu: Right-click
a field on the report, point to More, and then click Traffic
Light Conditions.
The Traffic Light Condition dialog box opens.
-
From the
drop-down menu below the field name, select a relational operator.
The options are:
- Equal to
- Not equal to
- Greater than
- Less than
- Greater than or equal
to
- Less than or equal
to
-
In the field
to the right of the Relational Operators drop-down menu, click the
arrow for the Type drop-down menu.
The Type dialog box opens.
-
In the Type
drop-down list, select Field.
The Type dialog box displays a list of the data fields
that you can choose from.
-
Select a
data field from the list.
-
Click OK.
The field that you selected appears in the field to the
right of the Relational Operators drop-down menu.
-
Click the Style button.
The Style menu opens.
-
From the
Style menu, click the Color button.
The Color dialog box opens.
-
Select a
color.
The color appears in the Preview box.
-
Click OK.
-
Click the Drill
Down button.
The Drill Down dialog opens.
-
In the Drill
Down dialog, specify each of the following:
- Drill down to a report
or a webpage
- URL of the webpage
- An alternate comment
- Target (New Window,
Same Window)
- Parameters that you
want to use (Name, Value)
-
Click OK.
-
Click the New button
to set traffic light conditions for additional fields.