How to: |
The Chart Wizard allows you to create a new chart procedure or SQL chart procedure, and open an existing report.
To open the Chart Wizard:
Note: If you choose to create a new chart using the shortcut menu in the Environments Tree panel, you will skip the first screen of the Chart Wizard. You will not have to specify whether you are creating a chart or SQL chart. You will instead be brought to the Chart Wizard - Choose location for the new chart window, with the location for your chart already selected.
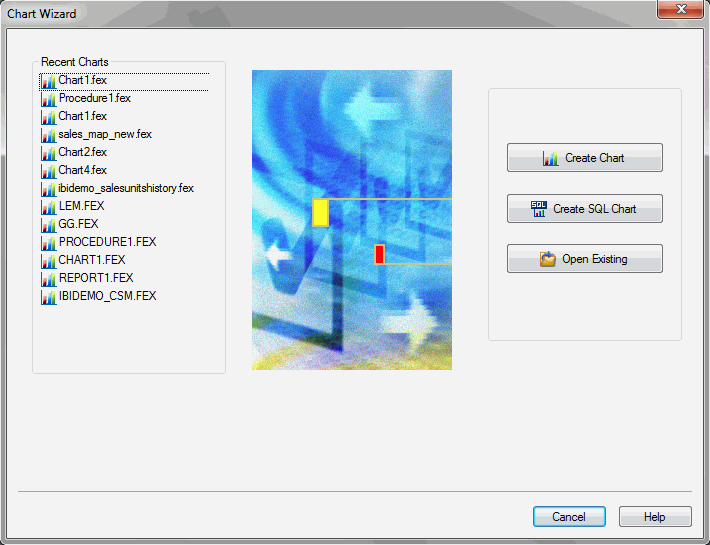
The Chart Wizard opens, as shown in the following image.
From the Chart Wizard, you can open a recent procedure, search for an existing procedure, create a new chart or SQL chart procedure, and access documentation resources.
After you launch the Chart Wizard, you can begin to create your chart procedure.
Note: If you choose to create a new chart using the shortcut menu in the Environments Tree panel, you will skip the first screen of the Chart Wizard. You will not have to specify whether you are creating a chart or SQL chart. You will instead be brought to the Chart Wizard - Choose location for the new chart window, with the location for your chart already selected.
The Chart Wizard - Choose location for the new chart window opens
The Chart Wizard- Select a master file window opens.
The Chart canvas opens.
You can use the features and functions on the ribbon that is located in the Chart canvas to format the chart.
After you launch the Chart Wizard, you can begin to create your SQL chart procedure.
Note: If you choose to create a new SQL chart using the shortcut menu in the Environments Tree panel, you will skip the first screen of the Chart Wizard. You will not have to specify whether you are creating a chart or SQL chart. You will instead be brought to the Chart Wizard - Choose location for the new chart window, with the location for your chart already selected.
The Chart Wizard - Choose location for the new chart window opens
The SQL Chart - Welcome window opens.
Optionally, you can run with limited records by clicking Run SQL. By default, the Run with limited records check box is selected so you can test your procedure with a read limit if the engine supports it. There is a field box next to the check box in which you can enter the number of records to be read. 100 is the default limit.
Note: Typing a procedure name is not required to create a new chart. If you do not type a procedure name in the Enter a Procedure Name field, a default procedure name will be provided until you save the procedure.
The Chart canvas and the Procedure View panel open. You can now add data to your chart and format the data using the tabs in the ribbon.
After you launch the Chart Wizard, you can begin to create your SQL chart procedure.
Note: If you choose to create a new SQL chart using the shortcut menu in the Environments Tree panel, you will skip the first screen of the Chart Wizard. You will not have to specify whether you are creating a chart or SQL chart. You will instead be brought to the Chart Wizard - Choose location for the new SQL Chart window, with the location for your chart already selected.
The Chart Wizard - Choose location for the new SQL Chart window opens.
The SQL Chart Wizard - Welcome window opens.
Optionally, you can run with limited records by clicking Run SQL. By default, the Run with limited records check box is selected so you can test your procedure with a read limit if the engine supports it. There is a field box next to the check box in which you can enter the number of records to be read. 100 is the default limit.
Note: Typing a procedure name is not required to create a new chart. If you do not type a procedure name in the Enter a Procedure Name field, a default procedure name will be provided until you save the procedure.
The Chart canvas and the Procedure View panel open. You can now add data to your chart and format the data using the tabs in the ribbon.
You can import commands from existing .sql files.
Note: If you choose to create a new SQL chart using the shortcut menu in the Environments Tree panel, you will skip the first screen of the Chart Wizard. You will not have to specify whether you are creating a chart or SQL chart. You will instead be brought to the Chart Wizard - Choose location for the new chart window, with the location for your chart already selected.
The Chart Wizard - Choose location for the new chart window opens
The SQL Chart - Welcome window opens.
Optionally, you can run with limited records by clicking Run SQL. By default, the Run with limited records check box is selected so you can test your procedure with a read limit if the engine supports it. There is a field box next to the check box in which you can enter the number of records to be read. 100 is the default limit. You can edit these options here or in the next step.
Note: Typing a procedure name is not required to create a new chart. If you do not type a procedure name in the Enter a Procedure Name field, a default procedure name will be provided until you save the procedure.
The Chart canvas and the Procedure View panel open. You can now add data to your chart and format the data using the tabs in the ribbon.
| WebFOCUS |