This section provides detailed descriptions of new security features.
xPreventing Cross-Site Request Forgery (CSRF)
A Cross-Site Request
Forgery, also known as a one-click attack or session riding, and abbreviated
as CSRF, is a type of malicious exploit of a website whereby unauthorized commands
are transmitted from a user that the website trusts. To prevent
attacks on the server from the browser where the Web Console runs,
the server generates a CSRF token to be sent with all POST requests.
The CSRF token prevents attacks by checking for an encrypted
value that was generated randomly and stored in the web session
of the actual authenticated user. If the token is not found in the
POST request or does not have the correct value, the request is redirected
to the sign-in page.
This feature is not supported for Kerberos and SSO environments.
xPrevention of Cross-Site Scripting (XSS) Attacks
An XSS (Cross-Site Scripting) attack consists of inserting
malicious code into a link that appears to be from a trusted source.
If a user clicks the link, the code is submitted as part of the
user request.
All Web Console output is now encoded so that XSS code cannot
be executed.
xDefault PTH Security Provider Configured During Installation
In order to make sure the server always starts securely, the
default security provider configured by the installation process
is now the PTH (server internal) provider. This provider keeps a
list of groups and group memberships in the admin.cfg file. During
installation of the server, a server administrator user ID is created
in admin.cfg. The installer can accept the default user ID (srvadmin)
or change it, but the installer must provide a password for this
ID. The user ID will be created as a two-part name in the form security_provider\user_ID,
for example, PTH\srvadmin.
With this security provider configured, the server starts with
security on (with the PTH provider) immediately after installation,
without the need to configure additional privileges. In prior releases,
the server started with security OPSYS if the server was authorized
to start security OPSYS. Authorization for security OPSYS is set
differently depending on the operating system. If OPSYS could not
be configured, the server started with security OFF.
When the server starts with security PTH, the PTH\srvadmin user
ID (or the one configured during installation) is the server administrator
user that is used to connect to the Server Web Console, and that
user can make additional security changes to the server, such as
adding and changing active security providers and changing access
control privileges for users, groups, and roles. It is recommended
that you keep the PTH provider as an active security provider, so
user PTH\srvadmin can be used as a backup Server Administrator.
All new security subjects will be registered
with a two-part name. For example, the following group named grp1
is registered under the LDAP01 security provider:
LDAP01\grp1
For an OPSYS security provider, there
may be multiple domains. For example, the following user whose ID
is user1 is registered under OPSYS security in the IBI domain:
OPSYS\IBI\user1
Note: If the silent installation is used, the server administrator
user ID with its associated password needs to be provided. If none
is provided, the default user ID PTH\srvadmin with the password srvadmin will
be configured.
x
When the server io_encryption setting
is ON, binary, alpha, and delimited HOLD files in edatemp and foccache
are encrypted. Data agent trace files (tsxxx.trc)
and agent output files (tsxxx.tro) are also
encrypted as a result of this setting. After encryption, the extensions
for these files are .trce and troe, respectively. This prevents
the user from opening these files in editors outside of the Web
Console or Data Management Console. Trace files and agent output
files can be viewed from the Web Console Workspace page
under Traces And Logs.
To turn on the io_encryption setting,
do the following:
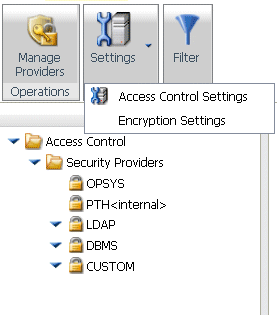
- On the Access Control
page, either click the Settings button on
the ribbon, or right-click the Access Control folder
and select Encryption Settings from the context
menu.
The
Encryption and Decryption page opens.
- Select y from
the io_encryption drop-down list, as shown in the following image.
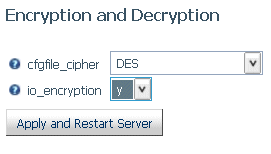
The
default encryption algorithm is DES. You
can change the type of encryption using the cfgfile_cipher setting
available on the same page.
- Click Apply
and Restart Server.
This setting will be added in
the edaserve.cfg configuration file.
xHiding Detailed Connection Information and Error Messages
For security
purposes, the server administrator can disable certain server features
for basic users. Some of the features that will be hidden when connecting
from the Web Console or Data Management Console (DMC) are the server
version, the server name and release, the sign-in information, and
the list of privileges for the user. For users connecting from all
front-end applications (Web Console, DMC, WebFOCUS), generic messages
will be displayed instead of detailed server error messages.
If a procedure generates an error, the user will see the following
message:
(FOC1240) Please contact your WebFOCUS Administrator
Complete messages will be posted to the edaprint log.
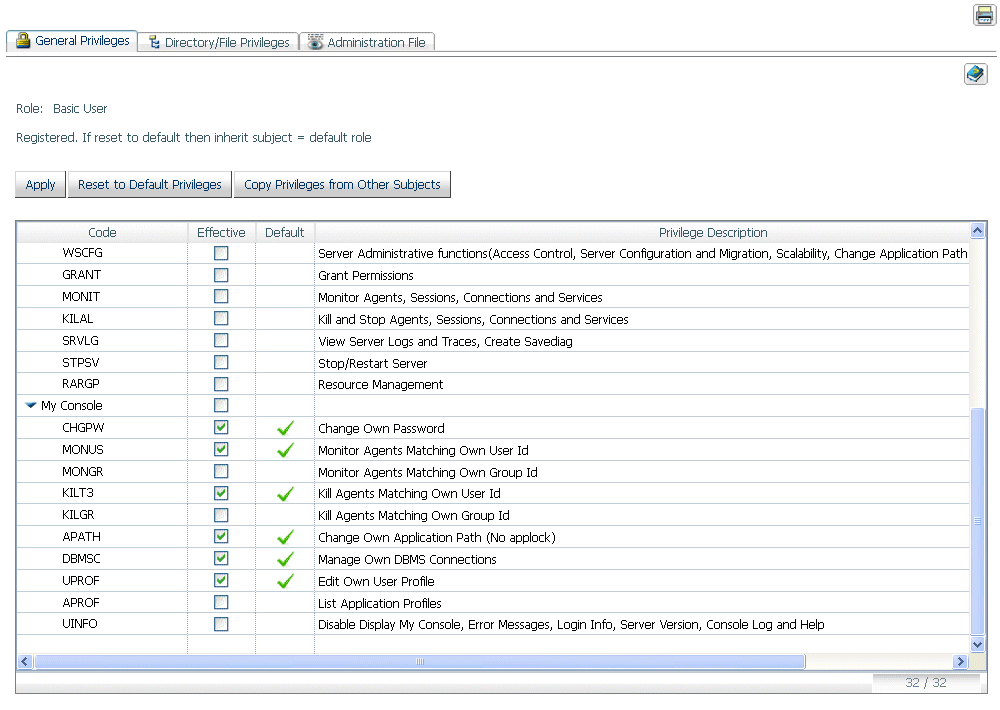
To set the UINFO privilege for a role, group, or user:
- Right-click the relevant
security subject on the Access Control page, and select Properties from
the context menu. The Properties page opens.
- On
the General Privileges tab, scroll down to the UINFO privilege,
check the box in the Effective column, and click Apply.
xWeb Console Parameter Validation
Every parameter on every form displayed by the Web Console
is registered with an internal table that documents the valid values
for each parameter and the permissions needed to change it. When
a form is submitted by a user, each parameter is validated to ensure
that the rules in the internal registration table have been followed.
This validation procedure ensures that no form can be compromised
by any type of external insertion.
xCalculating Privileges for Any Registered or Unregistered User or Group
The server administrator can calculate the privileges
of any registered or unregistered user or group on the server by
right-clicking the Access Control folder
and selecting Show Privileges from the context
menu.
The Show Privileges page opens, as shown
in the following image.
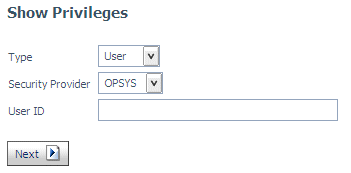
You can select a security provider and whether to show the privileges
of a user or group under the security provider, or to show the privileges
of any security role. You must enter a valid ID for the user or
group, or choose any of the registered roles.
You can enter an unregistered user or group. Then, the server
will calculate the privileges based on user membership and its group
registration.
When you click Next, the server calculates
the appropriate privileges and returns a page of Properties for
the chosen user, group, or role with tabs for General Privileges
and File/Directory Privileges. This page also indicates whether
the security subject you chose is registered and, if not, which
privileges it inherits. If your server is configured with profile_setting=all,
and you select a user who belongs to multiple registered groups,
the privileges of all will be combined in the display.
xServer-Wide Setting to Control the HTMLENCODE Parameter
The HTMLENCODE parameter controls whether HTML tags
in data are encoded as plain text or HTML tags. The value ON encodes
the tags as plain text so that the browser does not consider them
to contain executable code. This prevents an attack on the server
by inserting executable code into data.
You can set the value of HTMLENCODE to ON on the server Miscellaneous
Settings page. Doing so places this setting in the edaserve.cfg
file and enforces it server wide.
To change the server-wide value of HTMLENCODE:
- On the Workspace
page, either right-click the Workspace tree
or click the Settings drop-down list on the
ribbon, select Settings, and then select Miscellaneous
Settings.
The Miscellaneous
Settings page opens, as shown in the following image.
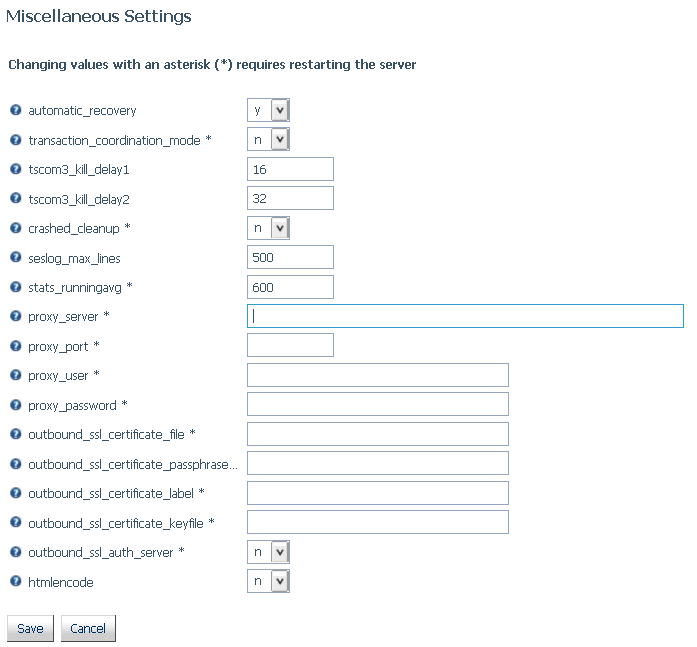
By
default, the value is n (OFF).
- From the htmlencode
drop-down list, select y.
- Click Save.
xDisplaying System and Security Functions Information
When a server is running with security, you can display
a report listing information for all system and security functions.
This information includes a short description of the listed functions
together with formats and descriptions of their parameters.
To view the system and security functions report, click the System/Security Functions
Information button on the Access Control page ribbon,
or right-click the Access Control folder
and select System/Security Functions on the
context menu.
xAdvanced PTH Users and Groups Management Page
A new interface was added to manage PTH Users and Groups
on a single page. The PTH <Internal> Users and
Groups Management page provides functions for creating
new users and groups and updating existing ones. Users can be assigned
to groups or deleted from groups using an easy drag-and-drop action.
xNew Function CHECKPRIVS Returns the Status of a General Privilege
The new function CHECKPRIVS, given a general privilege
code (for example, NODPT), returns the value Y (yes) or N (no) depending
on whether the connected user is has that privilege. The full list
of general privileges is available from the Web Console Access Control
page under Group/Role/User Properties or
from the Web Console C button under the My Console-/Show
My General Privileges option.
xNew Variable Returns a List of Groups for the Connected User
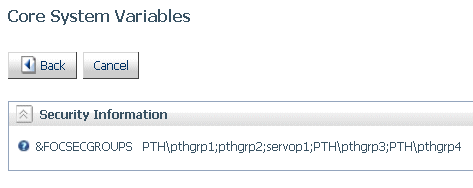
The Dialogue Manager &FOCSECGROUPS variable returns
the list of all groups that have the connected user as a member.
Each group on the list is separated from the next group by a semicolon
(;).
Note: The &FOCSECGROUP variable returns only one primary
group, not a list of groups.
On a WebFOCUS trusted connection, when
the list of groups is passed from the client to the server, &FOCSECGROUPS
will contain the full list of groups.
If the server is configured with profile_setting=all,
the connection to the Web Console or Data Management Console will
return the list of groups for the connected user, if the user is
a member of multiple groups.
- To see the list of
groups, from the Workspace page, right-click the Workspace tree
or click Settings on the ribbon, select Settings,
and then Core Engine System Variables.
The Core System Variables page opens,
as shown in the following image.
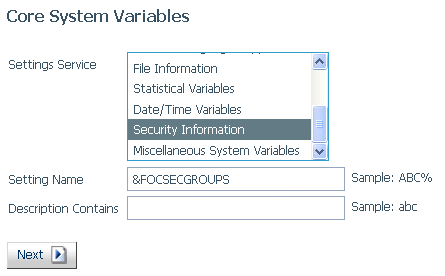
- Select Security
Information from the Settings Service drop-down list,
or enter &FOCSECGROUPS in the Setting Name text box, and click Next.
The
list of groups is displayed, as shown in the following image.
xDisabling a PTH Security Provider Account
You can disable an account that is registered in admin.cfg
under the PTH security provider in order to prevent a user from
signing in to the server with that account.
To disable a PTH account:
- Right-click PTH under
the Security Providers folder, and select Manage
Users/Groups from the context menu.
The PTH Users
and Groups Management page opens, listing all registered users on
the left, and all registered groups on the right.
- Select a user and
click Properties.
The PTH User properties
dialog box opens.
- Click Account
disabled as shown in the following image:
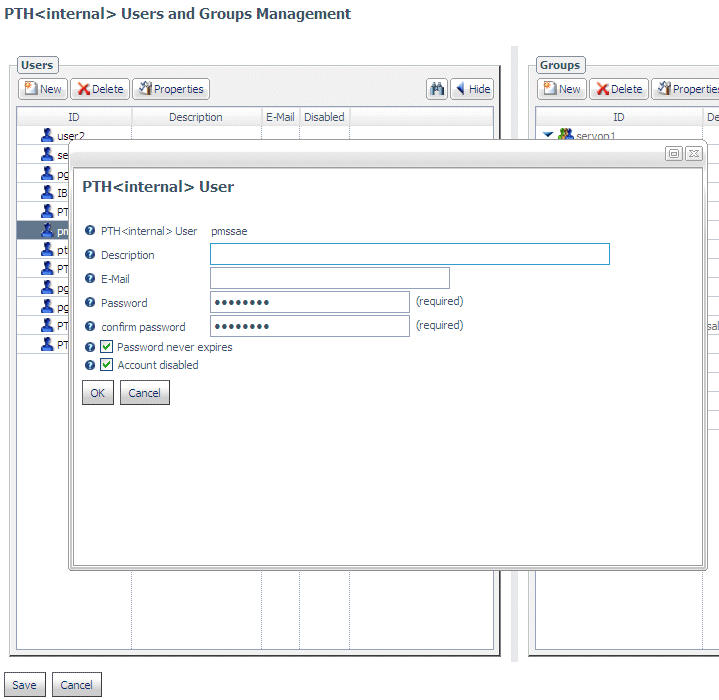
- Click OK.
A
red x is displayed in the Disabled column
for that user on the PTH Users and Groups Management page.
- Click Save.
xExpiring foccache When the Session Ends
The settings SESSION_EXPIRATION and foccache_maxage
have been combined under the setting foccache_maxage.
When a session is expired, the session foccache files are expired
as well, and are removed from the operating system, so that no unexpired
files are left in foccache directories after the user session is expired.
If you are using an odin.cfg file from a prior release, and it
has a SESSION_EXPIRATION setting, then the longer interval of the
two (foccache_maxage or SESSION_EXPIRATION) is chosen to expire
both the session and the session foccache files.
The SESSION_EXPIRATION setting has been removed from the Web
Console. To set a session expiration, use the foccache_maxage setting.
This setting is under Application Settings on the Web Console Applications
page.
xElimination of the IBIF_cmd Parameter
URLs containing the internal parameter IBIF_cmd are
no longer accepted by the server. This eliminates the ability to
execute server-acceptable syntax in order to evade the access control
configured for a connected user. A user who only has privileges
to run predefined server procedures will not be able to run WebFOCUS
syntax directly from the browser using ibiweb.exe with the IBIF_cmd
parameter.
xIdentifying a Default Provider for Trusted Groups
When multiple security providers are configured, one
must be identified as the default provider for trusted connections
when WebFOCUS or other client software sends a trusted group ID
without a security provider to the server.
To set the default provider for trusted
groups:
- On the Access Control
page, click Settings on the ribbon, or right-click
the Access Control folder and select Settings from
the context menu.
The Access Control
Settings page opens, as shown in the following image.
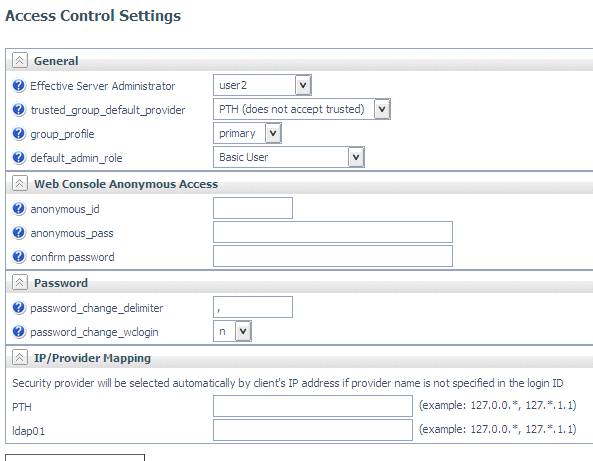
- You can select a
security provider that accepts trusted connections from the trusted_group_default_provider
drop-down list. You can also enter IP addresses to be mapped to
a specific provider, if no provider name is supplied by the client.


