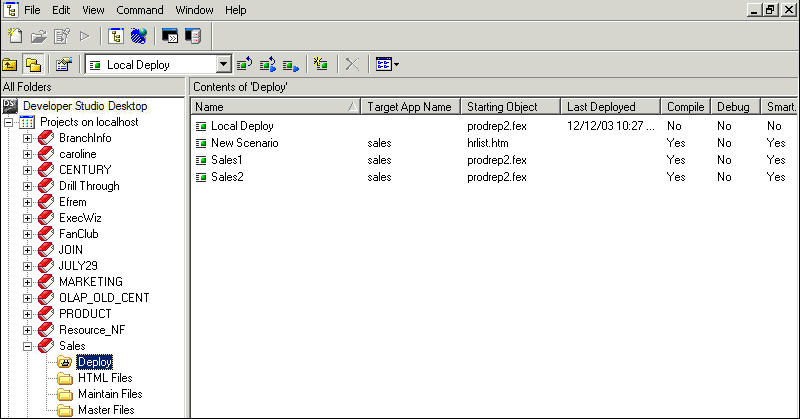
- Select and right-click the project.
-
From
the shortcut menu, select Project Deployment,
then select New Scenario.
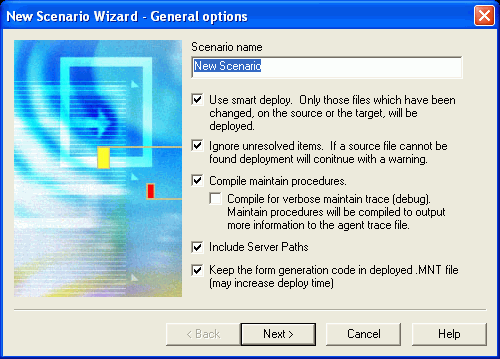
The New Scenario Wizard dialog box opens, as shown in the following image.
-
Respond
as follows:
- Scenario name. Type a name for the new deployment scenario. You can change the name at a later time with the Rename option.
-
Use smart deploy. Choose this
option to deploy only the files that have changed since the last
time you deployed the application. This option can significantly
increase the speed of deployment.
When Smart Deploy is active for a deployment scenario, after its first successful deployment, date and time information is stored in your Project GFA file for each file being deployed. Each subsequent Deploy action then compares the date and time stamp of the source files in your project against the date and time stamps stored in the Deployment Scenario. With Smart Deploy, only newer files will be deployed to the destination, where the source file has a newer time stamp than the one stored in the GFA.
Note:
- The date and time information is stored uniquely in each deployment scenario, so if your project has multiple deployment scenarios, there is no ambiguity about when the files were last deployed using a specific scenario. Take note that each time you first use a new deployment scenario, Smart Deploy performs a full deployment of all files referenced for deployment in your project. Subsequently, only changed files will be deployed.
- Smart Deploy stores file date and time stamps in the GFA after a successful deployment. If an error occurs during a first deployment of a new scenario, the date and time stamps are rolled back.
- If you add a new file to be deployed to a deployment scenario, the GFA has no date and time stamp for a file, so it will always be deployed the first time.
-
Ignore unresolved
items. This option ensures that deployment is completed in a
case where the project deployment scenario contains an unresolved
file. An unresolved file can be either:
A project file that was used in a deployment scenario and deleted outside of Developer Studio (or from another project in which it was shared).
or
A file located in a directory that changed and can no longer be found.
If this option is selected, the deployment scenario will not fail if it contains unresolved files. However, when the deployment process completes, it will display information about files skipped during the process because they were unresolved.
- Compile Maintain procedures. Choose this option to compile Maintain procedures during deployment. Compilation improves application performance. For more information, see the Developing WebFOCUS Maintain Applications manual.
- Compile for verbose Maintain trace (debug). This option is reserved for debugging purposes. It can affect performance. For more information, see the Developing WebFOCUS Maintain Applications manual.
- Include Server Paths. Choose this option to allow the deployment process to include server paths in the Call and Exec statements within Maintain procedures.
-
Keep the form
generation code in deployed .MNT file. Choose this option to
deploy .MNT files with any original form code intact. This option
is enabled by default. A decrease in the speed of deployment may
be noticed if a project contains many forms.
Although this code (XML) is not needed at run time once the .WFM files have been created during the deploy process, keeping it in the remote copy of the file can be an added safeguard should anything happen to the original version. MNT files deployed without the form code cannot be reopened in an MDE session.
Note: The XML code for the form should never be edited manually. Use the MDE to open and edit .MNT files containing forms.
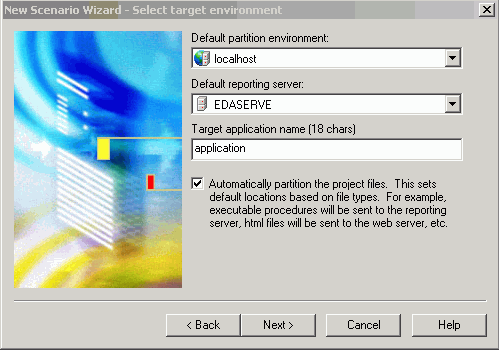
Click Next to proceed to the next Scenario Wizard window, as shown in the following image.
-
Respond
as follows:
-
Default
partition environment. From the drop-down list, select a WebFOCUS environment
that will be used by default when you partition files. Developer
Studio automatically partitions project files for you based on the
following:
HTML, GIF, JPG, VBScript, and JavaScript files are partitioned to the default web server. Executable WebFOCUS procedures (.fex and .mnt files) are partitioned to the default WebFOCUS Reporting Server.
By default, Developer Studio does not partition Master Files and Access Files in order not to overwrite production files with the same name on the deployment server.
Selecting an environment from this list does not force the deployment of files as defined in the scenario.
You can change the definition of the scenario.
-
Default
reporting server. From the drop-down list, you can select which
WebFOCUS Reporting Server to use as your Default partition environment.
This list is not active if you choose the value NONE for the Default partition environment.
-
Target application
name. Optionally, type an application name that will be used
on the web server and WebFOCUS Reporting Server deployment paths,
or use the default value (the current project name).
If you are deploying files to your development server, you must provide a target application name other than your development directory.
If you are deploying files to a WebFOCUS Reporting Server on z/OS, the target application name can be up to eight characters. For deployment servers on all other supported platforms, the name can be up to 18 characters. Spaces are not allowed. (If a space is entered, it is converted to an underscore.)
- Automatically partition the project files. This sets default locations based on file types.
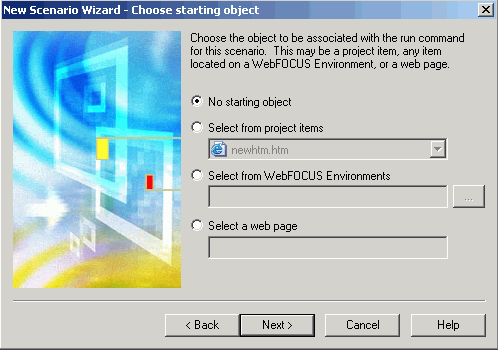
Click Next to proceed to the next Scenario Wizard window, as shown in the following image.
-
Default
partition environment. From the drop-down list, select a WebFOCUS environment
that will be used by default when you partition files. Developer
Studio automatically partitions project files for you based on the
following:
-
Respond
as follows:
- No starting object. Does not associate a starting object for the scenario.
-
Select from
project items. From the drop-down list, you can select a file
from the application as the starting object.
This option is enabled only when files are added to the application and when the option to partition files has been selected.
-
Select from
WebFOCUS Environments. Allows you to select a starting object
from an existing configured WebFOCUS Environment, for example, a
general launch page.
You must ensure that the deployed application has access to the file to avoid an error at run time.
-
Select a
web page. Allows you to select a URL as a starting object. To
specify a webpage, type the URL as a complete path to a file.
You must ensure that the deployed application has access to the file to avoid an error at run time.
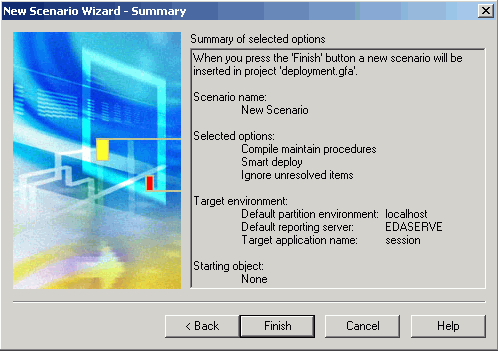
Click Next to proceed to the next Scenario Wizard window, as shown in the following.
-
Click Finish to
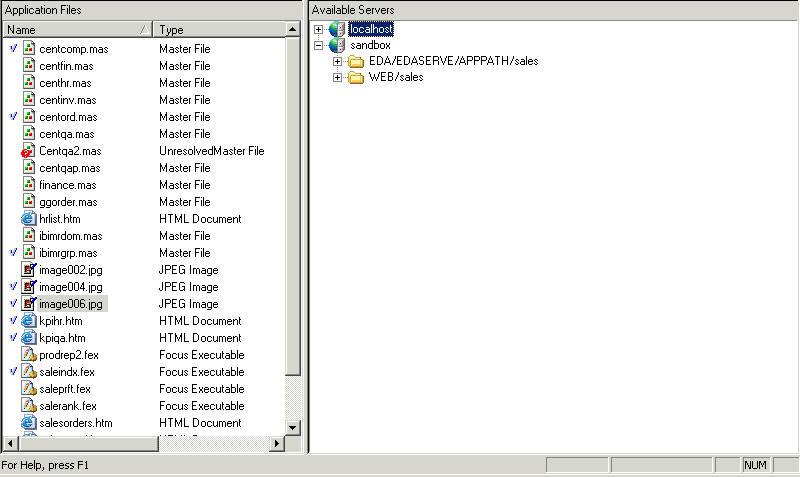
complete the deployment process. The following screen appears.
-
Close
or minimize the deployment scenario window, known as the Scenario
Editor, to return to the Explorer. The project displays a new folder
labeled Deploy. Later, when you have defined deployment scenarios,
you can display them by clicking the folder. The following image
shows the Explorer.
