Configuring IBM WebSphere 7.0

In this section:

This section explains how to configure WebSphere Application Server with or without IBM HTTP Server for use with WebFOCUS and ReportCaster. It is assumed that WebSphere components are installed and configured. You should refer to the WebSphere documentation for additional information.


Top of page

x
Java Version Requirement

How to:

As of WebFOCUS 8, Java Version 1.6 is the minimum version required on the system that is hosting the application server where the WebFOCUS Reporting Server and ReportCaster Distribution Server are deployed.

Important: For IBM WebSphere Application Server Version 7.0, apply the IBM WebSphere Application Server feature pack for OSGI applications and Java persistence API 2.0.


x
Procedure: How to Apply the IBM APAR

To apply the IBM APAR:

  1. In the administrative console, expand the Servers node and select Application Servers.
  2. Click the server to which the custom property is to be applied.
  3. Under Configuration and Container settings, expand the Web Container Settings node and select Web Container.
  4. Under Configuration and Additional Properties, click Custom Properties.

    The Custom Properties page opens.

  5. Click New.
  6. Enter the following in the Name field exactly as shown.
    com.ibm.ws.jsp.jdkSourceLevel
  7. Enter the following in the Value field exactly as shown:
    16
  8. Click Apply or OK.

    The Messages dialog box opens.

  9. Click Save.

Top of page

x
WebSphere Pre-Deployment Steps

How to:

Before deploying WebFOCUS web Applications, you should configure WebSphere for WebFOCUS graphs.


x
Procedure: How to Configure WebSphere for WebFOCUS Graphs

To generate graphs, WebFOCUS Servlets either need access to an X Windows Server (through the DISPLAY variable), or they can use the Java VM headless option.


x
Procedure: How to Set the WebSphere CLASSPATH for the WebFOCUS Repository

If you use ReportCaster, the CLASSPATH variable must include the JDBC driver of your repository. You can set CLASSPATH using the WebSphere Administrative Console.

Note: If you use InfoAssist, you may need to increase the default Java memory options as explained in Java Memory Issues. This can be done at a later time if needed, but it is done from the same area of the WebSphere Administrative Console as setting CLASSPATH.

  1. Start WebSphere if it is not already running.
  2. Log on to the WebSphere Administrative Console through a browser.
  3. On the left, expand Servers/Server Types.
  4. On the left, click WebSphere application servers.
  5. Click the server where you will deploy WebFOCUS.
  6. For WebSphere, under Server Infrastructure, click Java and Process Management.
  7. Click Process Definition.
  8. Under Additional Properties, click Java Virtual Machine.

    Note: If you need to change the Java VM memory options discussed in Java Memory Issues, you can specify the options in the Generic JVM arguments field.

  9. In the Classpath field, specify the absolute path of the JDBC driver, including the file name or names. For example:
    /home/oraclejdbc/ojdbc6.jar
  10. Click OK.
  11. On the top of the page, click Save.
  12. On the page that appears, click Save to save the master configuration.
  13. Restart the application server.

Top of page

x
Updating jackson-all-1.9.11.jar

How to:

If you are using WebSphere Application Server Version 8.0 or 8.5, you must upgrade the version of jackson-all-1.9.11.jar that is included with WebSphere, then redeploy the WebFOCUS web application.


x
Procedure: How to Update jackson-all-1.9.11.jar

WebFOCUS 8 is packaged with a newer version of the jackson-all-1.9.11.jar file, which includes updated classes. To avoid conflicts with the current version of the jackson-all-1.9.11.jar that is included and used by WebSphere Application Server Version 8.0 and 8.5, perform the following steps. These steps describe how to define a container-wide shared library that can be used by deployed WebFOCUS applications.

  1. Locate the httpclient*.jar, httpcore*.jar, and jackson-all-1.9.11.jar files that are packaged with WebFOCUS Version 8. By default, these files are located in the following directory:
    ibi/WebFOCUS81/webapps/webfocus/WEB-INF/lib
  2. Create an empty directory on your system and copy the httpclient*.jar, httpcore*.jar, and jackson-all-1.9.11.jar files to this new directory. For example:
    /appsrv1/IBM/shared
  3. Sign in to the WebSphere Integrated Solutions Console.
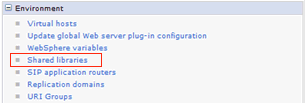
  4. In the left pane, expand Environment and select Shared libraries, as shown in the following image.

    Environment menu - Shared libraries

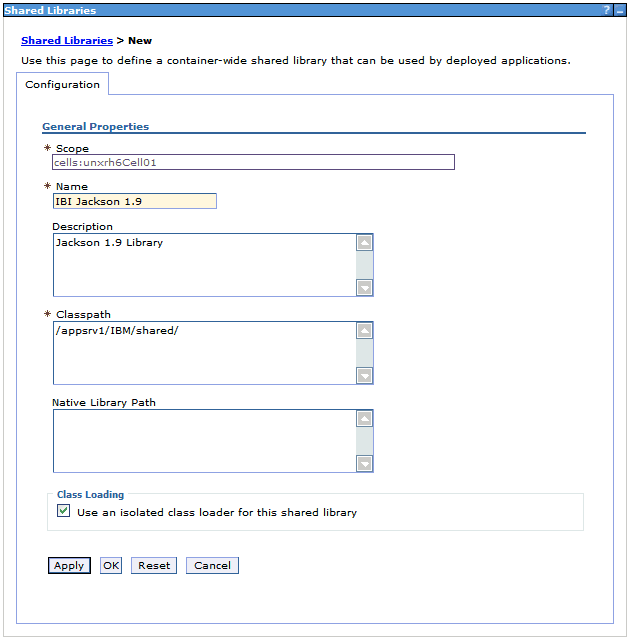
    The Shared Libraries pane opens, as shown in the following image.

    Shared Libraries > New

  5. Select a scope from the drop-down list, which specifies the level at which the resource definition is visible, and click New.

    The Shared Libraries > New pane opens, as shown in the following image.

    Shared Libraries > New pane

  6. In the Name field, enter a name for the new shared library that is being created (for example, IBI Jackson 1.9).
  7. Provide a description (optional).
  8. In the Classpath field, enter the path to the folder on your system where you copied the updated jackson-all-1.9.11.jar file (packaged with WebFOCUS 8).
  9. In the Class Loading area, select the Use an isolated class loader for this shared library check box.
  10. Click OK, then click Apply.


x
Procedure: How to Update the webfocus.war file for the WebFOCUS Web Application

This procedure describes how to define a container-wide shared library that can be used by deployed WebFOCUS applications.

Note: Only the webfocus.war file for the WebFOCUS web application requires this change. The ibi_help.war, approot.war, and ibi_html.war files do not require the changes described in this procedure.
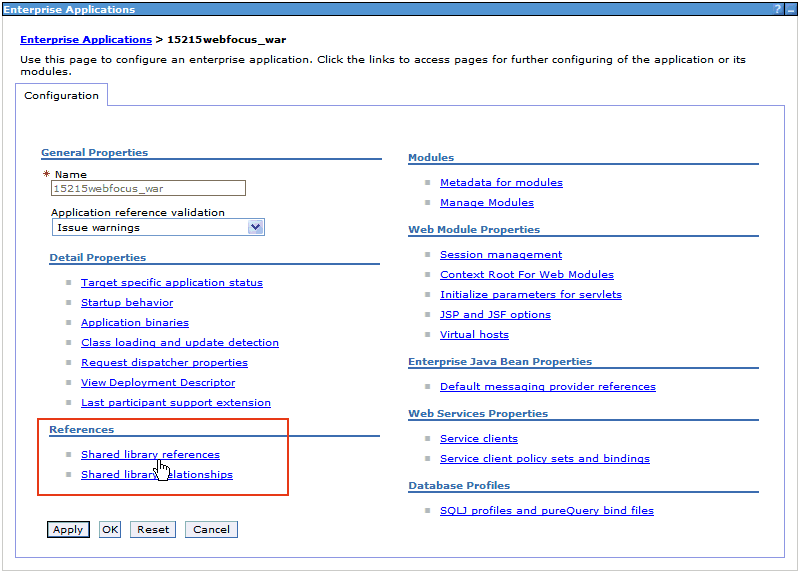
  1. In the WebSphere Integrated Solutions Console, expand Applications, and select WebSphere enterprise applications.

    The Enterprise Applications pane opens, as shown in the following image.

    Enterprise Applications pane

  2. Click the name of the webfocus.war file for the WebFOCUS web application (for example, 15215webfocus_war).
  3. In the References area, click Shared library references, as shown in the following image.

    Enterprise Applications pane - Reference area

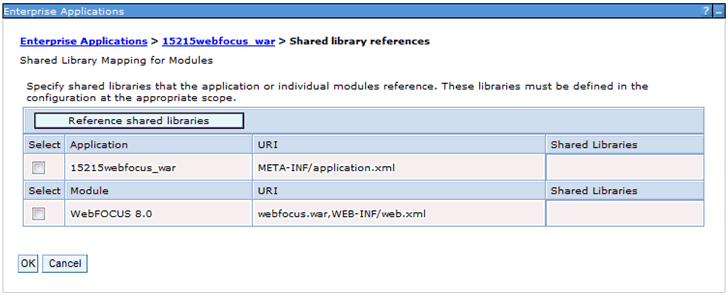
    The Shared library references pane opens, as shown in the following image.

    Shared library references pane

    Note: The WebFOCUS Application being used in this example is called 15215webfocus_war and the Module is called WebFOCUS 8.1.

  4. Select the check box to the left of the WebFOCUS Application and click Reference shared libraries.

    The Shared Library Mapping pane opens, as shown in the following image.
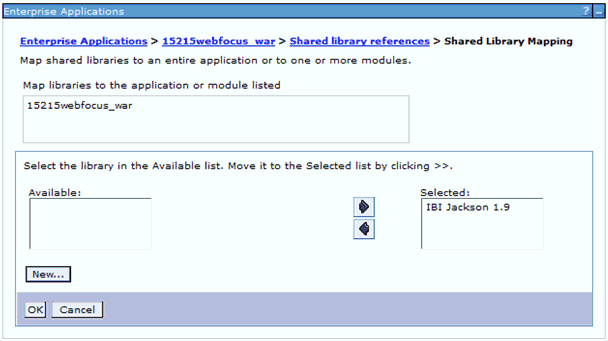
    Shared Library Mapping pane

  5. In the Available area, select the IBI Jackson 1.9 shared library, and then click the right arrow icon.

    The IBI Jackson 1.9 shared library is now listed in the Selected area.

  6. Click OK.
  7. Repeat steps 4 to 5 for the Module (for example, WebFOCUS 8.1) that is listed in the Shared library references pane.

    Ensure that the IBI Jackson 1.9 shared library for the Module is moved to the Selected area.

  8. Click OK.

    You are returned to the Shared library references pane, as shown in the following image.

    Shared library references pane

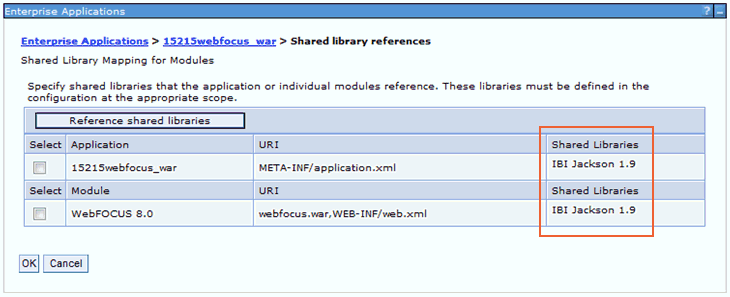
    Notice that the new shared library (IBI Jackson 1.9) is now listed in the Shared Libraries column for the Application and Module.

  9. Click OK.
  10. Restart your IBM WebSphere Application Server if it is already running.

    Note: Restarting only the WebFOCUS application will not be sufficient.


Top of page

x
Deploying Web Applications

How to:

Use the WebSphere Administrative Console, to deploy (install) the WebFOCUS web application. Repeat this procedure for each web application you need to deploy.

The web applications are located in the following directory:

/install_directory/ibi/WebFOCUS81/webapps

All web applications should be deployed.

Web Application

Purpose

webfocus.war

Always deploy this web application.

ibi_help.war

Always deploy this web application.

approot.war

Deploy this web application if you are using an application server only configuration.

You can use the default WebSphere instance or create a new instance using the WebSphere Administrative Console. See your IBM documentation if you wish to create new instances or virtual hosts.


x
Procedure: How to Deploy (Install) a Web Application With WebSphere 7.0
  1. If it is not open, access the WebSphere Administrative Console through a browser. For example:
    http://hostname:9060/ibm/console
  2. On the left, expand Applications.

    Note: If you want to deploy new instances of WebFOCUS but keep your old version, you must install WebFOCUS with different ports and new context roots.

  3. On the left, click [Install] New Application.
  4. On the right, select New Enterprise Application.
  5. Select the Remote file system radio button. In the full path field, type in the name of your application with its full path. Click Next. For example:
    /install_directory/ibi/WebFOCUS81/webapps/webfocus.war

    Note: In WebFOCUS 8, there is one web application in the WebFOCUS81/webappsdirectory, which contains the WebFOCUS Client and ReportCaster (ibi_apps).

    install_directory/ibi/WebFOCUS81/webapps/ibi_help.war
    install_directory/ibi/WebFOCUS81/webapps/approot.war
  6. Select Detailed and then click Next.
  7. Click Continue.
  8. On the Select Installation Options screen, change the application name to something unique in the Application name field. For example, prefix the application name with the name of the cluster or app server. Click Next.
  9. On the Map Modules to Servers screen, select the application listed on the bottom (for example, WebFOCUS). Then, while holding the Ctrl key, select the cluster or application server to which you will deploy and any web servers you will be using. Click Apply and then click Next.
  10. For steps 3 to 6, accept the default values and click Next. For step 7, Map virtual hosts for Web Modules, select the application and the virtual host you defined earlier and click Next.
  11. Set the context root for the web application. For this example, set it to /ibi_apps. Click Next.
  12. Review the summary screen and then click Finish to deploy.

    When the application deployment is complete, click Save directly to the master configuration.


Top of page

x
Verifying the WebFOCUS Configuration With IBM WebSphere

How to:

After configuring WebSphere components, verify operability.


x
Procedure: How to Verify the WebFOCUS Configuration
  1. If they are not started, start the following:
    • WebFOCUS Reporting Server
    • IBM HTTP and WebSphere Application Servers
  2. Type the following case-sensitive URL to access the WebFOCUS Welcome page that provides links to all WebFOCUS features:
    http://hostname:port/ibi_apps

    You may wish to bookmark this page for future use. This page is also referred to as the WebFOCUS home page.

  3. Proceed to WebFOCUS Post-Installation Tasks, and run the verification tool. If you use ReportCaster, be sure to review WebFOCUS ReportCaster Post-Installation Tasks .

Be aware that you may need to increase your Java memory settings if you use InfoAssist. You can do this later, as explained in Java Memory Issues.


WebFOCUS