Managing Application Directories and Configuring the Application Path
Procedures and the synonyms they use reside in application
directories. The Application Path is a list of viewable application
directories. It determines their order of appearance in the navigation
pane.
The Application Path is the default search criteria for the server.
The server searches each of the directories listed in the Application
Path sequentially to find the requested procedure or synonym.
By default, the server profile (EDASPROF.PRF) is run for all
users when they connect to the DataMigrator Server to provide access
to all application directories in the server search path.
However, you can control a users access to application directories
by creating individual user profiles. Each user can then:
- Access only
the application directories specified in the application path specified
for that profile.
- Use synonyms
and procedures in the specified application path.
Grouping procedures and synonyms into application directories
provides better control. For your convenience, three directories
are included in the server search path during installation:
- baseapp is
included in the search path for every user profile the DM administrator
creates. This directory cannot be removed.
- ibisamp contains
sample files you can use to create procedures, as well as sample procedures.
- foccache is a special
directory that allows you to create and reuse files for the duration
of your Data Management Console session, or until the maximum retention time
is reached (set by the server administrator).
You can, of course, set up additional application directories
in the server search path.
The following operations are available from the Application Directories
folder by right-clicking in the DMC or Web Console.
- Creating sample
procedures and data.
- Setting up
application directory mappings for different user profiles.
- Configuring
the application path by adding, removing, or reordering application directories.
- Filtering the
procedures or synonyms that appear in the application directories.
- Creating
new procedures and synonyms.
You can also use the Configure Application Path window to set
the viewable directories for DataMigrator, as well as add new directories
and mappings. To use DM procedures that reside in a directory other
than ibi\apps\baseapp, the directory must be added to the list of
viewable directories.
Note: You can also manage application directories and
configure the Application Path from the Applications page of the
Web Console. For more information, see the Server Administration manual
or the Web Console online help.
x
Procedure: How to Create an Application Directory
-
Right-click Application Directories in
the navigation pane. Select New and then
click Application Directory, as shown in
the following image.
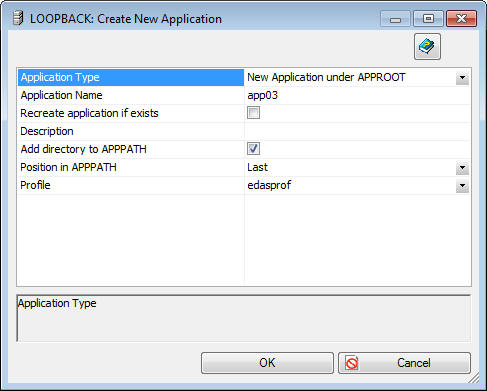
The
Create New Application dialog box opens, as shown in the following
image.
-
Enter
the name of the new application directory, and optionally a description.
Leave the Add directory to APPPATH check
box selected. Click OK.
Caution: The directory name may not contain spaces,
special characters, or capital letters. Capital letters are converted
to lowercase. If an application directory is created outside of
the DMC or Web Console, the same rules apply.
x
Procedure: How to Remove an Application Directory From the Application Path
-
Right-click Application Directories in
the navigation pane and click Application Path.
The Application Path dialog box opens, as shown in the
following image.
-
Find
the application directory you wish to delete. Under the In
Path column, remove the check from the check box.
-
Click Save.
x
Procedure: How to Delete an Application Directory
Note: You
must be connected to a server from a Server Administration ID.
-
If the application
directory is still located in the application path, remove it. For
more information, see How to Configure the Application Path.
-
Right-click Application
Directories and click Application Preferences.
- Select the Show
Applications not in PATH check box.
- Skip this step if Hide
Application Directories not in PATH is the available
option.
- If neither option
appears, make sure you are connected to the server from a Server
Administration ID.
-
Expand Inactive
Directories folder.
-
In the Inactive
Directories folder, right-click the directory you want
to delete and select Delete.
-
In the Confirm
dialog box, click OK.
x
Procedure: How to Add Application Directory Mappings
You
can create a new mapping to a directory anywhere in the file system
and include it in the server path. Application directory mappings
can be added and deleted on a per profile basis.
-
Right-click Application
Directories in the navigation pane. Select New and
then click Application Directory.
The Create New Application dialog box opens.
-
From
the Application Type drop-down menu, select Application
Mapping to Disk.
Additional options appear in the Create New Application
dialog box, as shown in the following image.
-
In the
Application Name box, enter an application name of up to 64 characters.
-
In the
Physical location box, enter the full path of the physical directory to
be mapped, in the format required by your platform. If needed, select Create
application if it does not exist from the Map to drop-down menu.
-
Optionally,
enter a description in the Description field.
-
Optionally,
select the Add directory to APPPATH check
box.
-
If you select Add directory to APPPATH,
you can also select from the Position in APPPATH and Profile drop-down
menus.
-
Click
the OK button.
The new mapping appears in the Application Configuration
dialog box.
x
Procedure: How to Delete Application Directory Mappings
-
Right-click Application Directories in
the navigation pane and click Application Path.
The Application Path dialog box opens.
-
Find
the mapping you wish to delete. Under the In Path column,
remove the check from the check box.
-
Click Save.
x
Procedure: How to Configure the Application Path
You must add an application directory
or mapping to the Application Path for it to be accessible.
-
Right-click Application
Directories in the navigation pane and click Application
Path.
The Application Path Configuration dialog box opens.
-
Select
the profile of the user whose Application Path you wish to set.
-
Select
the In Path check box for the directory or
mapping you want to add to the application path.
-
Optionally,
deselect the In Path check box for any directory
or mapping you want to remove from the application path. This allows
you to remove the directory or mapping from the path without deleting
it completely.
-
Set
the directory search order by selecting a directory or mapping and using
the up and down arrows.
You may want to consider moving the ibisamp directory to
the bottom of the list to avoid confusion. If you do not plan to
use the sample data, you can remove ibisamp from your Application
Path completely.
-
When
you have added and arranged all necessary directories and mappings,
click Save.
-
Right-click Application
Directories in the navigation pane and select Refresh to
see the directory or mapping in the tree.
Note: If there is a long list of application directories,
you can click the FInd button on the top
right or use Ctrl + F to find a text string in the name, physical
location, or description.
x
Reference: Application Directories Options
If
you right-click Application Directories in
the DMC navigation pane, the options shown in the following image
are available:
-
Refresh
-
Refreshes the application directories tree.
-
Explorer
-
Opens a Windows Explorer style window on the right side of
the Data Management Console that shows detailed information about
the currently selected server object.
-
New
-
Allows you to add tutorials, flows, procedures, synonyms,
and files on the server.
-
Search Files
-
Allows you to search on a number of parameters, including
file name, extension, description, content, as well as setting filtering
criteria.
-
Sort by
-
Allows you to sort by name, size, type and modify date.
-
Application Preferences
-
Allows you to set preferences for how objects in an application
directory appear. You can select whether to show subdirectories
last, show applications not in the path, and show object statistics.
-
Application Settings
-
Opens an Applications Settings dialog box that allows you
to set settings for the foccache and home application root directories.
-
Application Path
-
Allows you to add and delete application directories and
mappings from the application path.
-
Create My Home
-
Allows you to create a home application folder.
-
Schedule and E-mail
-
Has the following options:
-
Scheduler Agents. This
report runs for the user whose ID value is stored in the sched_scan_id
of a Scheduler. The Scheduler must be active to run the Scheduler
Agents report.
-
Scheduled Events. Opens a window that shows all jobs
scheduled to run during a specified time range, as seen in the following
image.
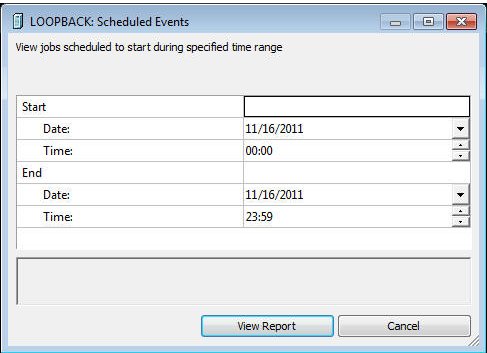
The
Scheduler must be active to run the Scheduler Events report, as
shown in the following image.
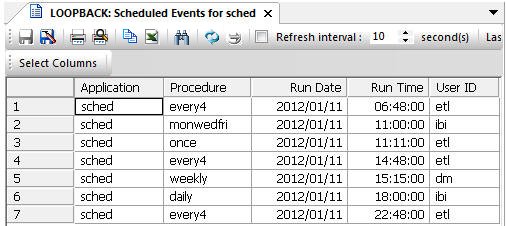
This
report shows all flows and procedures scheduled to run during the
time period you selected. The Run Date and Run Time columns show
their scheduled run times.
The User ID column shows the user
ID used when running the flow or procedure:
- sched_run_id
value - flow is run under
- user - the user ID
that saved the flow or procedure
- server_admin_id -
the first server administrator ID
-
Log and Statistics
-
Opens the Log and Statistics dialog box that enables you
to view a log or statistics report.
The following options
are available:
-
Report Type
-
Allows you to select either a log or statistics report.
-
Report Range
-
Allows you to select to view the last report, all the reports,
or a report specified within a select time range.
-
Completion Status
-
Allows you to view all reports, all completed reports, all
completed successfully reports, or all completed reports that contained errors.
-
Run by
-
Allows you to view reports for all flows, and those initiated
by the scheduler or submit. This includes flows initiated from the
DMC, WC, and CMRUN.
-
Application or Flow Name
-
Allows you to select a specific application or flow name
for the report.
-
Impact Analysis
-
Opens a sub-menu that allows you to view impact analysis
reports. For more information, see Impact Analysis Reports on Synonyms, Procedures and Columns.
-
Tutorials
-
Opens the Create Tutorial Framework dialog box that allows
you to create sample procedures and data for DataMigrator. For more
information, see How to Create Sample Procedures and Data.