In this section: |
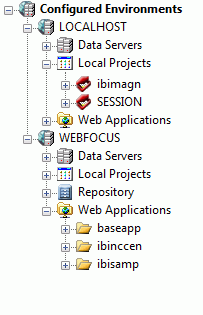
The Configured Environments tree contains a single top-level node, called Configured Environments. Below the Configured Environments node are the WebFOCUS environments you configure. All environments in App Studio are WebFOCUS environments. The subareas you see under a WebFOCUS environment might differ depending on the edition of App Studio that you license.
You can configure a WebFOCUS environment on the same machine as App Studio or elsewhere in your enterprise. Full (stand-alone) installations of App Studio let you manage resources and applications on your local machine, as well as on remote servers, from a single interface.
For more information, see How to Add a WebFOCUS Environment.
The following image shows a sample Configured Environments tree that contains two configured WebFOCUS environments.
Through the Security Center, you can control user permissions to limit the development areas a user can access. For example, Managed Reporting development through App Studio is only available to users who have permission.
For more information, see Derby Database.
How to: |
WebFOCUS environments in the Configured Environments tree contain subareas or nodes for application development in that environment. The Data Servers, Local Projects, Content, and Web Applications nodes expand to display the files that you can use to develop WebFOCUS applications successfully.
App Studio does not sort files, such as procedure files, Master Files, HTML files, or images, into separate folders according to file type. Use the Environments Tree toolbar to filter the files in a project or application folder.
Note: The Local Projects node only appears when the APPROOT of your WebFOCUS Client and the APPROOT of your Reporting Server match.
A WebFOCUS environment can contain any of the following development areas:
The Applications folder beneath each Reporting Server displays the directories based on the Application Root directory (APPROOT directory) for that Reporting Server (on Windows, drive:\ibi\apps by default).
The Reporting Server uses the APPROOT setting to locate files used in development. Any directory located under APPROOT appears under the Data Servers Applications node.
The Data Servers node is a physical view and displays all files in this location. The Reporting Server Application Root directory is used to store server-based files, such as procedures and metadata. You can only edit and run files processed or used by the Reporting Server (such as .fex, .mas, .acx, .gif, .htm, .html, and .sty files).
In addition, projects can be explicitly designed to use files in another application directory, and all projects can use files in the baseapp directory.
You can change the APPROOT directory location defined in the Reporting Server and WebFOCUS Client, but make sure that both Application Root directories point to the same physical location. This is a requirement for creating local projects.
The WebFOCUS Client resides on the web server and uses Java Servlet calls. The same applies for remote environments that have the WebFOCUS Client installed on the same machine as the Reporting Server and the APPROOT setting of the WebFOCUS Client and the APPROOT setting of the Reporting Server point to the same location.
If the APPROOT setting of the WebFOCUS Client and the APPROOT setting of the Reporting Server point to different locations, or if WebFOCUS and the Reporting Server are installed on different platforms, the Applications node under Data Servers and the Applications node under Web Applications show files and directories based on the configurations of WebFOCUS and the Reporting Server.
You can configure the WebFOCUS Application Root variable through the WebFOCUS Administration Console. On the WebFOCUS Administration Console, expand Configuration. Under Application Settings, select Application Directories. The Application Settings - Application Directories window opens.
Typically, these applications include HTML pages, graphic images, cascading style sheets, and JavaScript files.
The IBI_Approot_Directory is the first parameter listed in the window.
The edaserve.cfg file contains the APPROOT variable for the Reporting Server Application Root directory. Typically, these files include procedures, WebFOCUS StyleSheets, and customized HTML pages that require processing on the Reporting Server. You can configure the Approot Server variable through the Reporting Server Console, by selecting Workspace and then Configuration Files.
The edaserve.cfg file is located in:
|
Type of Installation |
Location of edaserve.cfg |
|---|---|
|
App Studio with localhost (full installation) |
install_drive:\ibi\AppStudio81\srv81\wfs\bin |
|
WebFOCUS |
install_drive:\ibi\srv81\wfs\bin |
You can filter these available files using the Environments Tree toolbar. By default, a sample project named SESSION is created during the App Studio Installation.
You can create a new project by right-clicking the Local Projects node and selecting New Project. The Project Wizard opens and guides you through the process of creating a project.
These project files are stored in a subdirectory located under the Application Root directory (APPROOT). A directory containing project files is distinguished from other directories under APPROOT by the existence of a.gfa (graphical FOCUS application) file. When you create a project, a.gfa file and directory are created to store the project files.
Note: During development, file names are preserved. App Studio does not enforce any case-sensitivity rule upon files received from, or sent to, a Reporting Server or web server.
App Studio projects (.gfa) are always case-insensitive. However, due to its cross-platform functionality, App Studio relies on information stored in lowercase. Therefore, when you are working on a UNIX platform, be consistent with how a particular Reporting Server handles files.
For example, when you perform remote development in a UNIX environment, create file names in lowercase. Also ensure that you use lowercase when referencing files using the INCLUDE command. By default, the Reporting Server enforces lowercase file names and directory names created in the Data Servers node.
Under the repository node, you can create or develop Managed Reporting content. For example, users can develop procedures or web applications, create ad hoc reports, and build custom user content.
In the repository area you can manage resources and applications on remote servers, as well as on your local machine, if you have performed a full installation of App Studio. You can create and edit application files on all remote servers from one easily accessible interface. You can also create and administer reports for Managed Reporting from a Windows application rather than a web browser.
The Project Wizard opens, as shown in the following image.
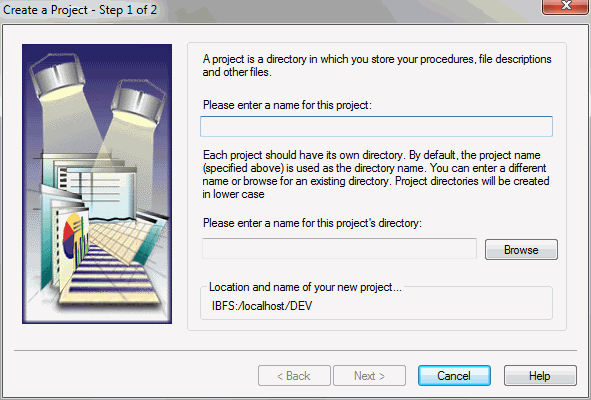
In the Create a Project - Step 1 of 2 dialog box, you can:
The Project Wizard displays the project name (with spaces and special characters corrected) as the default directory in the second input field. Optionally, you can enter the name of a subdirectory associated with another project file so that the new project shares project files with the existing project.
The location and name of the new project appears at the bottom of the dialog box.
The Create a Project - Step 2 of 2 dialog box opens, as shown in the following image.
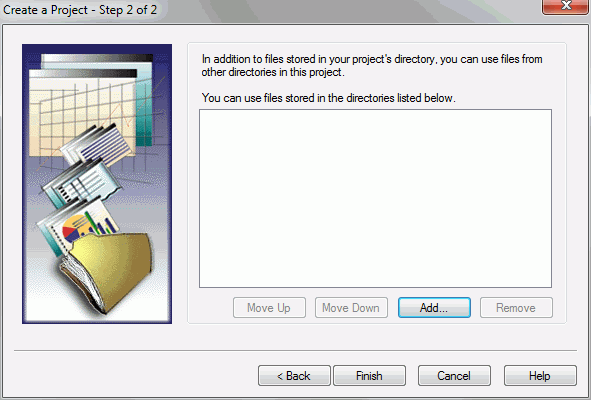
From this dialog box, you can add other directories to the project path. Project files in those directories are visible to the project and accessible for development.
The Browse For Folder dialog box opens, as shown in the following image.
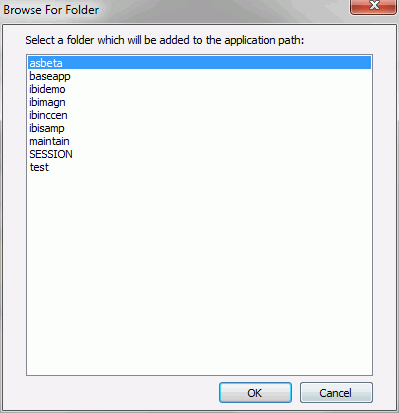
Repeat this step to add more directories to the project path.
The new project now appears under the Local Projects node.
You can update the directory folders associated with a Project through the File/Folder Properties panel. To add a file to the project, right-click the file, and then click Add to Project.
A new application with the default name, newapp, appears.
Note: If the APPROOT of the WebFOCUS Client and the APPROOT of the Reporting Server file point to the same place, the application you create appears below the Data Servers node and the Web Applications node because of the common Application Root directory.
You can add to the new application by right-clicking the application folder, pointing to New, and then clicking Procedure, Report, SQL Report, Chart, SQL Chart, HTML/Document, Synonym, Synonym via Metadata Canvas, Define Function Library, Upload Data, WebFOCUS StyleSheet, Text Document, XML Document With ESRI Configuration, or Application. You can also delete the new application by right-clicking the application folder, and clicking Delete.
The option to create a new folder in the repository area can be restricted for specific users or groups of users.
To create a new folder in the repository area, follow these steps:
A new folder with the default title, NewFolder1, appears.
The name and title of the folder can be modified in the File/Folder Properties panel.
Also, the tree differs depending on whether it is set to display titles or names.
To add to the new folder, right-click the application folder, point to New, and then click Procedure, Report, SQL Report, Chart, SQL Chart, HTML/Document, Visualization, Alert, Reporting Object, URL, Cascading Style Sheet, WebFOCUS StyleSheet, Text Document, Schedule, Distribution List, or Library Access List. To delete the new application, right-click the application folder, and click Delete.
| WebFOCUS |