Procedure: How to Create Mailing Labels
- In Report Painter, choose Format from the Report menu to open the Report Options dialog box.
- Click either Portable Document Format (PDF) or Postscript (PS) as the selected output format.
-
Click
the Label Options button from the Format tab.
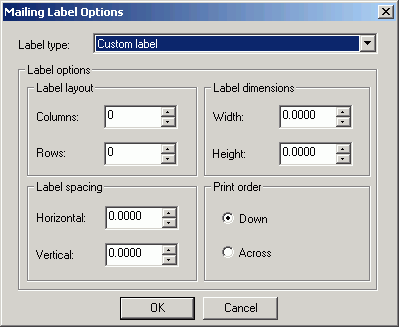
The Mailing Label Options dialog box opens.
Note: The Label Options button only appears for PDF and PS Styled report formats.
-
Select
the Label type and define the Label options. For:
- A Custom label, define the Label options and choose Print order.
- All other present label types, the Label options are predefined, choose Print order.
- Click OK to close the Mailing Labels Options dialog box.
- Click OK to close the Report Options dialog box and return to Report Painter.
- In Report Painter, add the fields you want to sort by.
-
Assign
a page break to the sort field so that each record is printed on a
separate label, and hide the sort field so that it does not appear
on the page.
- Right-click the By sort field and click Options. The Field Properties dialog box opens. Click the Sort tab and select On from the Page Break drop-down list in the Actions area. Click OK to return to the Report Painter window.
- Right-click the BY sort field and select On from the Invisible context menu.
-
Suppress
page numbering.
- Click Output from the Report menu to open the Report Options dialog box.
- In the Page numbering area, select OFF without lead space to suppress page numbering and the two leading blank lines that normally appear on each page. Click OK to return to the Report Painter window.
-
Create
the label as a page heading.
- Position the cursor in the page heading by clicking your left mouse button in the heading area.
-
Double-click or drag an address field from the Fields tab of
the Object Inspector. Press the Enter key to bring your cursor to
the next line. Continue until you have all your address fields in
the Page Heading.
Note: If Page Headings are not visible, ensure that Boundaries is selected on the View tab of the Report Options dialog box.
- Click Run to view the mailing labels. The labels will print exactly as they appear in the report output.
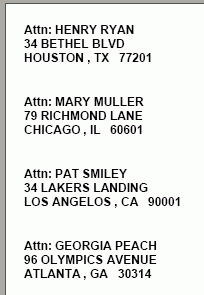
Example: Creating Mailing Labels
Suppose you want to create mailing labels to distribute a report by postal mail. The following example shows how to create mailing labels for the Gotham Grinds store managers.
- Open the GGSTORES data source in Report Painter.
- Click Format from the Report menu to open the Report Options dialog box.
- Click Portable Document Format (PDF) as the selected output format.
- Click the Label Options button from the Format tab. The Mailing Label Options dialog box opens.
- Click Custom Label from the Label Type drop-down list.
- Type the following
label options in the corresponding sections of the Mailing Label Options
dialog box:
- Label layout
-
- Columns: 2
- Rows: 10
- Label dimensions
-
- Width: 4.0
- Height: 1.0
- Label spacing
-
- Horizontal: 0.188
- Vertical: 0.0
- Click OK to close the Mailing Labels Options dialog box.
- Click OK to close the Report Options dialog box and return to Report Painter.
- Add your sort column. Click the By button on the Report Painter toolbar and double-click or drag STORE_CODE from the Fields tab of the Object Inspector.
- Assign a page
break and hide the sort field.
- Right-click Store ID in the Report Painter window and click Options. Click the Sort tab and select On from the Page Break drop-down list in the Actions area. Click OK to return to the Report Painter window.
- Right-click Store ID in the Report Painter window and select On from the Invisible context menu.
- Suppress page
numbering.
- Click Output from the Report menu to open the Report Options dialog box.
- From the Page numbering drop-down list, select OFF without lead space to suppress page numbering and the two leading blank lines normally on each page. Click OK to return to the Report Painter window.
- Create the
label as a page heading.
- Position the
cursor in the page heading by anywhere in the heading area. Type
the following in the heading area:
Attn:
Note: If Page Headings are not visible, ensure that Boundaries is selected on the View tab of the Report Options dialog box.
- Press the space bar to leave a blank space after it.
- Double-click or drag ADDRESS1 from the Fields tab of the Object Inspector. Position the cursor after ADDRESS 1 and press the Enter key to bring your cursor to the next line.
- Double-click or drag STORE_NAME from the Fields tab of the Object Inspector. Position the cursor after STORE_NAME and press the Enter key to bring your cursor to the next line.
- Double-click or drag ADDRESS2 from the Fields tab of the Object Inspector. Position the cursor after ADDRESS 2 and press the Enter key to bring your cursor to the next line.
- Double-click or drag CITY from the Fields tab of the Object Inspector. Position the cursor after CITY and insert a comma and a space. Then double-click or drag STATE. Position the cursor after STATE, add two spaces and double-click or drag ZIP.
- Position the
cursor in the page heading by anywhere in the heading area. Type
the following in the heading area:
- Click Run to
view the mailing labels. The labels will print exactly as they appear
in the report output, as shown in the following image.