How to: Reference: |
You can control the wrapping of report data in a report, thus preventing line breaks within report cells. When using HTML output, most web browsers will, by default, wrap alphanumeric report data that does not fit on a single line in a cell.
This bumps the contents of the cell onto a second line. A web browser wraps data based on its algorithmic settings. Use the WRAP attribute if you wish to suppress a web browser data wrapping.
By default, WRAP is set to ON for HTML output, allowing each individual browser to define the width of each column in the report. For PDF, PS, DHTML, PPT, and PPTX output, WRAP is set OFF by default. For these positioned output formats in which the location of each item in the report is explicitly defined, WRAP = ON is not a valid value, but specific widths can be defined using the n option.
In PDF and PostScript report output, you can control the line spacing in wrapped lines by using the WRAPGAP attribute.
Wrapping Data in PDF Reports That Use the OVER Phrase
OVER allows the presentation of a single data record across multiple lines within a report. By default, when OVER is defined within a request, the report shifts from a columnar presentation to a row level presentation. The field titles are displayed to the left of each value, rather than at the top of each column. This layout was not designed to be aligned in any specific fashion but to allow for the presentation of multiple elements of data within a small area. In many cases, reports that place columns over each other use blank AS names in order to align the columns properly. You can use the WRAP attribute to wrap data in PDF reports that use OVER and this technique works well with blank AS names.
Wrapping Data in PDF Reports That Use the ACROSS Phrase
In a request that uses ACROSS, the output displays each value of the ACROSS field above the set of data columns applicable to that ACROSS value.
If the ACROSS value is longer than the width of its columns, you can wrap the ACROSS value within the width of its underlying columns.
By default, the width of each ACROSS value group (the ACROSS value and the data columns within) is defined as the largest of either the sum of the width of the data columns or the largest ACROSS value for that group. With wrapping, the size of each ACROSS wrap will be defined by the width defined based on this rule including all data columns and any non-wrapped across fields.
The width of each ACROSS column for a given ACROSS group is defined as the length of the largest value for that ACROSS group. A single width is used for each group so in groups where the values are shorter than the longest value, you will see a larger right gap within the cell.
For reports containing multiple ACROSS fields, you can wrap individual ACROSS fields or all of them. Each designated value will wrap within the defined ACROSS group.
To control wrapping of text inside a report, use the following syntax within a StyleSheet.
TYPE=type, [subtype,] WRAP=value, $
where:
- type
Is the report component you wish to affect, such as REPORT, HEADING, or TITLE.
- subtype
Is any additional attribute, such as COLUMN, ACROSS, ITEM etc. that is needed to identify the report component that you are formatting. See Identifying a Report Component in a WebFOCUS StyleSheet for more information about how to specify different report components.
- value
Is one of the following:
- ON, which turns
on data wrapping. ON is the default value for HTML report output.
For PDF, PS, DHTML, PPT, and PPTX report output, WRAP is set OFF
by default. For these positioned formats in which the location
of each item in the report is explicitly defined, WRAP = ON is not
a valid value, but specific widths can be defined using the n option.
For HTML reports, WRAP is supported with all fields. For PDF reports,
WRAP is supported only with embedded fields, not text.
Note: This setting is not supported when using WRAP with OVER in PDF report output.
- OFF, which turns off data wrapping. This is the default value for PDF, PS, DHTML, PPT, and PPTX report output.
- n, which represents a specific numeric value that the column width can be set to. The value represents the measure specified with the UNITS parameter. This setting is supported for wrapping data in PDF reports that use the OVER phrase.
- ON, which turns
on data wrapping. ON is the default value for HTML report output.
For PDF, PS, DHTML, PPT, and PPTX report output, WRAP is set OFF
by default. For these positioned formats in which the location
of each item in the report is explicitly defined, WRAP = ON is not
a valid value, but specific widths can be defined using the n option.
For HTML reports, WRAP is supported with all fields. For PDF reports,
WRAP is supported only with embedded fields, not text.
Note: WRAP=ON and WRAP=n are not supported with JUSTIFY.
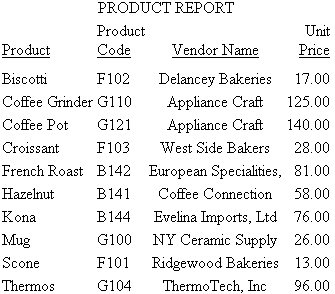
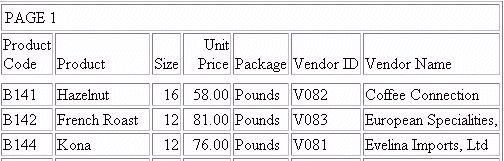
The following example, with WRAP=ON, wraps report data based on the web browser functionality. Note that because this value is the default, there is no need to specify WRAP=ON in the report request syntax.
TABLE FILE GGPRODS
PRINT SIZE UNIT_PRICE PACKAGE_TYPE
VENDOR_CODE VENDOR_NAME
BY PRODUCT_ID BY PRODUCT_DESCRIPTION
ON TABLE SET STYLE *
TYPE=REPORT, GRID=ON, $
ENDSTYLE
END
Note: Wrap is determined by the size of your browser window, so you may need to shrink your window to see the example wrap the data as in the following image.
Notice that records in the Vendor Name column break to a second line.
The following report request, with WRAP=OFF, suppresses the web browser data wrapping:
TABLE FILE GGPRODS
PRINT SIZE UNIT_PRICE PACKAGE_TYPE
VENDOR_CODE VENDOR_NAME
BY PRODUCT_ID BY PRODUCT_DESCRIPTION
ON TABLE SET STYLE *
TYPE=REPORT, WRAP=OFF, $
TYPE=REPORT, GRID=ON, $
ENDSTYLE
END
The output is:
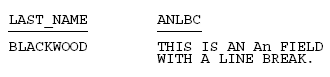
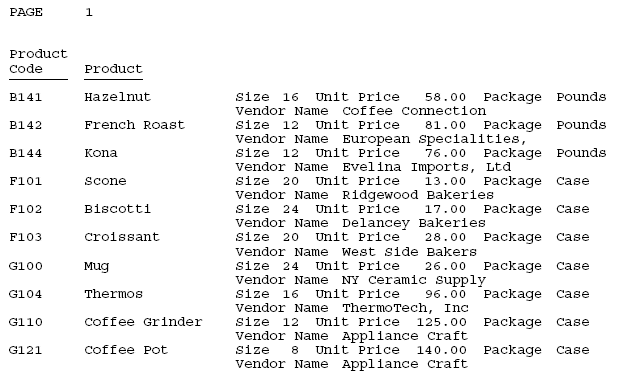
The following request against the GGPRODS data source places the column VENDOR_NAME on a new line with the OVER phrase. By default, wrap is turned off and must be defined explicitly within the StyleSheet:
TABLE FILE GGPRODS
PRINT SIZE UNIT_PRICE PACKAGE_TYPE OVER
VENDOR_NAME
BY PRODUCT_ID BY PRODUCT_DESCRIPTION
ON TABLE PCHOLD FORMAT PDF
END
The partial output is shown in the following image.
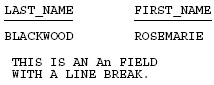
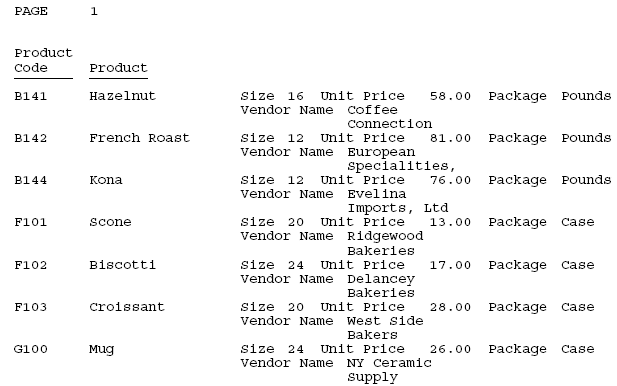
The following version of the request turns wrapping on and sets a column width of 1.5 for the VENDOR_NAME column, which has been placed on a new line because of the OVER phrase:
TABLE FILE GGPRODS
PRINT SIZE UNIT_PRICE PACKAGE_TYPE OVER
VENDOR_NAME
BY PRODUCT_ID BY PRODUCT_DESCRIPTION
ON TABLE PCHOLD FORMAT PDF
ON TABLE SET STYLE *
TYPE=REPORT, COLUMN=VENDOR_NAME, WRAP=1.5,$
ENDSTYLE
END
The partial output shows that the VENDOR_NAME column now wraps. Notice that turning WRAP ON causes the OVER value, not the OVER TITLE, to wrap:
Wrapping ACROSS Values is supported for HTML and PDF output formats.
TYPE=ACROSSVALUE, [ACROSS={fieldname|Nn|An}] WRAP={OFF|ON} ,$ where:
- ACROSS
- If you have a request with multiple ACROSS fields, you can identify each field using the ACROSS identifier. You only need to include the ACROSS identifier if you have multiple ACROSS fields in your request.
- fieldname
- Specifies a horizontal sort row by its field name.
- Nn
- Identifies a column by its position in the report. To determine this value, count vertical sort (BY) fields, display fields, and ROW-TOTAL fields, from left to right, including NOPRINT fields.
- An
- Specifies a horizontal sort row by its position in the sequence of horizontal sort rows. To determine this value, count horizontal sort (ACROSS) fields. Cannot be combined with a field name specification in the same StyleSheet.
- OFF
- Turns off wrapping of the ACROSS values. OFF is the default value.
- ON
- Turns on wrapping of the ACROSS values.
Note: WRAP=ON is not supported with JUSTIFY.
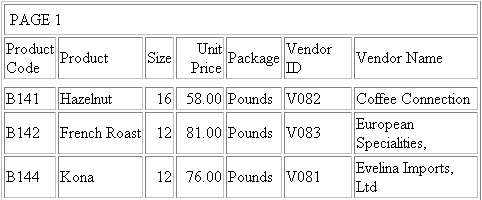
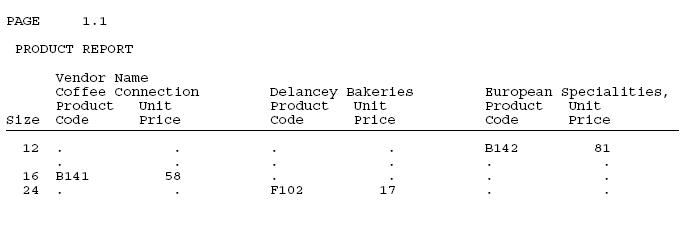
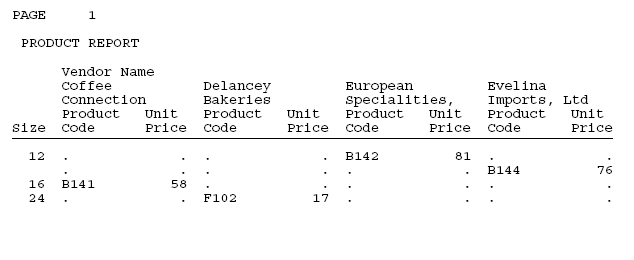
In the following request against the GGPRODS data source, VENDOR_NAME is an ACROSS field:
TABLE FILE GGPRODS
HEADING
" PRODUCT REPORT"
" "
PRINT PRODUCT_ID UNIT_PRICE/D5
ACROSS VENDOR_NAME
BY SIZE
WHERE VENDOR_NAME GT 'B' AND VENDOR_NAME LT 'F'
ON TABLE PCHOLD FORMAT PDF
ON TABLE SET STYLE *
TYPE=REPORT, GRID=OFF, $
TYPE=REPORT, COLUMN=PRODUCT_ID, WIDTH=.25, $
TYPE=REPORT, COLUMN=UNIT_PRICE, WIDTH=.25, $
ENDSTYLE
END
As shown in the following image, the output is too wide for one panel because some of the ACROSS field values (vendor names) are longer than the sum of the product code and unit price columns under them.
The following version of the request wraps the ACROSS values (TYPE=ACROSSVALUE, WRAP=ON ,$):
TABLE FILE GGPRODS
HEADING
" PRODUCT REPORT"
" "
PRINT PRODUCT_ID UNIT_PRICE/D5
ACROSS VENDOR_NAME
BY SIZE
WHERE VENDOR_NAME GT 'B' AND VENDOR_NAME LT 'F'
ON TABLE PCHOLD FORMAT PDF
ON TABLE SET STYLE *
TYPE=REPORT, GRID=OFF, $
TYPE=REPORT, COLUMN=PRODUCT_ID, WIDTH=.25, $
TYPE=REPORT, COLUMN=UNIT_PRICE, WIDTH=.25, $
TYPE = ACROSSVALUE, WRAP=ON,$
ENDSTYLE
END
The report now fits on one panel, as shown in the following image.
When OVER fields are defined with blank AS names (the value of the title of the column is set to empty ' '), they can be used to build a report with multiple data lines that present in an aligned grid fashion.
In this type of report, the column titles are usually indicated by adding multiple corresponding lines to the page headings rather than using the default titles that display to the left of the column field values. To present OVER fields with unique titles that take advantage of these new alignment features, you can place the column titles in independent fields and include them as fields within the given request.
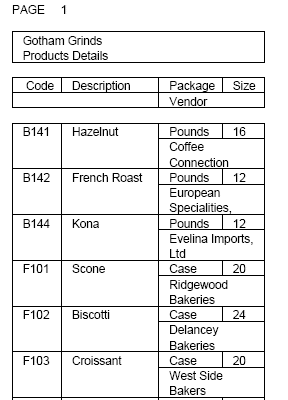
The following example demonstrates using OVER with blank AS names and WRAP to build a multi-data line report:
TABLE FILE GGPRODS
PRINT PACKAGE_TYPE AS '' SIZE  AS '' OVER
VENDOR_NAME AS ''
BY PRODUCT_ID  AS ''
BY PRODUCT_DESCRIPTION  AS ''
ON TABLE SUBHEAD
"Gotham Grinds"
"Products Details"
HEADING
" Code <+0>Description<+0>Size  <+0>Package"
-*" <+0> <+0>Vendor"
" <+0>Vendor"
ON TABLE PCHOLD FORMAT PDF
ON TABLE SET STYLE *
TYPE=REPORT, FONT=ARIAL, SIZE=10, SQUEEZE=ON,$
TYPE=REPORT, COLUMN=PACKAGE_TYPE, SQUEEZE=.5 ,$
TYPE=REPORT, COLUMN=VENDOR_NAME, WRAP=1 ,$
TYPE=REPORT, BORDER=ON, $
TYPE=HEADING, LINE=1, ITEM=1, BORDER=ON, $
TYPE=HEADING, LINE=1, ITEM=2, BORDER=ON, POSITION=PRODUCT_DESCRIPTION,$
TYPE=HEADING, LINE=1, ITEM=3, BORDER=ON, POSITION=SIZE ,$
TYPE=HEADING, LINE=1, ITEM=4, BORDER=ON, POSITION=PACKAGE_TYPE, $
TYPE=HEADING, LINE=2, ITEM=1, BORDER=ON, $
TYPE=HEADING, LINE=2, ITEM=2, BORDER=ON, POSITION=PACKAGE_TYPE,$
ENDSTYLE
END
On the report output, the Package Type and Size have been placed over the vendor name. The page heading has the corresponding titles. In the heading, the titles Package and Size have also been placed over the title Vendor Name. Note that the vendor name data wraps to maintain the alignment.
The width of both the column title and the column data for each OVER value is determined by the single SQUEEZE or WRAP value. The title will automatically size to the same width as the wrapped data column. If the column title is wider than the width defined for the column wrap, you can either define a smaller title or add your titles as OVER fields that can be sized independently.
The following examples demonstrate how to build a report with OVER and WRAP that has column titles longer than the designated WRAP size.
The following request defines two virtual fields to contain the column titles for the Product Name and Vendor Name fields. It then prints each virtual field next to its related data field and gives each a blank AS name. The first virtual field and data field are placed over the second virtual field and data field:
DEFINE FILE GGPRODS
TITLE_PROD/A20 = 'Product Description';
TITLE_VEND/A20 = 'Vendor Name';
END
TABLE FILE GGPRODS
PRINT TITLE_PROD AS '' PRODUCT_DESCRIPTION  AS '' OVER
TITLE_VEND AS '' VENDOR_NAME  AS ''
BY PRODUCT_ID  AS ''
ON TABLE SUBHEAD
"Gotham Grinds"
"Products Details"
ON TABLE PCHOLD FORMAT PDF
ON TABLE SET STYLE *
TYPE=REPORT, FONT=ARIAL, SIZE=10, SQUEEZE=ON,$
TYPE=REPORT, COLUMN=TITLE_PROD , SQUEEZE=1.25 ,$
TYPE=REPORT, COLUMN=TITLE_VEND , SQUEEZE=1.25 ,$
TYPE=REPORT, COLUMN=PRODUCT_DESCRIPTION, WRAP=.75 ,$
TYPE=REPORT, COLUMN=VENDOR_NAME, WRAP=.75 ,$
TYPE=REPORT, BORDER=ON, $
ENDSTYLE
END
The output shows that the titles and data align properly.

You can use the WRAPGAP attribute in a StyleSheet to control spacing between wrapped lines in PDF and PostScript report output.
type=component, WRAPGAP={ON|OFF|n}
where:
- component
- Is the component with wrapped lines.
- ON
- Does not leave any space between wrapped lines. ON is equivalent to specifying 0.0 for n.
- OFF
- Places wrapped data on the next line. OFF is the default value.
- n
- Is a number greater than or equal to zero that specifies how much space to leave between wrapped lines (using the unit of measurement specified by the UNITS attribute). Setting n to zero does not leave any space between wrapped lines, and is equivalent to specifying WRAPGAP=ON.
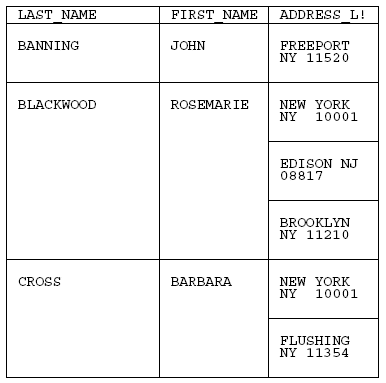
In the following request, wrapping is turned on for the ADDRESS_LN3 column of the report:
TABLE FILE EMPLOYEE
PRINT ADDRESS_LN3
BY LAST_NAME BY FIRST_NAME
WHERE LAST_NAME LE 'CROSS'
  ON TABLE PCHOLD FORMAT PDF
ON TABLE SET PAGE NOPAGE
ON TABLE SET STYLE *
type=report, grid=on, $
type=data, topgap=0.2, bottomgap=0.2,  $
type=data, wrapgap=off, $
type=REPORT, column=ADDRESS_LN3, wrap=1.0 ,$
END
With WRAPGAP=OFF, each wrapped line is placed on the next report line:

With WRAPGAP=ON, the wrapped lines are placed directly under each other:
You can only specify WRAPGAP for columns that have wrapping enabled (WRAP attribute or parameter set to ON or a number). The TOPGAP and BOTTOMGAP attributes specify how much vertical space to leave above and below a report component. Increasing the values or these attributes makes a decrease in spacing between wrapped lines more noticeable.