The following topics describe dimension related concepts
including designing a simple dimension load, interpreting a Dimension
Loader report, and running and scheduling a dimension load.
xDesigning Dimension Loads
The Manage tab provides access to the dimensions loaders.
These tools are fully integrated into your Administration view.
As you load data, you can immediately test new dimensions and measures
you have loaded.
Using the loaders, you can do the following:
- Define external
data that is retrieved and transformed in PMF.
- Define transformations
for the data and create a central view of data to use when loading
measures.
- Add FOCUS code
to execute MATCH or HOLD commands.
Data loads control all source data used for analysis and aggregation
in PMF. When you design loads, you are designing data loads for
each measure in the database, and also for the dimensions used to
slice and dice the data.
x
Reference: Sample Data From Source Tables
In the
Dimension Loader and Measure Loader, the Sample Data button enables
you to view data from any of your source tables. Viewing source
table data is useful for determining which fields to use when designing
data loads for your measures and dimensions.
To view sample data, select the desired
source table data from the Source Table drop-down menu, then click
the Sample Data
 button.
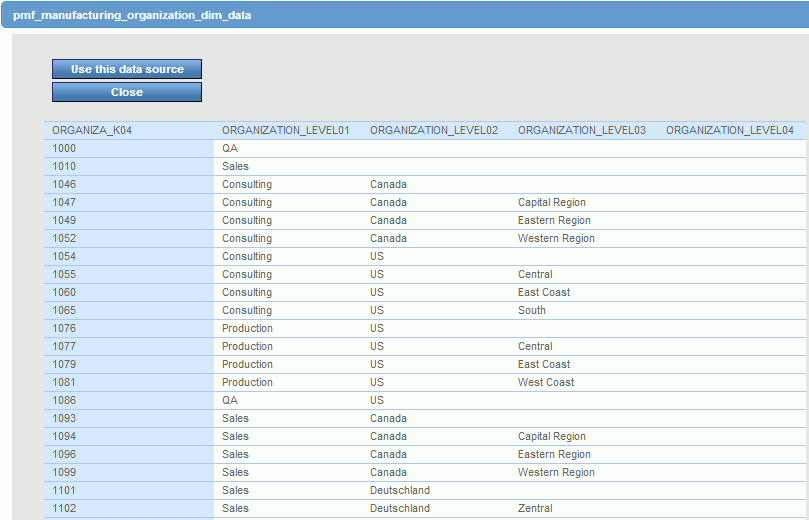
Sample
Data is displayed in a new browser window, as shown in the following image.
Tip: To
avoid connection errors when designing a load, you can use the Sample
Data button to test the selected data source to make sure it has
been set up correctly.
xDesigning a Simple Dimension Load
As you load dimensions, ensure that the metrics in PMF
show the correct level of responsibility in the hierarchy. The Dimension
Loader tools allow you to quickly map the tables and fields that
will serve as the source for the dimensions you will need to load.
The Dimension Loader controls the levels for dimensions used
throughout PMF. When you first create a new dimension, determine
its logical levels. For example, a Customer dimension might include
country, region, state, and city.
The mainstreet_century data mart supplied with PMF uses four
typical business dimensions: Location, Organization, Product, and
Time. All PMF applications must include a Time dimension.
Important: If you have existing measures, and dimensions
are loaded or reloaded, changing this information has a ripple effect
throughout the system, so make changes carefully. If you change
the intended value member or number of levels in any dimension,
you will probably need to reload all data for that dimension, as
well as reload all measures.
x
Procedure: How to Design a Simple Dimension Load
Note: If
your procedures and metadata are not located in the Mainstreet application,
make sure you have added the WebFOCUS application containing them
to the WebFOCUS Reporting Server APP PATH setting before you attempt
a load operation. You can do this using the Web Console.
The
following procedure outlines the steps required when designing a
simple dimension load. For information about designing a complex
dimension load when customizing the Time dimension, see Designing a Custom Time Dimension Load.
-
In the
Manage tab, click the Dimensions panel button.
-
Click
a dimension, for example, Organization.
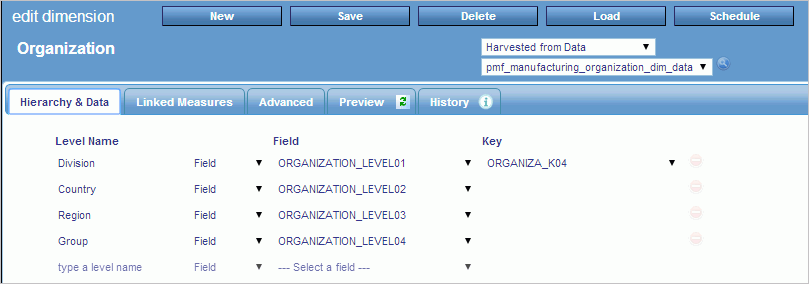
The Edit Dimension panel opens, as shown in the following
image.
Note: The
Dimension Loader automatically loads and displays the levels defined
for the metadata and checks the dimension to make sure it is correctly
set up. If anything is wrong, the Load status list displays the
error.
-
From
the first drop-down menu, select one of the following options:
-
Harvested
from Data. Choose this option to immediately start creating
a structure from a preexisting data source.
-
Collected
from Users. Choose this option if you want to create
a structure yourself.
-
From
the second drop-down menu, select a source table or Master File for
the dimension.
-
In the
Level Name field, type a dimension level name for each dimension
you add.
Note: To change the order of the dimension levels,
place the mouse over the dimension you wish to move and use the  icon
to drag the dimension up or down.
-
From
the drop-down menu, select Top, Field,
or Define.
Note: This field is only available if you have selected
the Harvested from Data option from the first
drop-down menu.
-
Do one
of the following:
- If you selected Top from
the drop-down menu, in the Field box, type the name you want to
display as the top-level dimension value (for example, Company-wide
or All). You will most likely want to add a new level above all
existing levels before using the Top option.
- If you selected Define from
the drop-down menu, type the code in the Field box. Code can span
multiple lines, and this field can only display one line of code
at a time.
To view, and optionally edit, multiple lines of code
displayed at the top of the Dimension Loader, click the Edit button.
Click the OK button to save any changes,
otherwise click the Cancel button.
- If you selected Field from
the drop-down menu, select a field from the Field drop-down menu.
Note: Whenever
you make any changes in the Dimension Loader, the changes will not
be effective until you save the changes and load the dimension and
any associated measures.
x
Reference: Dimension Loader Options
When
you design a dimension load, the following options are available
in the Dimension Loader.
|
Option
|
Description
|
|---|
|
New
|
This button opens a new Dimension loader.
|
|
Save
|
This button saves metadata information for
this dimension. You must save any changes you make before you can
perform a dimension load.
|
|
Load
|
This button performs the dimension load.
Use this to load dimensions after you add new or edit existing information
in the Dimension Loader.
|
|
Delete
|
This button deletes the selected dimension.
|
|
Schedule
|
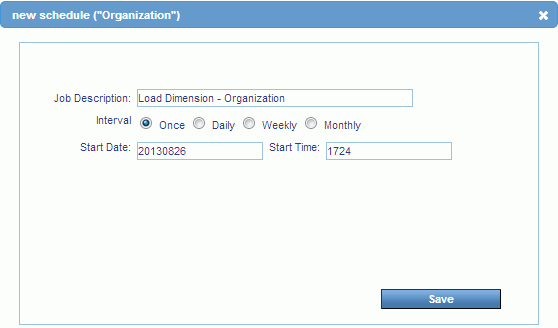
This button opens the Dimension Load Schedule
panel where you can schedule a one-time or recurring dimension load.
For more information, see Running and Scheduling a Dimension Load.
|
|
Sample Data
|
This button displays a report in a new browser
window, showing sample data for the source table you selected in
the Source Table drop-down menu. For more information, see Sample Data From Source Tables.
|
|
Advanced Tab
|
|
Description
|
This button opens a field box in which you
can type a description of the dimension load. Click OK to
save the description or Cancel to close the
field box without saving your changes.
|
|
Default Level
|
Select the dimension level
that will be automatically displayed for the dimension. The available
options are Region, Plant,
and Store.
|
|
Dimensional Tolerances (check box)
|
Selecting this check box activates
dimensional tolerances for this dimension. This enables you to select
a measure and configure tolerances for each dimension level value.
Note: This
option will only be available if Dimensional Measure Tolerances
in the Tolerances settings is enabled. For more information, see How to Set Dimensional Measure Tolerances.
|
|
Dimensional Weighting (check box)
|
Selecting this check box activates
dimensional measure-to-objective weighting for this dimension. This
enables you to select an objective and configure tolerances for
each dimension level value.
Note: This option will
only be available if Dimensional Measure Weights in the Tolerances
settings is enabled. For more information, see How to Set Dimensional Measure-to-Objective Weighting.
|
|
Distinct Count Aggregation (check box)
|
Enable this option to allow
aggregate measure values with distinct Dimension counts for higher-level
aggregation.
|
|
If data changes
| |
|
Also use surrogate keys (check box)
| |
|
Prefix Code
|
In the field box type FOCUS or SQL code
that will run before the dimension is loaded. Click OK to
save the code or Cancel to close the field
box without saving your changes.
If the table you are using
is DBA protected, you can type the command SET USER = user_DBA_
password before you select the source table. For example,
the sample Century Corp data uses the password WEBFOCUS.
|
|
Preview Tab
|
| |
This tab runs and displays the Dimension
Loader report in the Data for tab of the Dimension Loader.
This report shows you how the load will be performed. For more information,
see Interpreting the Dimension Loader Report.
Note: You must select
at least a Level 1 field in order to activate this option.
|
Note: As you load dimensions, make sure
to document them in the Description field box.
xInterpreting the Dimension Loader Report
After you have designed the dimension load, click the Preview tab
to open the preview of the Dimension Loader report.
Note: You must select at least a Level 1 field in order
to activate the Preview option.
The following is an example of the Dimension Loader report.
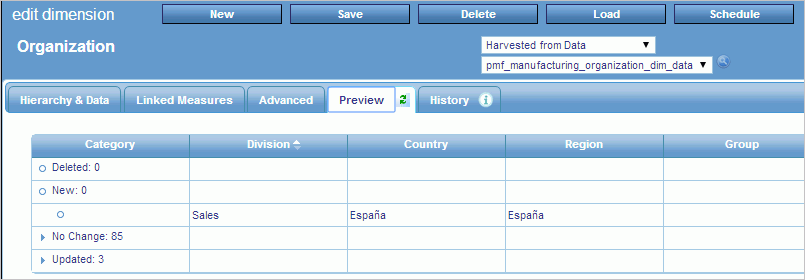
The Dimension Loader report displays the hierarchy of dimension
values to be loaded. The report compares data to be loaded to what
is already loaded so you can tune Dimension loads. The report shows
you the changes you will make when you load the new data.
Minus (-) signs appear next to records to indicate that the records
will be deleted. Plus (+) signs appear next to records to indicate
that the records will be added. If a record does not have a plus
or a minus sign, it means that the record already exists for the
dimension. You can sort on the signs so that the records appear
in ascending or descending order.
After you are finished tuning the dimension load and are satisfied
that the data to be loaded is correct, click Save to
save the metadata. You cannot perform a new dimension load unless
the metadata has been saved. However, you can load an existing dimension
load provided no changes have been made since the last time it was run.
If changes are made, save the changes first, then load the dimension.
xSetting Up the Month Name Display in a Dimension Load
You can control how PMF displays the values for months,
text, or numeric labeling (for example, Jan… Feb, or January… February,
and so on), and the order these components display (for example,
2009/December or December/2009).
Month Names to be displayed are actual data that is stored in
the PMF data mart. To set up Month Name display, you can use the
Dimension Loader for the Time Dimension.
x
Procedure: How to Set Up Month Name Display in the Time Dimension
-
On the Manage
tab, click the Dimensions panel button, then
click the Time Dimension. PMF displays the
Edit Dimension panel for Time. The example below shows the typical
configuration for Time (using Time AutoGen):

-
In the Month
Display drop-down menu, select an option from the table list below:
|
Option
|
Description
|
|---|
|
Number (default)
|
Displays the month as (most typically) a
two-digit number.
|
|
Abbreviation After Year
|
Displays the month as a name, using the
standard three-character abbreviation for the month (for example, Jan,
Feb, Mar, and so on).
Position the month name after the Year
(for example, 2009/Jan, 2009/Feb, 2009/Mar, and so on).
Note: If
you are using PMF configured for another language other than English,
the length of the Abbreviation could vary, or be the same as the
full length.
|
|
Abbreviation Before Year
|
Displays the month as a name, using the
standard three-character abbreviation for the month (for example, Jan,
Feb, Mar, and so on).
Position the month name before the Year
(for example, Jan/2009, Feb/2009, Mar/2009, and so on).
Note: If
you are using PMF configured for another language other than English,
the length of the Abbreviation could vary, or be the same as the
full length.
|
|
Full Name After Year
|
Displays the month as a name
using the long version of the name of the month (for example, January, February,
March, and so on).
Position the month name after the Year
(for example, 2009/January, 2009/February, 2009/March, and so on).
Note: If
you are using PMF configured for another language, the length of
the Full Name could vary, or be the same as the Abbreviation.
|
|
Full Name Before Year
|
Displays the month as a name using the long version
of the name of the month (for example, January, February, March,
and so on).
Position the month name before the Year (for example,
January/2009, February/2009, March/2009, and so on).
Note: If
you are using PMF configured for another language, the length of
the Full Name could vary, or be the same as the Abbreviation.
|
Note: The position you select does
not affect how the dates sort in any PMF Views or Gadgets.
-
If you are
using an alternate Time Dimension layout (for example, Years/Months/Weeks,
Years/Quarters/Months/Weeks), you will see another option called
Month Level. For this option, tell PMF the level in the Time Dimension
that represents Months, so that PMF can determine where the name
or number is to be displayed.
-
Click Save,
then click Load to reload your Time Dimension
and populate it with display month values as you indicated in the
Time Dimension configuration. Once you do this, you will see the
Month Name option displayed on all PMF Views and Gadgets.
Example: Month Names in PMF Views
After
you have configured Month Name display, Month Names display in your
PMF Views and Gadgets the way you have configured them, as shown
in the following examples. The following examples use the data from
the PMF manufacturing demo data mart.
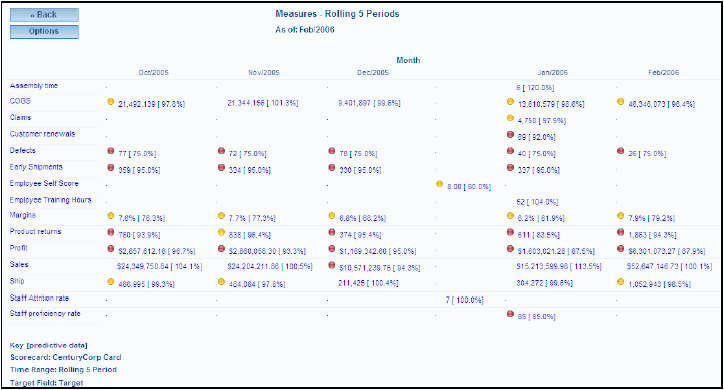
Rolling 5 Periods. The
following is an image which displays View drilled to Month level,
with the current date set to Feb 2006.
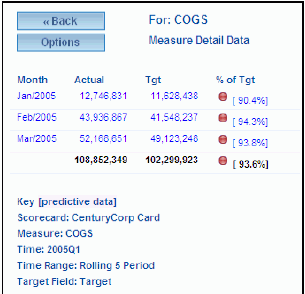
Measure Details. The
following is an image which displays the Month Names of the Measure
Details drill for 2005/Q1.
xDesigning a Custom Time Dimension Load
Time dimensions provide time-based views of your data.
PMF has default Time dimensions that are available, or you can create
custom Time dimensions. The Dimension Loader enables you to specify
a custom Time dimension that supports any regular or irregular time
period, which can be greater than or less than 12 months. You can specify
custom start and end dates for each period, and you can choose between
weekly or monthly rollups at the lowest dimension level.
Performance Management Framework 5.1.3 now supports up to five
levels of logical Time. This provides you with the ability to create
a Time Dimension that goes down to display more detail as needed.
You can specify Time in many more flexible ways. You can split
Time at up to six levels. For example, you could create a calendar
that specifies weeks, months, quarters, half-years, and years.
Some examples of possible configurations include:
- Year/Quarter/Month/Week
- Year/Period/Week
- Year/Semi-Year/Quarter/Month
To configure PMF to support more Time levels, follow the same
directions as you would for Alternate Time Dimensions in the PMF
documentation. The Time Dimension Loader will allow you to specify
up to five levels. You will need to build and deploy your Calendar
file to contain the specific dates that map to your Time Dimension
levels.
Time dimensions must be three levels, and can represent the standard
Y/Q/M (Year/Quarter/Month) time structure, or any other non-standard
time structure.
You can configure any arbitrary custom calendar, regardless of
regularity, where you define the three-level Time dimension and
the trending time parameters. PMF automatically generates the Time
dimension values and adjusts inbound dates for measures to map to the
correct fiscal periods you specified. If you are setting the default
Today date to use the system clock date, PMF automatically maps
the current system date to the correct fiscal time period when you
run views.
Examples of custom fiscal calendars include
the following:
- A 12-month,
4-quarter July-June calendar in the Y/Q/M structure.
- A 12-month,
3-trimester January-December calendar in the Y/T/M structure.
- A 13-period
calendar structured as 13 periods of 4 weeks each per year.
If you select a start month other than January, for example,
April, then month 01 of the calendar would be April, month 02 would
be May, and so forth. The fiscal year of a custom calendar is the
calendar year of fiscal month 12. If April of 2006 is month 01,
then April is treated as month 01 of fiscal year 2007, since month
12 is March 2007.
PMF can create almost any arbitrary three-level Time dimension
provided that the data is properly defined in an accessible data
source. Non-standard Time dimensions can be either regular or irregular.
A regular Time dimension always has the same number of lower level
entries for each and every upper level entry.
If your year is structured into 13 fiscal periods and every fiscal
period always has exactly 4 fiscal weeks, then your data is regular.
If you occasionally have a fiscal year with 14 fiscal periods or
a fiscal period with 5 fiscal weeks (which can happen in situations
where you need to adjust for extra days in the year), then your
data is irregular.
PMF can work with both regular and irregular calendars. Irregular
calendars require you to set up a custom data source that details
how the calendar works.
x
Creating a Custom Time Dimension From an External Data Source
PMF can create a custom Time dimension from an external data
source, provided that the external data source is accessible to
the PMF environment and is properly configured. The WebFOCUS adapter
must be set up to access the external data source before mapping the
dimension.
The external data source can contain regular or irregular time
data. PMF determines regularity or irregularity by inspecting the
data. If the time data is regular, PMF computes the prior time periods
automatically. PMF defines a prior time period as a time period
with identical second and third-level values when the year (first
level) is one year earlier. If the time data is irregular, you must
add prior time period information to the time source. For example,
if you have a custom calendar with 53 weeks, PMF cannot determine
how to map a 53 week year onto the prior 52 week year, and you must
define the prior time period information in the source data. If
PMF determines that data is irregular and prior date information
is missing, the system issues an error message.
All fields and data values must be the same length, in alpha
format. For example, if the source data has single digit low values
and double digit high values, the single digit values must have
leading zeros to make the values equal in length.
The external data source must be a standard WebFOCUS Master File
located in the WebFOCUS application path (APP PATH). The following
fields must be defined in the WebFOCUS Master File for both regular
and irregular Time dimensions.
|
Field Name
|
Description
|
|---|
|
TIME_KEY
|
Key field used to join to the measures source
data.
|
|
TIME_LEVEL01_VALUE
|
Data value of the first level in the Time
dimension hierarchy.
|
|
TIME_LEVEL02_VALUE
|
Data value of the second level in the Time
dimension hierarchy.
|
|
TIME_LEVEL03_VALUE
|
Data value of the third-level in the Time
dimension hierarchy.
|
|
START_DATE
|
Calendar date of the first day of the time
period.
|
|
END_DATE
|
Calendar date of the last day of the time
period.
|
The following fields must be defined
in the WebFOCUS Master File for only irregular Time dimensions.
|
Field Name
|
Description
|
|---|
|
PRIOR_TIME_LEVEL01_VALUE
|
Data value of the first level of the prior
period.
|
|
PRIOR_TIME_LEVEL02_VALUE
|
Data value of the second level of the prior period.
|
|
PRIOR_TIME_LEVEL03_VALUE
|
Data value of the third-level of the prior
period.
|
x
Reference: Sample Files Containing External Time Data
The
PMF sample data directory includes examples of external time data.
The following five (.csv) sample files include Master File definitions
and comma-delimited data files: time_source_reg1, time_source_reg2,
time_source_irreg1, time_source_irreg2, and time_source_irreg3.
If
you want to use these sample files, you must add the appropriate
WebFOCUS FILEDEF statement into your WebFOCUS profile. In addition,
you must use the alternate Master File definitions for the source
of the measure data (centord) for the sample measures. Examples
of the appropriate code to use are contained in the following source files:
centord_reg1, centord _reg2, centord _irreg1, centord _irreg2, and
centord _irreg3.
x
Procedure: How to Load a Non-Standard Time Dimension From a Custom Data Source
Once
you have correctly set up a non-standard Time dimension data source,
perform the following steps to load the time data into the PMF database.
-
From
the Manage tab, click Dimensions, and then
select the Time dimension to access the standard
Time dimension load panel.
-
From
the first drop-down menu, select Harvested from Data.
-
From the second drop-down menu, select
the Master File containing your custom Time dimension data.
The panel displays the default settings for the custom
Time dimension.
-
Click
the Sample Data button to verify that your custom
time data is correct.
-
From
the Key Field drop-down menu, select the key field which links the Time
dimension source data to your measures source data.
-
Supply
a Level Name for each of the time levels. The default names are Year,
Quarter, and Month.
These names are displayed on most standard views.
-
To map
each time level to a field in the source data file, confirm that Field is
selected from the Source drop-down menu (this is the default), then
select TIME_LEVELnn_VALUE from the Field/Define
Code drop-down menu, where nn represents
the level number.
-
Click
the Preview button to display the data to be
loaded. For more information, see Interpreting the Dimension Loader Report.
-
Click
the Save button to save the dimension metadata
in the database.
-
Click
the Load button to load the dimension data
into the database.
x
Displaying Custom Time Dimension Data
For standard Time dimension data in the Y/Q/M (Year/Quarter/Month) format,
PMF displays quarterly data in the format yyyyQq,
where yyyy is the four digit year, and q is the actual
quarter number, for example, 2006Q1. PMF displays monthly data in
the format yyyy/mm, where yyyy is the four
digit year, and mm is the actual month number, for example, 2006/01.
Note that the letter Q in the quarterly data example, and the forward
slash in the monthly data example, were assigned using the Abbr.
column in the Dimension Loader for the Time dimension.
For non-standard Time dimension data, you can choose alternate
abbreviations of up to 5 characters for each level, or you can leave
them blank. For standard Y/Q/M time, when you are displaying information
at the monthly level, there is no need to display the value of the
quarter. Months 01-03 are quarter 1, months 04-06 are quarter 2,
and so on. However, in other situations, the value of the second
level might not be obvious. For example, if you are using 13 fiscal
periods and 52 weeks in the year, it may not be obvious that week
45 is in fiscal period 12. In these situations, you have the option
to always display the second level when viewing at the third-level,
by selecting the check box in the Req. column for time level 2 in
the Dimension Loader for the Time dimension.
If PMF determines that time level 3 has repetitive information
and the combination of time level 1 and time level 3 is not unique,
then time level 2 is automatically required for all views. In these
situations, the Req. check box is activated by default and is not
displayed in the Dimension Loader for the Time dimension.
x
Accessing Custom Time Dimensions in the Measure Loader
After you create a custom calendar, the Dimensions tab
of the Measure Loader displays the custom time levels you entered
when you specified a custom time source. In most situations, the
Measure Loader determines the time values from a custom time source,
and PMF automatically calculates the measure date from the Time
dimension. In the Field maps tab of the Measure Loader, the Date
Mapping drop-down menu displays the correct selection automatically.
![]() button.
button.


