You can add fans to the WebFOCUS FanClub application, but what happens when you want to update or remove fans? You need to create a form where you can change information about a fan or remove a fan from the data source.
This section is divided into the following:
- Defining a link from the HTML Table in ShowFan that opens the Update/Delete form.
- Creating the Update/Delete form.
- Writing the code that updates the data source.
- Writing the code that deletes the record from the data source.
- Writing the code that deletes the record from GetFanStack.
xDefining HTML Table Links
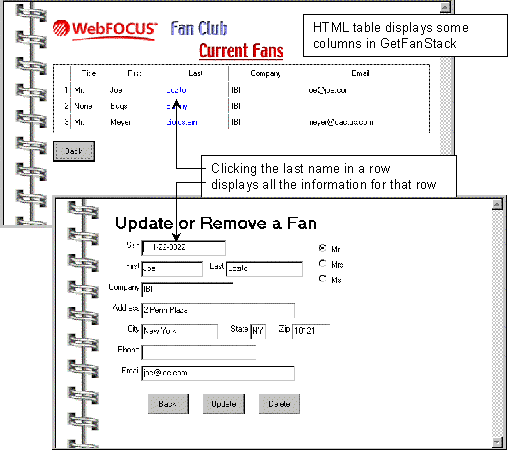
The end user will open the Update/Delete form by selecting a fan from the list of fans in the ShowFan form. As you will recall from the Basic Tutorial, ShowFan uses an HTML Table to display the contents of the data source stack GetFanStack, which contains all of the fans in the fannames data source. The following image illustrates the front end of the ShowFan and Update/Delete forms.

The application will determine which row the end user selected using the ClickRow syntax:
formname.tablename.ClickRow
The header row returns 0, and the first data row returns 1.
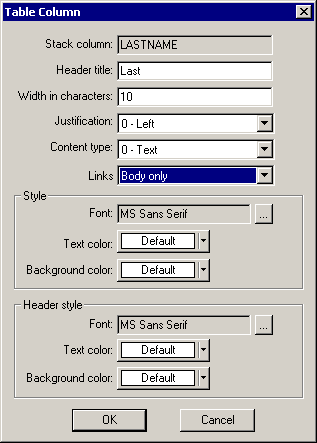
In order to take advantage of this feature, you need to enable links for the HTML Table, which you do by opening the HTML Table Control Columns dialog box, and then opening the Table Column dialog box for the Last column.
You also need to use the special ClickLink event instead of the Click event. ClickLink is unique to HTML Tables.
The row that the end user clicks in the HTML Table corresponds to the row in GetFanStack that you want to display in the Update/Delete form. Each data source stack has an associated variable called FocIndex, which determines what the current row is. When the end user clicks a row in the HTML Table on ShowFan, the FanClub application needs to set FocIndex to whatever the value of the row is. It does this using the COMPUTE command. It then opens the Update/Delete form.
The syntax of the COMPUTE command is
COMPUTE variable = expression;
where:
- variable
Is the FocIndex of GetFanStack (written GetFanStack.FocIndex).
- expression
Is ShowFan.HTMLTable1.ClickRow.
For the complete syntax of COMPUTE, see Command Reference in the Maintain Language Reference manual.
x
Procedure: How to Enable HTML Table Links
-
If you have not already done so, open the WebFOCUS FanClub application in the Maintain Development Environment.
-
Create a new form in the Start procedure.
-
Give it the name Update_Form.
-
Give it the title Update or Remove a Fan.
-
Open the ShowFan form.
-
Double-click the HTML Table to open the HTML Table Control Columns dialog box.
-
Double-click the Last column to open the Table Column dialog box.
-
In the Links list, select Body only, as shown in the following image.

-
Click OK to close the Table Column dialog box.
-
Click OK to close the HTML Table Columns dialog box.
-
Right-click the HTML Table, and in the shortcut menu, click Edit event handlers.
-
Select the ClickLink event.
-
Enter the following syntax in the Event Handler editor:
COMPUTE GetFanStack.FocIndex = ShowFan.HTMLTable1.ClickRow;
Winform Show Update_Form;
Tip: You can drag GetFanStack.FocIndex and Update_Form from the Project Explorer to the Event Handler editor to generate this syntax. You will have to expand GetFanStack in the Project Explorer to see FocIndex. You will have to type the rest of the syntax.
-
Close the Event Handler editor.
xCreating the Update/Delete Form
Your next step is to place controls on Update_Form. This form should look almost exactly like Form1. Making your forms look similar this way makes it easier for end users to learn your application, because forms that perform similar tasks work the same way. In fact, before you start developing your own applications, developing a template for the application is recommended.
For more tips on developing forms, see Developing and Using Forms in the Developing WebFOCUS Maintain Applications manual.
x
Procedure: How to Add Controls to Update_Form
-
Make Update_Form the active form.
-
Make Spiralbg the background image.
-
Drag GetFanStack from the Project Explorer to Update_Form.
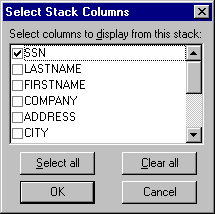
WebFOCUS Maintain opens the Select Stack Columns dialog box, as shown in the following image.

-
Select SSN, LASTNAME, FIRSTNAME, COMPANY, ADDRESS, CITY, STATE, ZIP, PHONE, EMAIL, and ENROLLMENT_DATE (all of the columns except for the last two).
-
Click OK.
WebFOCUS places prompted edit fields for all of these columns on Update_Form.
-
Change the prompt for Lastname to Last and the prompt for Firstname to First.
-
Move Last to the right, and move First up to its left.
-
Move up Company.
-
Move up Address.
-
Move up City.
-
Move State to the right of City.
-
Move Zip to the right of State.
-
Move up Phone.
-
Move up Email.
-
Move up Enrollment_Date.
-
Select Ssn, First, Company, Address, City, Phone, Email, and Enrollment_Date.
-
On the Layout toolbar, click Align Edges
 .
.
Then click the Center vertically button  .
.
(This command does not actually center the controls. Instead it aligns the prompted edit boxes by the left sides of the edit boxes.)
-
If necessary, select all of the controls and move them down so that you have room to add a title to a form.
-
Select the Text control
 .
.
-
Draw a box at the top of the form approximately where you want your title to be.
-
The text in the text control should be selected. Type Update or Remove a Fan and press Enter.
-
Double-click the Font property for the text control to open the Font dialog box.
-
Change the Font style to Bold and the Size to 18, and click OK.
-
Create a button with the name UpdateButton and the text Update.
Note: You cannot name the Update button "Update" because Update is a reserved word. Reserved words are command names, built-in function names, keywords, and other WebFOCUS terms that could cause unpredictable behavior if you use them to name components of your application.
However, there is no reason the text on the button (what the end user sees) cannot say Update.
For a complete list of reserved words, see Language Rules Reference in the Maintain Language Reference manual.
-
Create a Delete button named DeleteButton. Delete is also a reserved word.
-
Make the Ssn field read-only. Select it, then select Ssn_Edit in the drop-down list of controls in the Property sheet. Change the ReadOnly property from 0 - No to 1 - Yes.
x
Update_Form now looks almost like Form1 except that it has a slightly different purpose. However, Form1 has a group of radio buttons that enables the end user to supply the title of a fan (Mr., Mrs., or Ms.), and Update_Form needs this same set of radio buttons.
Rather than creating new radio buttons, you can copy them from Form1 and paste them into Update_Form.
WebFOCUS Maintain performs two types of copying; deep copy and shallow copy. When you perform a deep copy, WebFOCUS Maintain copies both the appearance of a control and any underlying data bindings, event handlers, and connections to resources. When you perform a shallow copy, WebFOCUS Maintain copies appearance only.
What happens if you perform a deep copy of the radio buttons from Form1 into Update_Form? You will see the three options (Mr., Mrs., and Ms.) and the tool tip text (Please select one) and the radio buttons will be bound to AddFanStack.TITLE (the TITLE column of AddFanStack). Since Update_Form uses GetFanStack, you need to change this binding to GetFanStack.TITLE. If you perform a shallow copy, you will see the three options and the tool tip text only. So, you do not save any time by using either a deep copy or a shallow copy.
You also need a Back button to close the form and return to the ShowFan form. The form ShowFan has a Back button, so you can copy it from here. If you perform a deep copy, you will get the button and the event handler self.WinClose (). If you perform a shallow copy, you will get the button only. You will have to reassign the event handler.
x
Procedure: How to Copy Controls to Update_Form
-
Open Form1, and copy the Mr., Mrs., Ms. set of radio buttons.
-
Close Form1 and paste the radio buttons into Update_Form by clicking Paste appearance in the Edit menu. (This command performs a shallow copy.)
-
Use the SelectedItem property to bind the set of radio buttons to GetFanStack.TITLE.
-
Open Show Fan and copy the Back button.
-
Close ShowFan and paste the Back button into Update_Form by clicking Paste in the Edit menu. (This command performs a deep copy.) You may need to reposition the button on your new form.
(If you wish, double-click the Back button to open the Event Handler editor to see that the self.WinClose (); syntax is still there.)
xMore About Copying Controls
You can always perform a shallow copy, but sometimes you cannot perform a deep copy. For example, if you copied the radio buttons from Form1 and tried to do a deep copy into another form in another procedure, you would no longer see the data binding to AddFanStack.TITLE, because AddFanStack is only defined in the context of the Start procedure. The new procedure does not know what AddFanStack is, so it loses the binding.


 .
.
 .
. .
.