In this section: |
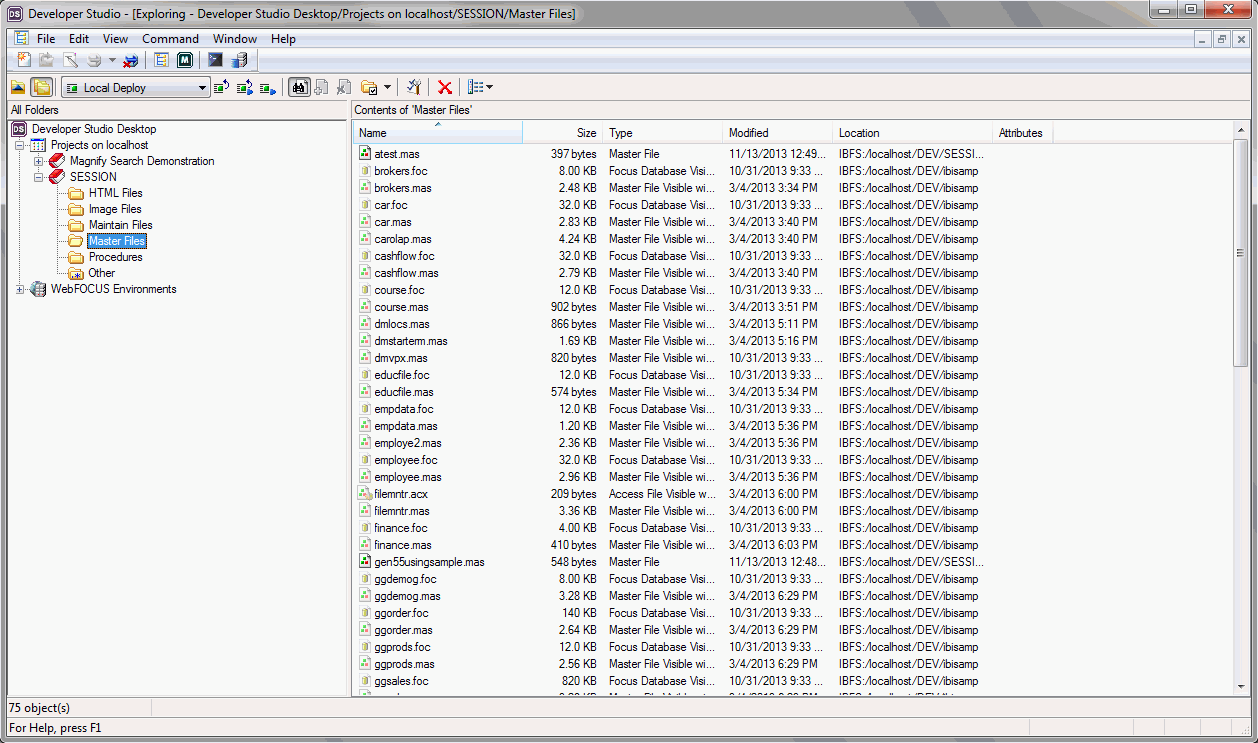
To start Developer Studio, select WebFOCUS Developer Studio from the program group Information Builders. The Developer Studio Explorer opens. In this example, the nodes on the left are expanded to illustrate folders in the working environment.
The Developer Studio Explorer is based on the familiar Microsoft Windows Explorer tree structure and provides access to development tools to quickly build and deploy web-based reporting applications. In addition, you can use the Maintain features to allow updating of your data.
If the main Explorer window has been closed, you can reopen it
by clicking the New Explorer button  on the main toolbar.
When installing a Developer Studio edition, be aware of the following product behavior that allows local and/or stand-alone development.
When you start Developer Studio, it attempts to start the Internet Information Services (IIS) web server by default to allow local and/or stand-alone development.
If you do not want the IIS web server to start automatically when you launch Developer Studio, you can uncheck the Start local Web server option in the Developer Studio Options dialog box.
If you are using a non-IIS web server, ensure that you have started and configured it according to instructions in the WebFOCUS Developer Studio Installation and Configuration manual. If you have multiple web servers set up on the same machine, ensure that they use different ports or that only the required server is running.
The Developer Studio Explorer displays two top-level folders by default, Projects on localhost and WebFOCUS Environments.
An optional top-level Windows Desktop folder can be displayed to provide access to local and network drives. From the Explorer Window menu in the main toolbar, select Options, and then Show Desktop on Explorer tree in the Explorer tab of the dialog box.
You can create a new project by right-clicking the Projects folder and selecting New Project. For each of the project virtual subdirectories, you can create a new resource by right-clicking the folder and selecting New. For more information, press the F1 key to access the help system.
By default, the Projects area shows projects on the localhost. However, you can manage projects on remote environments if you define WebFOCUS environments as explained below.
The project files are stored in a subdirectory located under the Application Root directory (APPROOT). A directory containing project files is distinguished from other directories under APPROOT by the existence of a .gfa (graphical FOCUS application) file. When you create a project, a .gfa file and a directory are created to store the project files. Files are grouped into virtual folders (HTML Files, Procedures, and others). These virtual folders only appear in the Developer Studio Explorer and only directories that contain a .gfa file appear under the Projects folder. Virtual folders are created by the Developer Studio interface to organize files of the same type and can be customized by the developers.
Note: The case of file names entered by a developer is preserved and Developer Studio does not enforce any case-sensitivity rule upon any files received or sent from or to a Reporting Server or web server. Developer Studio projects (.gfa) are always case-insensitive, but its cross-platform functionality relies on information stored in lowercase and it is the developers responsibility to be consistent with the way a particular Reporting Server handles files on UNIX platforms. For example, when performing remote Project development against UNIX environments, developers must ensure that file names are created in lowercase and that the appropriate lowercase is also used when referencing files using the INCLUDE command. While working in the Data Servers area, by default, the Reporting Server will enforce lowercase of files and directories that are created in this area.
Managed Reporting development and administration through Developer Studio is only available to users that have permissions to perform MR development and it is controlled by the Security System.
After adding WebFOCUS environments, you can browse and manage their contents. You can connect to multiple environments at the same time and can interact between environments.
For details about the three sub-areas located under WebFOCUS Environments, see WebFOCUS Environments in Developer Studio .
When you use either the Projects folder or the WebFOCUS Environments folder to access a WebFOCUS environment, a logon box displays, prompting you for a WebFOCUS ID and password. Note that a sign on dialog box may appear for connection to the web or application servers or the Reporting server, depending on the security implemented in the WebFOCUS environment that is being accessed. The example image below shows the dialog box that is initially presented when you access a WebFOCUS environment.
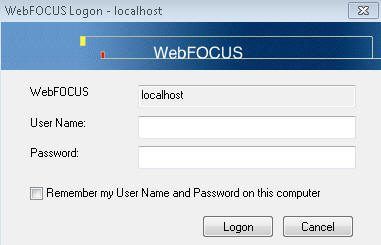
There is a check box option on the logon dialog boxes for remembering the ID or password. By default, it is not checked. If you check this box, your credentials will be stored and encrypted in the wfscom.xml file, the local configuration file that stores information processed by the Developer Studio communication layer. To view, clear the credentials stores, then open the WebFOCUS Environment Properties dialog for the environment that users need to make changes to.
For details about the wfscom.xml file, see Working With Environment Properties in Developer Studio . If you decide to change the stored credentials later, you can do so from the WebFOCUS Environment Properties dialog box.
The WebFOCUS Environments area contains sub-areas for the Data Servers, Repository, and Web Applications environments.
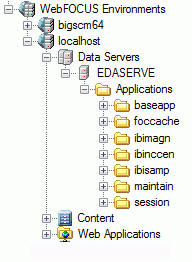
The Reporting Server uses the APPROOT setting to locate files used in development. Any directory located under APPROOT appears under the Data Servers Applications folder.
The Data Servers folder is a physical view. All files in this location are displayed. The Reporting Servers Application Root directory is used to store server-based files, such as procedures and metadata. You can only edit and run files processed or used by the Reporting Server, such as .fex, .mas, .acx, .gif, .htm, .html, and .sty files.
Note:
The WebFOCUS Application Root variable is configurable through the WebFOCUS Administration Console by selecting Application Directories by the path Configuration, Application Settings, and clicking Application Directories through the variable IBI_Approot_Directory. Typically, these applications include HTML pages, graphic images, cascading style sheets, and Java Script files.
The edaserve.cfg file contains the APPROOT variable for the Reporting Servers Application Root directory. Typically these files include procedures, WebFOCUS StyleSheets, and customized HTML pages that require processing on the Reporting Server. The Approot Server variable can be configured through the Reporting Server Console by selecting Workspace and then Configuration Files.
The edaserve.cfg file is located in:
|
Type of Installation |
Location of edaserve.cfg |
|---|---|
|
Developer Studio with localhost (full installation) |
install_drive:\ibi\DevStudio81\srv81\wfs\bin |
|
WebFOCUS |
install_drive:\ibi\srv81\wfs\bin |
Note: The Repository area is not visible for Developer Studio stand-alone installations. The Repository is installed only with WebFOCUS and access to it is controlled by the Security System.
Under the Repository, folders can be created to develop Managed Reporting content. For example, users can develop procedures or web applications, create ad hoc reports, and build custom user content. Development and Administration options are enabled based on user permissions defined in the Security System.
If you have the manage private resources permission, you can use Mode Manager to view and edit private files. To enable Mode Manager, right-click on the Repository node and click Mode Manager. Your view refreshes, displaying all private files in the Repository. You can open and make changes to these private files as needed. When you are finished, right-click on the Repository node and click Mode Normal. Your view refreshes, hiding the private files in the Repository node.
Note:
When a file in the Repository is marked as shared, and you do not have permission to save the original file, you will only be allowed to use the Save As command to save the file. This will allow you to save the file under a different name, leaving the original file untouched.
By default, the Repository displays files by title instead of by name.
| WebFOCUS |