Using the SQL Report Wizard
The SQL Report Wizard assists you with
SQL passthru, which allows you to execute SQL code that retrieves
data from an RDBMS. You can use the resulting extract file in Report Painter
or InfoAssist. The supported engines for the SQL Report Wizard are
DB2, DB2 for IBM i, Microsoft SQL Server, Oracle, Sybase, and Teradata.
The SQL Report Wizard is available throughout
all development areas of Developer Studio: Projects, Data Servers,
and Managed Reporting. When working in Managed Reporting, the tool
enables administrators to use SQL Reports in the available repository folder
or to use procedures that reside on the WebFOCUS Reporting Server.
Note: It is recommended to use the
Create Synonym Tool to execute a SQL Command for a stored procedure.
For more information, see Synonym Creation Parameters for
Stored Procedures, in the Accessing Data and Creating Synonyms chapter
of the Describing Data with Graphical Tools manual.
x
Procedure: How to Include SQL Commands From an External .sql File
-
Access
the SQL Report Wizard by doing one of
the following:
- In the Explorer,
right-click the Procedures folder and select New, Procedure.
In the Add Procedure dialog box enter a file name and then select SQL
Report Wizard from the Create with drop-down list. Click Open.
- In the Procedure
Viewer, click the component connector and then click SQL
Report on the drop-down list.
- You can click
the SQL Report icon on the Procedure Viewer
toolbar.
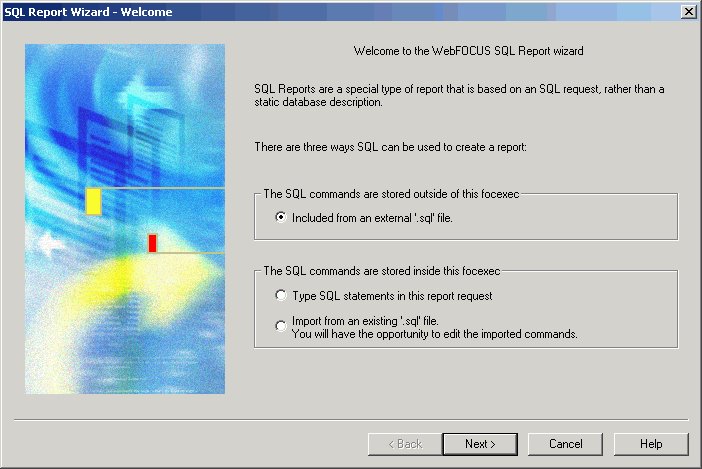
The SQL Report Wizard
- Welcome window opens, as shown in the following image.
-
Click
the Included from an external '.sql' file option
button. This enables you to browse and select external procedures
that exist in the repository of the project.
This enables sites to leverage pre-existing SQL procedures. It is not possible to execute procedures
from Managed Reporting.
Note: You can only browse
the files on the APP PATH if your .sql extension is a valid filter
in the Properties dialog box. To do this, see How to Add an .sql Extension as a Valid Filter.
-
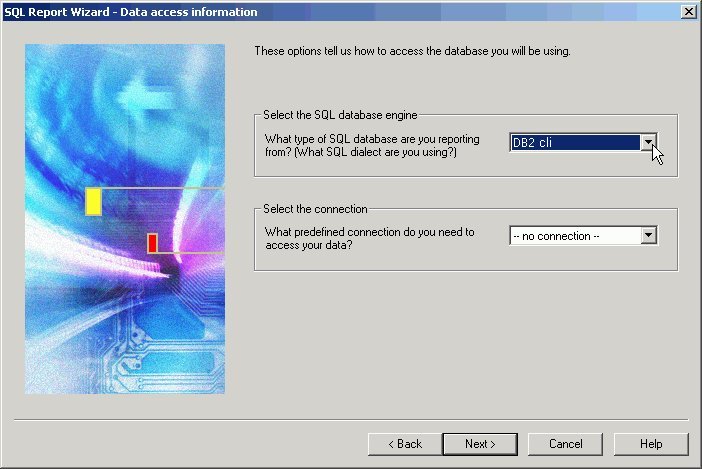
Click Next to
see the SQL Report Wizard - Data access information window, as shown
in the following image.
-
In the
Select the SQL database engine area, select a database engine from
the drop-down list. The list consists of available engines in the edasprof.prf file.
-
In the
Select the connection area, choose a connection from the drop-down
list generated from the engine that you selected. You can choose
the default value, which is the first connection in the edasprof.prf file for the
selected engine, or choose another connection defined in edasprof.prf.
-
Click Next to
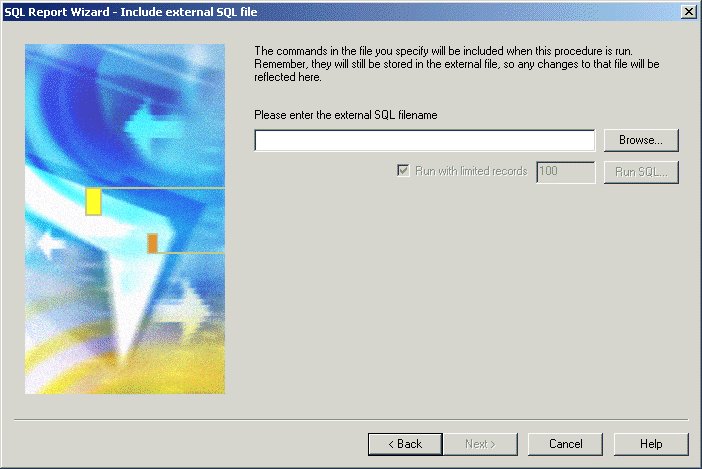
see the SQL Report Wizard - Include external SQL file window, as
shown in the following image.
-
Enter
the external SQL file name in the field, or click Browse to
select it.
Note: You can only browse
the files on the APP PATH if your .sql extension is a valid filter
in the Properties dialog box. To do this, see How to Add an .sql Extension as a Valid Filter.
-
Optionally,
you can run with limited records by clicking Run SQL.
By default, the Run with limited records check box
is selected so you can test your procedure with a read limit if
the engine supports it. There is a field box next to the check box
in which you can enter the number of records to be read. 100 is
the default limit.
-
Click Next to
see the SQL Report Wizard - Summary of SQL options window.
Do one of the following:
- To create a
report, select the Create Report option button.
This option is selected by default.
- To create a
graph, select the Create Graph option button.
-
Click Finish to
run the SQL procedure. When you have completed the procedure, you
can run it from the Procedures folder in the Explorer view.
x
Procedure: How to Pass SQL Commands to the RDBMS Using SQL Passthru
-
Access
the SQL Report Wizard by doing one of
the following:
- In the Explorer,
right-click the Procedures folder and select New, Procedure.
In the Add Procedure dialog box enter a file name and then select SQL
Report Wizard from the Create with drop-down list. Click Open.
- In the Procedure
Viewer, click the component connector and then click SQL
Report on the drop-down list.
- You can click
the SQL Report icon on the Procedure Viewer
toolbar.
The SQL Report Wizard - Welcome window opens.
-
Click
the Option button next to Type
SQL statements in the report request. This enables you
to enter SQL commands that will be passed on to the RDBMS with the
SQL Passthru feature.
-
Click Next to
see the SQL Report Wizard - Data access information window.
-
In the
Select the SQL database engine area, select a database engine from
the drop-down list. The list consists of available engines in the edasprof.prf file.
-
In the
Select the connection area, choose a connection from the drop-down
list generated from the engine that you selected. You can choose
the default value, which is the first connection in the edasprof.prf file for the
selected engine, or choose another connection defined in edasprof.prf.
-
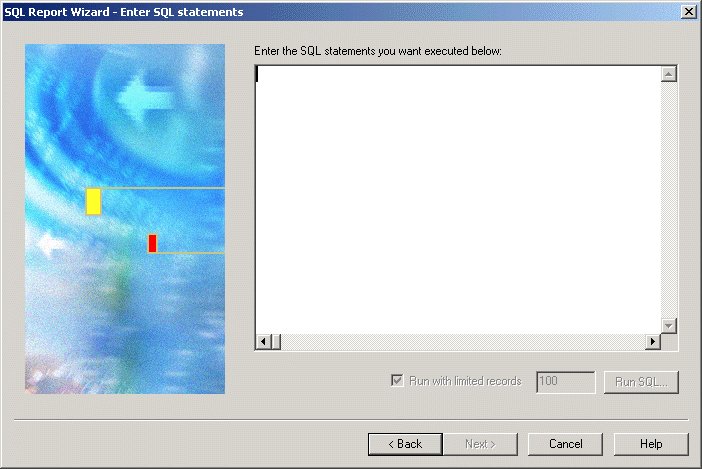
Click Next to
see the SQL Report Wizard - Enter SQL statements window, as shown
in the following image.
-
In the
field box, type the SQL statements you want to pass to the RDBMS.
-
Optionally,
you can run with limited records by clicking Run SQL.
By default, the Run with limited records check box is selected so
you can test your procedure with a read limit if the engine supports
it. There is a field box next to the check box in which you can
enter the number of records to be read. 100 is the default limit.
-
Click Run
SQL to run your report.
-
Click Next to
see the SQL Report Wizard - Summary of SQL options window.
Do one of the following:
- To create a
report, select the Create Report option button.
This option is selected by default.
- To create a
graph, select the Create Graph option button.
-
Click Finish to
run the SQL procedure. When you have completed the procedure, you
can run it from the Procedures folder in the Explorer view.
x
Procedure: How to Import SQL Commands From an Existing .sql File
-
Access
the SQL Report Wizard by doing one of
the following:
- In the Explorer,
right-click the Procedures folder and select New, Procedure.
In the Add Procedure dialog box enter a file name and then select SQL
Report Wizard from the Create with drop-down list. Click Open.
- In the Procedure
Viewer, click the component connector and then click SQL
Report on the drop-down list.
- You can click
the SQL Report icon on the Procedure Viewer
toolbar.
The SQL Report Wizard - Welcome window opens.
-
Click
the Option button next to Import
from an existing .sql file. This enables you to modify
SQL code after importing it from an external file to the procedure
being built. It enables you to modify the request using bits of
code.
-
Click Next to
see the SQL Report Wizard - Data access information window.
-
In the
Select the SQL database engine area, select a database engine from
the drop-down list. The list consists of available engines in the edasprof.prf file.
-
In the
Select the connection area, choose a connection from the drop-down
list generated from the engine that you selected. You can choose
the default value, which is the first connection in the edasprof.prf file for the
selected engine, or choose another connection defined in edasprof.prf.
-
Click Next to
see the SQL Report Wizard - Import external SQL file window, as
shown in the following image.
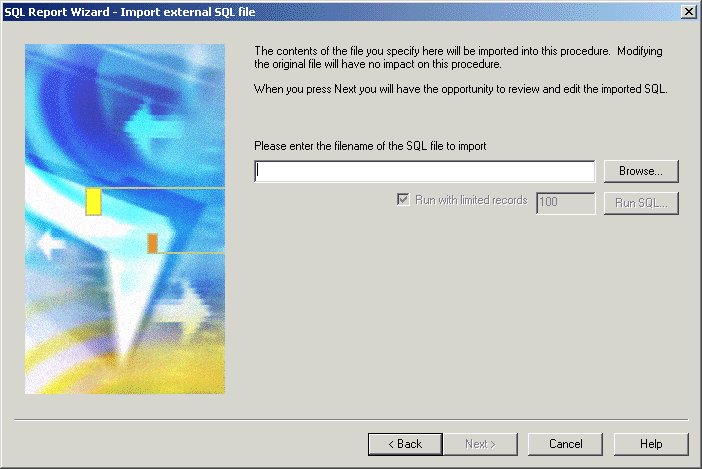
-
Type
the SQL file name that you want to import or click Browse to
select it.
Note: You can only browse
the files on the APP PATH if your .sql extension is a valid filter
in the Properties dialog box. To do this, see How to Add an .sql Extension as a Valid Filter.
-
Optionally,
you can run with limited records by clicking Run SQL.
By default, the Run with limited records check box is selected so
you can test your procedure with a read limit if the engine supports
it. There is a field box next to the check box in which you can
enter the number of records to be read. 100 is the default limit.
-
Click Run
SQL to run your report.
-
Click Next to
see the SQL Report Wizard - Enter SQL statements window. You can
edit the imported SQL code, if necessary.
-
Click Run
SQL to run your report.
-
Click Next to
see the SQL Report Wizard - Summary of SQL options window.
Do one of the following:
- To create a
report, select the Create Report option button.
This option is selected by default.
- To create a
graph, select the Create Graph option button.
-
Click Finish to
run the SQL procedure. When you have completed the procedure, you
can run it from the Procedures folder in the Explorer view.
x
Procedure: How to Add an .sql Extension as a Valid Filter
To browse the files on the APP PATH, your
.sql extension must be a valid filter in the Properties dialog box.
-
Right-click the project, select Properties,
then select the Edit Filters tab.
-
Scroll through the list until you
find the .sql extension in the Extensions column.
If the .sql file is not part of the displayed list in the
Extensions column, click the Add new filter file type
filter(s) icon  .
.
-
Select the .sql extension.
-
Click OK.