The topics in this section describe how to install your
software in a Hierarchical File System (HFS) environment on UNIX
System Services.
xInstallation Requirements for HFS
Before beginning the installation, review all requirements.
x
Operating System Requirements
The software runs on any supported release of z/OS.
For current information about supported releases:
- Go to http://techsupport.informationbuilders.com.
The
Information Builders Technical Support home page opens.
- In the Quick Links section on the right side of the page, click Supported Systems/Adapters.
The
Supported Systems and Adapters page opens.
- Click the link for the release you want.
The Supported Systems
and Adapters page for that release opens.
- Click the link for your platform.
The support chart for that
platform opens.
In general, the operating system should have the latest cumulative
patch levels applied.
Confirm that your server installation software is labeled for
your operating system level.
x
JVM Requirements for Java Services
If JVM-based adapters, server-side graphics, XBRL, or
user-written CALLJAVA applications are to be used, a Java Runtime
Environment (JRE) JVM must be installed on the machine, and the
server must be configured to use it
As of 7.7.05 and 8.0.01 production releases, the minimum JVM
release level is 1.6 or higher, due to required internal components
of the server. The Java Listener will not start unless 1.6 (or higher)
is in use. Prior 7.x releases would allow the listener to start
with any release, and sub-components would fail if they required
a higher Java Level. The primary reason for this change is that
Java 1.5 (and prior releases) are past their End of Service Life (EOSL)
dates, and, as such, are unsupportable, in addition to lacking newer
functionality. The following URL has Java EOL and EOSL information:
http://java.sun.com/products/archive/eol.policy.html
Installing maintenance updates to the EDAHOME of an existing
server running releases prior to production 7.7.05 will also have
the requirement of moving up all dependent configurations to use
Java 1.6 (as instructed in this section).
You may install a Java JRE or a Java SDK. When you install a
Java SDK, the JRE component (where the JVM lives) is included, so
either is allowed. If using servlet, the Java SDK is required for
the jar command, so it is generally preferred over the Java JRE.
The SDK or JRE build type must also match the 32-bit or 64-bit bit
type of the server. If an appropriate JVM from a JRE or SDK is not
found on the library path or using variables as described below, or
is not the appropriate bit type, a Failed to find JVM message
will be displayed. Further Java Services debugging information about
loading the JVM will be written to the server start log indicating JSCOM3
start failed as well as additional information that may be useful
in resolving the problem. JSCOM3 is the actual process name for
the Java Services Listener and the terms are often used interchangeably.
The JDK JRE bin and server (or client) subdirectories must be
specified in the load library path environment variable. A server
restart is required, plus the appropriate JVM must be on the path
if switching JRE levels. The load library path will be prompted
at install time if JVM-based adapters or features are required.
Otherwise, it can be manually set by editing the EDAENV file using
any of the following methods.
- For Java JDK,
set JDK_HOME (to the install home location) in the server environment
configuration file (EDAENV).
- For Java JRE, set JAVA_HOME (to the install home location) in
the server environment configuration file (EDAENV).
- Use library path (LIBPATH) to set explicit pathing. Use of JDK_HOME
or JAVA_HOME is preferred as they are less prone to error. The JRE
bin and server (or client) subdirectories must be specified in a
path-based environment variable and a server restart is required.
To change or add operating system environment variables, set
and export the variable in a .profile or script that always gets
called during a server start. It is very common to place variables
in the server edastart script, but it is recommended that they be
placed in a script that in turn calls edastart (so that the edastart
script remains vanilla).
To change or add a variable in a server environment start up
file (EDACONF bin\edaenv.cfg), either edit the file in a text editor
before starting the server or:
- Start the server (services like Java Listener may fail until
configured and the server is restarted).
- Open the Web Console and log on using an administrator ID.
- Select Workspace from the main menu.
- In the navigation pane, open the Configuration Files and Miscellaneous folders.
- Right-click Environment - edaenv.cfg and
select Edit.
- Make the desired edit.
- Save the file.
- Restart the server (changes are not effective until server is
restarted).
The format of edaenv.cfg variables is one per line in name=value
pairs. Spaces before and after the equal sign are optional. Values
with embedded spaces do not require quoting. Variables are always
uppercase.
If JVM-based adapters or features are not required, and the JVM
environment is not configured, the message Failed to find JVM is
normal and can be ignored.
To add classes to the JVM class path for customer-written CALLJAVA
applications, set and export the CLASSPATH variable to the operating
system level before server start-up or use the Web Console to set
the Java Listener IBI_CLASSPATH property.
x
IP Port Number Requirements
The install process prompts for two IP port numbers: the TCP
Listener and HTTP Listener. It also uses the next two consecutive
ports after the supplied HTTP Listener port for FDS use. This results
in a total of four IP ports.
The supplied IP port numbers must be above the IANA registered
well-known reserve range (numbers under 1024) and not over the maximum
legal number (65535). Additionally, do not use IP port numbers already
being used by other applications or products. Netstat, or netstat
like commands, should reveal what actual ports are in use.
x
The Web Console requires one
of the following web browsers:
- Microsoft Internet Explorer® 9 or higher.
- Mozilla Firefox® 27 or higher.
- Google Chrome® 33 or higher.
- Apple Safari® 7 or higher and Mobile iOS v5.
- Opera 19 or higher.
x
The server disk space requirement
for:
- Installation is 620 megabytes.
- Run time is a combination of the server software (620 megabytes)
plus the space required for applications, databases, sorts, output
preparation, and logs. The actual space required will depend on
the number and size of the applications and databases that you deploy
to the server.
You can divide your space requirements in different
ways. For example, you may choose to employ one mount point for
the working directory for users and trace files (edatemp), and one
mount point for the application directory (apps). Another option
is to employ one mount point for edatemp, and one for each individual
application.
For more information about using mount points,
see the IBM USS documentation.
x
Memory usage of a configured environment consists of
the following elements:
- Workspace Manager
- Listeners
- Concurrently running application agents
Actual memory usage depends on application features, and varies
depending on the application. The SHRLIBRGNSIZE parameter (defined
on SYS1.PARMLIB, member BPXPRMxx) can affect the amount of memory
that the server address space will allocate. For SHRLIBRGNSIZE,
we recommend the default MVS installation value of 64Mb:
SHRLIBRGNSIZE(67108864)
Server memory usage:
- The workspace (including Listeners) uses 200 megabytes.
- Each pre-started agent requires 4 megabytes.
The minimum amount of memory for a newly installed server with
no workload is 250Mb. However, depending on usage, workload, and
configuration options, 500Mb is recommended to start, to be adjusted
as needed.
x
Communications Requirements
You need four TCP/IP ports for each server instance
that you configure. Three of these ports must be consecutive. You
specify these port numbers during installation. You may require
additional ports depending on which options you configure later.
The server supports only IBM TCP/IP. It does not support Interlink
or any other third-party TCP/IP.
x
To install on z/OS deployed using the Hierarchical File
System (HFS) and UNIX System Services (USS), perform the following
steps.
x
Step 1. Establish the HFS Directory for the Software
The installation requires a set of HFS directories where
the product executable files, configuration files and sample applications
are loaded. The software also uses HFS directories for temporary
files during the software operation, by default. Application files
can be kept in the HFS directories or in PDS.
To better control the space allocated to the software, we recommend
defining a separate HFS data set, OMVS.IADMIN, and mounting it as
/u/iadmin for the exclusive use of the software. Note that both
names can be changed and existing HFS data sets used as an alternative.
The sample JCL in step 1a is for 1 gigabyte of space. The total
space that can be allocated to an HFS data set is dependent on the
operating system release and the physical device type. Refer to
IBM documentation for more information about HFS allocation. For
an SMS-managed data set, add the appropriate parameters.
x
Procedure: How to Establish the HFS Directory for the Software
To establish the HFS directory for the
server:
-
Create the following JCL to define the HFS data
set:
//********* JOB CARD GOES HERE ************//
//
//*************DEFINE HFS ******************//
//DEFWEB EXEC PGM=IEFBR14
//DD1 DD DISP=(NEW,CATLG),DSN=OMVS.IADMIN,DSNTYPE=HFS,
// VOL=SER=VPWRKC,DCB=(DSORG=PO),
// SPACE=(CYL,(1200,5),,CONTIG,ROUND)
-
Add a job card and submit the JCL.
-
Mount the file system by issuing the following commands
at the command line in Option 6 of ISPF:
MOUNT FILESYSTEM('OMVS.IADMIN')
MOUNTPOINT ('/u/iadmin') TYPE (HFS) MODE (RDWR)
where:
- OMVS.IADMIN
Is the name associated with the file system defined in Step
1.
- /u/iadmin
Is the mount entry point for the file system. Specify a directory appropriate
for your site.
The specified directory must exist before
you issue the MOUNT command. Once the directory is created, the
minimum permissions for all directory levels leading to iadmin must
be 755.
-
Update your BPXPRMxx member of SYS1.PARMLIB to permanently
mount the file system.
x
To install and run the software, the following types
of user IDs are required:
- Server installation ID (iinstal).
- OPSYS Server administrator ID (iadmin).
- PTH Administrator ID (srvadmin).
- Server system ID (iserver).
- General IDs (for connecting users).
The number of IDs and their names depend
on the needs and configuration of your site.
x
Software Installation ID (iinstal)
An ID is required to unload the software installation
from tape and to create PDSs and HFS directories. Many sites already
have a suitable ID that they use for installing vendor software.
The sample ID name iinstal is used throughout the installation
procedure to refer to this ID, but you can choose any name. (We
have omitted the second "l" from "install" due to a seven-character
length restriction in some RACF and eTrust™ CA-Top Secret®
environments.) To define iinstal, see Step 2A. Define the Software Installation ID.
x
OPSYS Server Administrator ID (iadmin)
An ID is required to administer the server. It will
own and have full access to server files installed in the HFS directory
that you specify during installation. This ID should be available
only to users who require administrative server privileges, such
as starting and stopping the server, adding adapters, and changing
run-time parameters.
The sample ID name iadmin and
group isrvgrp are used throughout the installation procedure
to refer to this ID, but you can choose any names. To define iadmin, if
you are using:
x
An ID is required to administer the server immediately
after initial installation. This ID is defined and maintained solely
in the realm of the server.
For more information about running the server in secure mode,
see Step 7. Configure Server Security.
x
Server System ID (iserver)
If you plan to run the server with security provider
OPSYS, you must create a user ID for internal use by the server.
The server will use this server system ID when it needs superuser
privileges. For example, it will use it to impersonate a connected
user when the server agent is created.
This ID does not need TSO logon privileges. All IDs require an
OMVS segment. Be sure never to delete this ID. Doing so would cause
server administration problems.
The sample ID name iserver is used throughout the installation
procedure to refer to this ID, but you can choose any name.
You can define this server system ID
as either:
-
A superuser ID. This is an ID whose security definition
specifies UID(0), authorizing it to perform all z/OS UNIX functions
without restriction.
To define iserver
using a superuser ID, if you are using:
RACF, see Step 2C/RACF. Define the Server System User ID With RACF.
CA-ACF2, see Step 2C/ACF2. Define the Server System User ID With CA-ACF2.
CA-Top Secret, see Step 2C/Top Secret. Define the Server System User ID With
CA-Top Secret.
-
An ID employing profiles with UNIXPRIV for authorization, which
is necessary for certain superuser privileges.
By granting limited
superuser privileges with a high degree of granularity to an ID that
does not have superuser authority, you minimize the number of assignments
of superuser authority at your installation and reduce your security
risk.
This is supported for sites using RACF, eTrust™
CA-ACF2®, and eTrust CA-Top Secret. Note that global access
checking is not used for authorization checking to UNIXPRIV resources.
To
define iserver using UNIXPRIV profiles, see Step 2D. Define the Server System User ID With UNIXPRIV Profiles.
x
General IDs (for Connecting Users)
Any user requiring access to the server must have a
non-superuser ID (that is, it must have a unique UID other than
0) and have an OMVS segment. For information about this, see Step 2E. Add the OMVS Segment to General User IDs.
x
User ID Installation Scenarios
There are two user ID installation scenarios:
-
Installation and administrator IDs are the same.
The
user ID must have a unique non-zero UID. It cannot be a superuser.
For this scenario, logon to TSO with this ID and do not change the
default administrator ID that is presented on the first full panel
of the ISETUP installation process.
-
Installation and administrator IDs are different.
The installation
ID can be a superuser or non-superuser, and must have authority
over the administrator ID so that it can change ownership of the
server directory structure from the installation ID to the administrator
ID. The command issued during the installation process to change
ownership is shown.
The administrator ID must have
a unique non-0 UID. It cannot be a superuser.
x
Step 2A. Define the Software Installation ID
When defining the software installation ID:
- The installation ID requires read access to the BPX.FILEATTR.APF
facility class.
- The installation ID requires an OMVS segment.
- The installation ID can be any existing user ID. If it is the
same as the administrator ID (iadmin), see one of the following
topics for a sample definition. If you are using:
x
Step 2B/RACF. Define the OPSYS Server Administrator ID With RACF
The server administrator ID requires an OMVS segment.
To define the server administrator ID
with RACF:
- Have the Security Administrator issue the following RACF
commands:
ADDUSER iadmin PASSW(xxxx)
DFLTGRP(ISRVGRP)
OMVS(UID(8) HOME('/u/iadmin') PROGRAM('/bin/sh)')
TSO(ACCTNUM(12345) PROC(PROC01))
- Verify that the ADDUSER command completed successfully by issuing
the following command, and be sure that the command is available
to the iadmin ID:
[TSO] LISTUSER iadmin OMVS NORACF
You
should receive the following response:
USER=iadmin
OMVS INFORMATION
------------------------------
UID=0000000008
HOME=/u/iadmin
PROGRAM=/bin/sh
- A Security Administrator must update the Facility classes of
RACF, using the following commands issued with ISPF Option 6:
RDEFINE FACILITY BPX.FILEATTR.APF  UACC(NONE)
PERMIT BPX.FILEATTR.APF CL(FACILITY) ID(iadmin) ACCESS(READ)
- Refresh the RACF Facility class so that these commands will
take effect.
SETROPTS RACLIST(FACILITY) REFRESH
- Continue by verifying the server administrator ID, as described
in How to Verify the OPSYS Server Administrator ID.
x
Step 2B/ACF2. Define the OPSYS Server Administrator ID With CA-ACF2
The server administrator ID
requires an OMVS segment.
To define the server administrator ID
with eTrust CA-ACF2:
- To define the ID that will administer the server, issue
the following commands:
SET LID
INSERT iadmin GROUP(admin) PASSWORD(pass) STC
SET PROFILE(USER) DIV(OMVS)
INSERT iadmin UID(n) HOME(/) OMVSPGM(/bin/sh)
where:
- iadmin
Is the ID you are creating to administer the server.
- admin
Is the group in which iadmin will reside.
- pass
Is the password for iadmin.
- n
Is the UID.
- Continue by verifying the server administrator ID, as described
in How to Verify the OPSYS Server Administrator ID.
x
Step 2B/Top Secret. Define the OPSYS Server Administrator ID With CA-Top Secret
The server administrator ID
requires an OMVS segment.
To define the server administrator ID
with eTrust CA-Top Secret:
- Create a department ID for everyone defined to eTrust
CA-Top Secret who will be using the server, by issuing the command
TSS CRE(dept) TYPE(DEPT) NAME('formal
department name')
where:
- dept
Is the name of the department you are creating.
- formal department name
Is the label you want to associate with the new department.
- For users within the department you just created for the server,
you can define resource access within a group. To define an ID for
that group, issue the command
TSS CRE(deptgrp) NAME('dept group') DEPT(dept) TYPE(GROUP) GID(n)where:
- deptgrp
Is the name of the group you are creating.
- dept group
Is the label you want to associate with the new group.
- dept
Is the name of the department you created.
- n
Is the number you want to assign to the new group.
- Create the iadmin ID and attach it to the new department by
issuing the following commands
TSS CRE(iadmin) NAME('iadmin
id') TYPE(USER) DEPT(dept) PASSWORD(pass)
GROUP(deptgrp) DFLTGRP(deptgrp)
where:
- iadmin
Is the ID you are creating to administer the server.
- iadmin id
Is the label you want to associate with the new ID.
- dept
Is the name of the department that you created.
- pass
Is the password for the ID you are creating.
- deptgrp
Is the group you created.
- Issue the following command to define the user's USS shell program
(using OMVSPGM), facility access (using FAC), and, optionally, the
initial directory (using HOME).
The OMVS segment of the ACID defines
the ACID's UID, the user's home directory, and the initial program
that the user will run. The initial program is generally the shell program
that the user invokes.
TSS ADD(iadmin) UID(n) [HOME(/u/dir)] OMVSPGM(/bin/sh) FAC(BATCH,TSO)
where:
- iadmin
Is the ID you created to administer the server.
- n
Is the UID. It cannot be 0 (zero).
- HOME
Defines the initial directory path name. If it is omitted,
USS sets the user's initial directory to the root directory.
- dir
Is the ID home directory.
- Issue the following command
TSS PER(iadmin) IBMFAC(BPX.FILEATTR.APF) ACC(READ)
where:
- iadmin
Is the ID you created to administer the server.
- Continue by verifying the server administrator ID, as described
in How to Verify the OPSYS Server Administrator ID.
x
Procedure: How to Verify the OPSYS Server Administrator ID
To verify the server administrator ID:
-
Verify that the home directory of the server administrator
ID is correct by logging on to the server administrator ID (if not
already logged on) and issuing the following command from ISPF option
6:
OSHELL pwd
You
should receive the following response:
/u/iadmin
This
directory should be the home directory specified in the UID definition
for iadmin.
-
For a second confirmation, issue the following command:
OSHELL echo $HOME
You
should receive the following response:
/u/iadmin
-
Verify that the server administrator ID has a unique
UID and the correct GID defined by issuing the following command
and press Enter:
OSHELL id
You
should receive the following response:
uid=8(IADMIN) gid=50(ISRVGRP)
This
UID and GID should match what is defined in the OMVS segment.
x
Step 2C/RACF. Define the Server System User ID With RACF
The RACF commands in this procedure must be issued by
the Security Administrator. The server system user ID does not require
logon authority.
To define the server system user ID with RACF:
- Issue the following RACF command
ADDUSER iserver DFLTGRP(OMVSGRP) OMVS(UID(0)) NOPASSWORD
where:
- iserver
Is the account you use for the system server ID.
- Verify that the above ADDUSER command completed successfully
by issuing the following command:
[TSO] LISTUSER iserver OMVS NORACF
You
should receive the following output:
USER=iserver
OMVS INFORMATION
------------------------------
UID=0000000000
HOME=/u/iserver
PROGRAM=/bin/sh
x
Step 2C/ACF2. Define the Server System User ID With CA-ACF2
To define the server system
user ID with eTrust CA-ACF2, issue the following commands:
SET LID
INSERT iserver NAME(iserverID) GROUP(pgm)
SET PROFILE(USER) DIV(omvs)
INSERT iserver UID(0) HOME(/) PROGRAM(/bin/sh)
SET PROFILE(GROUP) DIV(omvs)
INSERT pgm GID(n)
where:
- iserver
Is the ID you are defining for the server system ID.
- iserverID
Is the description you want to associate with the system
server ID.
- pgm
Is the ID group.
- omvs
Is the name of your OMVS division.
- n
Is the group ID.
x
Step 2C/Top Secret. Define the Server System User ID With
CA-Top Secret
To define the server system
user ID with eTrust CA-Top Secret:
- Issue the following commands
TSS CRE(iserver) TYPE(USER) NAME('server
system ID') DEPT(dept)
PASS(pass,0) SOURCE(INTRDR)
where:
- iserver
Is the name you wish to assign to the server system ID you
are defining.
- dept
Is the name of the department you created in step 2b.
- server system ID
Is the label you want to associate with the new ID.
- pass
Is the ID password.
This password never expires.
Note
that the SOURCE(INTRDR) setting prevents this ACID from logging on.
- Define the required access for the server system ID by issuing
the following command
TSS ADD(iserver) UID(0) HOME(/) OMVSPGM(/bin/sh) GROUP(deptgrp) DFLTGRP(deptgrp)
where:
- iserver
Is the server system ID.
- deptgrp
Is the name of the group you created in step 2b.
- You can choose to audit the server system ID. Each time the
ACID is used, an audit record will be written to eTrust CA-Top
Secret audit tracking file. To set this option, issue the following
command
TSS ADD(iserver) AUDIT
where:
- iserver
Is the server system ID.
x
Step 2D. Define the Server System User ID With UNIXPRIV Profiles
Resource names in the UNIXPRIV class are associated
with z/OS UNIX privileges. In order to use authorization to grant
z/OS UNIX privileges, you must define profiles in the UNIXPRIV class
protecting these resources. The UNIXPRIV class must be active. If
you are using RACF, SETROPTS RACLIST must be in effect for the UNIXPRIV class.
To use profiles in the UNIXPRIV class to grant authorization
for superuser privileges to a server system ID that does not have
superuser authority (UID=0), you must assign:
READ access for SUPERUSER.FILESYS.CHOWN
CONTROL access for SUPERUSER.FILESYS
Note:
-
It is strongly recommended that you do
you not assign TSO privileges to the UNIXPRIV user ID. This can
be done by adding the keyword NOPASSWORD to the RACF command ADDUSER.
-
The installation routine ISETUP will ask for the server system
ID (default ISERVER). It will check if the supplied userid has a
UID of 0. If it does not, UNIXPRIV authorization is assumed. This
will result in an entry in the ibi/srv77/product_type/bin/edaserve.cfg
file as follows:
server_system_id = ISERVR3/PRIV
rather
than
server_system_id = ISERVER
If you installed the software with the server system ID pointing
to a superuser ID (UID=0), and then decide to use UNIXPRIV userid,
the value in the edaserve.cfg file must reflect the /PRIV syntax.
Edit the file manually or using the Web Console, click Workspace,
Configuration/Monitor. Open the Configuration
Files folder, double-click Workspace,
and change the server_system_id value before starting the server.
For more information about UNIXPRIV authorization, for:
- RACF, see the IBM Security Server RACF Security Administrator's Guide.
- ACF2, see the eTrust CA-ACF2 Security Cookbook.
- Top Secret, see the eTrust CA-Top Secret Security Cookbook.
Example: Server System User ID With UNIXPRIV
The
server system ID requires different authorities in order to be used
with UNIXPRIV. The following RACF example lists the authorities
for a system server ID with UNIXPRIV authorization, named ISERVR3.
Authorizations for your site may differ.
Occurrences of ISERVR3
In standard access list of general resource profile UNIXMAP U100122
In standard access list of general resource profile TSOAUTH RECOVER
In standard access list of general resource profile TSOAUTH JCL
In standard access list of general resource profile ACCTNUM EDA
In standard access list of general resource profile UNIXPRIV
   SUPERUSER.FILESYS.CHOWN
In standard access list of general resource profile UNIXPRIV
   SUPERUSER.FILESYS
Owner of profile ISERVR3.* (G)
First qualifier of profile ISERVR3.* (G)
In access list of group EDA
User entry exists
x
Step 2E. Add the OMVS Segment to General User IDs
To add the OMVS segment to general user IDs:
- For all end-users connecting to servers, ensure that each
user ID has an OMVS segment (or is set up to use a default user
ID as documented in the IBM manual UNIX System Services Planning).
For
example, to modify an existing RACF TSO user ID profile, from ISPF
Option6, issue the following command
ALTUSER user_ID OMVS(UID(nnn) HOME('/u/user_ID') PROGRAM('/bin/sh'))where:
- user_ID
Is the user ID you are modifying.
x
Step 3. Collect Required Information for Adapters
For current information about which adapters are supported:
- Go to http://techsupport.informationbuilders.com.
The
Information Builders Technical Support home page opens.
- In the Quick Links section on the right side of the page, click Supported Systems/Adapters.
The
Supported Systems and Adapters page opens.
- Click the link for the release you want.
The Supported Systems
and Adapters page for that release opens.
- Click the link for your platform.
The support chart for that
platform opens.
You must provide information to configure the adapters that you
are licensed to install. The installation procedure automatically
prompts you for this information. When you are prompted for an optional
steplib, ddname, or environment variable, the installation procedure
will indicate this with an OPT> prompt.
If you are using non-APF-authorized DBMS libraries, you must
allocate the libraries to the ddname TASKLIB in IRUNJCL. The installation
routine collects the information and allocates the required libraries
in STEPLIB.
After you have installed and configured the server, you will
be able to further configure your adapters using a web-based server
configuration tool called the Web Console.
The following table describes what information
you need to provide for each adapter that you have. (If an adapter
is not listed, no information needs to be provided for it.) Note that
the table refers to:
|
Adapter
|
Information you must provide
|
|---|
|
Adabas
|
Provide the data set name for the following
STEPLIB allocation:
This is
required only for the synonym creation process. For example, in
a production environment in which all synonyms already exist, you
can omit this.
When you configure the adapter, you will need
to provide the name of the Adabas source library and the associated
data set name.
|
|
CA-DATACOM
|
Provide the data set names for the following
STEPLIB allocations:
- CUSLIB load library
- CAILIB load library
- utility library
- URT library
|
|
CA-IDMS
(both DB and SQL)
|
Provide the data set names for the following
STEPLIB allocations:
- load library
- DBA load library
Provide the data set names to which
the following ddnames are allocated:
- SYSIDMS. Check with
your CA-IDMS DBA regarding this ddname.
- SYSCTL. Is the library corresponding to the central version
you want to use.
|
|
Call Java
|
You must have the JDK installed.
Provide
a value for the following environment variables:
- CLASSPATH.
Provide the paths of the .jar files that you want to access. These
paths will be appended to CLASSPATH.
- This adapter requires configuration of the JSCOM3 listener.
The path to JVM must be provided using either JDK_HOME or JAVA_HOME. The
installation will prompt for it.
|
|
CICS Transaction
|
Provide the data set name for the following
STEPLIB allocation:
|
|
DB2 CAF
|
Provide the data set names for the following
STEPLIB allocations:
|
|
DB2 CLI
|
Provide the data set names for the following
STEPLIB allocations:
Provide
a value for the following environment variable:
- DSNAOINI,
which contains the full path and file name of the DB2 CLI .ini file.
|
|
EJB
|
You must have the JDK installed.
Provide
a value for the following environment variables:
|
|
IMS
|
Provide the data set names for the following
STEPLIB allocations:
- DFSPZP load library (optional; not
needed if PZP modules are stored in the DFSRESLB library)
- DFSRESLB load library
|
|
IMSBMP
|
Provide the data set names for the following
STEPLIB allocation:
Provide
the data set names for the following FOCPSB allocation:
- FOCPSB library containing FOCPSB definitions
|
|
JDBC
|
You must have the JDK installed.
Provide
a value for the following environment variables:
- CLASSPATH.
Provide the paths of the .jar files that you want to access. These
paths will be appended to CLASSPATH.
- This adapter requires configuration of the JSCOM3 listener.
The path to JVM must be provided using either JDK_HOME or JAVA_HOME. The
installation will prompt for it.
|
|
Microsoft SQL Server
|
Select the Call Java adapter, in addition
to the Microsoft SQL Server adapter.
Provide a value for the
following environment variables:
- CLASSPATH. Provide the
paths to the following files. These paths will be appended to CLASSPATH.
- msbase.jar
- mssqlserver.jar
- msutil.jar
- This adapter requires configuration of the JSCOM3 listener.
The path to JVM must be provided using either JDK_HOME or JAVA_HOME. The
installation will prompt for it.
|
|
Millennium
|
Provide the data set name for the following
STEPLIB allocation:
|
|
Model 204
|
Provide the data set name for the following
STEPLIB allocation:
|
|
MQSeries
|
Provide the data set names for the following
STEPLIB allocations:
- SCSQLOAD load library
- SCSQAUTH load library
|
|
NATURAL Batch
|
Provide the data set name for the following
STEPLIB allocation:
|
|
SAP (SQL)
|
Provide values for the following
environment variables:
- LIBPATH, which contains the path
to SAP RFC SDK.
- SAP_CODEPAGE=0126, or the correct SAP code page for your language
environment.
|
|
SAP BW
|
Provide values for the following
environment variables:
- LIBPATH, which contains the path
to SAP RFC SDK.SAP_CODEPAGE=0126, or the correct SAP code page for
your language environment.
|
|
Supra
|
Provide the dataset name for
the following STEPLIB allocations:
- LINKLIB load library.
- INTERFLM load library.
- ENVLIB load library.
Provide the dataset name to
which the following ddname is allocated:
- CSIPARM containing
the CSIPARM definition, which in turn points to the Central PDM
you are accessing.
- CSISYSIN containing the parameters used for connecting the multi-session
adapter to the Central PDM.
|
|
VSAM CICS
|
Provide the data set name for the following
STEPLIB allocation:
|
x
Step 4. Access the Installation Software
You can choose to access the server installation software
using either:
x
Procedure: How to Unload the Installation Software From Tape
The
software is provided on a cartridge in 3490 or 3590 format with
MVS PDSs. Perform the following to unload the installation data
set from the tape:
-
Log on to
TSO.
-
Run an IEBCOPY job to allocate and unload the qualifier.HOME.DATA
data set. This PDS contains the members needed for the actual installation.
It is recommended that you use HOME.DATA
as the low-level qualifier for the target data set. Although you
can specify any low-level qualifier, HOME.DATA enables the installation
procedure to generate default data set names, simplifying your installation.
Note: If you do not use HOME.DATA, then change
the following line to reflect the value you used.
// SET EDAUSSD='HOME.DATA'
Do
this before you run ISETUP.
The following sample JCL
is for the initial unload to a new data set:
//IEBCOPY  EXEC PGM=IEBCOPY,REGION=0M
//SYSPRINT DD SYSOUT=*
//SYSUT1   DD UNIT=workunit,SPACE=(CYL,(5,1))
//OUT1     DD DISP=(NEW,CATLG,DELETE),
//         DSN=qualifier.HOME.DATA,
//         DCB=(RECFM=FB,LRECL=80,BLKSIZE=3200),
//         SPACE=(CYL,(5,5,25)),
//         UNIT=SYSDA
//IN1      DD DISP=(OLD,PASS),
//            DSN=HOME.DATA,
//            UNIT=cart,
//            VOL=(,RETAIN,,SER=volser),
//            LABEL=(1,SL)
//SYSPRINT  DD  SYSOUT=*
//SYSIN     DD  *
  COPY INDD=IN1,OUTDD=OUT1
where:
- workunit
Is the unit for the work data set.
- qualifier
Is the high-level qualifier for HOME.DATA and for all other
data sets that the installation procedure allocates. We recommend
that the high-level qualifier reflect the release of the software.
However, you can use any site-specific value.
For PDS, we
recommend retaining the low-level qualifier HOME.DATA, but you can
change this to any site-specific value. If you use a low-level qualifier
other than HOME.DATA, you must then edit member PDSSNAME to change
the string “HOME.DATA” to the low-level qualifier you specify here.
- cart
Is the unit type of the tape drive. Common names include
3490, TAPE, and 3590. Change as needed.
- volser
Is the value shown on the media label.
After
this job has run, qualifier.HOME.DATA is allocated, cataloged,
and populated with the members needed to continue the product installation.
x
Procedure: How to Download the Installation Software Using FTP
To download the installation software:
-
Go to http://techsupport.informationbuilders.com.
The Information Builders Technical Support home page opens.
-
Click My Downloads in the My Account
section on the right side of the page.
The Downloads, Upgrades, Service Packs, and PTFs page opens.
-
Click the link for your product (for example, WebFOCUS
and iWay Server and iWay Client).
The Downloads by Release page for your product opens.
-
Click your release from the Current Production Releases
list.
The Software Downloads page for your release opens.
-
Scroll down and find the platform on which you want to
install the server, and then click Download to
the right of the platform name.
-
Fill in the registration form and then click Continue.
The Software Download Agreement page opens.
-
Select I agree... to consent to
the Download Agreement, and then click Continue.
The Download Instructions page opens. Select AUTOMATIC
or MANUAL and follow the relevant instructions.
A copy of
the instructions is automatically emailed to you for later reference.
-
Log on to TSO.
-
Follow the instructions on the Download Page in your
TSO session.
-
Review Optional Low-Level Qualifier Changes. If you did not restore the first
data set as HOME.DATA (see download instructions) then change the
following line to reflect the data value you used:
// SET EDAUSSD='HOME.DATA'
-
Run the ISETUP procedure.
Specify (F)tp for Input Source on the second panel.
Note
that after the server is properly installed, you can optionally
delete any downloaded temporary files.
Continue with Step 5. Run ISETUP.
x
Reference: Optional Low-Level Qualifier Changes
We
recommend retaining the default low-level qualifiers that are supplied
for the installation libraries. However, if you need to change any
of them (for example, to conform to site-specific naming conventions),
you can do so by editing them in member PDSSNAME of high_level_qualifier.HOME.DATA.
You can see a list of the qualifiers in Default Low-Level Qualifiers.
Caution: If you
change any low-level qualifiers and do not reflect those changes
exactly in USSSNAME, you will experience problems with the server
installation and operation.
Once you have finished changing
any names, continue with Step 5. Run ISETUP.
x
Reference: Default Low-Level Qualifiers
The following low-level qualifiers are set in high_level_qualifier.HOME.DATA(PDSSNAME):
//         SET  EDAUSSD='HOME.DATA'        Server installation library
//         SET  EDAUSSL='HOME.LOAD'        Server base load library
//         SET  FFSUSSD='FFS.DATA'         Full Function server
//         SET  WFSUSSD='WFS.DATA'         WebFocus Reporting server
//         SET  ETLUSSD='DM.DATA'          DataMigrator
//         SET  WFMUSSD='WFM.DATA'         WebFocus Maintain Server
//         SET  CGWUSSD='CGW.DATA'         Communications Gateway
//         SET  CLNUSSD='CLN.DATA'         Client
//         SET  EDACICS='HOME.CICS.LOAD'   CICS load library
x
Server installation consists of a series of ISPF panels,
which gather the required information. After the panel dialog is
complete, JCL is created and submitted to install the server on
z/OS. This JCL job retrieves the remainder of the MVS libraries
and HFS files from the media and configures a basic working server.
- Execute the ISETUP member of your high_level_qualifier.HOME.DATA using
ISPF option 6.
The first Installation and Configuration
panel opens.
- Type 1 and press
Enter to continue to the next panel.
The following panel opens.
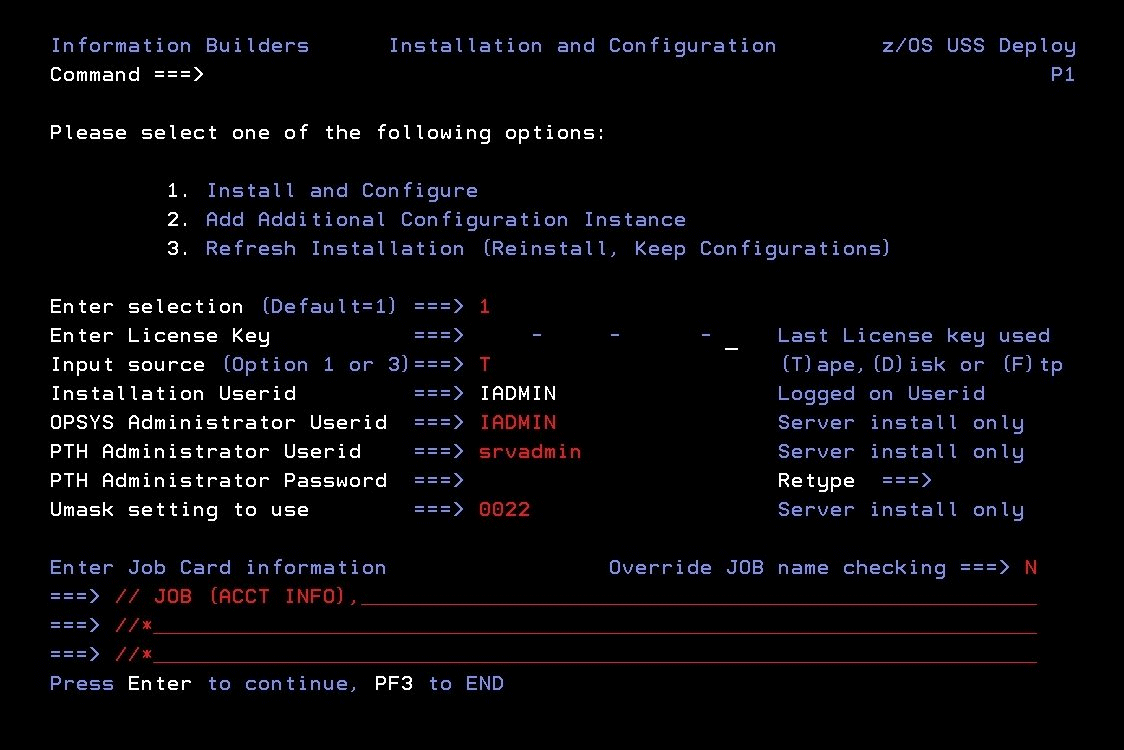
- Complete the panel as follows.
|
Field
|
Instructions
|
|---|
|
Enter selection
|
Accept the default value 1, Install
and Configure, for a new installation.
For option
2, Add Additional Configuration Instance,
see Adding a Configuration Instance for HFS.
For option 3, Refresh Installation,
see Upgrading Your Server Release for HFS.
|
|
Enter License Key
|
Enter the license key that was provided
with the software.
Be sure to store this key in a safe place
for future reference.
|
|
Input source
|
Enter the input source:
-
T for
Tape - If you received your software on tape media.
-
D for Disk - If you selected manual
download from the download instructions.
-
F for FTP - If you selected automatic
download from the download instructions.
|
|
Installation Userid
|
Shows the current logon ID. It cannot be
changed.
|
|
OPSYS Administrator Userid
|
Initially, this field shows the same ID
as the installation user ID.
If the installation user ID is
a superuser (UID=0), you must specify a non-superuser ID to administer
the server. Specify this ID here.
|
|
PTH Administrator Userid
|
An ID is required to administer the server
immediately after initial installation. This is defined and maintained solely
in the realm of the server. Defaults to srvadmin and
it can be changed here.
For more information about running
the server in secure mode, see Step 7. Configure Server Security.
|
|
PTH Administrator Password
|
Password for the PTH Administrator ID. It
cannot be left blank and must be matched at Retype field.
|
|
Umask setting to use
|
Shows the current umask setting for the
iadmin ID. The JCL passes this setting to the server for use at
run time.
Every time the server creates a file in the .../ibi/profiles
or .../ibi/apps directory structures (usually in response to Web
Console activity), the server assigns to the file the default permissions
666 filtered by the umask value. You specify whichever umask value
is necessary to mask out the permissions you do not want to grant.
For
example, if you specify a umask value of 0022, the server create
files with the permissions 644: umask 0022 is subtracted from the
default 666, disallowing the group and world write permissions.
|
|
Enter Job Card information
|
To provide JOB card information for submitting
jobs to the JES queue, provide a valid job name (a maximum of seven
characters following the // on the first JCL line), which defaults
to the user ID that you are currently using.
This job name
is used for multiple submissions (for example, jobnameA, jobnameB, jobnameC,
and so on) in the JCL generated by the installation procedure.
|
|
Override JOB name checking
|
To provide your own JOB card information,
including JOB name, enter Y and provide valid
JOB card information in the Enter Job Card information field.
The JOB card information that you enter will be used for each job
that is submitted.
|
If you used the same user ID for both installation
and administration, skip to Step 6. Otherwise, continue with Step
4.
- Press Enter to continue to the next panel.
The following panel
opens.
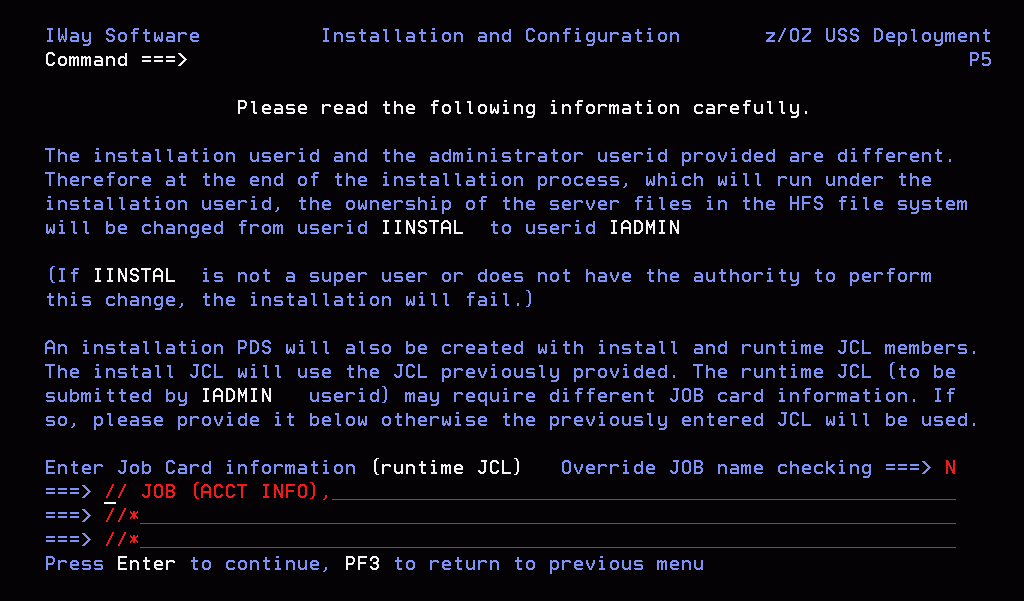
This panel appears
only if you provided two different user IDs in the previous panel.
The
installation process will change ownership of HFS files from the
installation ID (iinstal) to the administrator ID (iadmin). The
installation ID must have authority to issue the chown command to
make this change of ownership. This action is taken at the end of
the installation process.
- Complete the panel as follows.
|
Field
|
Instructions
|
|---|
|
Enter Job Card information
|
To provide JOB card information for submitting
the run-time jobs to the JES queue, provide a valid job name (a
maximum of seven characters following the // on the first JCL line),
which defaults to the user ID that you are currently using.
This
job name is used for multiple submissions (for example, jobnameA, jobnameB, jobnameC,
and so on) in the JCL generated by the installation procedure.
|
|
Override JOB name checking
|
To provide your own JOB card information,
including JOB name, enter Y and provide valid
JOB card information in the Enter Job Card information field.
The JOB card information that you enter will be used for each run-time
job that is created.
|
- Press Enter to continue to the next panel.
This
following panel only appears if FTP was previously selected. Otherwise,
skip to Step 8.

- Complete the panel as follows.
|
Field
|
Instructions
|
|---|
|
FTP Download Directory
|
This defaults to the current userid home
directory plus /download. Change the value to an existing directory
name or leave unchanged (/download will be created).
|
|
FTP Userid
|
Cut and paste from the download instructions
|
|
FTP Password
|
Cut and paste from the download instructions
|
- Press Enter to continue to the next panel.
Note
that in the current panel (and some later panels), if you are running
ISETUP from:
-
high_level_qualifier.HOME.DATA,
the panel will display default values for some fields.
- Any other library, the panel will not display any default values.
In
this and some later panels, you can see a field default value (if
one exists) by blanking out the field and pressing Enter.
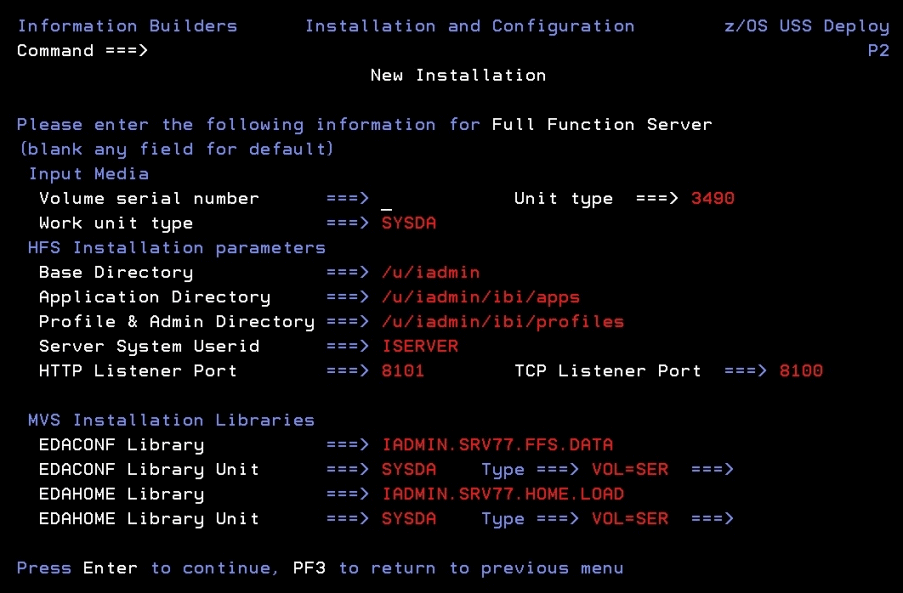
Complete the panel as follows.
|
Field
|
Instructions
|
|---|
|
Input
Media (installing from tape only)
|
|
Volume serial number
|
Provide the volume serial number of the
server media. The number is located on the tape supplied in you
server package.
|
|
Work unit type
|
Review the default value and change if necessary.
You
can specify a UNIT= type value (for example, SYSDA), or you
can direct work files to a specific volume serial number by specifying,
in single quotation marks ('), 'SYSDA,VOL=SER=volume'.
|
|
Input
Media (installing from disk/FTP only)
|
|
Directory name of input
|
Provide the name of the directory in which
the installation files reside.
|
|
General
Installation Parameters
|
|
Base Directory
|
This indicates where to install the software.
The default value is the home directory of the user ID you are using
to install the product. Change this value, if necessary, to a valid directory
that has space for the installation. The installation procedure
checks whether this directory exists and has enough space. If either
test fails, you will receive a message indicating the failure and
available options.
|
|
Application Directory
|
This indicates where application components
will reside. The default value is based on the value specified for Base Directory.
To specify another location for application components, change the
value for this field.
|
|
Profile & Admin Directory
|
This indicates where user profiles and administration
files will reside. The default value is based on the value specified for Base
Directory. To specify a different location for application components,
change the value for this field.
|
|
Server System Userid
|
This shows the default value, ISERVER. To
change this value, see the requirements in Step 2. Set Up User IDs.
|
|
HTTP Listener Port
|
This indicates the port number that the
server will use for HTTP. It is the first of three connection ports
that must be available to the server.
For example, if you
choose port 8101, then ports 8101, 8102, and 8103 are used by the
server. Ensure that you choose ports that are not currently being
used.
|
|
TCP Listener Port
|
This is the port number of the TCP Listener.
The
default is one less than the port specified for the HTTP Listener,
but it can be any port number other than the three reserved for
HTTP.
|
|
MVS
Installation Libraries
|
|
EDACONF Library
|
This is the full data set name the installation
procedure will use to allocate the EDACONF configuration library
on MVS. If you are running from high_level_qualifier.HOME.DATA,
this field will have the default value high_level_qualifier.product_type.DATA
(where product_type is based on license key). If you used another
name to unload the first data set, this field will be blank. On
subsequent running of ISETUP, the previous value used will be displayed.
Change the value as necessary.
|
|
EDACONF Library Unit/Type
|
These show the values that the installation
process will use to allocate the EDACONF library on MVS. If necessary,
you can change these to site-specific values.
Type can be VOL=SER (default), DATACLAS, MGMTCLAS,
or STORCLAS.
|
|
EDAHOME Library
|
This is the full data set name the installation
procedure will use to allocate the EDAHOME load library on MVS.
If you are running from high_level_qualifier.HOME.DATA, this field
will have the default value high_level_qualifier.HOME.LOAD.
If you used another name to unload the first data set, this field
will be blank. On subsequent running of ISETUP, the previous value
used will be displayed. Change the value as necessary.
|
|
EDAHOME Library Unit/Type
|
These show the values that the installation
process will use to allocate the EDAHOME load library on MVS. If necessary,
you can change these to site-specific values.
Type can be VOL=SER (default), DATACLAS, MGMTCLAS,
or STORCLAS.
|
- Press Enter to continue to the next panel.
Depending
on your license key, the Data Adapter panel may open before the Demonstration
Files panel. If the Data Adapter panel opens, continue with Step
10. Otherwise, skip to Step 11.
- The Data Adapter panel lists adapters that require the allocation
of MVS libraries in IRUNJCL or environment variables in the EDAENV
member.
To select specific adapters:
- Type Y next
to the required adapters and press Enter.
- Supply the requested information, which is described in Step 3. Collect Required Information for Adapters.
After you have finished installing
and configuring, you can use the Web Console to finish configuring
these adapters, and to configure adapters that do not have MVS JCL requirements.
- Press Enter to continue to the next panel.
The
JSCOM3 Listener configuration panel opens.
- Configuration of the JSCOM3 Listener is either
optional or mandatory depending on which adapters were selected.
If any Java-based adapters were selected (EJB, Call Java, JDBC,
Microsoft SQL Server), the configuration is mandatory.
- The panel will prompt for the path to the Java environment to
be passed to either JDK_HOME or JAVA_HOME, as described in JVM Requirements for Java Services.
- If no Java-based adapters were select, this configuration might
still be desirable to enable server-side graphics and Adobe® Flex®
features. To skip the configuration, leave the path blank.
- Press Enter to continue to the next panel.
The confirmation
panel opens.
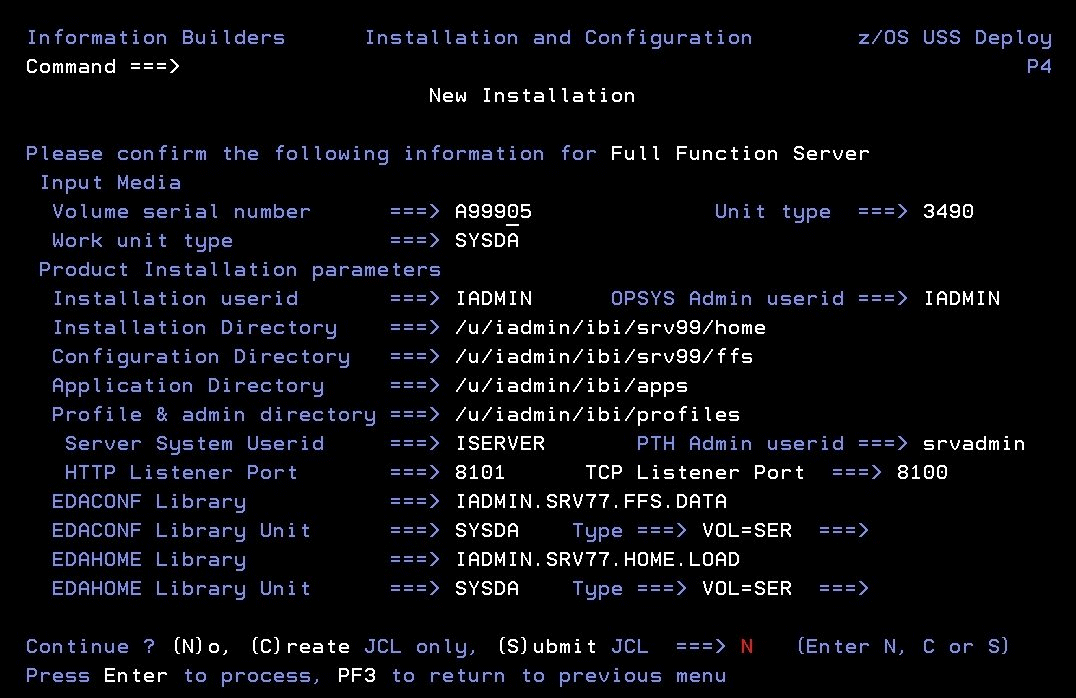
- Ensure that all values on the Confirmation panel are correct,
then select one of the following options:
-
N to return
to the initial panel so that you can change installation values.
-
C to create JCL which you can submit at a later time.
The JCL is placed in your high_level_qualifier.product_type.DATA
configuration library.
-
S to create JCL and submit the job immediately.
Note: If
FTP was selected, JCL will be created to download the server software
and run the install and configuration process.
- As the job is processed, in SDSF, check JESLOG for errors and
return codes.
The following is a table of the jobs
created. All members are created in the configuration library (EDACONF).
|
Job
|
Description
|
|---|
|
ISETUPJ1
|
Main JCL Job stream that is used to install
the software. For FTP processing, this JCL can be restarted at any
step due to a previous failure. To do this, add RESTART = procname.stepname
to the JOB card and resubmit the ISETUPJ1 JCL.
|
|
ISOPTS1
|
Options used to install the server.
|
The following members all call procedure
IRUNJCL, which is the main server JCL. If you need to change the
server JCL, change member IRUNJCL.
|
Member
|
Description
|
|---|
|
ISTART
|
Starts the server.
|
|
ISTOP
|
Stops the server.
|
|
ICLEAR
|
Clears server resources after abnormal end.
|
|
ICLRDIR
|
Clears superuser-owned directories from
a previously run secure server.
|
|
ISAVEDIA
|
Creates a directory called sdnnnnnn and
populates it with full diagnostic information.
|
|
ISHOW
|
Shows current workspace status.
|
|
ITRCON
|
Turns on dynamic tracing (server will be
started if not already running).
|
|
ITRCOFF
|
Turns off dynamic tracing (server will be
started if not already running).
|
The following members contain batch JCL
for auxiliary functions, and are also created in the configuration
library.
|
Member
|
Description
|
|---|
|
CMRUN
|
JCL to run DataMigrator batch jobs.
|
|
DB2V9PRM
|
DB2 version 9 DBRM referenced in GENDB2
JCL.
|
|
DB2V10PR
|
DB2 version 10 DBRM referenced in GENDB2
JCL.
|
|
DB2V11PR
|
DB2 version 11 DBRM referenced in GENDB2
JCL.
|
|
GENDB2
|
JCL to bind the DB2/CAF plan.
|
|
IIMSBMP
|
Example JCL to run the IMS/XMI server job
in BMP mode.
|
|
IIMSDLI
|
Example JCL to run the IMS/XMI
server job in DLI mode.
|
|
IRDAAPPC
|
Example CLIST to run RDAAPP
Client test tool.
|
|
IRDAAPPJ
|
Example JCL to run RDAAPP Client test tool.
|
The following members contain sample
started task JCL, and are also created in the configuration library.
|
Member
|
Description
|
|---|
|
IWAYS
|
A started task that starts the server.
|
|
IWAYP
|
A started task that stops the server.
|
|
EDAPRMP
|
A parameter file used by IWAYP.
|
|
EDAENV
|
A parameter file used by IWAYS, IWAYP, ISTART,
and ISTOP.
|
The following table shows the HFS directory
structures created during the installation process.
|
Directory Structure
|
Description
|
|---|
/u/iadmin/ibi/srv77/tape |
Contains HFS files from the input media.
|
/u/iadmin/ibi/srv77/install |
Working directory for the installation process.
Log and error files reside here.
|
/u/iadmin/ibi/apps |
The installation creates baseapp and
one or more sample application directories under this directory.
|
/u/iadmin/ibi/profiles |
This is where user profiles are created,
as well as admin.cfg.
|
/u/iadmin/ibi/srv77/home |
Software system directories are created
under this directory.
|
/u/iadmin/ibi/srv77/product_type |
Configuration directories are created under
this directory. The license key specified in the ISETUP procedure determines product_type.
product_type is
one or more of the following:
FFS for
a Full-Function Server
DM for
a DataMigrator Server
WFS for a WebFOCUS
Reporting Server
WFM for a Shared
Application Server for WebFOCUS Maintain
|
x
Step 6. Test the Installation
This section describes how to verify server installation.
x
Procedure: How to Test the Server Installation
-
Log on to TSO as iadmin.
-
Submit the ISTART JCL to start the server. This executes
the IRUNJCL proc.
-
Check the job output for errors. Look for the EDAPRINT message:
(EDA13023) ALL INITIAL SERVERS STARTED
-
Start the Web Console by opening a browser pointed at
the listener port of the server. The URL format is
http://host:port
where:
- host
Is the name of the machine on which the server is installed.
- port
Is one port higher than the port specified when installing
the server. For example, if you specified port 8100 during installation,
then use port 8101 to access the Web Console.
The
Web Console opens.
-
If the Web Console
opens and displays application tree folders in the left pane, the
server is working because it uses its own underlying data access
and reporting technologies to visualize the application tree. The server
may be further data tested (if desired).
-
Continue with adapter configuration, as described in
the Adapter Administration manual.
When
you are finished using the server, you can use the Web Console to
stop the server by going to the Web Console menu bar, selecting Workspace,
and then Stop.
If you experience problems
at start up, examine the job output for more information.
x
Step 7. Configure Server Security
If you will be configuring your server with an OPSYS
security provider, you must perform the instructions in the following
topics. (For PTH, DBMS, and LDAP security providers, skip these
topics.)
You can see a full description of all server security providers
in the Web Console help, and also in the Server
Administration manual. To see it in the Web Console:
- From the Web Console menu bar, select Help,
then Contents and Search.
The Web Console
Help window opens.
- In the left pane, expand Server Administration.
x
The default security provider for a
new installation is the internal security provider, PTH. The PTH
provider implements security using user IDs, passwords, and group memberships
stored in the admin.cfg configuration file.
After the initial installation, the Server Administrator that
was configured during the installation can start the server and
use the Web Console to further customize security settings, for
example, to configure alternate or additional security providers,
create additional PTH IDs, and register groups and users in a security
role. For more information about security providers, see the Server
Security chapter in the Server Administration manual.
x
Procedure: How to Satisfy Security Provider OPSYS Requirements
To
run a server with security provider OPSYS, you must perform the
following steps. You must do this once after installing and after
each refresh of the server with fixes.
Set up tscom300.out
as a root-owned SUID program:
-
If the server is running, bring it down.
-
Log on to the system as root, or issue the su root command.
-
Change your current directory to the bin directory of
the home directory created during the installation procedure.
For example, type the following command:
cd /home/iadmin/ibi/srv77/home/bin
-
Change file ownership and permissions by typing the following commands:
chown root tscom300.out
chmod 4555 tscom300.out
-
Verify your changes by issuing the following command:
ls -l tscom300.out
The
output should be similar to the following:
-r-sr-xr-x 1 root iadmin 123503 Aug 23 04:45 tscom300.out
Note
the permissions and ownerships.
When
you start the server, it will now run with security provider OPSYS.
The chmod and chown steps will need to be repeated
after any server upgrade since the tscom300.out file is replaced
during upgrade and the attributes are lost.
Note: If
this Security Provider OPSYS step has been configured and the site later
decides to switch to Security OFF, special steps must be taken to
ensure the mode remains after a full server shutdown (where edastart
-start is used to restart the server). The steps are:
- After the server recycles from the change to OFF, use the Web
Console to open the environment configuration file of the server
by clicking Workspace and expanding the Configuration Files folder,
followed by the Miscellaneous folder.
- Double-click Environment - edaenv.cfg to
edit the file and add the EDAEXTSEC=OFF variable.
- Save your work.
After the next full server shutdown,
be sure to do an edastart -cleardir before restarting the server.
This will clear any root owned files that would prevent a security
OFF server from starting.
x
Preventing Unsecured Server Starts After Upgrades
If the server cannot impersonate users because it lacks
platform-specific authorization steps, the server start aborts and
error messages are written to the edaprint log.
This feature prevents an unsecured server start after a software
upgrade if any of the required post-upgrade reauthorization steps
are missed on a UNIX, IBM i, or z/OS HFS deployment. This is not
applicable to other platforms. The setting may be placed in any normal
server start-up shell or profile that a site is using or in the
server edaenv.cfg environment configuration file. The messages vary
slightly by platform.
The edaprint messages are:
Configured security is 'ON' as set by EDAEXTSEC variable.
Server has no root privilege.
Workspace initialization aborted.
(EDA13171) UNABLE TO START SERVER
x
Procedure: How to Configure Security With All Security Products
To configure server security with
RACF, eTrust CA-ACF2, or eTrust CA-Top Secret:
-
Log on to TSO using an
ID with read access to the BPX.FILEATTR.APF facility class.
-
Using the name of the actual EDAHOME directory, change
file attributes by entering the following TSO commands in ISPF Command
Shell (option 6):
OSHELL extattr +a /u/iadmin/ibi/srv77/home/bin/tscom300.out
OSHELL extattr +a /u/iadmin/ibi/srv77/home/bin/tsqprx.out
-
Verify your changes by issuing the following command:
OSHELL ls -E /u/iadmin/ibi/srv77/home/bin/tscom300.out
OSHELL ls -E /u/iadmin/ibi/srv77/home/bin/tsqprx.out
The
extended attributes portion of the output should be a-s-.
-
The libraries allocated to STEPLIB in IRUNJCL must be
APF-authorized. Any non-APF-authorized libraries must be allocated
to the TASKLIB DDNAME.
-
Test server security by repeating the process described
in Step 6. Test the Installation.
x
Procedure: How to Configure Security With eTrust CA-ACF2
If
you are installing the server to run with eTrust CA-ACF2
security package, you may have to apply fix number QO71149 for eTrust
CA-ACF2 6.4 or QO51462 for eTrust CA-ACF2 6.5. If you are
installing the server under z/OS 1.12 or higher to run with eTrust
CA-ACF2 14.0, PTF RO24848 may have to be applied if server USS user
IDs are to be defined using the USS default segment. For more information
about these fixes, contact Computer Associates.
The MVS address
space must have access to those system resources that are required by
each user. eTrust CA-ACF2 will check for job-level access
as well as user-level access. Therefore, the job-level user ID must
have access to all data sets. For example, this can be done by setting
the MAINT attribute on the eTrust CA-ACF2 record for the
job-level user ID. Refer to eTrust CA-ACF2 technical reference
guides for further information.
The job-level user ID of the
server should have the Multiple User, Single Address Space (MUSSAS)
attribute set to on. If the server is run as a started task, you
must enable the started task attribute for the job-level user ID.
You must also use the Web Console to define this user ID with OPER
authority. For more information, see the Server Administration manual.
Each
user ID must be defined to eTrust CA-ACF2.
To create
the necessary logon IDs and profile records, issue the following commands:
ACF
SET LID
INSERT OMVS GROUP(OMVSGRP) STC UID(0)
INSERT INETD GROUP(OMVSGRP) STC UID(0) HOME(/) OMVSPGM(/bin/sh)
INSERT TCPIP GROUP(OMVSGRP) STC UID(0)
For more information,
see the following sections in Computer Associates eTrust CA-ACF2
Security for z/OS and OS/390 Cookbook:
- Defining
USS Users
- Superusers
- HTTP Server
- Installation Steps
x
Procedure: How to Configure Security With eTrust CA-Top Secret
If
you use Computer Associates eTrust CA-Top Secret, follow
these guidelines and refer to the security vendor manual for implementing
user-level security.
The TSS PERMIT command for BPX.FILEATTR.APF
facility class access is:
TSS PER(user_acid) IBMFAC(BPX.FILEATTR.APF) ACC(READ)
This
allows users to turn on the APF-authorized attribute for an HFS
file. Please refer to z/OS UNIX System Services Support in
the eTrust CA-Top Secret Security Cookbook for more
information.
To use eTrust CA-Top Secret, perform the
following steps:
- Create a eTrust CA-Top Secret
facility entry for the server security module, *PATHNAM.
This
is an example of a facility entry defining the server to eTrust
CA-Top Secret:
FACILITY DISPLAY
PGM=*PATHNAM ID=9 TYPE=26
ATTRIBUTES=IN-USE,ACTIVE,SHRPRF,ASUBM,TENV,NOABEND,MULTIUSER,NOXDEF
ATTRIBUTES=LUMSG,STMSG,SIGN(M),NOPSEUDO,INSTDATA,NORNDPW,AUTHINIT
ATTRIBUTES=NOPROMPT,MENU,NOAUDIT,RES,NOMRO,WARNPW,NOTSOC
ATTRIBUTES=NOTRACE,NOLAB,NODORMPW,NONPWR,NOIMSXTND
MODE=IMPL
LOGGING=ACCESS,INIT,SMF,MSG,SEC9
UIDACID=8 LOCKTIME=000 DEFACID=*NONE* KEY=8
For more
information, see How to Define z/OS UNIX System Services Users in
Computer Associates' eTrust CA-Top Secret Security for OS/390 and
z/OS Cookbook.
- Within this entry, include eTrust CA-Top Secret parameters
to establish the proper operating characteristics.
The ISERVER
and IADMIN ACIDs must have authority to the facility you have defined for
the server and to the resources within the facility:
TSS
ADD(region_acid) MASTFAC(facility) <-
defines the facility to CA-Top Secret
TSS ADD(user_acid) FAC(facility) <-
adds it to users requiring server access
- Each user of the server must be defined to eTrust CA-Top
Secret and given access to the appropriate system resources, including
the facility you have defined for the server.
Each user requires
an OMVS segment and HFS directories.
- If you are operating with eTrust CA-Top Secret HFSSEC=ON,
continue with Step 5. Otherwise, skip to Step 7.
- In the definitions for IADMIN and ISERVER ACIDs (shown in the
previous examples), set up the following security authorization:
XA HFSSEC = /U.IADMIN
ACCESS = ALL
- eTrust CA-Top Secret provides superuser granularity
with separate definitions for the following resource names:
SUPERUSER.FILESYS.FILE (CONTROL access)
SUPERUSER.FILESYS.CHOWN
SUPERUSER.FILESYS.MOUNT
SUPERUSER.FILESYS.PFSCTL
SUPERUSER.FILESYS.VREGISTER
SUPERUSER.IPC.RMID
SUPERUSER.PROCESS.GETPSENT
SUPERUSER.PROCESS.KILL
SUPERUSER.PROCESS.PTRACE
SUPERUSER.SETPRIORITY
Ensure that the server system
ID, ISERVER, which has UID=0, is granted full access to all these
resources. Grant access to the superuser-listed resources by means of
the UNIXPRIV resource class. For example:
TSS ADD(owning_acid) UNIXPRIV(SUPERUSE)
TSS PER(acid) UNIXPRIV(SUPERUSER.FILESYS.FILE) ACC(CONTROL)
For
details see the Superuser Granularity topic in Computer Associates'eTrust
CA-Top Secret Security for OS/390 and z/OS Cookbook.
- After you create a new user ID or change a user UID or GID,
you must issue the following command to reflect the updates in Top
Secret's in-storage tables:
TSS MOD(OMVSTABS)
The
following commands can also be used to list all UIDs, GIDs and their owners:
TSS WHOOWNS UID(*)
TSS WHOOWNS GID(*)
This information can be used for
diagnostic purposes.
For more information, see Computer Associates eTrust
CA-Top Secret Security for OS/390 and z/OS Cookbook.
Example: Facility
Entry Defining the Server to CA-Top Secret
The following
is an example of a facility entry that defines the server to eTrust CA-Top
Secret:
FACILITY DISPLAY
PGM=*PATHNAM ID=9 TYPE=26
ATTRIBUTES=IN-USE,ACTIVE,SHRPRF,ASUBM,TENV,NOABEND,MULTIUSER,NOXDEF
ATTRIBUTES=LUMSG,STMSG,SIGN(M),NOPSEUDO,INSTDATA,NORNDPW,AUTHINIT
ATTRIBUTES=NOPROMPT,MENU,NOAUDIT,RES,NOMRO,WARNPW,NOTSOC
ATTRIBUTES=NOTRACE,NOLAB,NODORMPW,NONPWR,NOIMSXTND
MODE=IMPL
LOGGING=ACCESS,INIT,SMF,MSG,SEC9
UIDACID=8 LOCKTIME=000 DEFACID=*NONE* KEY=8
Example: ISERVER
ACID Definition for CA-Top Secret
Following is an example
of an ISERVER ACID definition for eTrust CA-Top Secret. Note
that:
- UID is zero.
- The facility of the server is set to IWAY as an example; it
can differ at your site.
- The SOURCE = INTRDR setting prevents this ACID from logging
on.
TSS LIST(ISERVER) DATA(ALL,PROFILE)
ACCESSORID = ISERVER             NAME = IWAY ID
TYPE       = USER                SIZE = 512 BYTES
SOURCE     = INTRDR
DEPT ACID  = IWAY                DEPARTMENT = IWAY DEPT
DIV ACID   = IWAYDIV             DIVISION = IWAYDIV
GROUPS     = IWAYGRP
DFLTGRP    = IWAYGRP
----------- SEGMENT OMVS
HOME       = /
OMVSPGM    = /bin/sh
UID        = 0000000000
Example: IADMIN ACID Definition for CA-Top Secret
Following
is an example of an IADMIN ACID definition for eTrust CA-Top
Secret. Note that UID is not zero.
TSS LIST(IADMIN) DATA(ALL,PROFILE)
ACCESSORID = IADMIN             NAME = IWAY ADMIN ID
TYPE       = USER               SIZE = 512 BYTES
FACILITY   = TSO
FACILITY   = BATCH
DEPT ACID  = IWAY               DEPARTMENT = IWAY DEPT
DIV ACID   = IWAYDIV            DIVISION = IWAY DIVISION
GROUPS     = IWAYGRP
DFLTGRP    = IWAYGRP
----------- SEGMENT OMVS
HOME       = /u/iadmin
OMVSPGM    = /bin/sh
UID        = 0000000008
xStarting and Stopping a Server for HFS
This section provides information on operation and use
of the server. Additional information on the server and how to configure
adapters is available in the Web Console help. The Web Console help
is also available as the Server Administration manual.
x
Starting and Stopping the Server Using a Batch Job
To start the server, submit the ISTART member of the
MVS configuration library (high_level_qualifier.product_type.DATA).
To stop a server, submit the ISTOP member of the MVS configuration
library or use the Web Console. For information about using the
Web Console, see the Server Administration manual.
x
Starting and Stopping the Server Using a Started Task
ISETUP creates started task JCL to start and stop the
server. These started task members of the MVS configuration library
are:
-
IWAYS, which starts the server.
-
IWAYP, which stops the server.
In order to execute the started tasks, you must:
-
Copy them into SYS1.PROCLIB or any
other JES2 Proclib data set.
-
Satisfy security requirements. All external
security-related permissions must exist for both the data sets and
the started tasks. In order to issue the started tasks, the user
must satisfy both of the following requirements:
- Have at
least OPERATOR authority defined within the Web Console.
- Be in the same security group, or associated with the same security
group, as the owner of the server directory structure (for example,
as iadmin).
To submit the started tasks from the MVS console, issue the following
command:
S IWAYS
S IWAYP
You can add the started tasks to any automation product that
you run.
Example: Sample IWAYS Started Task
This
is an example of iWAYS, the started task that starts the server:
//IWAYS       PROC
//TSCOM300    EXEC PGM=TSCOM300,
//       PARM='ENVAR("_EDC_UMASK_DFLT=0022")/'
//STEPLIB     DD   DSN=IADMIN.SRV77.HOME.LOAD,DISP=SHR
//EDAPRINT    DD   SYSOUT=A
//SYSPRINT    DD   SYSOUT=A
//SYSOUT      DD   SYSOUT=A
//EDAPARM     DD   DUMMY
//EDAENV      DD   DSN=IADMIN.SRV77.FFS.DATA(EDAENV),DISP=SHR
Example: Sample IWAYP Started Task
This
is an example of iWAYP, the started task that stops the server:
//IWAYP       PROC
//TSCOM300    EXEC PGM=TSCOM300
//STEPLIB     DD   DSN=IADMIN.SRV77.HOME.LOAD,DISP=SHR
//EDAPRINT    DD   SYSOUT=A
//SYSPRINT    DD   SYSOUT=A
//SYSOUT      DD   SYSOUT=A
//EDAPARM     DD   DSN=IADMIN.SRV77.FFS.DATA(EDAPRMP),DISP=SHR
//EDAENV      DD   DSN=IADMIN.SRV77.FFS.DATA(EDAENV),DISP=SHR
x
Server Operations Using MVS Operator Commands
On MVS, you can issue operator MODIFY commands against
the server job from either from the MVS Console or SDSF. You can
use MODIFY commands to pass options to an already running job:
Use MVS Operator MODIFY commands in the following format:
F jobname, parameters
For instance:
F IWAY77,-SHOW
Note: If the server job is cancelled or it abends, submit
the ICLEAR job in the configuration data set before restarting the
server.
xDB2 Security Exit Configuration for HFS
Customize the DB2 security exit to allow the Adapter
for DB2 to run with user-level security enabled. If you do so, users
will connect to DB2 with the authorization of the user ID with which
they logged on to the server. The server must also be running with security
turned on.
If you do not customize the DB2 security exit, all users will
be assigned the connection ID to DB2 that is associated with the
region, job submitter, or started task.
For DB2 CLI adapter, the connection to DB2 must be configured
as trusted for the exit to be invoked.
The changes that must be made to the IBM DB2 sign-on exit, DSN3SATH,
differ for RACF and eTrust CA-Top Secret sites and eTrust
CA-ACF2 sites.
The highlighted text and comments shown in the examples indicate
the lines containing the recommended modification of DSN3SATH, which
calls the module FOCDSN3 the supplied exit.
After you finish the edits, assemble the exit into an object
file. This object file is input to the link JCL found in Modifying the Link JCL for DSN3SATH.
Note:
- The positioning of these lines is approximate,
assuming that no other changes or additions have already been made
to DSN3SATH. If any changes have been made, you should decide on
the most appropriate location for this call to FOCDSN3.
- FOCDSN3 is used to set the proper primary (individual user ID)
authorization.
- Another program, FOCDSN4, is used to set the proper secondary
(group ID) authorization for RACF and eTrust CA-Top Secret.
FOCDSN4 is not needed with eTrust CA-ACF2; the secondary
authorization ID(s) will be set correctly without it.
Example: Changing DSN3SATH for RACF and eTrust CA-Top Secret Sites
1. Search for the SATH001 label -
add two lines (FOCDSN3):
SATH001  DS    0H
         USING WORKAREA,R11        ESTABLISH DATA AREA ADDRESSABILITY
         ST    R2,FREMFLAG                SAVE FREEMAIN INDICATOR
         XC    SAVEAREA(72),SAVEAREA CLEAR REGISTER SAVE AREA
         .
         .
         .
*********SECTION 1:  DETERMINE THE PRIMARY AUTHORIZATION ID  ************
*                                                                       *
*  IF THE INPUT AUTHID IS NULL OR BLANKS, CHANGE IT TO THE AUTHID       *
*  IN EITHER THE JCT OR THE FIELD POINTED TO BY ASCBJBNS.               *
*  THE CODE IN THIS SECTION IS AN ASSEMBLER LANGUAGE VERSION OF         *
*  THE DEFAULT IDENTIFY AUTHORIZATION EXIT.  IT IS EXECUTED ONLY        *
*  IF THE FIELD ASXBUSER IS NULL UPON RETURN FROM THE RACROUTE          *
*  SERVICE.  FOR EXAMPLE, IT DETERMINES THE PRIMARY AUTH ID FOR         *
*  ENVIRONMENTS WITH NO SECURITY SYSTEM INSTALLED AND ACTIVE.           *
*                                                                       *
*************************************************************************
SPACE
    LA    R1,AIDLPRIM         LOAD PARM REG1             <--ADD
    CALL  FOCDSN3             GO GET THE IBI EXIT        <--ADD
    CLI   AIDLPRIM,BLANK      IS THE INPUT PRIMARY AUTHID NULL
    BH    SATH020             SKIP IF A PRIMARY AUTH ID EXISTS
2. Search for the SATH020 label -
add a comment box, add one line, and comment out four lines:
SATH020  DS    0H                  BRANCH TO HERE IF PRIMARY EXISTS
*****OPTIONAL CHANGE @CHAR7:  FALLBACK TO SEVEN CHAR PRIMARY AUTHID***
*                                                                    *
*  IF YOUR INSTALLATION REQUIRES ONLY SEVEN CHARACTER PRIMARY        *
*  AUTHORIZATION IDS (POSSIBLY TRUNCATED) DUE TO DB2 PRIVILEGES      *
*  GRANTED TO TRUNCATED AUTHORIZATION IDS, THEN YOU MUST BLANK OUT   *
*  COLUMN 1 OF THE ASSEMBLER STATEMENT IMMEDIATELY FOLLOWING THIS    *
*  BLOCK COMMENT. THEN ASSEMBLE THIS PROGRAM AND LINK-EDIT IT INTO   *
*  THE APPROPRIATE DB2 LOAD LIBRARY AS EXPLAINED IN AN APPENDIX      *
*  OF "THE DB2 ADMINISTRATION GUIDE".                                *
*                                                                    *
*  OTHERWISE, YOU NEED DO NOTHING.                                   *
*                                                            @KYD0271*
**********************************************************************
*      MVI   AIDLPRIM+7,BLANK    BLANK OUT EIGHTH CHARACTER
       SPACE
       .
       .
       .
*   RACF IS ACTIVE ON THIS MVS
****************************************************************** <--ADD
*                                                                * <--ADD
* The logic was modified because in DB2 V8 AIDLACEE is always not* <--ADD
* NULL. We used to honor AIDLACEE first, FOCDSN4 second and then * <--ADD
* AS ACEE. Now we honor FOCDSN4 first, AIDLACEE second and then  * <--ADD
* AS ACEE.                                                       * <--ADD
*                                                                * <--ADD
* 03/11/05   ASK0                                                * <--ADD
****************************************************************** <--ADD
  USING ACEE,R6             ESTABLISH BASE FOR ACEE        @KYL0108
  L     R6,AIDLACEE         Get => caller ACEE if any             <--ADD
* ICM   R6,B'1111',AIDLACEE CALLER PASSED ACEE ADDRESS? @KYL0108 <-COMMENT
* BZ    SATH024              NO, USE ADDRESS SPACE ACEE  @KYL0108 <-COMMENT
* CLC   ACEEACEE,EYEACEE    IS IT REALLY AN ACEE?       @KYL0108 <-COMMENT
* BE    SATH027             YES, PROCEED NORMALLY       @KYL0108 <-COMMENT
      SPACE 1
SATH024  DS    0H                  USE ADDRESS SPACE ACEE      @KYL0108
    .
    .
    .
3. Search for the SATH025 label - replace
sath025 and add sath026 (FOCDSN4):
SATH025  DS    0H

    CALL  FOCDSN4              GO GET THE IBI EXIT (4=GROUP AUTH) <--ADD
    LTR   R6,R6                DOES AN ACEE EXIST?  IF NOT,       <--ADD
    BZ    SATH026              CHECK ACEE IN ADDRESS SPACE        <--ADD
    CLC   ACEEACEE,EYEACEE     DOES IT LOOK LIKE AN ACEE?         <--ADD
    BE    SATH027              YES, GO DO GROUPS                  <--ADD
SATH026  DS    0H                                                  <--ADD
   L      R6,ASCBASXB          GET ADDRESS SPACE EXTENSION BLOCK  <--ADD
   L      R6,ASXBSENV-ASXB(,R6) GET ACEE ADDRESS                  <--ADD
   CLC    ACEEACEE,EYEACEE     DOES IT LOOK LIKE AN ACEE?         <--ADD
   BNE    SATH049              NO, THEN CAN'T DO GROUPS           <--ADD
   DROP   R8                   DROP ASCB BASE REG                 <--ADD
   SPACE 1                                                        <--ADD
SATH027 DS 0H CHECK LIST OF GROUPS OPTION
TM RCVTOPTX,RCVTLGRP IS LIST OF GROUPS CHECKING ACTIVE
BZ SATH040 SKIP TO SINGLE GROUP COPY IF NOT
DROP R7 DROP RCVT BASE REG
SPACE 1
* RACF LIST OF GROUPS OPTION IS ACTIVE
EJECT
.
.
.
Example: Changing DSN3SATH for eTrust CA-ACF2 Sites
*DSN3SATH source is provided by
ACF2.
1. Search for PRIMARY AUTHORIZATION ID - add
two lines (FOCDSN3):
*****************************************************************
*                                                               *
*           PRIMARY AUTHORIZATION ID                            *
*                                                               *
*****************************************************************
*                                                               *
*      IF THE PRIMARY AUTHORIZATION ID IS NULL OR BLANKS        *
*      IF CA-ACF2 IS AVAILABLE                                  *
*      SET PRIMARY ID FROM ACFASVT (ASVLID)                     *
*      ELSE                                                     *
*      IF TSO FOREGROUND USER                                   *
*      SET PRIMARY ID FROM TSO LOGON ID (ASCBJBNS)              *
*      ELSE                                                     *
*      SET PRIMARY ID FROM JOB USER (JCTUSER)                   *
*                                                               *
*****************************************************************
      SPACE 2                                               04260000
      LA R1,AIDLPRIM LOAD PARM REG1                 <--ADD
      CALL FOCDSN3 GO GET THE IBI EXIT              <--ADD
       CLI   AIDLPRIM,C' '      PRIMARY AUTHID THERE ?      04270000
       BH    PRIMWTO            ..YES, EVERYTHINGS OK HERE  04280000
       L     R3,PSAAOLD-PSA(0)  CURRENT ASCB ADDRESS        04290000
       USING ASCB,R3            ASCB ADDRESSABILITY         04300000
       SPACE 2                                              04310000
Example: Modifying the Link JCL for DSN3SATH
This
is sample link JCL for the IBM exit DSN3SATH. Modify the JCL to
link the modules into the DB2 security exit as follows.
//LKED  EXEC PGM=IEWL,PARM='LIST,XREF,LET,RENT,AMODE=31'
//OBJECT    DD DSN=db2pref.SDSNSAMP.OBJ,DISP=SHR <--OUTPUT OF ASSEMBLE
STEP
//EDAMOD    DD DSN=high_level_qualifier.HOME.LOAD,DISP=SHR
//SYSLMOD   DD DSN=db2pref.DSNEXIT,DISP=SHR
//SYSPRINT  DD SYSOUT=*
//SYSUT1    DD UNIT=SYSDA,SPACE=(100,(50,50))
//SYSLIN    DD *
  INCLUDE EDAMOD(FOCDSN3)
***********************************************************************
*** Omit the following line for eTrust CA-ACF2
***********************************************************************
  INCLUDE EDAMOD(FOCDSN4)
          ENTRY DSN3@ATH
  NAME DSN3@ATH(R)
/*
where:
-
db2pref
-
Is the prefix for the DB2 data sets.
- high_level_qualifier
-
Is the high-level qualifier for the data sets.
Once this job finishes
successfully, you must recycle the DB2 subsystem in order for the
changes to take effect.
xUpgrading Your Server Release for HFS
Use this option to upgrade a server to a new maintenance
level within the same major release. A major release is indicated
by the first two digits of the release number.
x
Step 1. Access the Installation Software
You can choose to access the server installation software
using either
x
Procedure: How to Unload the Installation Software From Tape
The
software is provided on a cartridge in 3490 or 3590 format with
MVS PDSs. Perform the following to unload the installation data
set from the tape:
-
Log on to
TSO.
-
Run an IEBCOPY job to allocate and unload the qualifier.HOME.DATA
data set. This PDS contains the members needed for the actual installation.
It is recommended that you use HOME.DATA
as the low-level qualifier for the target data set. Although you
can specify any low-level qualifier, HOME.DATA enables the installation
procedure to generate default data set names, simplifying your installation.
Note: If you do not use HOME.DATA, then change
the following line to reflect the value you used.
// SET EDAUSSD='HOME.DATA'
Do
this before you run ISETUP.
The following sample JCL
is for the initial unload to a new data set:
//IEBCOPY  EXEC PGM=IEBCOPY,REGION=0M
//SYSPRINT DD SYSOUT=*
//SYSUT1   DD UNIT=workunit,SPACE=(CYL,(5,1))
//OUT1     DD DISP=(NEW,CATLG,DELETE),
//         DSN=qualifier.HOME.DATA,
//         DCB=(RECFM=FB,LRECL=80,BLKSIZE=3200),
//         SPACE=(CYL,(5,5,25)),
//         UNIT=SYSDA
//IN1      DD DISP=(OLD,PASS),
//            DSN=HOME.DATA,
//            UNIT=cart,
//            VOL=(,RETAIN,,SER=volser),
//            LABEL=(1,SL)
//SYSPRINT  DD  SYSOUT=*
//SYSIN     DD  *
  COPY INDD=IN1,OUTDD=OUT1
where:
- workunit
Is the unit for the work data set.
- qualifier
Is the high-level qualifier for HOME.DATA and for all other
data sets that the installation procedure allocates. We recommend
that the high-level qualifier reflect the release of the software.
However, you can use any site-specific value.
For PDS, we
recommend retaining the low-level qualifier HOME.DATA, but you can
change this to any site-specific value. If you use a low-level qualifier
other than HOME.DATA, you must then edit member PDSSNAME to change
the string “HOME.DATA” to the low-level qualifier you specify here.
- cart
Is the unit type of the tape drive. Common names include
3490, TAPE, and 3590. Change as needed.
- volser
Is the value shown on the media label.
After
this job has run, qualifier.HOME.DATA is allocated, cataloged,
and populated with the members needed to continue the product installation.
Proceed
to Step 2. Run ISETUP.
x
Procedure: How to Download the Installation Software Using FTP
To
download the installation software:
-
Go to http://techsupport.informationbuilders.com.
The Information Builders Technical Support home page opens.
-
Click My Downloads in the My Account
section on the right side of the page.
The Downloads, Upgrades, Service Packs, and PTFs page opens.
-
Click the link for your product (for example, WebFOCUS
and iWay Server and iWay Client).
The Downloads by Release page for your product opens.
-
Click your release from the Current Production Releases
list.
The Software Downloads page for your release opens.
-
Scroll down and find the platform on which you want to
install the server, and then click Download to
the right of the platform name.
-
Fill in the registration form and then click Continue.
The Software Download Agreement page opens.
-
Select I agree... to consent to
the Download Agreement, and then click Continue.
The Download Instructions page opens. Select AUTOMATIC
or MANUAL and follow the relevant instructions.
A copy of
the instructions is automatically emailed to you for later reference.
-
Log on to TSO.
-
Follow the instructions on the Download Page in your
TSO session.
-
Review Optional Low-Level Qualifier Changes. If you did not restore the first
data set as HOME.DATA (see download instructions) then change the
following line to reflect the data value you used:
// SET EDAUSSD='HOME.DATA'
-
Run the ISETUP procedure.
Specify (F)tp for Input Source on
the second panel.
Note that after the server is properly
installed, you can optionally delete any downloaded temporary files.
Continue
with Step 2. Run ISETUP.
x
Reference: Optional Low-Level Qualifier Changes
We
recommend retaining the default low-level qualifiers that are supplied
for the installation libraries. However, if you need to change any
of them (for example, to conform to site-specific naming conventions),
you can do so by editing them in member USSSNAME of high_level_qualifier.HOME.DATA.
You can see a list of the qualifiers in Default Low-Level Qualifiers.
Caution: If you change
any low-level qualifiers and do not reflect those changes exactly
in USSSNAME, you will experience problems with the server installation
and operation.
Once you have finished changing any names,
continue with Step 2. Run ISETUP.
x
Reference: Default Low-Level Qualifiers
The following low-level qualifiers are set in high_level_qualifier.HOME.DATA(PDSSNAME):
//         SET  EDAUSSD='HOME.DATA'        Server installation library
//         SET  EDAUSSL='HOME.LOAD'        Server base load library
//         SET  FFSUSSD='FFS.DATA'         Full Function server
//         SET  WFSUSSD='WFS.DATA'         WebFocus Reporting server
//         SET  ETLUSSD='DM.DATA'          DataMigrator
//         SET  WFMUSSD='WFM.DATA'         WebFocus Maintain Server
//         SET  CGWUSSD='CGW.DATA'         Communications Gateway
//         SET  CLNUSSD='CLN.DATA'         Client
//         SET  EDACICS='HOME.CICS.LOAD'   CICS load library
x
Caution: Ensure that all server processes are
stopped before upgrading.
Server upgrade consists of a series of ISPF panels, which gather
information for the upgrade. After the panel dialog is complete,
JCL is created and submitted (if required) to upgrade the server
on z/OS. This JCL job retrieves the remainder of the MVS libraries
and HFS files from the media.
- Execute the ISETUP member of your high_level_qualifier.HOME.DATA using
ISPF option 6.
The Installation and Configuration panel
opens.
- Select 1 for HFS deployment and press
Enter to continue to the next panel.
- Complete the panel as follows.
|
Field
|
Instructions
|
|---|
|
Enter selection
|
Choose option 3, Refresh
Installation.
|
|
Enter License Key
|
Enter the 10-digit license key that was
provided with the software.
|
|
Input source
|
Choose the Input source, T for tape, D for
disk (see note), or F for automatic FTP download direct to MVS.
Note: If
you downloaded the server software using FTP to another platform
and then manually transferred the files to MVS, choose D and,
on the next panel, provide the directory name where the transferred
files reside.
|
|
Installation Userid
|
Shows the current logon ID. It cannot be
changed.
|
|
OPSYS Administration Userid
|
Initially, this field shows the same ID
as the installation user ID.
If the installation user ID is
a superuser (UID=0), you must specify a non-superuser ID to administer
the server. Specify this ID here.
|
|
PTH Administrator Userid
|
An ID is required to administer the server
immediately after initial installation. This ID is defined and maintained solely
in the realm of the server. It defaults to srvadmin.
Note: For
a Refresh Installation, this parameter is ignored, as no configuration
files are updated. ISETUP must be run by the OPSYS Administration userid.
|
|
PTH Administrator Password
|
Password for the PTH Administrator ID.
Note: For
a Refresh Installation, this parameter is ignored, as no configuration
files are updated. ISETUP must be run by the OPSYS Administration userid.
|
|
Umask setting to use
|
Shows the current umask setting for the
iadmin ID. The JCL passes this setting to the server for use at
run time.
Every time the server creates a file in the .../ibi/profiles
or .../ibi/apps directory structures (usually in response to Web
Console activity), the server assigns to the file the default permissions
666 filtered by the umask value. You specify whichever umask value
is necessary to mask out the permissions you do not want to grant.
For
example, if you specify a umask value of 0022, the server create
files with the permissions 644: umask 0022 is subtracted from the
default 666, disallowing the group and world write permissions.
|
|
Enter Job Card information
|
To provide JOB card information for submitting
jobs to the JES queue, provide a valid job name (a maximum of seven
characters following the // on the first JCL line), which defaults
to the user ID that you are currently using.
This job name
is used for multiple submissions (for example, jobnameA, jobnameB, jobnameC,
and so on) in the JCL generated by the installation procedure.
|
|
Override JOB name checking
|
To provide your own JOB card information,
including JOB name, enter Y and provide valid
JOB card information in the Enter Job Card information field.
The JOB card information that you enter will be used for each job
that is submitted.
|
If you used the same user ID for both installation
and administration, skip to Step 7. Otherwise, continue with the
following step.
- Press Enter to continue to the next panel.
This panel appears
only if you provided two different user IDs in the previous panel.
The
installation process will change ownership of HFS server files from
the installation ID (iinstal) to the administrator ID (iadmin).
The installation ID must have authority to issue the chown command
to make this change of ownership. This action is taken at the end
of the installation process.
- Complete the panel as follows.
|
Field
|
Instructions
|
|---|
|
Enter Job Card information
|
To provide JOB card information for submitting
the run-time jobs to the JES queue, provide a valid job name (a maximum
of seven characters following the // on the first JCL line), which
defaults to the user ID that you are currently using.
This
job name is used for multiple submissions (for example, jobnameA, jobnameB, jobnameC,
and so on) in the JCL generated by the installation procedure.
|
|
Override JOB name checking
|
To provide your own JOB card information,
including JOB name, enter Y and provide valid
JOB card information in the Enter Job Card information field.
The JOB card information that you enter will be used for each run-time
job that is created.
|
- If you selected input source T or D, skip to Step 7.
If you
selected F for automatic FTP only, complete the panel as follows.
|
Field
|
Instructions
|
|---|
|
FTP Download Directory
|
Directory to be used as the target for the
FTP files. This directory must already exist.
|
|
FTP Userid
|
User ID provided on the download instructions.
|
|
FTP Password
|
Password provided on the download instructions.
|
- Press Enter to continue to the next panel,
and complete the panel as follows.
|
Field
|
Instructions
|
|---|
|
HFS Base Directory
|
Base directory of the current server that
is to be refreshed. The value will be checked to see if it contains
a valid server directory structure. (It should contain .../ibi/srvxx/home/bin
where xx is the major release level.) From this
value, the current installation library name is obtained and this
will be the location used to create the refresh JCL.
|
- Press Enter to continue to the next panel, and complete the
panel as follows.
|
Field
|
Instructions
|
|---|
|
Input
Media (installing from tape)
|
|
Volume serial number
|
Provide the volume serial number of the
server media. The number is located on the tape supplied in you
server package.
|
|
Volume unit type
|
Review the default value and change it,
if necessary.
|
|
Work unit type
|
Review the default value and change, if
necessary.
You can specify a UNIT= type value (for
example, SYSDA), or you can direct work files to a specific volume
serial number by specifying, in single quotation marks ('), 'SYSDA,VOL=SER=volume'.
|
|
Input
Media (installing from disk)
|
|
Directory name of input
|
Provide the name of the directory in which
the installation files reside.
|
|
MVS
Installation Libraries
|
|
EDAHOME Library
|
This is the full data set name the installation
procedure will use to allocate the EDAHOME load library on MVS and where
the refresh load modules will be stored. If you are running from high_level_qualifier.HOME.DATA,
this field will have the default value high_level_qualifier.HOME.LOAD.
If you used another name to unload the first data set, this field
will be blank. On subsequent running of ISETUP, the previous value
used will be displayed. Change the value as necessary.
|
|
EDAHOME Library Unit/Type
|
These show the values that
the installation process will use to allocate the EDAHOME load library
on MVS. If necessary, you can change these to site-specific values.
Type
can be VOL=SER (default), DATACLAS, MGMTCLAS,
or STORCLAS.
|
Note: The EDACONF Library name is
where the refresh JCL will be created. This library is the current
server installation library. The value cannot be changed.
- Ensure that all values on the panel are correct, then select
one of the following options:
-
N to return to the
initial panel so that you can change installation values.
-
C to create JCL which you can submit at a later
time. The JCL is placed in your configuration library.
-
S to create JCL and submit the job immediately.
- As the job is processed, in SDSF, check JESLOG for errors and
return codes.
The following jobs are added to the current configuration library
of the server:
|
Job
|
Description
|
|---|
ISETUPJ3
ISOPTS3 |
Main JCL Job stream that is used to install
the server.
|
The following directories are added to the HFS directory structure
of the existing server:
|
Directory
|
Description
|
|---|
/u/iadmin/ibi/srv77/tape |
Contains HFS files from the input media.
|
/u/iadmin/ibi/srv77/install |
Working directory for the installation process.
Log and error files reside here.
|
x
Step 3. Test the Server Installation
This section describes how to test the server installation.
x
Procedure: How to Test the Server Installation
-
Log on to TSO as iadmin.
-
Submit the ISTART JCL to start the server.
-
Check the job output for errors. Look for the EDAPRINT message:
(EDA13023) ALL INITIAL SERVERS STARTED
-
Start the Web Console by opening a browser pointed at
the listener port of the server. The URL format is
http://host:port
where:
- host
Is the name of the machine on which the server is installed.
- port
Is one port higher than the port specified when installing
the server. For example, if you specified port 8100 during installation,
then use port 8101 to access the Web Console.
The
Web Console opens.
-
If the Web Console
opens and displays application tree folders in the left pane, the
server is working because it uses its own underlying data access
and reporting technologies to visualize the application tree. The server
may be further data tested (if desired).
When
you are finished using the server, you can use the Web Console to
stop the server by going to the Web Console menu bar, selecting Workspace,
and then Stop.
If you experience problems
at start up, examine the job output for more information.
x
Step 4. Reconfigure Server Security
For information about configuring server security, see Step 7. Configure Server Security.
To reconfigure server security to OPSYS provider only:
- Log on to TSO using an ID with read access to the BPX.FILEATTR.APF
facility class.
- Using the name of the actual EDAHOME directory, change file
attributes by entering the following TSO commands in ISPF Command
Shell (option 6):
OSHELL extattr +a /u/iadmin/ibi/srv77/home/bin/tscom300.out
OSHELL extattr +a /u/iadmin/ibi/srv77/home/bin/tsqprx.out
- Verify your changes by issuing the following command:
OSHELL ls -E /u/iadmin/ibi/srv77/home/bin/tscom300.out
OSHELL ls -E /u/iadmin/ibi/srv77/home/bin/tsqprx.out
The
extended attributes portion of the output should be a-s-.
- The libraries allocated to STEPLIB in IRUNJCL must be APF-authorized.
Any non-APF-authorized libraries must be allocated the TASKLIB DDNAME.
- Test server security by repeating the process described in Step 3. Test the Server Installation.
This step will need to be repeated after any server upgrade since
these files are replaced during upgrade.
x
Preventing Unsecured Server Starts After Upgrades
If
the security provider is set to OPSYS in the configuration file and,
additionally, explicit environment variable EDAEXTSEC is set to
OPSYS (or ON), and the server cannot impersonate users because it
lacks platform-specific authorization steps, the server start aborts
and error messages are written to the edaprint log.
This feature prevents an unsecured
server start after a software upgrade if any of the required post-upgrade
reauthorization steps are missed on a UNIX, IBM i, or z/OS HFS
deployment. This is not applicable to other platforms. The setting
may be placed in any normal server start-up shell or profile that
a site is using or in the server edaenv.cfg configuration file.
The messages vary slightly by platform.
The edaprint messages
are:
I Configured primary security is 'OPSYS' as set in configuration file
E Server security explicitly set to OPSYS, but lacks authority!
Workspace initialization aborted.
(EDA13171) UNABLE TO START SERVER
x
Step 5. Reconfigure Adapters
While most adapters do not require
additional steps after updating binary files, the following table
notes the adapters that do require some consideration.
|
Adapter
|
Steps After Updating Binaries
|
|---|
|
Adabas
|
- Re-enable the module containing SVC
using the Web Console adapter configuration page.
- Test the adapter from the adapter page before running your applications.
|
|
DB2 CAF
|
- Rebind the DB2 plan using the Web Console
adapter configuration page.
- Test the adapter from the adapter page before running your applications.
|
xAccounting for HFS - SMF Records
The server provides an optional facility to use for
accounting purposes that enables you to log resource utilization
on a per-user basis. This facility enables the server to generate
SMF records for query-level and user-level accounting.
Server accounting requires that the server STEPLIB data sets
be APF-authorized. When SMF records are generated, they contain:
- The logon ID and security ID of the user.
- The CPU time and EXCPs consumed.
- Data based on the type of record written.
You can process the SMF records using the accounting programs
that exist at your site. Examples of SMF records are provided in SMF Record Format for RECTYPES 1 and 4.
In order to write SMF records, the server must be running APF
authorized.
Two sample Master Files (SMFVSAM and SMFFIX) are provided for
accessing accounting statistics. They reside under the catalog subdirectory
in the EDAHOME location. Their difference is that SMFVSAM can be
used to report directly from the system-live SYS1.MANx records,
while SMFFIX can be used to report from a sequential file produced from
running the SMFDUMP utility. These Master Files enable you to interpret
the SMF records generated by the accounting facility using reporting
requests or store procedures. Both Master Files are for logoff records
only, as indicated by ALIAS=2 on the RECTYPE field entry.
A sample procedure report to query the SMF data is also provided
under the same location. It is called smfman1.fex.
x
Syntax: How to Enable Accounting
To
enable accounting, insert the following statement into the server
configuration file (edaserve.cfg):
smf_recno=smfnumber
where:
- smfnumber
Is an integer in a range from 128 to 255, inclusive. This
number represents the SMF number used by the accounting facility
when it sends records to the SMF system.
By
default, both RECTYPE pairs will be created when accounting is enabled.
You can override the default by coding the following parameter on
edaserve.cfg:
smf_subtype = {all|logon|query} where:
- all
Cuts all records. This is the default.
- logon
Cuts logon records only (RECTYPE pair 1 and 2).
- query
Cuts query records only (RECTYPE pair 4 and 5).
x
Syntax: How to Set the Accounting Field
Up
to 40 characters can be supplied that appear in the SMF records
field SMFOFA40. The SET BILLCODE command can be used in any support
server profile to provide the account field information. The syntax
is
SET BILLCODE=value
where:
- value
Is the 1–40 characters to be used on each SMF record produced.
This
information can also be set dynamically from a client application
by coding an RPC with the SET command and executing it with the
value as a parameter. WebFOCUS users can send the SET command to
the server.
x
Procedure: How to Report From SMF Data
To
report from SMF data, execute the sample procedure smfman1.fex,
provided under home/catalog (DDNAME EDAHFEX for a PDS Deployment
server).
You will be prompted for the DSN of the SMF VSAM
data set from which you want to report, and the smf_recno value
used to produce the SMF records.
Following
is a listing of smfman1.fex
DYNAM ALLOC FI SMFVSAM DSN &SMFDSN.Please provide SMF VSAM DSN. SHR REU
DEFINE FILE SMFVSAM
CPU/D8.2 = SMFOFCPU / 100 ;
USER/A20 = SMFOFUID ;
EXCPS/I6 = SMFOFEXC ;
TIME/D9.2 = SMFOFLTM / 100 ;
HR/I2 = SMFOFTME / 360000 ;
MIN/I2 = (SMFOFTME  - (HR*360000)) / 6000 ;
TOD/A5 = EDIT(HR) | ':' | EDIT(MIN) ;
END
TABLE FILE SMFVSAM
PRINT USER CPU EXCPS TIME TOD
WHERE SMFOFRTY EQ &SMFNUM.Please provide SMF number(type) for report.
END
x
There are four RECTYPE values defined
to produce SMF records:
|
RECTYPE
|
Description
|
|---|
|
1
|
Indicates a start of task record. When included
in a report, these statistics tell when a task initiation occurred,
and are of no particular use in chargeback. By pairing start and
end of task records for all tasks within a time period, statistics,
such as average active time, peak task count, and average task count,
can be determined. These values can be used for future capacity
planning activities for the server.
|
|
2
|
Indicates the start of a task record. When
included in a report, these statistics tell when a task termination
occurred. These records are cut for both publicly and privately
deployed services and contain statistics for the subtask as a whole.
For
privately deployed services, RECTYPE (2) records contain statistics associated
with a single user connection.
|
|
4
|
Begin query. Record layout is the same as
RECTYPE (1).
|
|
5
|
End query. Record layout is the same as
RECTYPE (2).
|
x
Reference: SMF Record Format for RECTYPES 1 and 4
The record format for RECTYPES 1 and
4 of the SMF records written by the server is defined below. The
format is provided in the system 390 assembler DSECT form.
SMFON    DSECT
         SPACE
*----------------------------------------------------*
*  USAGE ACCOUNTING SMF RECORD LAYOUT FOR LOGON RECORDS.              *
*                                                                     *
*  THIS IS THE DSECT DESCRIBING THE SMF RECORD WHICH IS PASSED TO     *
*  YOUR EXIT ON AT USER LOGON TIME.  IT IS COMPLETELY READY TO BE     *
*  WRITTEN WHEN YOUR EXIT RECEIVES CONTROL.                           *
*----------------------------------------------------*
         SPACE
*----------------------------------------------------*
* THE FIRST TWENTY FOUR BYTES OF THE RECORD ARE THE SMF HEADER. *
* THESE FIELDS ARE REQUIRED IN ALL SMF RECORDS (18 BYTES FOR RECORDS *
* WITHOUT SUBTYPES; WE USE SUBTYPES, THE HEADER IS 24 BYTES). *
SPACESMFONLEN DS H'116' RECORD LENGTH
SMFONSEG DS XL2'0000' SEGMENT DESCRIPTOR (0 UNLESS SPANNED)
SMFONFLG DS XL1 SYSTEM INDICATOR
SMFONRTY DS XL1 RECORD TYPE
SMFONTME DS XL4 TIME, IN HUNDREDTHS OF A SECOND
SMFONDTE DS PL4 DATE, 00CYYDDDF, WHERE F IS THE SIGN
SMFONSID DS CL4 SYSTEM IDENTIFICATION
SMFONSBS DS CL4 SUBSYSTEM IDENTIFICATION
SMFONSBT DS XL2'0001' SUBTYPE OF RECORD - X'0001' INDICATES X
THIS IS A LOGON RECORD
SPACE*----------------------------------------------------*
* THE NEXT FIELDS ARE THOSE PRESENT IN THE LOGON *
* RECORD FOR THE START OF A USER SESSION. *
*----------------------------------------------------*
SPACE
SMFONMSO DS CL8 JOBNAME
SMFONJID DS CL8 JOBID (FROM SSIBJBID)
SMFONASI DS Y ASID
SMFONRV1 DS XL2 RESERVED
SMFONUID DS CL20 SECURITY USERID
SMFONLID DS CL20 USERID PRESENTED AT LOGON (SAME AS X
SMFONSID UNLESS CHANGED VIA MSIDTR X
SECURITY EXIT)
SMFONRSV DS XL8 RESERVED FOR FUTURE EXPANSION
SMFONCTI DS XL4 RESERVED FOR FUTURE EXPANSION
SMFONSRV DS CL8 SERVICE NAME FROM SERVICE BLOCK
SMFONRS0 DS XL4 RESERVED FOR FUTURE EXPANSION
SMFONCNT DS XL1 CONNECTION TYPE
SPACESMFONTSO EQU 1 CONNECTION VIA TSO
SMFONCIC EQU 2 CONNECTION VIA CICS
SMFONVTM EQU 4 CONNECTION VIA VTAM
SMFONPSR EQU 8
SPACE
SMFONRS1 DS XL3 RESERVED
SMFONID1 DS F SYSPLEX ID 1
SMFONID2 DS F SYSPLEX ID 2
SMFOFPID DS XL20 POOLED USER ID
SMFONRS2 DS XL12 RESERVED
SMFONL EQU *-SMFON LENGTH OF THE SMF LOGON RECORD
x
Reference: SMF Record Format for RECTYPES 2 and 5
The record format for RECTYPES 2 and
5 of the SMF records written by the server is defined below. The
format is provided in the system 390 assembler DSECT form.
SMFOF    DSECT
         SPACE
*----------------------------------------------------*
*  USAGE ACCOUNTING SMF RECORD LAYOUT FOR LOGOFF RECORDS.             *
*                                                                     *
*  THIS IS THE DSECT DESCRIBING THE SMF RECORD WHICH IS PASSED TO     *
*  YOUR EXIT ON AT USER LOGOFF TIME.  IT IS COMPLETELY READY TO BE    *
*  WRITTEN WHEN YOUR EXIT RECEIVES CONTROL.                           *
*----------------------------------------------------*
         SPACE
*----------------------------------------------------*
* THE FIRST TWENTY FOUR BYTES OF THE RECORD ARE THE SMF HEADER. *
* THESE FIELDS ARE REQUIRED IN ALL SMF RECORDS (18 BYTES FOR RECORDS *
* WITHOUT SUBTYPES; WE USE SUBTYPES, THE HEADER IS 24 BYTES). *
*----------------------------------------------------*
SPACE
SMFOFLEN DS H'168' RECORD LENGTH
SMFOFSEG DS XL2'0000' SEGMENT DESCRIPTOR (0 UNLESS SPANNED)
SMFOFFLG DS XL1 SYSTEM INDICATOR
SMFOFRTY DS XL1 RECORD TYPE
SMFOFTME DS XL4 TIME, IN HUNDREDTHS OF A SECOND
SMFOFDTE DS PL4 DATE, 00CYDDDF, WHERE F IS THE SIGN
SMFOFSID DS CL4 SYSTEM IDENTIFICATION
SMFOFSBS DS CL4 SUBSYSTEM IDENTIFICATION
SMFOFSBT DS XL2'0002' SUBTYPE OF RECORD - X'0002' INDICATES X
THIS IS A LOGOFF RECORD
SPACE*----------------------------------------------------*
* THE NEXT FIELDS ARE THOSE PRESENT IN THE LOGOFF *
* RECORD FOR THE END OF A USER SESSION. *
*----------------------------------------------------*
SPACE
SMFOFMSO DS CL8 JOBNAME
SMFOFJID DS CL8 JOBID (FROM SSIBJBID)
SMFOFASI DS Y ASID
SMFOFRV1 DS XL2 RESERVED
SMFOFUID DS CL20 SECURITY USERID
SMFOFLID DS CL20 USERID PRESENTED AT LOGON (SAME AS X
SMFOFSID UNLESS CHANGED VIA MSIDTR X
SECURITY EXIT)
SMFMEMA DS XL4 MEMORY ABOVE THE LINE (IN KILOBYTES)
SMFMEMB DS XL4 MEMORY BELOW THE LINE (IN KILOBYTES)
SMFZIIP DS XL4 ZIIP CPU NORMALIZED (HUNDREDTHS OF A SEC)
SMFOFSRV DS CL8 SERVICE NAME FROM THE SERVICE BLOCK
SMFZPOCP DS XL4 ZIIP ON CP (HUNDREDTHS OF A SEC)
SMFOFCNT DS XL1 CONNECTION TYPE
SPACESMFOFTSO EQU 1 CONNECTION VIA TSO
SMFOFCIC EQU 2 CONNECTION VIA CICS
SMFOFVTM EQU 4 CONNECTION VIA VTAM
SMFOFPSR EQU 8
SMFOFCC DS XL3 COMPLETION CODE FOR THE TASK
SMFOFACT DS CL8 USER ACCOUNTING INFORMATION; THIS X
FIELD CURRENTLY PASSED AS LOW VALUE
SMFOFCPU DS XL4 CPU TIME IN HUNDREDTHS OF A SECOND
SMFOFEXC DS XL4 COUNT OF EXCP'S
SMFOFLTM DS FL4 LOGON DURATION IN HUNDREDTHS OF A X
SECOND
SMFPRTY DS XL1 PRIORITY
SMFCOMPL DS XL1 COMPLETION TYPE
DS XL2 RESERVED
SMFOFID1 DS F SYSPLEX ID 1
SMFOFID2 DS F SYSPLEX ID 2
SMFOPID DS XL20 POOLED USERID
SMFOFA40 DS CL40 FULL 40-BYTE ACCOUNTING FIELD
SPACE
SMFOFL EQU *-SMFOF LENGTH OF THE SMF LOGOFF RECORD
x
Reference: Accounting for DB2 in a Server Task
When
using a server to access DB2 data, certain processing takes place
within the DB2 address space and is governed by the DB2 chargeback
system. If a user requests data from DB2, the server passes the
request to the DB2 subsystem. The DB2 subsystem then processes the
request, performing such tasks as retrieving rows and aggregating
the data. It generates the answer set, and passes the output back
to the server. The server then performs any joins and formatting
which have not been performed by DB2 to satisfy the original request.
Charges incurred while the request was being
processed by the DB2 subsystem are added to the charges accumulated
in the server task that originated the request for processing. If
the server accounting is enabled, these charges are associated with
the user logon and security IDs in the SMF records described earlier.
xPerformance Considerations for HFS
There are several ways in which you can improve the
server performance:
x
Running the Server in a Non-Swappable Address Space
We recommend that you run the server in a non-swappable
address space. In order to make the server address space permanently
non-swappable, add the following entry to SYS1.PARMLIB(SCHEDxx):
PPT PGMNAME(TSCOM300)         /* PROGRAM NAME */
NOSWAP                        /* NON-SWAPPABLE */
CANCEL                        /* CAN BE CANCELLED */
Do not use the KEY 0 parameter, or any other parameter (such
as NOPASS), unless the system programmer completely understands
the consequences of adding the parameter.
All local spawn transactions will perform in the mode of the
server. For example, if the server address space is non-swappable,
all local spawn execute as non-swappable.
The server executes limited non-local spawn, such as when the
user executes a UNIX system command. Non-local spawn execute as
swappable.
The server never executes a fork subroutine. (A fork subroutine
creates a new process. The new process, called the child process,
is an almost exact copy of the calling process, which is called
the parent process.)
x
Although the server may run in a specific performance
group, transactions submitted by server agents may perform differently
than the server by adding the following keyword to edaserve.cfg:
wlm_enclave_trname = WLM_transaction_name
where:
- WLM_transaction_name
Can be up to 8 characters.
This is a service-level keyword.
Using this setting, the task will join a Workload Manager (WLM)
enclave when a request starts, and leave the enclave when the request
finishes. This gives WLM control of the dispatching priority of
the task. The transaction rules defined on WLM will determine the default
service class assigned to this transaction, and that service class
will determine how the request runs.
This feature helps to balance a workload so that a long request
will not affect a short request. This can be achieved through WLM
rules designed to lower the priority of a long request after a certain
period of time. Without this feature, all requests share the region priority.
The transaction name passed in this keyword must match one defined
in the WLM Classification Rules for the Job Entry Subsystem (JES).
A corresponding WLM Service Class pointed to by this rule will then
be associated with this service.
The classification rules for JES must be used even if the server
is started as a started task. The subtasks are always run under
JES.
For example, you would include the following in edaserve.cfg:
SERVICE = DEFAULT

BEGIN
wlm_enclave_trname = IWAYFAST
.
.
.
END
The WLM definition is:
Subsystem Type JES - Batch Jobs
Classification:

Default service class is PRDBATLO
There is no default report class.

  Qualifier  Qualifier      Starting       Service   Report
# type       name           position       Class     Class
- ---------- -------------- ---------      --------- --------
1 TN        IWAYFAST                   EDAQRYHI
WLM subrules (levels 2 and above) are supported. For a server
request to join an enclave in a particular service class, the names
of all rule qualifiers below our transaction name are checked. For
example, consider the following WLM definition:
Subsystem Type JES - Batch Jobs
Classification:

Default service class is PRDBATLO
There is no default report class.

  Qualifier Qualifier     Starting Service  Report
# type      name          position Class    Class
- --------- ------------- -------- -------- --------
1 SSC       PRDMVS                 PRDDFLT
2 . TN       . IWAYFAST               EDAQRYHI
In this particular case, the qualifier 1 type is SSC (Subsystem
Collection), and a server request will only join the enclave IWAYFAST
if it is running on a particular LPAR in the SYSPLEX. This qualifier
(PRDMVS) must match the XCF group definition: issue $DMASDEF (for
JES2) and check the value of XCFGRPNM field.
You can handle WLM scheduling environments by defining them to
WLM and then adding the JOB statement parameter SCHENV=xxxxx to
the ISTART JCL.
xGeneral Information for a z/OS HFS Installation
This section covers general information for a z/OS installation.
x
Sample Metadata, Data, and Other Tutorial Samples
Releases prior to 7.7.06 pre-load various samples into
the IBISAMP application. As of 7.7.06, on a new installation, the
IBISAMP application is created, but is not pre-loaded. The server
Web Console has a new feature on the ribbon and on the application
tree (under new), Tutorials (the Create
Tutorial Framework page), which has a pull-down for various samples.
The DMC also has this feature on the application tree.
There are currently about 10 different tutorial/sample selections
available on the pull-down select list to match various customer
needs. The bulk of the prior IBISAMP sample objects can be generated
by selecting the Create Legacy Sample Tables and Files tutorial.
Other prior IBISAMP Data Migrator sample objects (usually starting with
the characters dm*) are now loaded by choosing their respective
Data Migrator tutorials. Under the new method, the tutorials/samples
may be loaded to any application, not just IBISAMP.
If you are doing just a software refresh, the prior IBISAMP objects
will be unchanged (because a refresh does not touch app directories).
x
Frequently Asked Questions for HFS
Q: How do I execute server user profiles from a
PDS?
A: We recommended that you copy the server user profiles
from the PDS to the HFS directory /ibi/profiles, and rename them
to add the extension .prf (for example, user_id.prf). Alternatively,
you can use the following technique to execute user profiles from
a PDS:
- In the IRUNJCL member, allocate DDNAME //MVSPROF to the
PDS containing user profiles. For example:
//MVSPROF DD DISP=SHR,DSN=high_level_qualifier.EDAPROF.DATA
- Add the highlighted lines to the global server profile, edasprof.prf:
APP MAP MVSPROF fex=//dd:mvsprof
APP MAP MVSAPP mas=//dd:master;fex=//dd:focexec;acx=//dd:access;
...
APP PATH IBISAMP MVSAPP
-SET &USERID='12345678';
-SET &USERID=GETUSER(&USERID);
EX MVSPROF/&USERID
Q: What permissions are specified for application component
files?
A: Application component files, such as FOCEXEC procedures
(.FEX), Master Files (.MAS), and Access Files (.ACX), reside in
the /ibi/apps/applicationname directory, where they are created
with a permission of 666 minus the UMASK setting.
For example, if the UMASK value is 022, each application component
is created with a permission of 644.
Caution: When using the above UMASK values, if one user
ID creates application components, all other users will be able
to read them, but not to write, update, or refresh.
You can provide write access by changing the value of UMASK at
installation time, or manually in IRUNJCL. For example:
//TSCOM300  EXEC PGM=TSCOM300,
//       PARM='ENVAR("_EDC_UMASK_DFLT=0022")/'
//STEPLIB   DD DISP=SHR,DSN=EDABXV.SRV77.HOME.LOAD
Q: Can I monitor server startup by checking the MVS SYSLOG?
A: Yes.
The following messages are written to the SYSLOG when
x
To troubleshoot an installation problem, identify your
problem in the following list, and follow the link to a description
of the solution.
If you cannot find your problem described in the list, and cannot
resolve it yourself, contact Customer Support Services as described
in Information You Should Have and Customer Support. In addition, supply the following information to
Customer Support Services:
If you have a troubleshooting suggestion that is not described
in the list, and you think others will find it helpful, we invite
you to send it to us, as described in How to Add Your Problem to the Troubleshooting Guide. We will consider including
your problem in a future release of this manual.
Problems:
x
Reference: Problem: The Server Abends With a U4039 Code
Problem: The
server abends with a U4039 code.
Cause: This is
a generic abend.
Solution: Find out what caused the
abend by checking the edaprint.log file, SYSOUT ddname, and
the MVS system log.
x
Reference: Problem: INSUFFICIENT AUTHORITY TO GETPSENT messages in
JESLOG
Problem: INSUFFICIENT
AUTHORITY TO GETPSENT messages appearing in JESLOG.
Cause: See IBM APAR II11813.
Solution: The
APAR recommends issuing one of the following RACF commands:
SETROPTS LOGOPTIONS (NEVER(PROCACT))
SETOPTS LOGOPTIONS (DEFAULT(PROCACT))
However, when
a non-superuser in the OMVS shell issues the command ps -ef, the following
security message is repeated in SYSLOG:
ICH408I USER(default) GROUP(dgltgrp) NAME(bpxdefaultuser) 060
CL(PROCACT) INSUFFICIENT AUTHORITY TO GETPSENT
This
does not indicate an error. It is an informational message issued
because of RACF LOGOPTIONS settings. The ps -ef command is a request
to show all processes that the requester is authorized to see, but
a non-superuser is allowed to see only his or her own processes.
x
Reference: Problem: Request fails, and JVM
not found messages
written to edaprint.log
Problem: The request fails, and JVM not found messages
are written to edaprint.log.
Cause: If the server cannot
find the Java Virtual Machine (JVM), the JSCOM Listener will not
be able to start, and messages will be written to the server log stating
that the JVM cannot be found.
Solution: Specify
the location of the JVM in JDK_HOME or JAVA_HOME. (For information,
see JVM Requirements for Java Services.)
x
Reference: Secured Server Starts Unsecured or Does not Start After Upgrade
A server will implicitly
attempt to start unsecured if proper authorization steps have not
been completed. Starting the server normally clears edatemp. If
prior edatemp files exist (and authorization has not been done),
start up will fail due to an inability to clear the directory. However,
if an edastart -cleardir command was issued just before the upgrade,
there is nothing to clear, no error occurs, and the server starts.
If the server starts and is not inspected after the initial start
up, the server being in the wrong mode may go unnoticed.
The
proper solution is to add proper authorizations after an upgrade,
as described in Step 4. Reconfigure Server Security, and restart the server. A new
safety measure has also been added. If the environment variable
EDAEXTSEC is set to OPSYS explicitly, and a server lacks authorization,
it will not start (see Preventing Unsecured Server Starts After Upgrades for details).
x
Procedure: How to Generate a Server Trace
To generate a server trace:
-
Turn tracing by going to the Web Console menu
bar, selecting Workspace, and then Diagnostics;
or else by running the ITRCON JCL member.
-
Reproduce the problem.
-
Submit the ISAVEDIA member to produce the diagnostic information.
A directory called sdnnnnnn is created under your
configuration directory (for example, /ibi/srv77/ffs/sd123456).
Diagnostic information is placed in this directory. Make sure you
have access to this directory.
Do
not change anything in the EDAENV member: changes could prevent
the correct information from being copied to your directory.
x
Procedure: How to Generate a System Dump
To
generate a system dump:
-
Allocate DDNAME SYSMDUMP pointing to the data
set with the following DCB parameters:
RECFM=FB,LRECL=4160,BLKSIZE=4160.
-
To get the first dump, add the parameter FREE=CLOSE to
your DD statement. The DD statement should appear as follows:
//SYSMDUMP DD DISP=SHR,DSN=MYID.EDAPTH.SYSMDUMP,FREE=CLOSE
-
To get the last dump, the statement should appear as
follows:
//SYSMDUMP DD DISP=SHR,DSN=MYID.EDAPTH.SYSMDUMP
Only
two IDs must have privileges to write into this data set: ISERVER
and IADMIN. General server users DO NOT need read or write access
to the SYSMDUMP data set.
-
To prevent abendaid from intercepting the dump, add:
//ABNLIGNR DD DUMMY
-
To prevent Language Environment from intercepting the
dump, specify:
EDADUMPOPT=UAIMM in EDAENV DD
This
enables you to get more accurate information reflecting the moment
the abend actually occurs.
-
Save the entire job output for the server (including
JES logs), and send it to Customer Support Services.
Instead
of using JCL allocations to add SYSMDUMP, the procedure described below
can be used alternatively.
x
Procedure: How to Add JCL Allocations to a Running Server
A
z/OS operator can issue modify commands from the z/OS system console
to allocate DDNAMES to the server without restarting it. This procedure
is useful if you need to reallocate a file that was freed to allow
a batch overnight utility to run, or perhaps to add SYSMDUMP allocation
to a running server.
x
Syntax: How to Allocate a Data set From the z/OS System Console
F <iway_server_jobname/started task>,DYNAM ALLOC FI <ddname> DA <dsname>
<optional dynam parameters>
Example: Allocating a VSAM Data set
F IWAY2,DYNAM ALLOC F VSAMFILE DA VSAM.FILEA.CLUSTER SHR
Example: Allocating a SYSMDUMP Data
set With FREE=CLOSE Option
F IWAY2,DYNAM ALLOC FILE SYSMDUMP DA PROD2.SYSMDUMP.DATA SHR CLOSE
Note: The
examples above assume IWAY2 is the jobname/started task ID for the
server.
All valid DYNAM ALLOC syntaxes are supported. For
more information on the DYNAM command, please refer to the Store
Procedures Reference manual.
The following message
will be issued in the server JESMSGLG indicating if the command
was processed successfully or not.
Success:
+DYNAM COMMAND SUCCESFULLY PROCESSED Rc=0
Failure:
+DYNAM ERROR: IKJ56225I DATA SET IWAY.TEST ALREADY IN USE, TRY LATER
x
Procedure: How to Free Data sets Allocated to the Server
A
z/OS operator can issue modify commands from the z/OS system console
to free DDNAMEs or DSNAMEs allocated to the server. Both global allocations
(made at the server ISTART JCL) and local ones (DYNAM ALLOC commands issued
by user tasks) can be freed. This procedure is useful if you need
to free an allocation to run a batch utility overnight, without
restarting the server.
x
Syntax: How to Free a Data set From the MVS System Console
To
free a single DDNAME:
F <iway_server_jobname/started task>,DYNAM FREE FI <ddname>
To
free a single DSNAME (all occurrences in the server):
F <iway_server_jobname/started task>,DYNAM FREE DS <dsname>
To
free multiple DDNAMEs, passing a pattern (free all DDNAMEs staring
with AB):
F <iway_server_jobname/started task>,DYNAM FREE FI AB*
To
free multiple DSNAMEs (all occurrences in the server), passing a
pattern (free all allocations of data sets starting with IWAY.VSAM):
F <iway_server_jobname/started task>,DYNAM FREE DA IWAY.VSAM*
A
message will be issued in the iway_server JESMSGLG indicating if
the command was process successfully or not, as follows.
Success:
+DYNAM COMMAND SUCCESFULLY PROCESSED Rc=0
Failure:
+DYNAM ERROR: IKJ56225I DATA SET IWAY.TEST ALREADY IN USE, TRY LATER
Example: Freeing an Allocated Data Set
Suppose
ISTART JCL (jobname IWAY2) has the following allocation:
//VSAMFILE DD DISP=SHR,DSN=VSAM.FILEA.CLUSTER
The
operator can free this file using the command (from MVS console):
F IWAY2,DYNAM FREE FI VSAMFILE
x
Procedure: How to Initialize the RDAAPP Application
RDAAPP
is an interactive client test application that facilitates the execution
of SQL statements and stored procedures on the Unified server. During
the installation process, JCL and REXX routines are created in the
installation data set as members IRDAAPPJ and IRDAAPPC respectively.
The
following installation data set is used for HFS deployment.
qualify.servertype.DATA
where:
- product_type
Is determined by your license key.
The
following installation data set is used for PDS deployment.
qualify.PDS.product_type.DATA
where:
- product_type
Is determined by your license key.
Note: The
RDAAPP application is not intended for use as a production tool.
-
To use the IRDAAPPJ JCL,
you must first edit the member IRDAAPPJ and add your request details.
-
To edit the member IRDAAPPJ, change the following
field,
//STDIN DD *
Put your request here
//
to
//STDIN DD *
<enter blank line>
<enter userid>
<enter password>
LOOPBACK
<enter request>
<enter optional parameters>
Q
Q
//
-
Complete the panel as follows.
|
Field
|
Instructions
|
|---|
<enter userid> |
Enter a valid user ID or blank
line if the userid of the user who submitted the job is to be used
for a trusted connection.
|
<enter password> |
Enter the password for the
above userid or a blank line if the userid/password of the user
who submitted the job is to be used for a trusted connection.
|
LOOPBACK |
Match a node name in the EDACS3
allocation in the IRDAAPPJ JCL. Default is LOOPBACK.
|
<enter request> |
Enter one of the following
values:
|
S |
To enter an SQL SELECT statement. Type the statement
after you enter the value S (see the following example).
|
P |
To enter an SQL PREPARE statement. Type
the statement after you enter the value P.
|
D |
To execute a prepared statement by supplying the
ID. Type the ID after you enter the value E.
|
Q |
To quit.
|
? |
For this list of commands.
|
<enter optional parameters> |
Depending on the above command,
you may be prompted for:
Select engine (0/ENTER - EDA, 1 -
DB2, 2 - TERADATA, and so on.).
Reclimit (Press Enter for
all records).
Readlimit (Press Enter for all records).
|
Q |
Quit RDAAPP (It is needed twice).
|
-
Once you have made the above edits, submit the JCL
for execution.
-
Type the following command at the TSO ready prompt to
use the IRDAAPPC REXX routine:
EX 'qualif.product_type.DATA(IRDAAPPC)'
or
EX 'qualif.PDS.product_type.DATA(IRDAAPPC)'
where:
- product_type
Is determined by your license key.
-
After the prompts, enter the same information as specified
in the above table.
Example: IRDAAPPC REXX Execution
The
following is the screen output from a sample execution of the IRDAAPPC
REXX routine:
********************************************************************
**                  RDAAPP Client test tool                       **
********************************************************************
<<< RDAAPP : Initializing EDA/API SQL, Version 7, Release 7 >>>
Default communications config file : //DD:EDACS3
Override? (Press enter for default) :    <enter blank line>
<<< Initialization Successful >>>
Enter User Name : <enter
userid or leave blank for current TSO userid>
Enter Password : <enter password or leave blank for current
TSO userid  password>
Enter server name, number, SELF, URL or ? (Hit return for 'LOOPBACK') :
<<< Successfully connected to synchronous server LOOPBACK >>>
Enter Command (? for command help):                            S
SELECT COUNTRY FROM CAR;
Select engine (0/ENTER - EDA, 1 - DB2, 2 - TERADATA, etc) :
Reclimit (Hit enter for all records):
Readlimit (Hit enter for all records):
Please Wait...
ENGLAND
FRANCE
ITALY
JAPAN
W GERMANY
<<< 5 record(s) processed. (scb count 5) wait=4 secs, retrieval=0 secs>>>
<<< 5 record(s) processed. (scb count 5)>>>
Q
Enter Connect or Quit:
Q
<<< RDAAPP : Exiting... >>>
***
Enter Command (? for command help):
x
Procedure: How to Add Your Problem to the Troubleshooting Guide
If you have troubleshooting suggestions
that you think others will find helpful, we invite you to send them
to us so that we can consider including them in a future release.
You can:
- Email them to books_info@ibi.com.
Include your name and phone number, and include Server
Installation Troubleshooting in the subject line.
- Send them to:
Technical Content Management
Information Builders
Two Penn Plaza
New
York, NY 10121-2898
Please include your name, phone number,
email address, and postal address.