Using the Wizards

In this section:

The SQL Wizard leads you through the creation of metadata. The Upload Wizard leads you through the process of uploading a file from your local machine to the server. The Quick Copy Wizard lets you load a new file, replace an existing file, or append a new file to an existing file.

After each process is complete, the wizard lets you run or save a test query and schedule or email the final output.

For information about the Quick Copy Wizard, see the DataMigrator User’s Guide.


Top of page

x
SQL Wizard

How to:

The SQL Wizard provides a step-by-step process for creating a summary table or cluster synonym and running a report. The wizard enables you to:

  1. Configure an adapter, create a new connection, or change connection parameters.
  2. Import metadata.
  3. Select a Fact Table to create Joins.
  4. Categorize dimensions and measures to create summary table or cluster synonyms.
  5. Generate a test query.
  6. Run, submit with email or schedule the report.
  7. Return to the console.

The SQL Wizard displays these steps on the ribbon or in the navigation pane, as shown in the following image.

When you complete a task, the wizard automatically moves to the next step.

To exit the wizard and return to the full console, click Full Console.


x
Procedure: How to Access the SQL Wizard
  1. Access the SQL Wizard by clicking the Wizards icon.

    The Wizards pane opens, as shown in the following image.
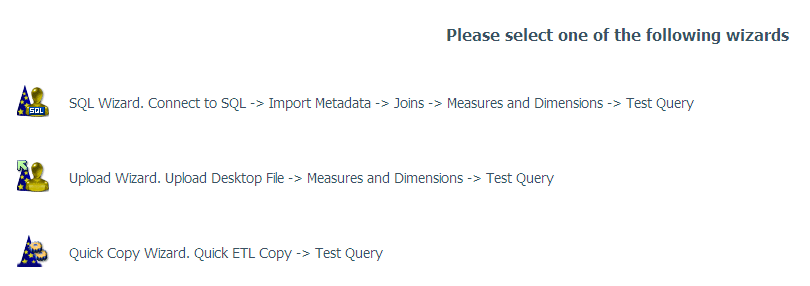
  2. Select the SQL Wizard.


x
Procedure: How to Use the SQL Wizard to Configure an Adapter, Create a New Connection, or Change a Connection
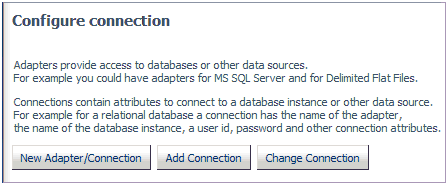
  1. Select one of the following options:
    • New Adapter/Connection
    • Add Connection
    • Change Connection

  2. If you select New Adapter/Connection, the Configure Adapter pane opens. Select the radio button for the adapter and click Next.
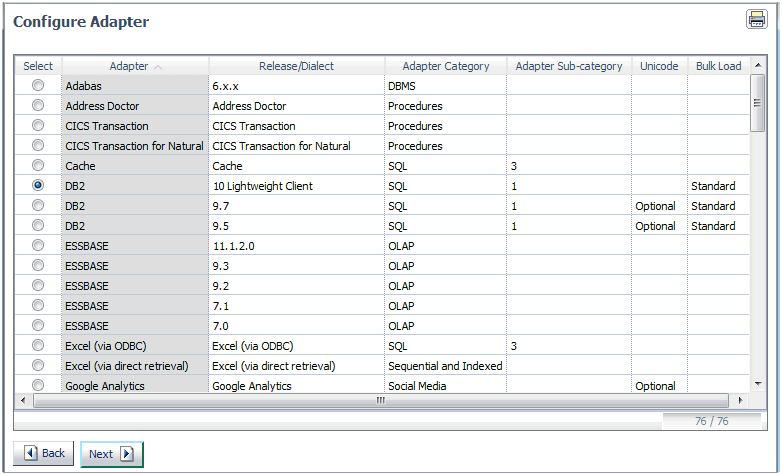
    Note: You can click any of the column headings to sort the available adapters.

    The Add Adapter to Configuration pane opens. Enter the parameters for the specific adapter and click Configure. For information on the parameters, see the Adapter Administration manual.

  3. If you select Add Connection, the Add Connections pane opens. Select an radio button for an available adapter and click Next.
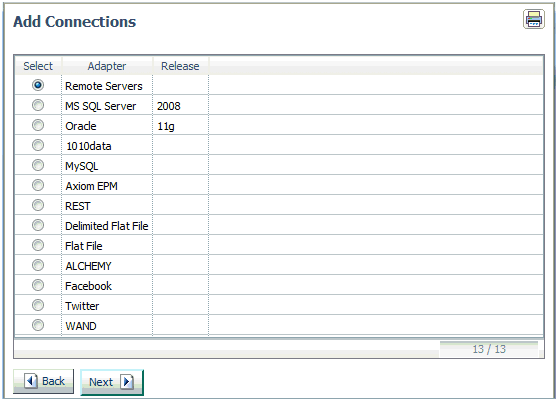
    The Add Connection pane opens. Enter the parameters for the specific adapter and click Configure. For information on the parameters, see the Adapter Administration manual.

  4. If you select Change Connection, the Edit Connections pane opens. Select the radio button for the connection and click Next.
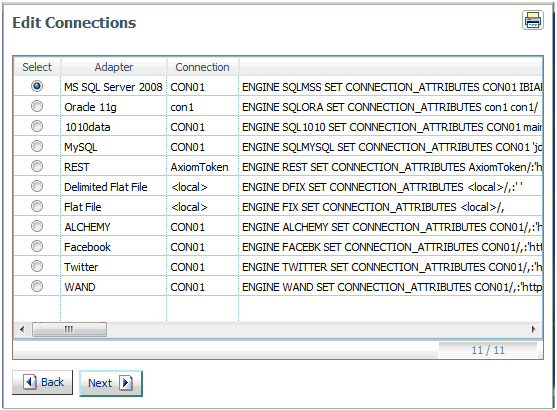
    Note: You can click any of the column headings to sort the available connections.

    The Change Connect Parameters pane opens. Change the parameters for the specific connection and click Configure.

  5. Click Next to move to the Import Metadata step.


x
Procedure: How to Use the SQL Wizard to Import Metadata

After completing the Connection step, the wizard moves to the Import Metadata step where you can create one or more synonyms.

The Select connection to create synonyms pane opens, as shown in the following image.
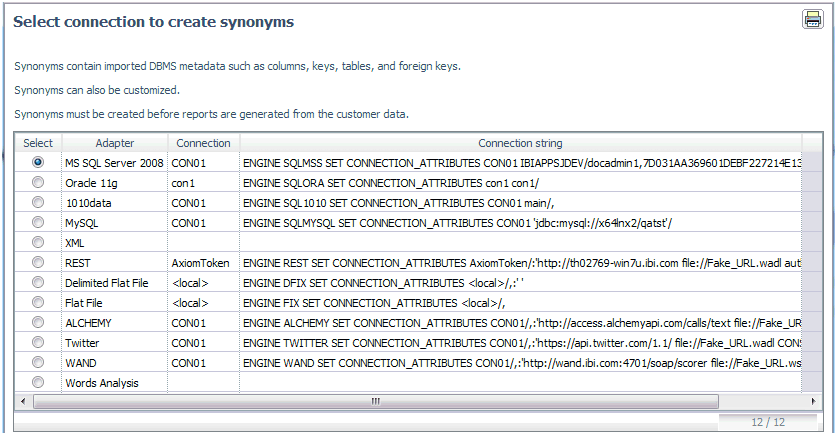
  1. Select the radio button for the adapter and click Next.

    Note: You can click the Adapter or Connection column to sort the available adapters.

    The Select Synonym Candidates pane opens.
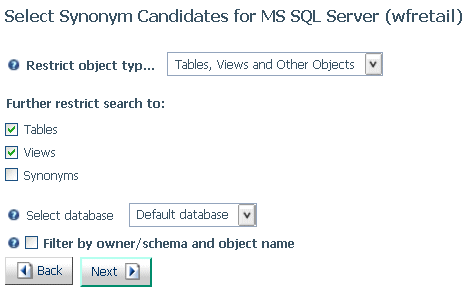
  2. Select or enter the object types, database, and filtering conditions, and click Next.

    For additional information on the parameters, see the Adapter Administration manual.

    The Create Synonym page opens.
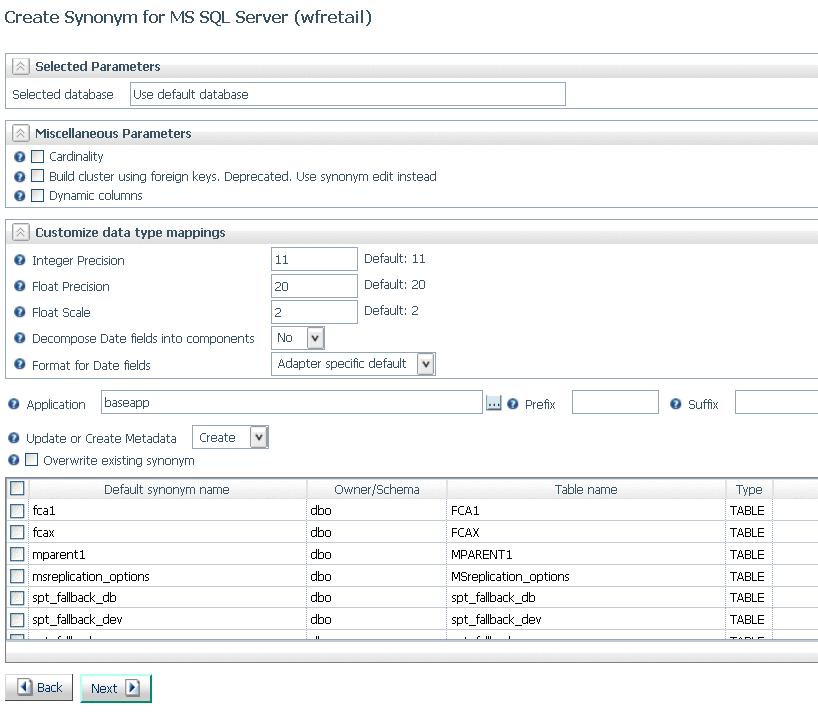
  3. Select one or more tables,

    You can select or enter values for:

    • Miscellaneous parameters such as cardinality (whether to reflect the number of rows in a table) and whether to use dynamic columns (retrieve metadata dynamically from the data source).
    • Data type mappings.
    • Whether to decompose date fields into their components (precision for integer and floating point fields, and scale for floating point fields).
    • The date format to use.
    • The target application.
    • Whether to create or update the synonym.
    • Whether to overwrite existing synonyms with the same name.
    • The synonym name.
  4. Click Next.

    The synonyms are created in the application directory, as indicated on the Create Synonym Status page.

    For more information about synonym creation parameters, see the chapter for your adapter in the Adapter Administration manual.

  5. Click Next.

The wizard moves to the Joins step.


x
Procedure: How to Use the SQL Wizard to Select One or More Tables

After you have created synonym(s), the wizard moves to the Joins step where you can select one or more fact tables or a single table, as shown in the following image.
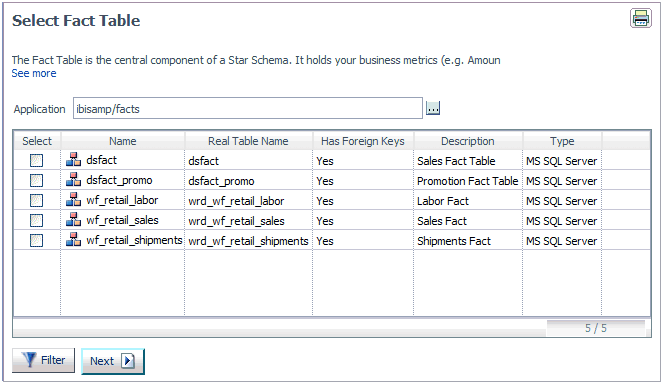
  1. Select one or more check boxes for particular synonyms and click Next.

    The Select Synonyms to be added for the Star Schema pane opens, as shown in the following image.
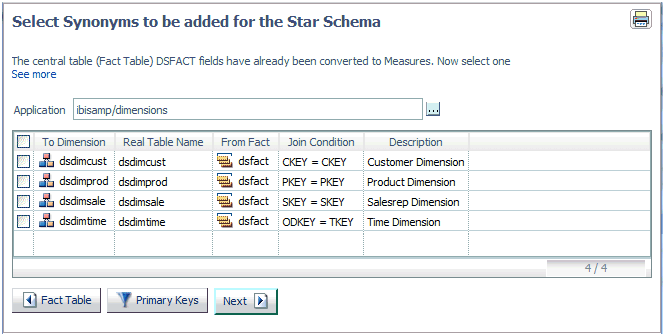
  2. Select check boxes for one or more synonyms, and click Next. If you are not creating a star schema, but are creating a synonym for a single table, just click Next.

The wizard moves to the Measures and Dimensions step.


x
Procedure: How to Use the SQL Wizard to Categorize Fields

After completing the Import Metadata and Joins steps, the wizard moves to the Measures and Dimensions step. This step creates measure groups for the selected fact tables and dimension hierarchies, based on name pattern matching and date-time analysis.

The Categorize Fields into Measures, Dimensions and Hierarchies pane opens, as shown in the following image.
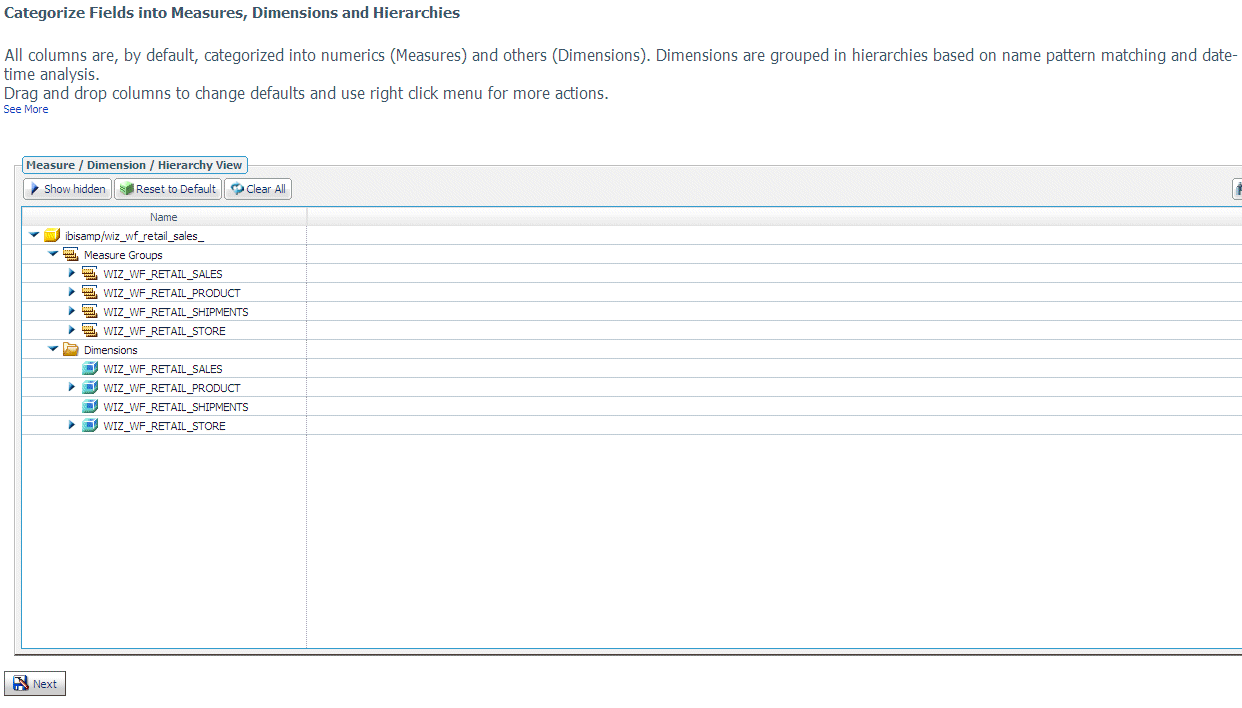
To show both the Column/Table View and the Measure/Dimension/Hierarchy View, click Show Hidden. This view is shown in the following image.
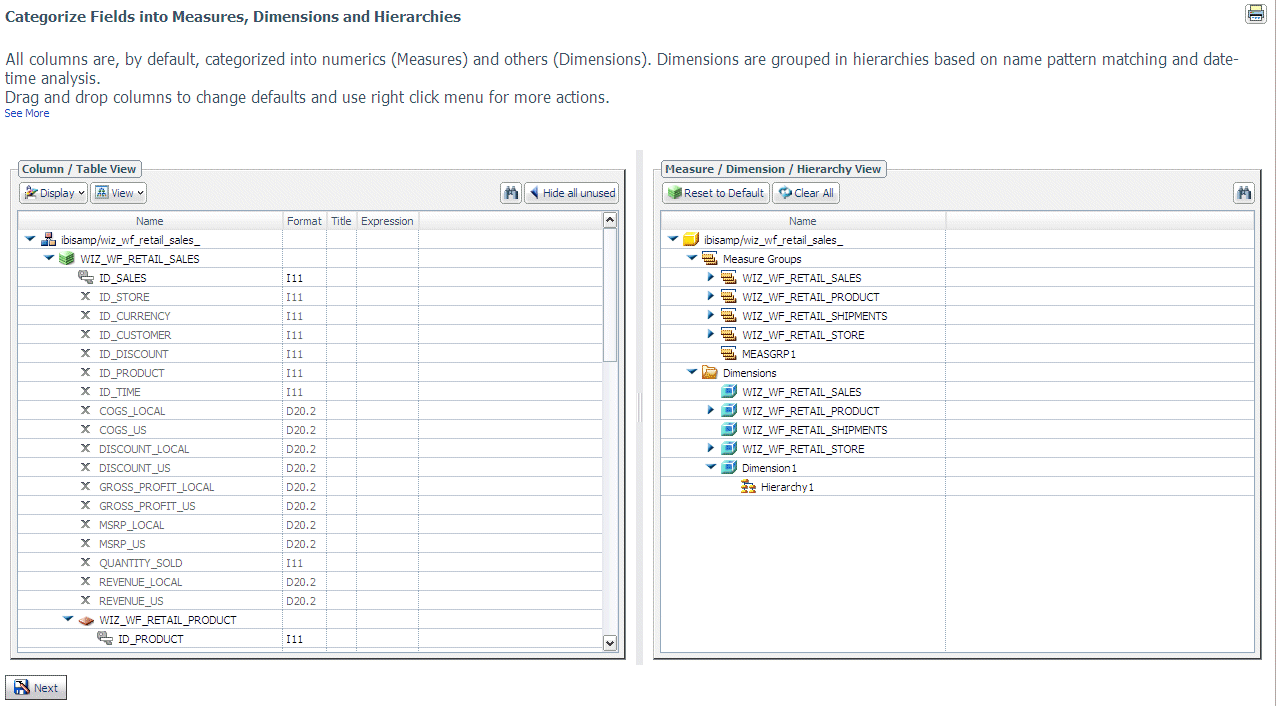
The alphanumeric columns are categorized as dimensions and hierarchies, and the numeric columns are categorized as measure groups and measures.

  1. Use right-click options on the Data pane to delete items, insert child tables, change the join condition, and see sample data. Use right-click options on the Measures/Dimensions/Hierarchies pane to insert new measure groups and dimensions, hide or rename items, delete hierarchies, and assign a geographic role.

    All of the options are described in the help text on the page.

  2. Click Next.

    The Save As dialog box opens.

  3. Enter a name for the synonym in the File Name field and click OK.

    The Create Test Query pane opens.


x
Procedure: How to Use the SQL Wizard to Generate a Test Query

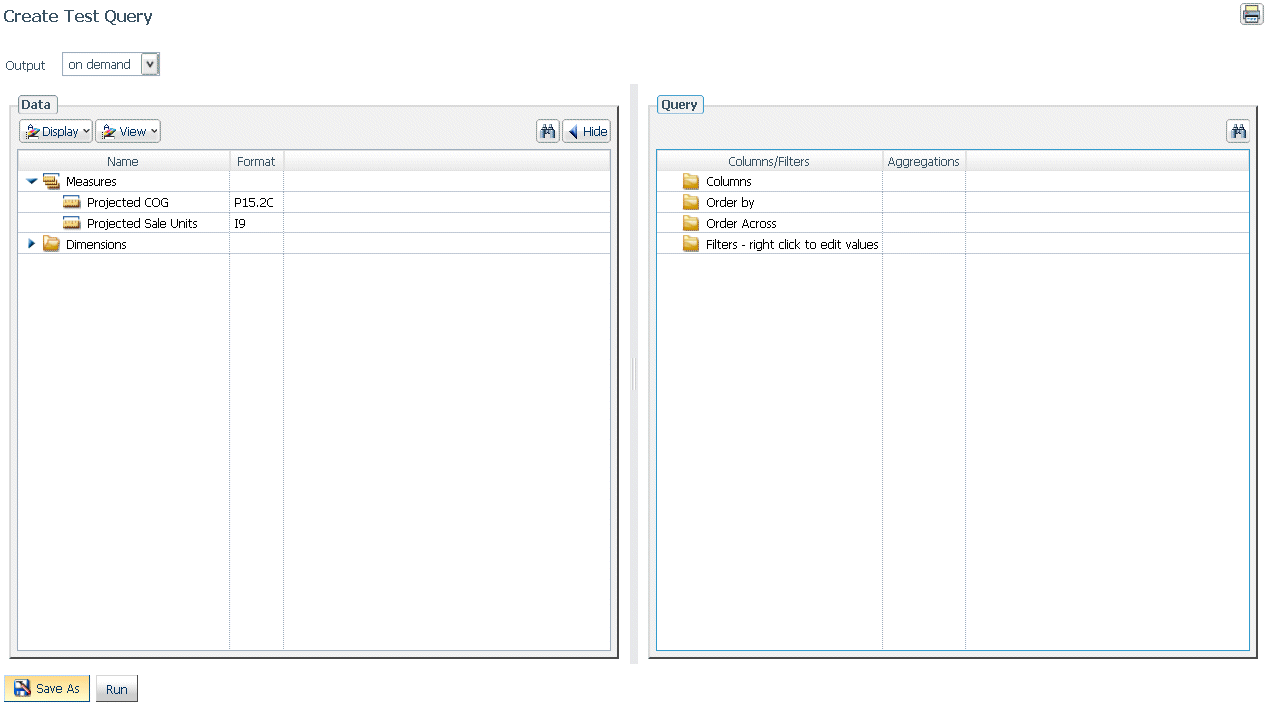
The Create a Test Query page has two panes, as shown in the following image.
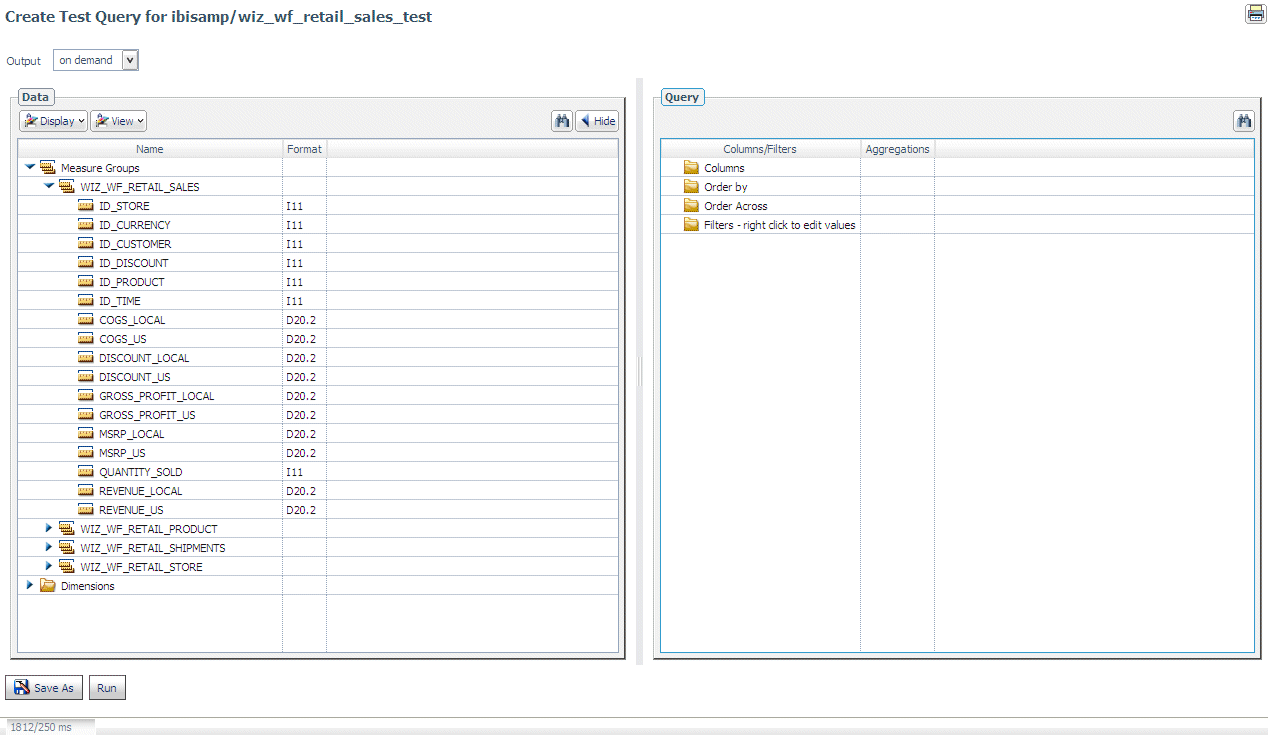
The left pane lists the data available for the query. The right pane has categories in which you can place the data for summation, sorting, and filtering.

  1. Drag fields from the Data list to the Query list in the appropriate categories for the query you are designing. Right-click a filter field to select values and a relational operator to use in the filter.
  2. Click Save As, to save the query, or Run, to run the query immediately.

    If you clicked Save As, the Save As dialog box opens. Assign a name for the query, and click OK.

    If you selected Run, the query runs and the results display in a new tab.


x
Procedure: How to Use the SQL Wizard to Run, Email or Schedule a Report
  1. Click Run, E-Mail, Schedule from the ribbon or the navigation pane.

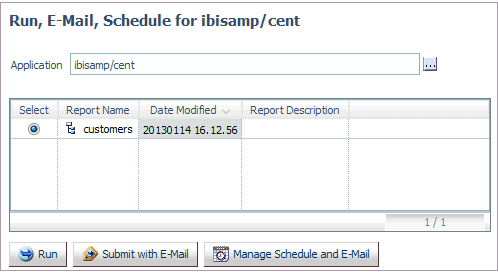
    The Run, E-Mail, Schedule pane opens, as shown in the following image.
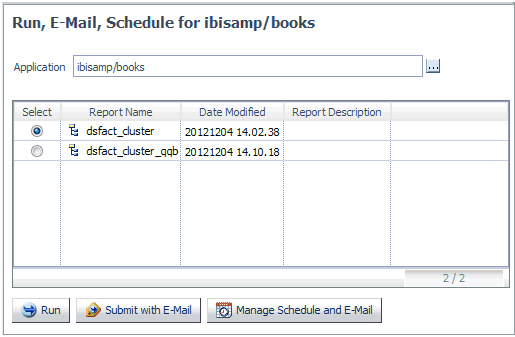
  2. Select the radio button for a report.
  3. Click Run to run the report.
  4. Click Submit with E-Mail to submit the procedure and specify start or completion email.

    The Submit procedure with E-Mail pane opens, as shown in the following image.
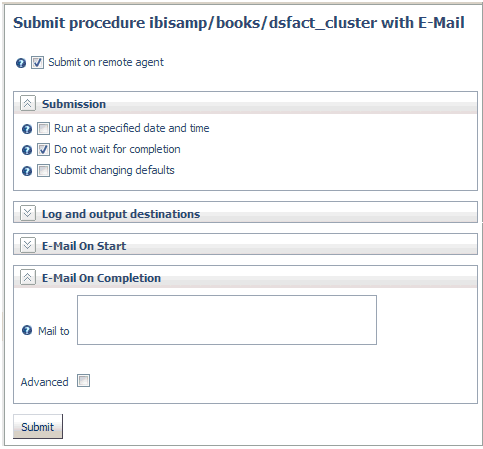
  5. To schedule the procedure, click Manage Schedule and Email.

    The Manage Schedule and E-Mail for procedure pane opens, as shown in the following image.
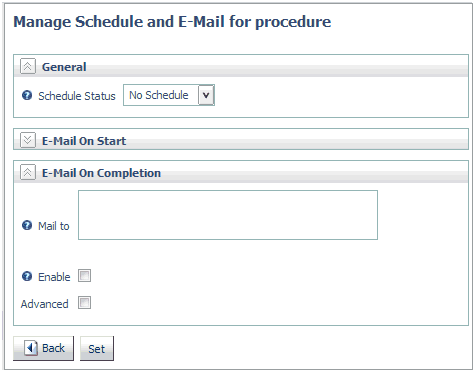
For information on email and scheduling options, see Sending an E-mail Notification for a Procedure and Scheduling a Procedure.

Top of page

x
Upload Wizard

How to:

The Upload Wizard enables you to upload files from your local machine to server application folders and to load them into a DBMS for use in creating synonyms and reports. You can then run a report with or without email, or schedule it.

The wizard enables you to:

The Upload Wizard displays these steps on the ribbon or in the navigation pane, as shown in the following image.

When you complete a task, the wizard automatically moves to the next step.


x
Procedure: How to Use the Upload Wizard to Upload a File and Create a Synonym
  1. From the Web Console, click the Wizards icon, as shown in the following image.

    The Wizards pane opens, as shown in the following image.

  2. Select Upload Wizard.

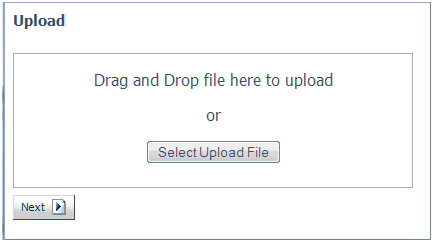
    The Upload Wizard opens to the Upload pane, as shown in the following image.

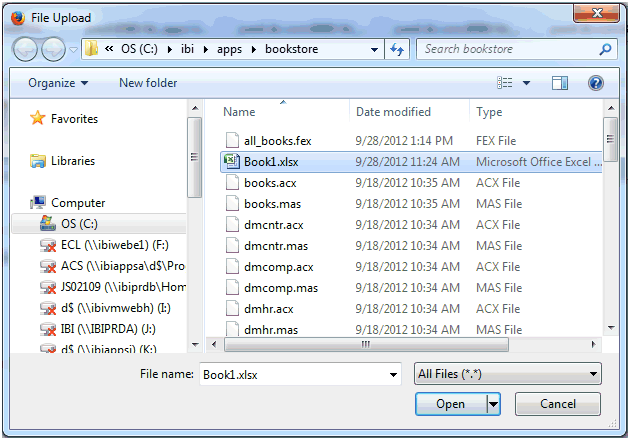
  3. Drag and drop a file or click Select Upload File and navigate to a file on your file system, as shown in the following image.

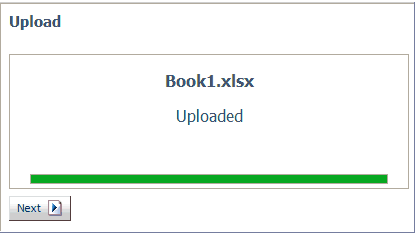
  4. Click Open. The upload is confirmed, as shown in the following image.

    Note: Wait until the file is completely uploaded before trying to use it. The upload progress is indicated by the progress bar.

  5. Click Next.

    The synonym creation screens will vary, depending on the type of file uploaded.

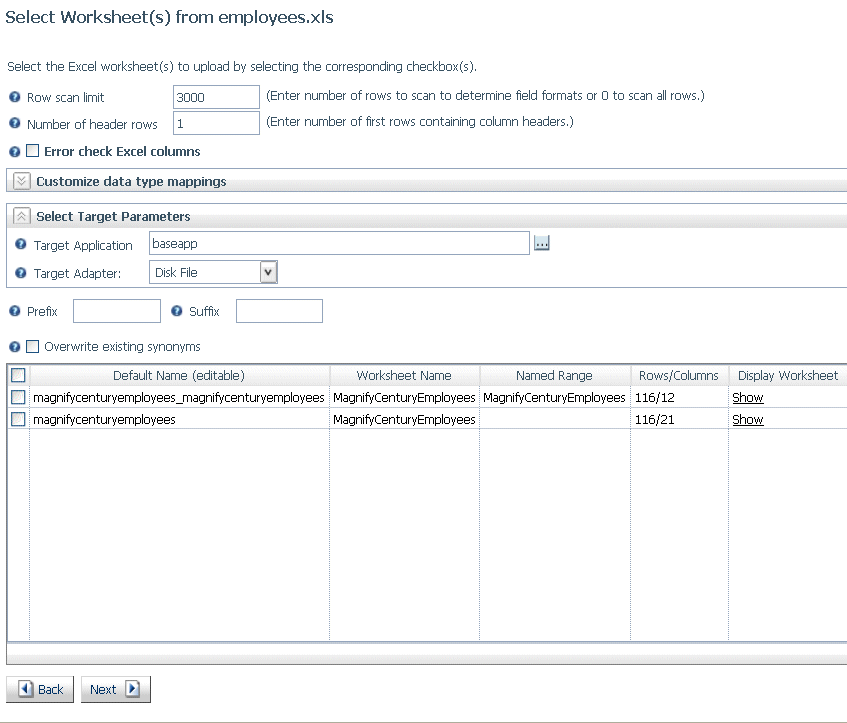
    1. If you uploaded an Excel file, the Select Worksheets page opens, as shown in the following image.

      You can select or enter values for the following attributes;

      • The number of rows to scan in order to set field data types.
      • The number of header rows.
      • Whether to decompose date fields into their components.
      • Whether to error check the columns (using the first data row to set field data types).
      • The date format to use.
      • The target application for the file.
      • The target adapter.

        The Target Parameters that display depend on the target adapter you select, If the target adapter is a relational data source, a Target Connection parameter will appear and, if supported by the adapter, a bulk load option. If the target adapter is a delimited flat file, Field Delimiter, Enclosure, and Header parameters will appear,

      • Whether to overwrite existing synonyms with the same names
      • The worksheets to be processed.
      • The synonym names.
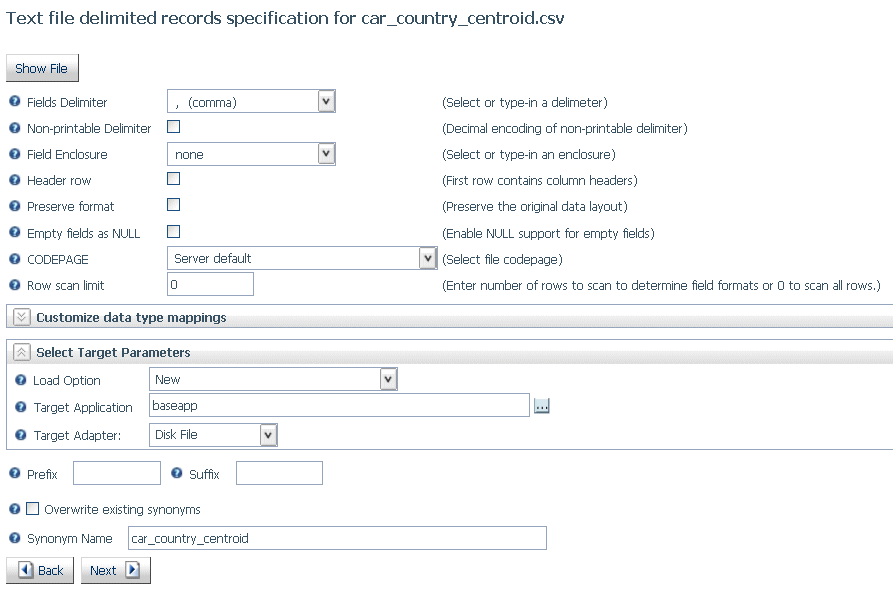
    2. If you uploaded a delimited file, the Text file delimited records specification page opens, as shown in the following image.

      You can enter or select values for the following attributes;

      • The delimiter character.
      • The enclosure character.
      • Whether the first row contains column headings.
      • Whether to preserve leading blanks.
      • Whether to enable null support.
      • The code page.
      • How many rows to use to determine field formats.
      • Whether to decompose date fields into their components.
      • The date format to use.
      • Whether to recreate the file and metadata, append the new data (keeping the existing metadata), or replace the data (keeping the existing metadata).
      • The target application for the file.
      • The target adapter.

        The Target Parameters that display depend on the target adapter you select, If the target adapter is a relational data source, a Target Connection parameter will appear and, if supported by the adapter, a bulk load option. If the target adapter is a delimited flat file, Field Delimiter, Enclosure, and Header parameters will appear,

      • Whether to overwrite existing synonyms.
      • The synonym name.
  6. Enter parameters for the synonym, and click Next.

    The synonym is created.

  7. Click Next.

    The Measures and Dimensions pane opens.

To exit the Upload Wizard, click Full Console.


x
Procedure: How to Use the Upload Wizard to Categorize Data

The Upload Wizard categorizes the objects in the synonym into measures, dimensions, and hierarchies.

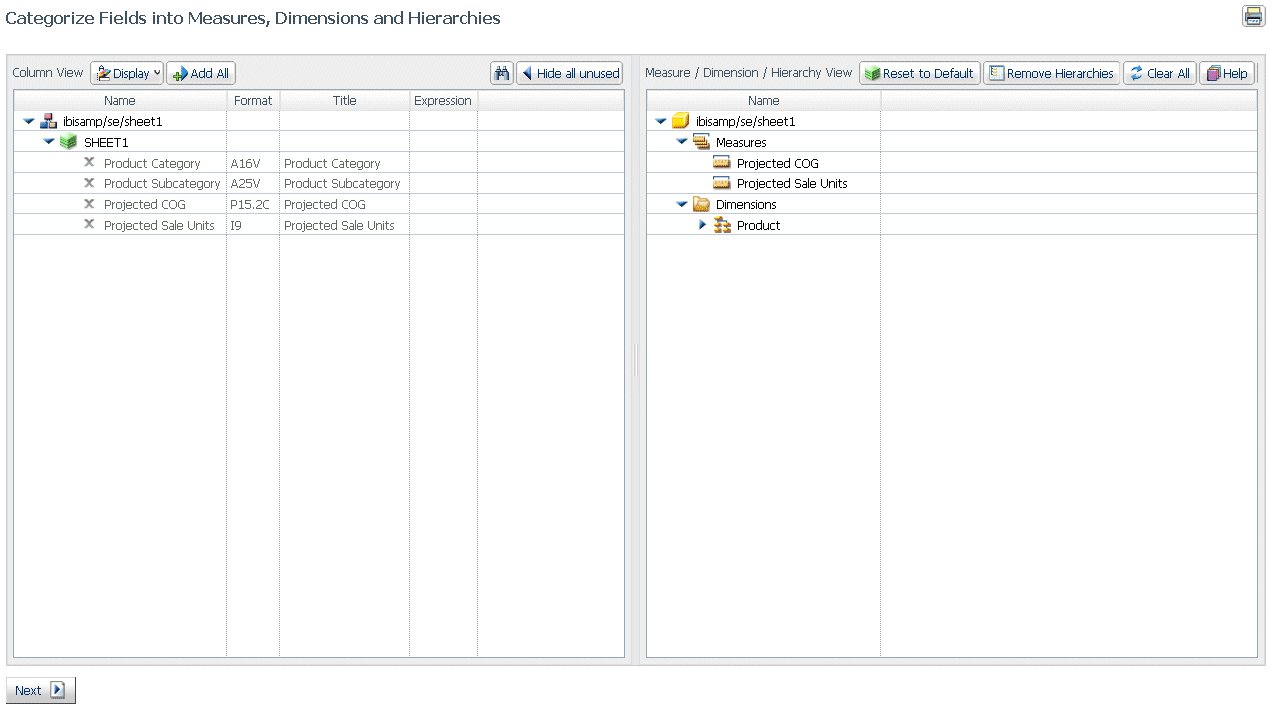
  1. Click Show Hidden to show the Column View on the left and the Measure/Dimension/Hierarchy View on the right.

    The Column View on the left shows the uploaded file, as shown in the following image.

    On the right, the columns have been categorized as measures, dimensions, and hierarchies.

  2. Use right-click options on the Column View pane to see sample data and rename items. Use right-click options on the Measures/Dimensions/Hierarchies pane to insert new measure groups and dimensions, hide or rename items, delete hierarchies, assign a geographic role, and see sample data.
  3. Click Next.

    The Save As dialog box opens.

  4. Enter a name for the synonym in the File Name field and click OK.
  5. Click Next.

The wizard moves to the Test Query step and opens the Create Test Query pane.


x
Procedure: How to Use the Upload Wizard Create a Test Query

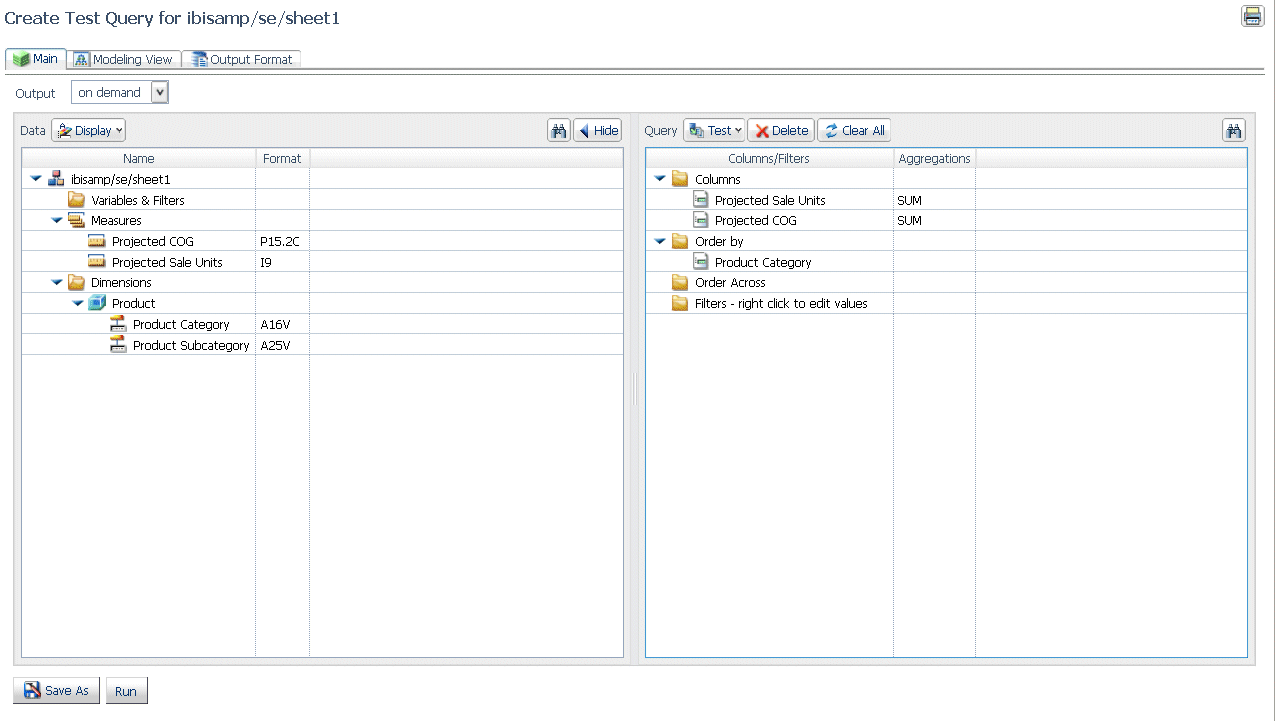
When the Wizard moves to the Test Query step, the Create Test Query pane opens, as shown in the following image.

  1. Create a query by dragging objects from the Data section on the left to the appropriate query category in the Query section on the right, as shown in the following image.

    You can move the query pane to the bottom or right by selecting the location from the Output drop-down list.

    You can use the Modeling View tab to create a join and the Output Format tab to select an output format for the query.

  2. Click Save As or Run.

    If you clicked Save As, the Save As dialog box opens so that you can save the query. A status page shows whether the query was saved successfully.

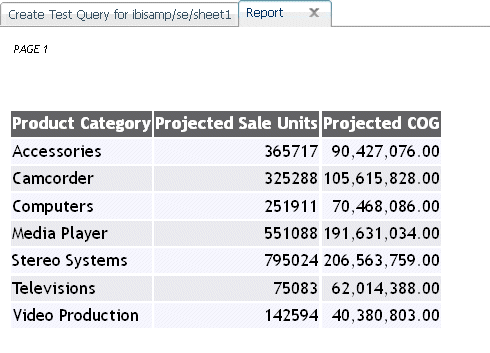
    If you clicked Run, the report output is displayed, as shown in the following image.


x
Procedure: How to Use the Upload Wizard to Run, Email, or Schedule a Procedure

After you have created a test query with the Upload Wizard, you can run the procedure, submit it to run with email, or schedule it.

  1. Click Run, E-Mail, Schedule from the ribbon or navigation pane.

    The Run, E-Mail, Schedule page opens, as shown in the following image.

  2. Click Run to run the report.
  3. Click Submit with E-Mail to submit the procedure and specify start or completion email.

    The Submit procedure with E-Mail pane opens.

  4. To schedule the procedure, click Manage Schedule and Email.

For information on email and scheduling options, see Sending an E-mail Notification for a Procedure and Scheduling a Procedure.
To exit the Upload Wizard, click Full Console.


iWay Software