ReportCaster Configuration
ReportCaster configuration parameters are managed within
the ReportCaster Console Configuration tab. For additional ReportCaster
configuration information, see the ReportCaster manual.
xConfiguring the Memory Available for the ReportCaster Log Report
The size of the ReportCaster log report is limited by
the amount of memory available to the Java VM. When the memory of
the Java VM is exceeded, a Java OutOfMemoryException error occurs.
To control the size of the log report,
you can set the following ReportCaster Server Configuration tool
parameters:
- In the Distribution Servers
folder, Max Messages per Task from Data Server limits the number
of messages written to the log file. The default value is 1000.
- In the Log Settings
folder, Log Purge Period designates the number of days in which the
logs will be purged. The default value is every 30 days.
xConfiguring the Heap Size for the ReportCaster Distribution Server
If the ReportCaster Distribution Server experiences
a Java out of memory error, you must increase the amount of memory
(heap size) available to Java on the Distribution Server. This is
done by passing parameters on the Java command line, as follows:
java -Xms<initial heap size> -Xmx<maximum heap size>
For example,
java -Xms256m -Xmx512m
In addition:
- If the Distribution
Server is running on Windows from the command line, then edit the
schbkr file located in the ReportCaster bin directory.
- If the Distribution
Server is running as a Windows service, then use the Registry Editor
to change the value of the JvmMs and JvmMx registry keys.
You must restart the Distribution Server to enable this change.
xConfiguring ReportCaster Failover and Workload Distribution
The Distribution Server Failover feature allows you
to configure a backup Distribution Server that can resume ReportCaster
operations when there is an interruption (planned or unplanned)
in the primary Distribution Server service. The primary Distribution Server
is monitored to verify that it is operational. If there is an interruption
in service, the failover Distribution Server is triggered to take
over the role of the primary server.
The Workload Distribution feature allows ReportCaster to distribute
scheduled jobs across multiple Distribution Servers, providing an
efficient and fast way to process large numbers of ReportCaster
schedules. Multiple Distribution Servers can be installed on one or
more hosts. One instance is designated as the Workload Manager,
while the others are designated as Workers. The WebFOCUS Repository
will be shared by the Workload Manager and the Workers. Workload
Distribution is set up through the ReportCaster Configuration tool.
All servers will share one set of configuration information, and
the Workload Manager will push any configuration changes to the
Workers.
For your application of ReportCaster, you can configure either
Failover or Workload Distribution, or both at the same time. The
following procedure includes instructions to configure both, but
notes when to skip to the appropriate steps if you are only configuring one
or the other.
x
Procedure: How to Configure Distribution Server Failover
To configure
distribution server failover:
-
Open the
ReportCaster Console and click Configuration in
the top pane.
-
Click the Distribution
Servers folder in the left pane.
-
Click the
button to the right of the Secondary Distribution Server field.
The Secondary Distribution Server dialog box opens, as
shown in the following image.
-
Select the Enabled check
box.
-
Enter the
host name and port number of the Secondary server.
-
Click OK.
-
Click Save and
then OK when you are prompted to save.
-
Install
the Distribution Server on the specified host with the specified port
number for that host.
x
Procedure: How to Configure Workload Distribution
To
configure workload distribution:
-
Open the
ReportCaster Console and click Configuration in
the top pane.
-
Click the Distribution
Servers folder in the left pane.
-
Click the
button to the right of the Workload Distribution field.
The Workload Distribution dialog
box opens, as shown in the following image.
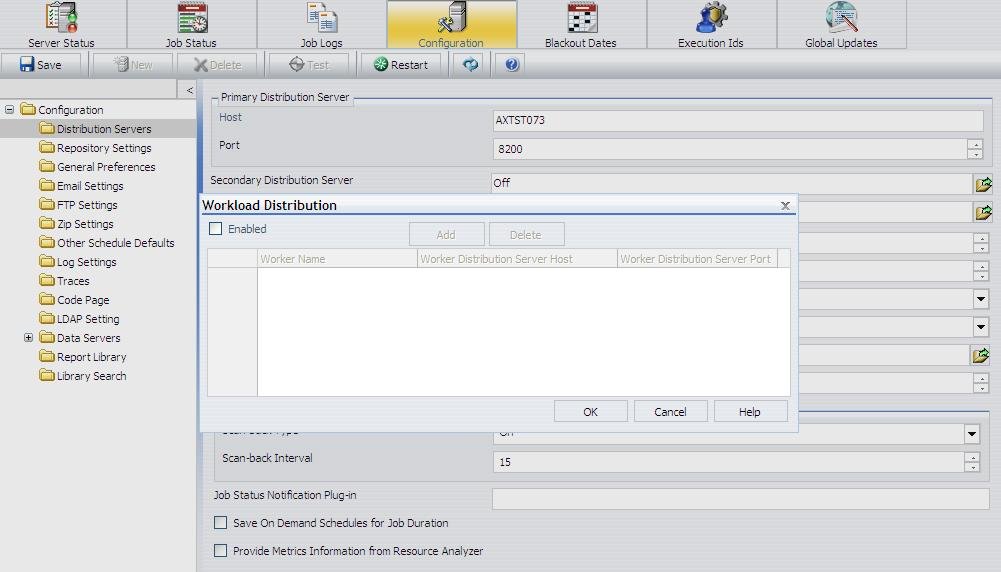
-
Select the Enabled check
box.

-
Click Add.
-
Enter the
name, host name, and port number of the Worker Distribution Server.
Repeat this step for each Worker Distribution Server instance
that you want to add.
-
Click OK.
-
Click Save and
then OK when you are prompted to save.
-
Install
the Distribution Server on each of the specified hosts with the specified
port number for that host.
xAdding Support for UTF-8 to the Distribution Server
Support for UTF-8 can be added to the Distribution Server
by adding -Dfile.encoding=UTF8 to the Distribution Server Java command.
If the Distribution Server is being run from the command line, modify
the schbkr bat or script file and add -Dfile.encoding=UTF8 to the
Java command. If the Distribution Server
is being run as a Windows Service, modify the Windows registry by
accessing
HKEY_LOCAL_MACHINE\SOFTWARE\InformationBuilders\ReportCaster\WFXXXX
\Parameters\Java
and adding the following to the Options
string:
-Dfile.encoding=UTF8
where:
- WFXXXX
Is the release number in which you are working.
xConfiguring Secure Communications to the ReportCaster Distribution Server
ReportCaster encryption can be enabled to secure communications between
the ReportCaster application and the ReportCaster Distribution Server.
For more information, see Distribution Server Settings in
the ReportCaster manual.
xConfiguring ReportCaster Web Services in an SSL Environment
By default, the Axis Servlet only accepts HTTP requests.
If you use ReportCaster Web Services in an SSL environment, you
will need to manually configure the Axis Servlet to accept HTTPS
requests. To do so, add a second AxisServletListener with the
name https to axis2.xml and specify the port parameter for both
listeners. The axis2.xml file is located in the
drive:\ibi\WebFOCUS81\webapps\webfocus\WEB-INF\conf folder.
The following code is an example of a second AxisServletListener.
<transportReceiver name="https"
class="org.apache_1_6_2.axis2.transport.http.AxisServletListener">
<parameter name="port">8443</parameter>
</transportReceiver>
For more information, see
xUsing the ReportCaster SFTP Key Generation Utility
ReportCaster includes a configuration utility for SFTP
public and private keys.
x
Procedure: How to Use the ReportCaster SFTP Key Generation Utility
-
Navigate
to the drive:\ibi\WebFOCUS81\ReportCaster\bin directory and
double-click sshkeygen.bat.
The ssh-keygen dialog box opens, as shown in the
following image.
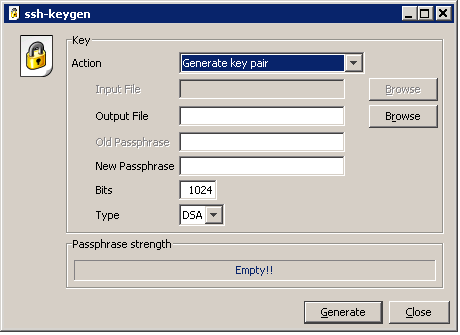
-
Set the
output file to ibi\WebFOCUS81\ReportCaster\cfg\sftp_private_key.txt.
-
Enter a
passphrase in the New Passphrase field.
The Passphrase strength field indicates the strength of
the password entered.
-
Select the
type of key.
The following image displays an example of a dialog box
with all necessary changes made.
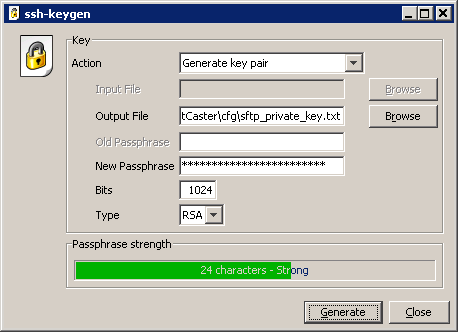
-
Click Generate.
WebFOCUS writes two files to the drive:ibi\WebFOCUS81\ReportCaster\cfg
directory. These are sftp_private_key.txt and sftp_private_key.txt.pub.
The file sftp_private_key.txt.pub contains the public key.
-
Install
the public key (sftp_private_key.txt.pub) on your SFTP server.