Installing the WebFOCUS Client
This following procedure provides the steps for installing
the WebFOCUS Client on UNIX.
Note: Before beginning the installation, verify that all
prerequisites are met. In particular, this installation requires
knowledge of the Primary ReportCaster Distribution Server machine name
and port number.
xRemoval of the ibi_html WebFOCUS Alias
As of WebFOCUS Release 8.0 Version 01, the ibi_html
alias has been removed from WebFOCUS packaging. If you are upgrading,
this section describes how to configure your web and application
server settings (for example, Apache Tomcat) if ibi_html references exist
in your earlier applications as custom aliases.
x
Procedure: How to Configure Apache Tomcat to Use the ibi_html Soft Alias
To
configure Apache Tomcat to use the ibi_html soft alias:
-
Stop Apache Tomcat.
-
Make a copy of the approot.xml file, which is located
in the following directory
<tomcat_home>conf/Catalina/localhost
where:
- <tomcat_home>
Is the root location where Apache Tomcat is installed.
-
Rename the copy of approot.xml to ibi_html.xml or according
to your custom alias (for example, ibi_html8.xml).
-
Edit the ibi_html.xml file and change the value specified
by the <Context docBase> element to the full path to the ibi_html.war
file. In addition, change the path value from /approot to /ibi_html.
For example:
<?xml version='1.0' encoding='utf-8'?>
<Context docBase="../ibi/WebFOCUS81/webapps/ibi_html.war" path="/ibi_html">
</Context>
Note: Do not replace /ibi_html
with your custom alias (for example, ibi_html8).
-
Start Apache Tomcat.
You can now use your ibi_html alias.
x
Procedure: How to Install the WebFOCUS Client (Console Installation Mode)
This
section describes how to install WebFOCUS Client on UNIX using the
console installation mode. For demonstration purposes, a custom
install is performed using an Oracle 11g database for the repository.
The web and application server being used is Apache Tomcat 7.0.33,
which is packaged with the installation.
Note: Before
you run the WebFOCUS Client installation, set the ulimit on the
user ID that is going to run the installation program as follows:
ulimit=8192
-
Download the WebFOCUS 8 installation
file for UNIX.
-
Change the permissions of the installer file (installWebFOCUS8103.bin)
to read and execute with the following command:
chmod 755 installWebFOCUS8103.bin
-
Execute the installer file with the following command:
./installWebFOCUS8103.bin -i console
The
Welcome to WebFOCUS 8.1 message displays.
-
Press Enter to continue.
The WebFOCUS License Agreement displays in sections.
-
Press Enter to move through the license information.
-
At the DO YOU ACCEPT THE TERMS OF THIS LICENSE AGREEMENT
prompt, type Y and press Enter.
The Choose Install Type prompt is displayed.
-
Type 2 for a full installation
and press Enter.
The License Code prompt is displayed.
-
At the WebFOCUS License Code prompt, type your license
code and press Enter to continue.
-
At the WebFOCUS Site Code prompt, type your site code
and press Enter to continue.
The Choose Install Set prompt is displayed.
-
Type 2 for a custom installation
and press Enter.
The Choose Destination Locations prompt is displayed.
-
Press
Enter to accept the default destination directory, or type a custom destination directory and then press Enter.
Note: Do not include spaces in the path.
The Select Components to Install prompt is displayed.
-
To install a component, type Y or press enter. To not install a component, type N.
-
Type Y to install WebFOCUS or N to cancel.
The destination directory prompt is displayed.
-
Press Enter to accept the default destination, or type a destination path and press Enter.
Note:The directory path cannot contain spaces.
The mail server host prompt is displayed.
-
Type the mail server host name and press Enter.
The Install ReportCaster Distribution Server prompt is displayed.
-
Type Y to install the ReportCaster Distribution Server the same machine, or N not to install it.
Note: If you plan to install the Distribution Server on a different machine, type N.
The Install and Configure Tomcat prompt is displayed.
-
Type Y to install Tomcat or N to skip it. If you install Tomcat, you will be prompted for a destination directory. Press Enter to accept the default destination, or type a destination path and press Enter.
The Install Derby prompt is displayed.
-
Type Y to install Derby or N to configure an existing database.
A list of supported
databases is displayed.
The
database choices are:
- 1 - Apache Derby
- 2 - DB2
- 3 - Informix
- 4 - MSSQL 2005
- 5 - MSSQL 2008
- 6 - MSSQL 2012
- 7 - MYSQL
- 8 - Oracle
- 9 - Other DB
- 10 - Sybase SQL Anywhere
-
Type the option number for your database (for example, 8 for
Oracle).
The prompt to create a WebFOCUS Repository is displayed.
-
Type N and press Enter.
-
For Oracle, type values for the following parameters
and press Enter, or press Enter to accept the default.
-
DB Server Node. Type the name of the machine
where the Oracle Database Server is running.
-
Port. The default is 1521. Type the port number on which
the Oracle Database Server is listening on.
-
User Id. This is used to communicate to the UOA repository.
-
Password. Type the password for the user ID.
-
ORASID. Type the value for the Oracle SID.
-
JDBC Driver. Accept the default value, oracle.jdbc.OracleDriver.
-
JDBC Path. Type the fully qualified path to the Oracle
JDBC driver, including the jar file name.
-
At the double colon prompt (::), press Enter to continue.
The Advanced Configuration prompts display, as shown in
the following image.
-
At the WebFOCUS Application Context prompt, type a context
root and press Enter, or press Enter to accept the default (ibi_apps).
-
At the WebFOCUS Help Context prompt, type a help context
root and press Enter, or press Enter to accept the default (ibi_help).
-
A t the WebFOCUS Reporting Server Host prompt, type a
host name and press Enter, or press Enter to accept the default.
-
At the WebFOCUS Reporting Server Port prompt, type a
server port and press Enter, or press Enter to accept the default
(8120).
-
At the Distribution Server Host prompt, type a host name
and press Enter, or press Enter to accept the default.
-
At the Distribution Server Port prompt, type a server
port and press Enter, or press Enter to accept the default (8200).
-
Start Distribution Server (Y/N): N
This prompt will appear for license keys with ReportCaster,
and if we chose to install ReportCaster on this machine.
-
Tomcat HTTP Port: (DEFAULT: 8080):
Tomcat Server Shutdown Port: (DEFAULT: 8009):
Tomcat
AJP Port: (DEFAULT: 8005):
The Tomcat prompts will appear
if we choose to install and configure Tomcat during installation.
The
Pre-Installation Summary prompt for the Distribution Server, Reporting
Server, Database, Tomcat, Context Roots and Alias, and Mail Host
is displayed, as well as Disk Space information.
Note: If any
of the Advanced Configuration parameters are incorrect, type BACK to reenter
values for the settings.
-
Press Enter to complete the installation.
The Installation Complete prompt is displayed once the
installation has finished.
-
Press Enter to exit from the installer.
x
Procedure: How to Install the Typical Version of the WebFOCUS Client (GUI Installation Mode)
This
section describes how to perform a typical install for the WebFOCUS
Client on UNIX using the GUI installation mode.
To use the
GUI installation, ensure that the installer has access to an X Windows
Server (through the DISPLAY variable). If an X Windows Server is
available, you must set a DISPLAY environment variable before you
start the installer. For example:
DISPLAY=xserver_host:0.0
export DISPLAY
TERM=xterm
export TERM
where:
- xserver_host
Is the host name or IP Address of a machine that is running
an X Server.
-
Download and launch the WebFOCUS 8 installation
file for UNIX.
The Welcome to WebFOCUS 8.1 window opens, recommending
that you quit all programs before continuing with the installation.
-
Click Next to
continue the installation.
The License Agreement dialog box opens.
-
Read the license agreement, select the I accept
the terms of the License Agreement radio button, and
click Next.
The Choose Install Type dialog box opens.
-
Select the Full Install option,
and then click Next.
The License Code dialog box opens.
-
Enter the license code and site code that were delivered
with your WebFOCUS software in the corresponding fields, and click Next.
The Choose Install Set dialog box opens.
-
Select Typical and click Next.
The
Choose Destination Locations dialog box opens.
-
Type a destination folder for the installation or accept
the default value.
Note: Do not include any spaces in the path. In
addition, provide a path to a unique destination folder. If you
provide a path to an existing directory, WebFOCUS will prompt you to delete the existing directory or choose a different target folder.
-
Click Next.
The Select Components to Install dialog box opens, as shown
in the following image.
-
Perform the following steps:
-
In the WebFOCUS component area, type the
host name or IP address for your mail server in the Mail Server
Host Name field.
-
In the Derby 10.9.1.0 component area, specify a user
ID and password for the new Apache Derby database that will be installed.
-
Click Next to accept all of
the default installation components and configuration settings.
The Pre-Installation Summary window opens.
-
Verify that all of the information is correct and click Install.
As WebFOCUS is being configured on your system,
the Please Wait window is displayed.
After WebFOCUS is configured, the Installing WebFOCUS
8.1 dialog box opens. As WebFOCUS is being installed, the Installing
WebFOCUS 8.1 dialog box informs you about the installation tasks that are
being performed.
The Install Complete window opens, listing the installation directory.
-
Click Done to exit the installation.
x
Procedure: How to Install the Custom Version of the WebFOCUS Client (GUI Installation Mode)
This
section describes how to perform a custom install for the WebFOCUS
Client on UNIX using the GUI installation mode.
To use the
GUI installation, ensure that the installer has access to an X Windows
Server (through the DISPLAY variable). If an X Windows Server is
available, you must set a DISPLAY environment variable before you
start the installer. For example:
DISPLAY=xserver_host:0.0
export DISPLAY
TERM=xterm
export TERM
where:
- xserver_host
Is the host name or IP Address of a machine that is running
an X Server.
-
Download and launch the WebFOCUS 8 installation
file for UNIX.
The Welcome to the WebFOCUS installation program window
opens.
-
Choose the
appropriate language from the drop-down list and click OK.
The Welcome to WebFOCUS 8.1 window opens, recommending
that you quit all programs before continuing with the installation.
-
Click Next.
The License Agreement dialog box opens.
-
Read the license agreement, select the I accept
the terms of the License Agreement radio button, and
click Next.
The Choose Install Type dialog box opens.
-
Select the Full Install option,
and then click Next.
The License Code dialog box opens.
-
Enter your WebFOCUS license code and site code in the
corresponding fields, and click Next.
The Choose Install Set dialog box opens.
-
Select Custom and click Next.
The Select Program Folder dialog box opens.
-
Type a destination folder for the installation or accept
the default value.
Note: Do not include any spaces in the path. In
addition, provide a path to a unique destination folder. If you
provide a path to an existing directory, WebFOCUS will prompt you to delete the existing directory or choose a different target folder.
-
Click Next.
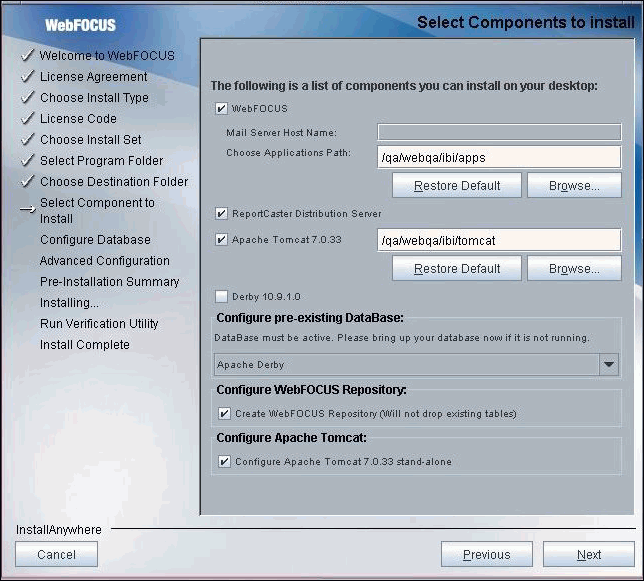
The Select Components to Install dialog box opens, as shown
in the following image.
-
Perform the following steps:
-
In the WebFOCUS component area, type the
host name or IP address for your mail server in the Mail Server
Host Name field.
Notice that the Derby 10.9.10 option
is not selected. In this case, a pre-existing database must be selected
and configured.
-
Select an existing database (for example, Apache Derby)
from the Configure pre-existing Database drop-down list.
Note: If want to use an existing WebFOCUS repository
that already has tables defined, then uncheck the Create
WebFOCUS Repository option. After the installation is
completed, you must drop and recreate the existing tables in the repository.
If
want to use a web or application server other than Apache Tomcat,
then uncheck the Apache Tomcat 7.0.33 option.
The Configure WebFOCUS Client area will appear and you must enter
the port number that is currently used by your web server in the Web
Server Port field.
-
Click Next to accept the remaining
default installation components and configuration settings.
The Database Configuration dialog box opens, as shown in
the following image. In this example, Apache Derby is being configured,
since it was the pre-existing database that was selected.
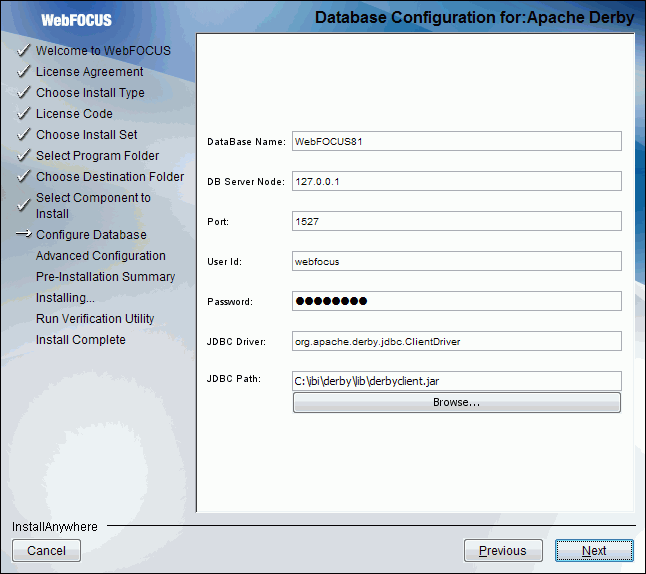
Note:
- For security reasons, the DB Server Node field is set to 127.0.0.1.
If you are running on multiple environments and want to access this
Apache Derby instance from another location, change 127.0.0.1 to
the machine name.
- The derby.properties file for the existing Derby instance, which
will be used for the installation, should also include the machine
name if it will be accessed from multiple environments.
-
Modify the values for the database configuration parameters
according to your existing configuration.
-
Click Next.
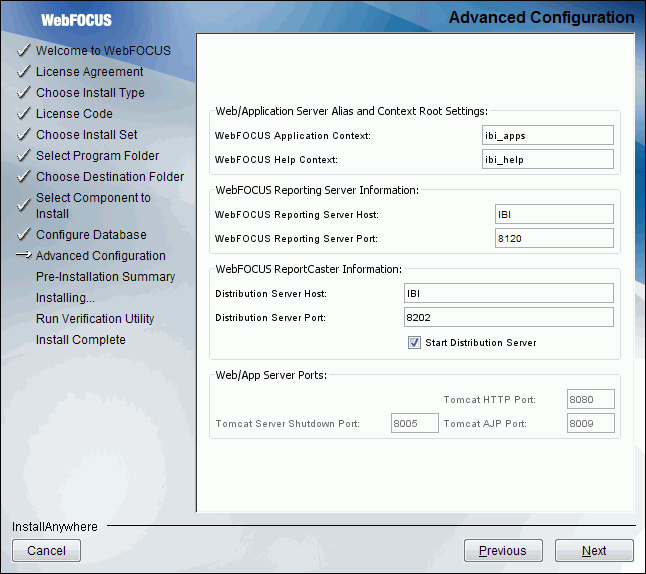
The Advanced Configuration dialog box opens, as shown in
the following image.
-
Perform the following steps:
-
In the WebFOCUS Application Context field,
type a context root or accept the default (ibi_apps).
-
In the WebFOCUS Help Context field, type a help context
root or accept the default (ibi_help).
-
In the WebFOCUS Reporting Server Host field, type
a host name or accept the default. The default WebFOCUS Reporting
Server host is the name of the machine where WebFOCUS is being installed.
-
In the WebFOCUS Reporting Server Port field, type
a server port or accept the default (8120).
-
In the Distribution Server Host field, type a host
name. The default Distribution Server host is the name of the machine
where WebFOCUS is being installed.
-
In the Distribution Server Port field, type a server
port or accept the default (8200).
-
In the Web/App Server Ports area, specify the port
values that are being used by your application server.
Note: The Web/App Server Ports area will appear
only if you chose to install and configure Tomcat.
-
Click Next.
The Pre-Installation Summary window opens.
-
Verify that
all of the information is correct and click Install to
continue with the configuration and installation.
As WebFOCUS is being configured on your system,
the Please Wait window is displayed.
After WebFOCUS is configured, the Installing WebFOCUS
8.1 dialog box opens. As WebFOCUS is being installed, the Installing
WebFOCUS 8.1 dialog box informs you about the installation tasks that are
being performed.
The Install Complete window opens, listing the installation directory.
-
Click Done to exit the installation.
x
Upgrading from Release 8.0 to Release 8.1
The upgrade installation installs WebFOCUS 8.1 over your existing 8.0 release. This will carry over all WebFOCUS data, including the licensing information, allowing you to skip some of the steps required in the typical install. Because the architecture of WebFOCUS Portals and Favorites has changed in 8.1, the upgrade also requires that Portals and Favorites be converted for use in the new architecture. You can allow the installer to perform this conversion during installation or run the conversion tools manually after the upgrade.
It is strongly recommended that you back up your WebFOCUS Repository before performing the upgrade.
Note: You cannot run WebFOCUS 8.0 and WebFOCUS 8.1 against the same Repository simultaneously. If you plan to maintain separate WebFOCUS 8.0 and WebFOCUS 8.1 installations, each WebFOCUS installation must run against a different Repository database.
x
Procedure: How to Upgrade from Release 8.0 to Release 8.1
-
Download
the WebFOCUS Client installation file, then double-click the file.
-
Choose the
appropriate language from the drop-down list and click OK.
The Welcome to WebFOCUS 8.1 window opens, recommending
that you quit all programs before continuing with the installation.
-
Click Next to
continue the installation.
The License Agreement dialog box opens.
-
Read the
license agreement, select the radio button to accept the terms of
the license agreement, and click Next to
continue the installation.
The Choose Install Type dialog box opens.
-
Select Update,
then select an existing installation to update, and then click Next to continue the installation.
-
In the Run Upgrade Utilities dialog box, select one of the following options and click Next:
- If you select Convert Favorites and Portals now, proceed to step 7.
Note: The conversion does not occur immediately. First, the installer upgrades the WebFOCUS software. Once the rest of the installation is complete, WebFOCUS will automatically convert Favorites and Portals to the 8.1 format.
- If you select Skip the conversion and convert Favorites and Portals after the upgrade, proceed to step 8.
-
Enter a WebFOCUS Administrator ID and password and click Next.
The installer connects to the WebFOCUS Repository to ensure that the Repository is up and to check your Administrator credentials.
If the database connection fails or the credentials are not valid, you will be offered several options:
- Try again after starting the database or correcting your credentials.
- Exit, returning to the Run Upgrade Utilities dialog box.
- Continue with the installation without converting the Favorites and Portals.
-
The Pre-Installation Summary dialog box lists your current product and the upgraded product. If anything is incorrect, click Previous and change your selections. Otherwise, click Install.
When the installation is complete, the Run Verification Utility dialog box appears.
-
Select the verification utilities you would like to run and click Next. The available utilities are:
- The WebFOCUS Console Verification Utility
- WebFOCUS Online Documentation
The Install Complete dialog box opens, listing the installation directory.
-
Click Done to
exit the installation.
If you are going to run the conversion utilities manually, proceed to
Converting WebFOCUS Portals and Favorites When Upgrading.
x
Upgrading from Release 8.1 to Release 8.1 Version 03
The upgrade installs WebFOCUS 8.1.03 over your existing WebFOCUS installation. This will carry over all WebFOCUS data, including the licensing information, allowing you to skip some of the steps required in the typical install. The upgrade also requires that Favorites be converted for use in the new architecture. You run the Favorites conversion tool after the installation is complete.
It is strongly recommended that you back up your WebFOCUS Repository before performing the upgrade.
x
Procedure: How to Upgrade from Release 8.1 to Release 8.1 Version 03
-
Download
the WebFOCUS Client installation file, then double-click the file.
-
Choose the
appropriate language from the drop-down list and click OK.
The Welcome to WebFOCUS 8.1 window opens, recommending
that you quit all programs before continuing with the installation.
-
Click Next to
continue the installation.
The License Agreement dialog box opens.
-
Read the
license agreement, select the radio button to accept the terms of
the license agreement, and click Next to
continue the installation.
The Choose Install Type dialog box opens.
-
Select Update,
then select an existing installation to update, and then click Next to continue the installation.
-
The Pre-Installation Summary dialog box lists your current product and the upgraded product. If anything is incorrect, click Previous and change your selections. Otherwise, click Install.
When the installation is complete, the Run Verification Utility dialog box appears.
-
Select the verification utilities you would like to run and click Next. The available utilities are:
- The WebFOCUS Console Verification Utility
- WebFOCUS Online Documentation
When the installation is finished, the Install Complete dialog box opens, listing the installation directory.
-
Click Done to
exit the installation.
x
Procedure: How to Install a Stand-Alone ReportCaster Distribution Server
Note: The
WebFOCUS Client must be installed before running the stand-alone
ReportCaster Distribution Server installation.
To install
a stand-alone ReportCaster Distribution Server on a separate machine
from the WebFOCUS Client:
-
Log on to the machine from which the installation
will be invoked.
Note: The installer file (installWebFOCUS8103.bin)
must be accessible from this machine.
-
Create a work directory and change to that directory.
-
Execute the installer file, using the following command:
./installWebFOCUS8103.bin -i console
The installation will provide a series of command-line
prompts.
The WebFOCUS License Agreement displays in sections.
-
Press Enter to move through the license information.
-
At the DO YOU ACCEPT THE TERMS OF THIS LICENSE AGREEMENT
prompt, type Y and press Enter.
-
At the Choose Install Type prompt, type 2 for
Full Install and press Enter.
-
At the WebFOCUS License Code prompt, type in your license
code and press Enter to continue.
-
At the WebFOCUS Site Code prompt, type in your site code
and press Enter to continue.
-
At the Choose Install Set prompt, type 2 for
a custom installation and press Enter.
-
At the Choose Destination Locations prompt, type a destination
folder for the installation and press Enter, or press Enter to accept
the default.
Note: Do not include spaces in the path.
-
At the Select Component to Install prompt, type Y or N and
press Enter for each of the following components, or press Enter
to accept the default (Y).
-
Install WebFOCUS. Type N.
-
Install ReportCaster Distribution Server. Type Y.
The
installer will display the message:
You have chosen
to install ReportCaster Distribution Server only, WebFOCUS will
not be installed
Select an existing database from
the list of databases provided. Select the same database which
the WebFOCUS Client will be using.
In the Database Configuration
pane, provide the necessary information for the existing database.
-
Press Enter to continue the installation.
The Advanced Configuration prompts display.
-
At the Distribution Server Host prompt, type a host name
and press Enter, or press Enter to accept the default.
-
At the Distribution Server Port prompt, type a server
port and press Enter, or press Enter to accept the default.
-
At the Start Distribution Server prompt, type N and
press Enter.
The configurations for the Distribution Server and Database
are displayed.
Note: If any of the Advanced Configuration
parameters are incorrect, type back to reenter
values for the settings.
-
Press Enter to complete the installation.