Controlling the HTML Composer Environment

How to:

Reference:

You can set properties for HTML Composer with the HTML Page tab, located in the Developer Studio Options dialog box. The HTML Page tab enables you to set page properties such as the location of reports and graphs, the display of a grid in your layouts, the default form type, and setting the default caching option for the HTML page. The changes that are made in the HTML Page tab are saved to the registry. This allows a customized environment to be created for various users.


Top of page

x
Procedure: How to Set Page Properties
  1. Select Options from the Window menu.

    The Developer Studio Options dialog box opens.

  2. Select the HTML Page tab.

    For more information about the HTML Page tab, see HTML Page Tab.

  3. Make your changes, and click OK.

Top of page

x
Procedure: How to Select Form Settings From the HTML Page Tab
  1. Select Options from the Window menu.

    The Developer Studio Options dialog box opens.

  2. Select the HTML Page tab.
  3. Click the Form Settings button.

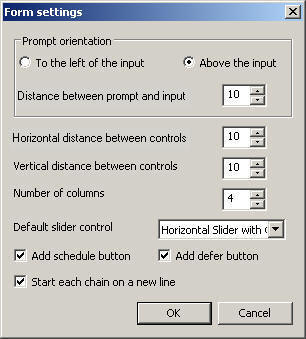
    The Form settings dialog box opens.

  4. Select the orientation for the form object in the layout.
  5. Use the spin buttons to increase or decrease the distance between the prompt, horizontal and vertical controls of the form, and the number of columns for the form.

    or

    Position the cursor in the input box and type a number.

  6. Use the slider control type options to select how the slider bar appears.

    Slider bars are available when using numeric range value parameters in your report or graph.

  7. Use the Add schedule button option to add a schedule button for referenced procedures with parameters if your WebFOCUS environment is licensed to use ReportCaster. For more information, see Adding ReportCaster Schedule Capability to HTML Composer.
  8. Use the Add defer button option to add a defer button for running a report deferred in the Managed Reporting environment. For more information, see Running a Managed Reporting Report Deferred From HTML Composer.
  9. Start each chain on a new line to create multiple chains from the New Parameters dialog box. Each set of chained parameters appears on new line of the Design tab, regardless of the grouping option selected from the New Parameters dialog box.

    Start each chain on a new line is selected by default.

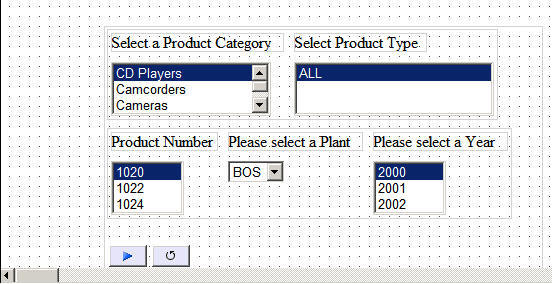
    For example, the following image shows the default behavior where the first chain (Product Category and Product Type) is shown on one line and the second chain (Product Number, Plant, Year) start on a new line. This enables you to see the relationship of the chains within the form.

  10. Click OK to close the Form Settings dialog box.

    The form settings are applied and shown in the HTML Composer Design view.

  11. To reset the default form settings, right-click the form object and select AutoArrange from the context menu.

    Note: The AutoArrange option is only available when using a multiple layer form type.

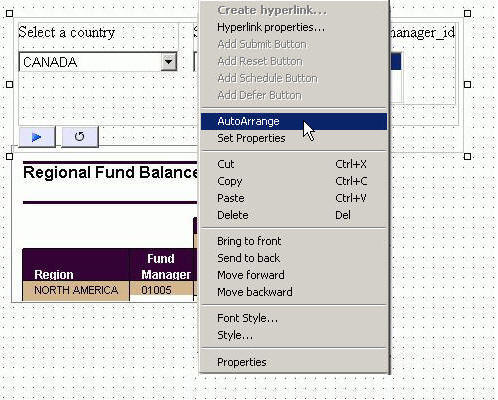
    The form is auto arranged on the layout, using the default form settings.


Top of page

x
Reference: HTML Page Tab

The following options are available from the HTML Page tab, located in the Developer Studio Options dialog box.

Grid Settings

Show Grid

Displays a grid. If this is not selected, the grid is turned off for all layouts.

Snap to Grid

Causes objects in the layout to snap to grid lines when being positioned. For detailed positioning, deselect this option.

Width

The width of the grid in pixels.

Height

The height of the grid in pixels.

Preview Settings

Report and Graph Preview

Previews report and graph data in the Design view. If checked, additional options are available (Simulated Data or Live Data).

This option is selected by default.

If unchecked, icons are used to represent the area in the Design view for reports and graphs. This is the fastest method of loading reports since no request are made to the server.

Simulated Data

Selecting to preview simulated data sends a request to the reporting server that gathers formatting information from the Master File. The database is not accessed, but rather mock data is used to visually represent the report.

This option is only available when previewing reports and graphs.

Live Data

Selecting to preview live data sends a request to the reporting server, and to the database, to get a snapshot of the actual data in the report.

This option is only available when previewing reports and graphs.

Record limit for reports

Enables you to limit the number of records used to gather data for previewing the report in live data mode. For example, if you set 500 as the record limit for the report, then 500 rows of data are gathered for the report results.

This option is only available if the Live Data option is selected.

Record limit for input controls

Sets the number or records to be shown for the input controls when gathering data for reports and graphs.

This option is only available if the Live Data option is selected.

Use Prefix

Selecting Use Prefix will take any FOCUS syntax in the input box and apply it to the components at preview time. For example, SQL SQLORA SET OPTIMIZATION OFF. Since the settings are saved for all documents, you can select the Use Prefix option to indicate to the tool whether or not to use the prefix for the specific document.

Form type

Sets the default form type in the parameter grouping options of the New Parameters dialog box. Form types are None, Single layer, or Multiple layer.

  • When None is selected, the parameter grouping option shows Do not create a form on the New Parameters dialog box.
  • When Single layer is selected, the parameter grouping option shows New single layer form on the New Parameters dialog box. The single layer form contains all of the elements within a single group box.

    Single layer is the default form type.

  • When Multiple layer is selected, the parameter grouping option shows New multiple layer form on the New Parameters dialog box. The multiple layer form contains group boxes around each element in the form. You may move and resize each element of the control.

You may override the set form type on the HTML Page tab from the Parameter grouping options drop-down list of the New Parameters dialog box. For details, see Automatically Creating Controls From the New Parameters Dialog Box.

Form settings

Options are available so that you may customize how the forms are populated and arranged in the document. For details, see Form Settings Dialog Box.

Show 'New Parameters' dialog

Controls whether or not the New Parameters dialog box shows when adding parameters in HTML Composer.

The New Parameters dialog box is shown by default.

Show 'Template Selector' dialog

Controls whether or not the Template selector dialog box shows when a new HTML page is created using HTML Composer.

Activate 'Unlock Template' option

Controls whether to add an unlock icon to the toolbar when a template is in use.

Default caching option

Controls whether cache run time data is on or off for the HTML page. The default is off.

When adding dynamic parameters to the HTML page, input controls retrieve data using procedures. You may cache the run time data for input controls by using the cache run time option on the Properties and settings dialog box in the Parameters tab. This setting overrides the Default caching option from the HTML Page tab. For more information about the Parameters tab, see Creating a Dynamic List of Values.

Auto Arrange Objects

Automatically arranges the objects on the Parameters tab so that they take the least amount of space without overlapping each other. Auto Arrange is on by default.

If this option is turned off, you may auto arrange objects directly from the Parameters tab. Right-click anywhere on the Parameters tab and select AutoArrange from the context menu.

Refresh thumbnails every

Automatically refreshes the content on the Thumbnail tab of the Properties window, every 20 seconds by default. You may change the time interval of the automatic refresh.

Default Theme

You can set the default theme for a new HTML page. The Information Builders theme is chosen by default.

The following is the list of themes that you can use.

  • Information Builders
  • Black
  • Blue
  • Green
  • Orange
  • Purple
  • Red
  • Silver
  • Teal
  • Plain
  • Yellow red
  • Beige blue
  • Dramatic blue
  • Neutral gray
  • Light blue
  • Light green
  • Light purple

Top of page

x
Reference: Form Settings Dialog Box

The following options are available from the Form settings dialog box of HTML Composer.

Prompt orientation

Prompt refers to the descriptive text used to label the control/parameter in the output.

To the left of the input

Places the descriptive text used to label the control/parameter to the left of the input.

Above the input

Places the descriptive text used to label the control/parameter above the input.

Distance between the prompt and input

Sets the distance between the prompt and input.

Horizontal distance between controls

Sets the horizontal distance between controls.

Vertical distance between controls

Sets the vertical distance between controls.

Number of columns

Determines when the form will wrap and start laying controls out in a new row.

Default slider control

Sets how the slider control appears. Select from the following types of slider bars:

Slider controls are available when using numeric range value parameters in your report or graph.

  • Horizontal or Vertical Slider Simple bar. The slider bar has no end arrows, just a bar with the slider.
  • Horizontal or Vertical Slider with Color Bar and Arrows. Arrows appear at each end of the slider bar.
  • Horizontal or Vertical Slider with Color Bar, Arrows, and Edit. Arrows and an edit box appear at the end of the slider bar, showing the current value.

Once a slider control is inserted into HTML Composer, changing these options will not affect the existing sliders. The option is only applied to new slider controls. To change the existing slider bar type, delete the slider object and insert a new slider control.

Add schedule button

Automatically adds a schedule button for referenced procedures with parameters. This option is selected by default. For more information about adding schedule capability to HTML Composer forms, see Adding ReportCaster Schedule Capability to HTML Composer.

Add defer button

Automatically adds a defer button for referenced procedures with parameters. This option is selected by default. For more information running reports deferred, see Running a Managed Reporting Report Deferred From HTML Composer.

Start each chain on a new line

When creating multiple chains from the New Parameters dialog box, each set of chained parameters appears on new line of the Design tab, regardless of the grouping option selected from the New Parameters dialog box.

Start each chain on a new line is selected by default.


WebFOCUS