Arranging Columns on a Page

In this section:

Reference:

How easily a user locates data depends on the arrangement of columns on a page. You have many design options. Using StyleSheet attributes or commands you can:


Top of page

x
Reference: Column Arrangement Features

Feature

Description

Applies to

SQUEEZE

Sets column width.

HTML (requires FONT=DEFAULT-FIXED)

PDF

PS

SET SPACES

Sets number of spaces between columns.

HTML (requires SET STYLEMODE=FIXED)

SEQUENCE

Sets column order.

PDF

PS

HTML

EXL2K

Note: does not work with EXL2K FORMULA

FOLD-LINE

Reduces report width by stacking columns.

PDF

PS

OVER

Stacks columns by placing them over one another.

HTML

PDF

PS

IN {n|+n}

Sets absolute or relative starting position of a column.

HTML (requires SET STYLEMODE=FIXED)

PDF

PS


Top of page

x
Determining Column Width

How to:

The value of the SQUEEZE attribute in a StyleSheet determines column width in a report. You can use a SET parameter instead of a StyleSheet to set the value of SQUEEZE. If there are conflicting StyleSheet and SET values, the StyleSheet overrides the SET. For details on SET, see the Developing Reporting Applications manual.

When SQUEEZE is set to ON (the default), StyleSheet column width is ignored. Column width is determined using your browser's default settings.

When using SQUEEZE it may affect the way headings, footings, and column titles display in your report. For details, see Using Headings, Footings, Titles, and Labels.


x
Syntax: How to Determine Column Width (HTML)

This syntax applies to an HTML report. For the syntax for a PDF or PS report, see How to Determine Column Width (PDF or PS).

[TYPE=REPORT,] SQUEEZE={ON|OFF}, $

where:

TYPE=REPORT

Applies the column width to the entire report. Not required, as it is the default.

ON

Determines column width based on the longest data value or column title, whichever is greater. ON is the default value.

For HTML reports, the web browser shrinks the column width to the shortest column title or field value.

OFF

Determines column width based on the field format in the Master File. Blank spaces pad the column width up to the length of the column title or field format, whichever is greater.

Note:


Example: Using Default Column Width (HTML)

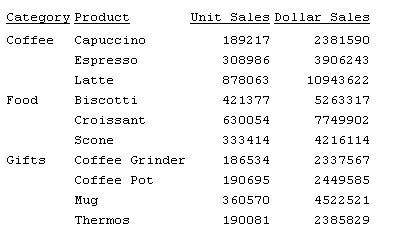
This request uses SQUEEZE=ON (the default) for an HTML report. Column width is based on the wider of the data value or column title.

SET PAGE-NUM = OFF
TABLE FILE GGSALES
SUM UNITS DOLLARS
BY CATEGORY BY PRODUCT
ON TABLE SET STYLE *
TYPE=REPORT, GRID=OFF, FONT=COURIER, $
ENDSTYLE
END

For Category, Unit Sales, and Dollar Sales, the column title is wider than the corresponding data values. For Product, the wider data values determine column width. The HTML report is:


Example: Using Column Width Based on Field Format in Master File (HTML)

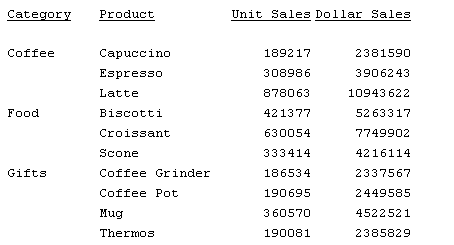
This request sets SQUEEZE to OFF for an HTML report. Column width is based on the field format in the Master File.

SET PAGE-NUM = OFF
TABLE FILE GGSALES
SUM UNITS DOLLARS
BY CATEGORY BY PRODUCT
ON TABLE SET STYLE *
TYPE=REPORT, GRID=OFF, SQUEEZE=OFF, FONT=COURIER, $
ENDSTYLE
END

Blank spaces pad the column width up to the length of the field format for Category (A11) and Product (A16). The HTML report is:


x
Syntax: How to Determine Column Width (PDF or PS)

This syntax applies to a PDF or PS report. For the syntax for an HTML report, see How to Determine Column Width (HTML).

[TYPE=REPORT,] COLUMN=identifier, SQUEEZE={ON|OFF|width}, $

where:

TYPE=REPORT

Applies the column width to the entire report. Not required, as it is the default.

identifier

Selects a column using the COLUMN attribute described in Identifying a Report Component in a WebFOCUS StyleSheet. If you omit a column identifier, the value for SQUEEZE applies to all columns in a report. You can also use SET SQUEEZE to set the width of all columns.

ON

Determines column width based on the widest data value or column title, whichever is greater.

OFF

Determines column width based on the field format in the Master File. Blank spaces pad the column width up to the length of the column title or field format, whichever is greater. OFF is the default value.

width

Is a measurement for the column width, specified with the UNITS attribute.

If the widest data value exceeds the specified measurement:

And the field is...

The following displays...

Alphanumeric

As much of the value as will fit in the specified width, followed by an exclamation mark (!) to indicate truncation.

Numeric

Asterisks (*) in place of the field value.

Note: SQUEEZE is not supported for columns created with the OVER phrase.


Example: Determining Column Width (PDF)

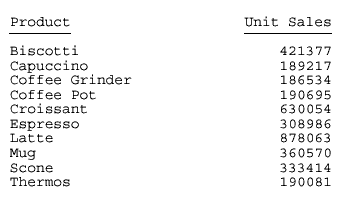
This request uses SQUEEZE=2.5 to increase the default column width of the PRODUCT field in a PDF report. Note that this feature is used primarily for printed reports. Depending on your screen resolution, the column width may look different than how it will print.

SET ONLINE-FMT = PDF 
TABLE FILE GGSALES
SUM UNITS
BY PRODUCT
ON TABLE SET PAGE-NUM OFF
ON TABLE SET STYLE * 
TYPE=REPORT, COLUMN=PRODUCT, SQUEEZE=2.5, $ 
ENDSTYLE
END

The PDF report is:

Top of page

x
Controlling Column Spacing

How to:

By default, report columns are separated by one or two spaces, depending on the output width. The SET SPACES or ON TABLE SET SPACES parameter controls the number of spaces between columns in a report.

In a horizontal sort (ACROSS) phrase, the SPACES parameter determines the distance between horizontal sort sets. Within a set, the distance between columns is always one space and cannot be changed.

This feature applies to an HTML report. It requires you to set the STYLEMODE parameter to FIXED.


x
Syntax: How to Control Column Spacing

This syntax applies to an HTML report.

For all report requests in a procedure

SET SPACES = {n|AUTO}

For one report request

ON TABLE SET SPACES {n|AUTO}

where:

n

Is an integer between 1 and 8, indicating the number of spaces between report columns.

AUTO

Automatically separates report columns with one or two spaces. AUTO is the default value.


Example: Controlling Column Spacing Between Horizontal (ACROSS) Fields

This request uses ACROSS with ON TABLE SET SPACES. The ON TABLE SET STYLEMODE FIXED parameter is required for HTML.

TABLE FILE CENTORD
SUM QUANTITY LINEPRICE ACROSS ORDER_NUM BY PLANT AS 'Plant'
WHERE ORDER_NUM EQ '28003' OR '28004' 
ON TABLE SET SPACES 7 
ON TABLE SET PAGE-NUM OFF 
ON TABLE SET STYLEMODE FIXED 
END

The ACROSS set consists of the fields titled Quantity and Line Total. The distance between each set is seven spaces:


Top of page

x
Changing Column Order

How to:

You can change the order in which vertical sort (BY) columns are displayed in a report. This feature does not apply to horizontal sort (ACROSS) rows or stacked (OVER) columns.


x
Syntax: How to Change Column Order

This syntax applies to PDF, PS, HTML, and EXL2K reports.

[TYPE=REPORT,] COLUMN=identifier, SEQUENCE=sequence, $

where:

TYPE=REPORT

Applies the column order to the entire report. Not required, as it is the default.

identifier

Selects a column using the COLUMN attribute described in Identifying a Report Component in a WebFOCUS StyleSheet.

sequence

Is a number that represents the order of the selected column.

Numbers need not be in sequential order or in increments of one. The order of the columns is from lowest to highest. NOPRINT columns are not included.


Example: Changing Column Order

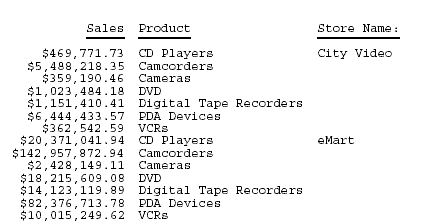
This request rearranges the order in which columns normally appear in the report, that is, with SNAME first, PRODCAT second, and LINEPRICE third.

SET ONLINE-FMT = PDF
TABLE FILE CENTORD
SUM LINEPRICE AS 'Sales'
BY SNAME BY PRODCAT AS 'Product'
WHERE SNAME EQ 'eMart' OR 'City Video'
ON TABLE SET PAGE-NUM OFF
ON TABLE SET STYLE * 
TYPE=REPORT, COLUMN=SNAME, SEQUENCE=3, $
TYPE=REPORT, COLUMN=PRODCAT, SEQUENCE=2, $
TYPE=REPORT, COLUMN=LINEPRICE, SEQUENCE=1, $ 
ENDSTYLE
END

LINEPRICE (Sales) is now the first column, PRODCAT (Product) is the second column (as it was by default), and SNAME (Store Name) is the third column. The PDF report is:


Top of page

x
Stacking Columns

In this section:

How to:

You can stack columns in a report to reduce report width, or to easily compare values in a report by creating a matrix. To stack columns, you can use:

The difference between FOLD-LINE and OVER is that FOLD-LINE begins the second line (not the second column) just underneath the first line, but slightly indented. OVER literally stacks the values of one column directly over another. You can use FOLD-LINE and OVER in the same request.


x
Syntax: How to Stack Columns With FOLD-LINE
display_command fieldname ... FOLD-LINE fieldname ...

or

{ON|BY} fieldname FOLD-LINE

where:

display_command

Is a display command. There is no offset when a line is folded after a display field.

fieldname

Is a display field or sort field placed on a separate line when the value of the ON or BY field changes. When folded on a sort field, a line is offset by two spaces from the preceding line.

ON|BY

Is a vertical sort phrase. The terms are synonymous.


Example: Stacking Columns With FOLD-LINE

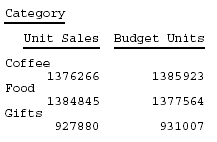
The following illustrates how to use FOLD-LINE to decrease the width of your report. In this example, columns are stacked when the value of the sort field CATEGORY changes.

TABLE FILE GGSALES
SUM UNITS BUDUNITS
BY CATEGORY
ON CATEGORY FOLD-LINE
ON TABLE SET ONLINE-FMT PDF
ON TABLE SET PAGE-NUM OFF
END

The report is:

Without FOLD-LINE, the report looks like this:


x
Syntax: How to Stack Columns With OVER
display_command fieldname1 OVER fieldname2 OVER fieldname3 ...

where:

display_command

Is a display command.

fieldname1, fieldname2, fieldname3

Is a display field or calculated value. A text field is not valid.


Example: Stacking Columns With OVER

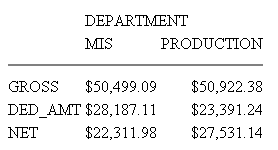
This request contains an ACROSS phrase in an HTML report to sort horizontally by department. It uses two OVER phrases to stack columns.

TABLE FILE EMPLOYEE
SUM GROSS OVER DED_AMT OVER
COMPUTE NET/D8.2M = GROSS - DED_AMT; 
ACROSS DEPARTMENT
ON TABLE SET PAGE-NUM OFF
ON TABLE SET STYLE *
TYPE=REPORT, GRID=OFF,$
ENDSTYLE
END

With the use of OVER, the columns GROSS, DED_AMT, and NET are stacked for readability:

Without the use of OVER, the HTML report looks like this:


x
Alignment of Fields in Reports Using OVER in PDF Report Output

When columns are placed on report output, they are separated by gaps. You can control the size of the gaps between columns with the LEFTGAP and RIGHTGAP StyleSheet attributes.

By default, the gaps between columns are placed outside of the boundaries reserved for the fields on the report output. Therefore, the width or squeeze value defined for a field defines the size of the text area for the data value. It does not count the width of the gaps between columns. The bounding box used to define borders and background color is determined based on the data width plus the left gap plus the right gap.

Gaps external to the column boundaries must be accounted for when you try to align fields in reports that use the OVER phrase.

This feature is designed to support the development of multi-row reports using blank AS names (column titles). Unless otherwise noted, these features work with non-blank titles, but they have not been designed to support alignment with non-blank column titles.

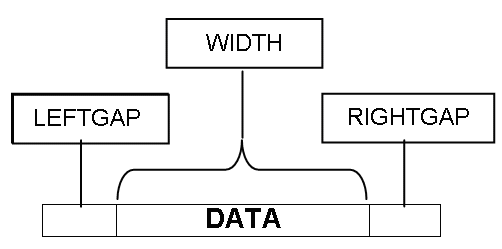
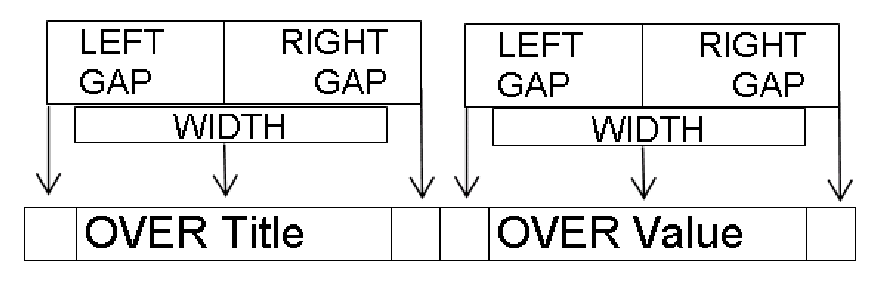
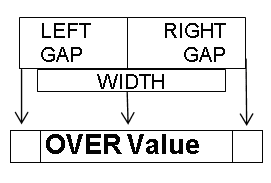
By default, column titles are placed to the left of the field values in a report using OVER. The OVER Title and the OVER Value each are measured by the combination of three parameters, LEFTGAP, WIDTH, and RIGHTGAP:

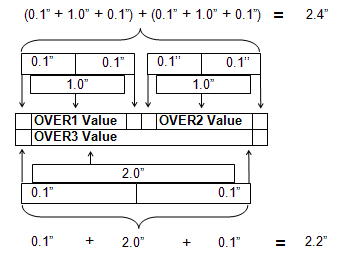
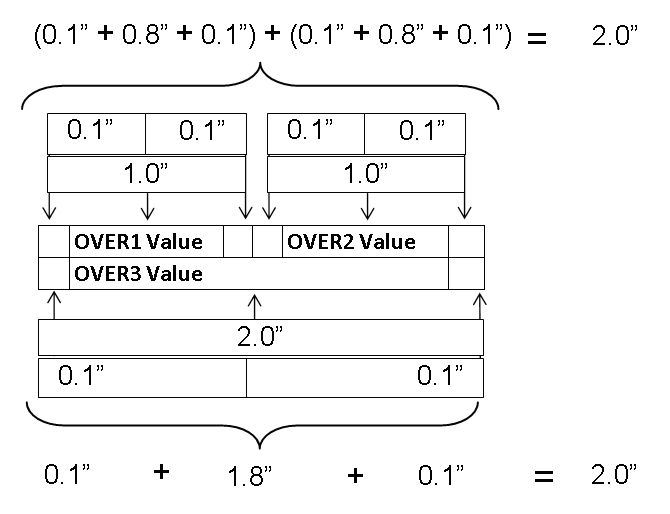
With OVER and blank AS names, each data value becomes a data cell that can be used to construct rows and columns within the data lines of the report. In order to align data values on a lower line with the columns above them, you must calculate widths for the lower level columns that take into account the widths of the data above them plus the widths of all of the left gaps and right gaps in between.

It can be complex to calculate how to size each column when aligning data and headings in reports using OVER. Each calculation of the column size must additionally account for the external left and right gap, and these gaps are cumulative as the number of columns on a given row increases.

Using the GAPINTERNAL=ON StyleSheet attribute, you can have the gaps placed within the column boundaries for PDF report output. This feature makes it much easier to align fields and headings in reports that use the OVER phrase to create multiple lines.

Note: OVER is now supported with SQUEEZE.


x
Syntax: How to Control GAP Placement on Reports
TYPE=REPORT, GAPINTERNAL={OFF|ON}

where:

OFF

Places the left and right gaps outside the defined field width. OFF is the default value.

ON

Places the left and right gaps internal to the defined field width.


Example: Comparing External Gaps With Internal Gaps

With GAPINTERNAL=OFF, you must account for the accumulation of left and right gaps as well as the field widths when defining widths of stacked columns.

With GAPINTERNAL=ON, the defined WIDTH represents the entire space used by the given data cell or column. This takes the cumulative effect out as the OVER values proceed across a row.


Example: Using GAPINTERNAL in a Report

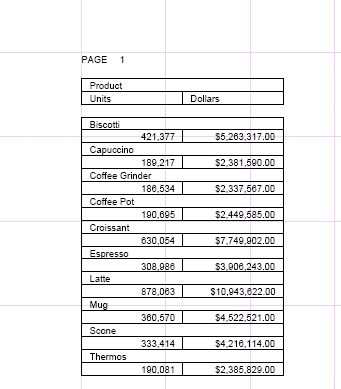
The following request against the GGSALES data source places the PRODUCT field over the UNITS and DOLLARS fields and sets GAPINTERNAL to OFF:

SET LAYOUTGRID=ON
TABLE FILE GGSALES
"Product<+0>"
"Units<+0>Dollars"
SUM
PRODUCT AS ''
OVER
UNITS/D8C AS '' DOLLARS/D12.2CM AS ''
BY PRODUCT NOPRINT
ON TABLE PCHOLD FORMAT PDF
ON TABLE SET STYLE *
TYPE=REPORT, SQUEEZE=ON, FONT=ARIAL, SIZE=8, LEFTMARGIN=1, TOPMARGIN=1,
 LEFTGAP=.1, RIGHTGAP=.1, GAPINTERNAL=OFF, $
TYPE=REPORT, BORDER=ON, $
TYPE=HEADING, BORDERALL=ON, $
TYPE=HEADING, LINE=1, ITEM=1, POSITION = PRODUCT, $
TYPE=HEADING, LINE=2, ITEM=1, POSITION = UNITS, $
TYPE=HEADING, LINE=2, ITEM=2, POSITION = DOLLARS, $
TYPE=REPORT, COLUMN=PRODUCT(2),   SQUEEZE=2,  $
TYPE=REPORT, COLUMN=UNITS, SQUEEZE=1, $
TYPE=REPORT, COLUMN=DOLLARS, SQUEEZE=1, $
ENDSTYLE
END

The widths specified for UNITS and DOLLARS are one inch each, while the PRODUCT field is specified to be two inches. With GAPINTERNAL=OFF, the LAYOUTGRID shows that the widths used to place the columns are greater than the widths specified in the request. The additional space presented by the external leftgap and rightgap accounts for this effect:

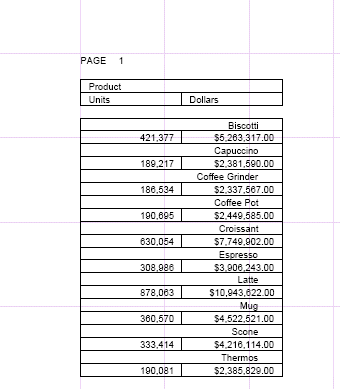
The heading borders are aligned on the right of the report because of the SQUEEZE=ON attribute in the StyleSheet. Extra space was added to the report to align the headings. If you change the StyleSheet declaration for the PRODUCTS field to JUSTIFY=RIGHT, you can see that the extra space prevents the product value from aligning with the dollar value:

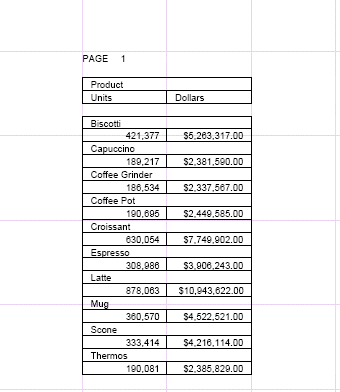
Changing the StyleSheet declaration to GAPINTERNAL=ON causes the specified widths to be used because the gaps are internal and are included in the specified values:

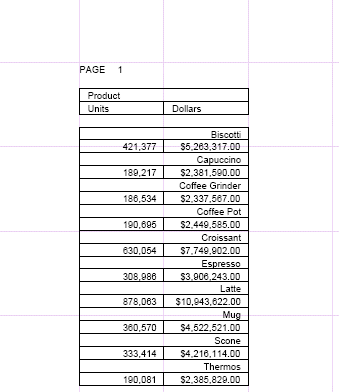
The following report output demonstrates that the values align properly even if the PRODUCT values are defined with JUSTIFY=RIGHT:


Top of page

x
Positioning a Column

How to:

You can specify the absolute or relative starting position for a column in a report. The relative starting position is the number of characters to the right of the last column.

When using this feature with an HTML report, set the STYLEMODE parameter to FIXED.


x
Syntax: How to Position a Column
field IN {n|+n}

where:

field

Is the column that is positioned.

n

Is a number indicating the absolute position of the column.

When used with ACROSS, n specifies the starting position of the ACROSS set.

When used with FOLD-LINE or OVER, n applies to the line on which the referenced field occurs.

+n

Is a number indicating the relative position of the column. The value of n is the number of characters to the right of the last column.


Example: Positioning Columns

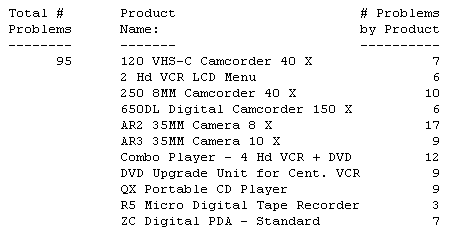
This request specifies absolute positioning for the three columns in the report. The ON TABLE SET STYLEMODE FIXED parameter is required for HTML.

TABLE FILE CENTQA 
SUM CNT.PROBNUM IN 1 AS 'Total #,Problems' 
SUM CNT.PROBNUM IN 45 AS '# Problems,by Product'
BY PLANT NOPRINT BY PRODNAME IN 15 
WHERE PLANT EQ 'ORL'
ON TABLE SET PAGE-NUM OFF 
ON TABLE SET STYLEMODE FIXED 
END

The columns are spaced for readability:


Example: Positioning Horizontal Sort (ACROSS) Columns

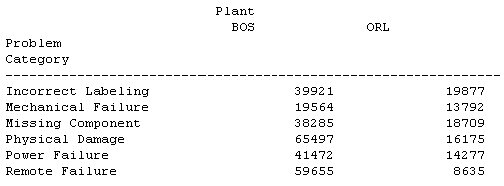
This request uses the IN phrase with the horizontal sort field PLANT to specify the column starting position. It also uses relative positioning to add extra spaces between the PROBNUM columns. The ON TABLE SET STYLEMODE FIXED parameter is required for HTML reports.

TABLE FILE CENTQA 
SUM PROBNUM IN +8
ACROSS PLANT IN 35 
BY PROBLEM_CATEGORY
WHERE PLANT EQ 'BOS' OR 'ORL'
ON TABLE SET PAGE-NUM OFF
ON TABLE SET STYLEMODE FIXED
END

The ACROSS set starts in column 35, and there are eight extra spaces between the data columns in the ACROSS:


Example: Positioning Stacked (OVER) Columns

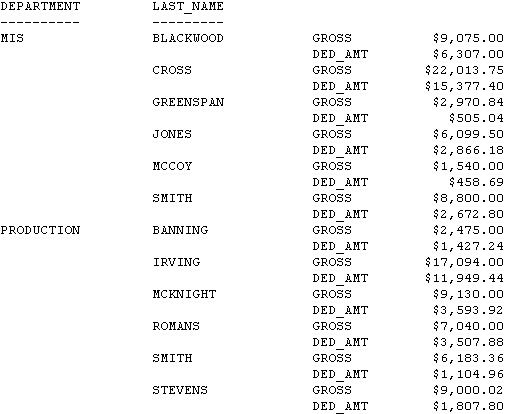
The following request uses OVER to stack columns and IN to position them.

TABLE FILE EMPLOYEE 
SUM GROSS IN 40
OVER DED_AMT IN 40 
BY DEPARTMENT BY LAST_NAME IN 20 
ON TABLE SET PAGE-NUM OFF
ON TABLE SET STYLEMODE FIXED
END

In the report, GROSS and DED_AMT are stacked, starting in column 40. LAST_NAME starts in column 20.


WebFOCUS