How to: |
WebFOCUS reporting procedures (FOCEXECs) are used to integrate between WebFOCUS and ArcGIS Server. The following types of FOCEXECs can be created for a Geographic Business Intelligence Solution (GBIS):
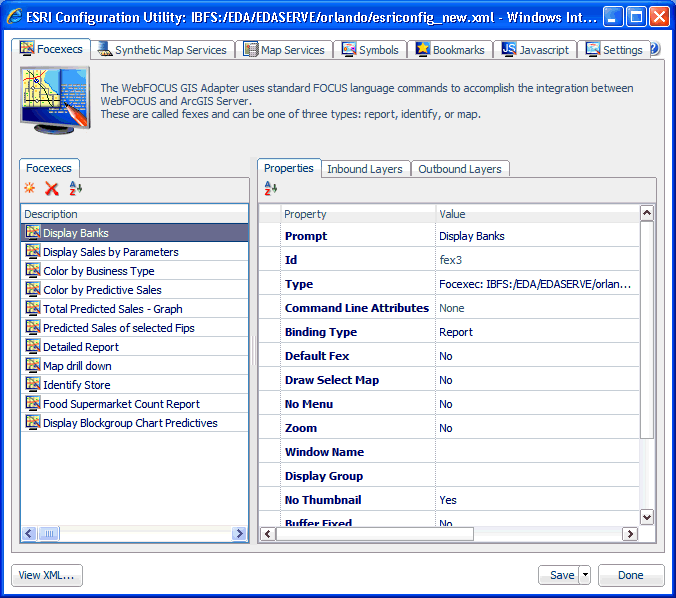
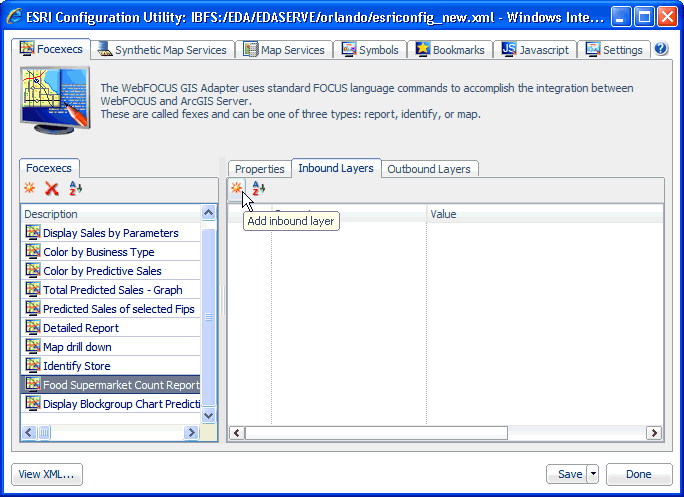
The following image shows the XML definition file (esriconfig_new.xml) being edited in the ESRI Configuration Utility. The esriconfig_new.xml file is used by the Retail Predictives sample application. In this image, the Focexecs tab is selected.
The Retail Predictives sample application uses the following FOCEXECs:
Report
/orlando/bankloc.fex
/orlando/rp_sales.fex
/orlando/totalsales_graph.fex
/orlando/rp_bustype.fex
/orlando/stores_count_bustype.fex
/orlando/food_supermarkets_by_county.fex
Map
/orlando/mp_highest_retailsales.fex
/orlando/mp_sales.fex
/orlando/mp_fips.fex
/orlando/blockgroup_chart.fex
Identify
/orlando/identify_store.fex
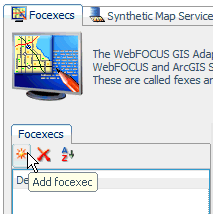
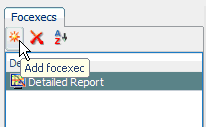
To add a Report FOCEXEC using the ESRI Configuration Utility:
http://server:port/ibi_appswhere:
Is the name of the server on which WebFOCUS is installed.
Is the number of the port on which the server is listening.
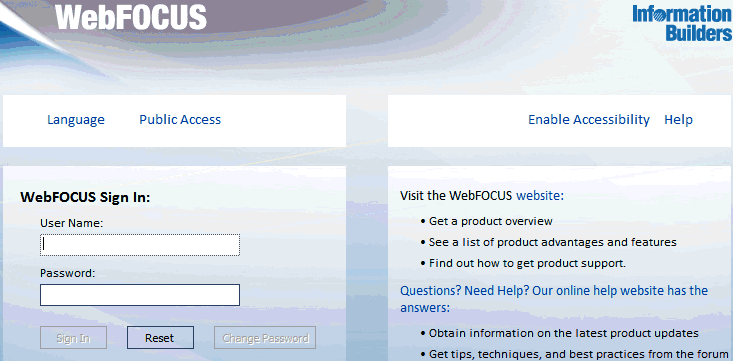
The WebFOCUS Sign In page opens, as shown in the following image.
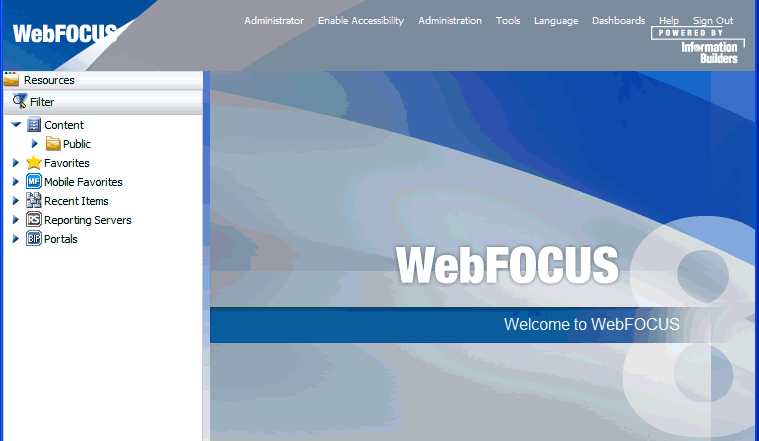
The WebFOCUS BI Portal page opens, as shown in the following image.

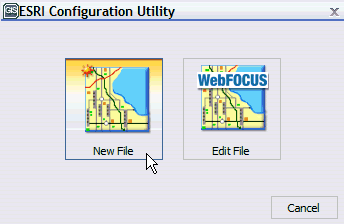
The ESRI Configuration Utility dialog opens, as shown in the following image.
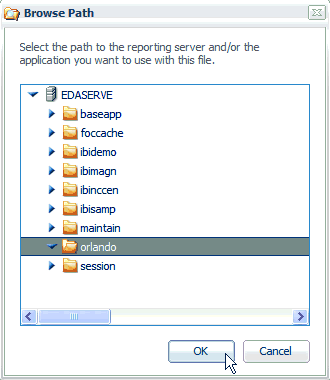
The Browse Path dialog opens, as shown in the following image.
The ESRI Configuration Utility opens for a new XML definition file, as shown in the following image.
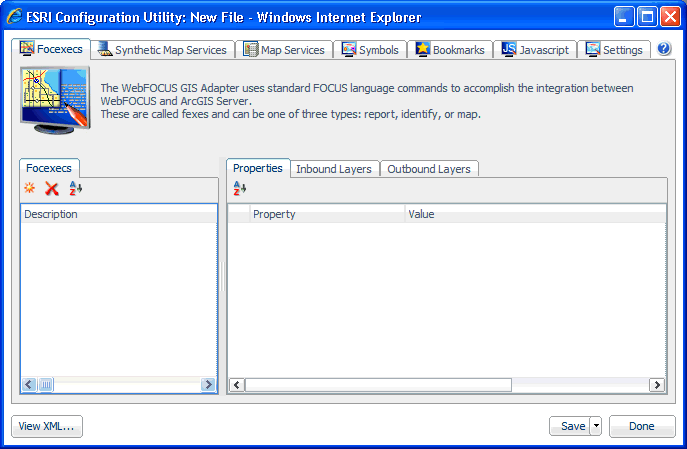
The Focexecs tab is selected by default.
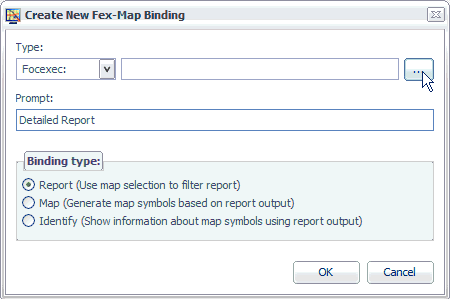
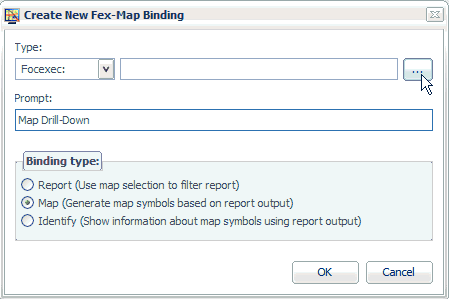
The Create New Fex-Map Binding dialog opens, as shown in the following image.
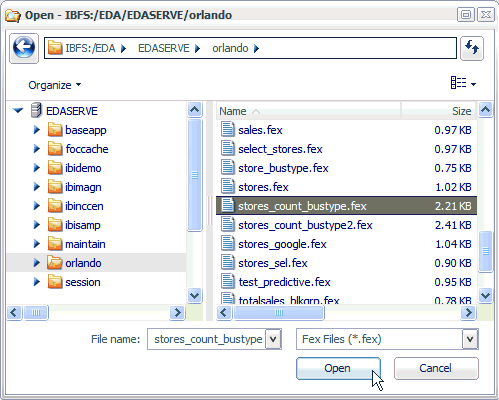
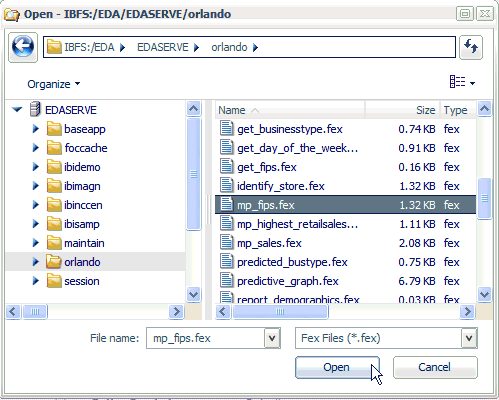
The Open dialog is displayed.
You are returned to the Create New Fex-Map Binding dialog, as shown in the following image.
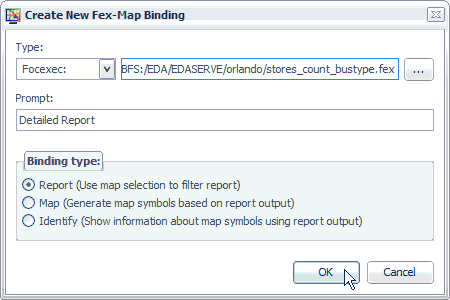
Notice that the path to the selected Report FOCEXEC (for example, stores_count_bustype.fex) is now added to the Fex file path field.
Note: To explore the syntax and structure used for this Report FOCEXEC (stores_count_bustype.fex), see Sample Report FOCEXEC.
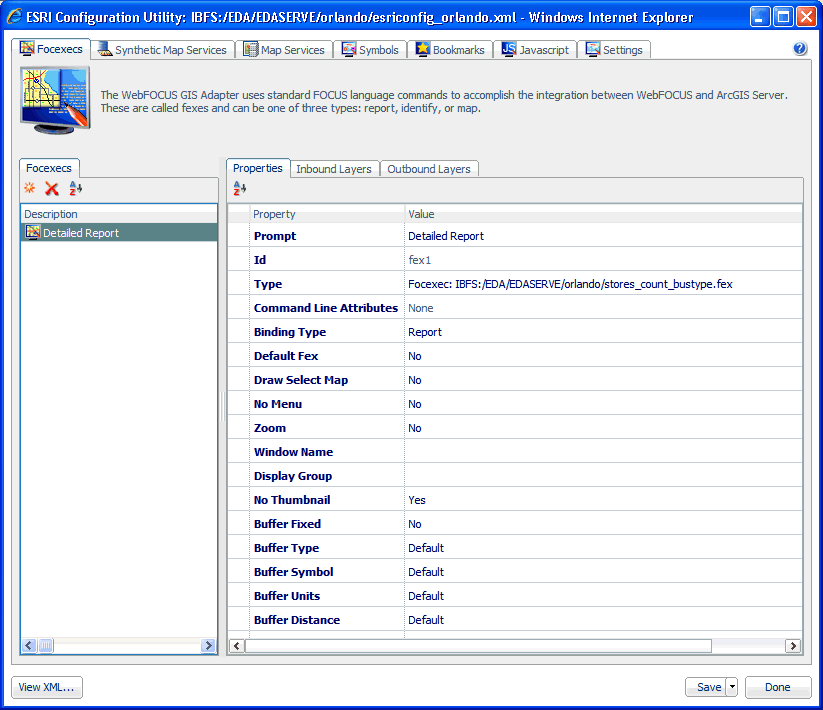
The new Report FOCEXEC (called Detailed Report) is added to the Focexecs pane in the ESRI Configuration Utility, as shown in the following image.
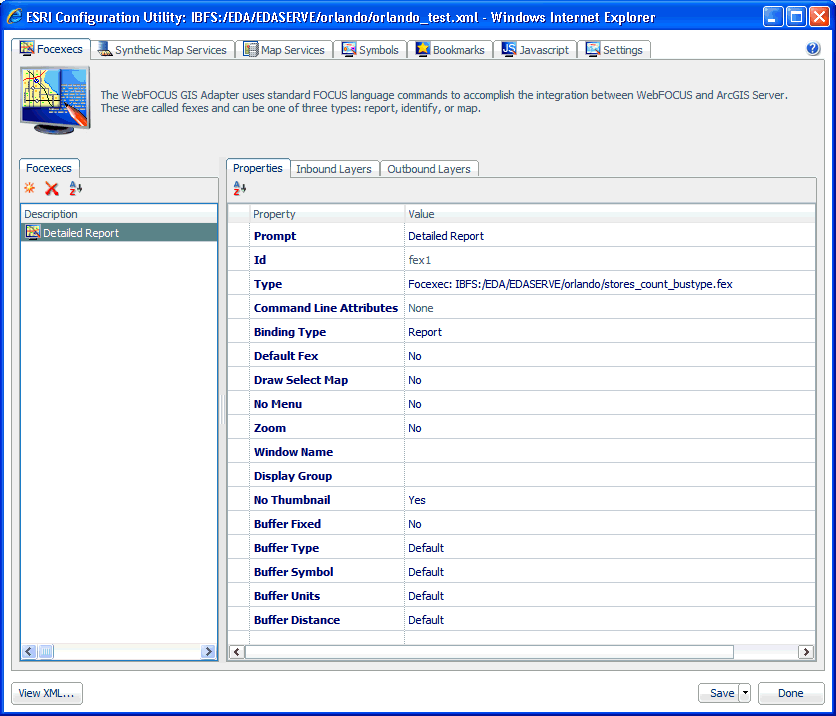
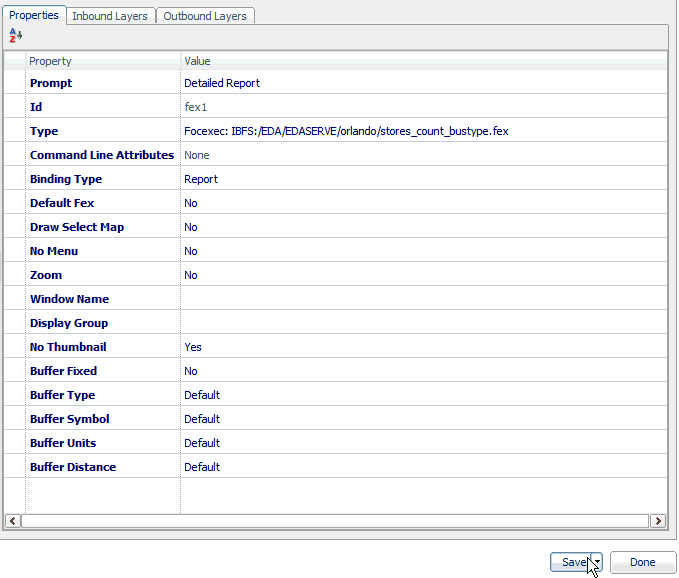
The Properties tab lists the available configuration properties for the Report FOCEXEC. Enter the configuration properties for the Detailed Report FOCEXEC, as listed in the following table.
|
Property |
Description |
|---|---|
|
Prompt |
The Prompt value that you specified in the Create New Fex-Map Binding dialog. Detailed Report |
|
Id |
An ID that is automatically assigned to the FOCEXEC based on the order it is added. fex1 |
|
Type |
The type (Focexec or Adhoc) and path to the selected Report FOCEXEC on the server. Focexec:IBFS:/EDA/EDASERVE/orlando/ stores_count_bustype.fex |
|
Command Line Attributes |
None |
|
Binding Type |
The type of FOCEXEC (Report, Map, or Identify), as indicated by the selection made from the Binding type area in the Create New Fex-Map Binding dialog. Report |
|
Default Fex |
Designates this Report FOCEXEC to be the report that is launched when no other is specified. Yes |
|
Draw Select Map |
Changes the map view after the user makes a selection. The WebFOCUS GIS Viewer for Flex displays a map image with the selections of the user changed according to the symbol chosen for the inbound layer. No |
|
No Menu |
Removes this procedure from the menu of the WebFOCUS GIS Viewer for Flex. No |
|
Zoom |
Zooms into the area that was selected in the WebFOCUS GIS Viewer for Flex. No |
|
Window Name |
Displays the report output in a new window. This option can be used for all report output formats that are not HTML, such as PDF and Excel. |
|
Display Group |
Assigns the Report FOCEXEC to a display group. This is reflected in the menu for reports. The menu hierarchy displays as Layer-Display Group-Prompt. |
|
No Thumbnail |
Yes |
|
Buffer Fixed |
Determines whether the buffer distances are preset or can be changed from the user interface. No |
|
Buffer Type |
The type of buffer to perform around the graphic or around selected features. Available values from the drop-down list include Feature, Sketch, Disabled, and Normal. Normal |
|
Buffer Symbol |
Allows you to select a Buffer symbol style from the drop-down list to be used by your Report FOCEXEC. Default |
|
Buffer Units |
The unit of measure used for buffering. Feet |
|
Buffer Distance |
The distance values used for buffering. This can be a list of comma-separated values. 50,200 |
For example:
The binding between the Report FOCEXEC and ArcGIS Server is achieved by defining an inbound layer. Inbound layers are used to identify which attribute is extracted from a map layer when a user draws a selected area on the map. Inbound layers provide information from ArcGIS Server to WebFOCUS. One or more inbound layer(s) associates a FOCEXEC to one or more map layer(s). They also define the filtering criteria for a FOCEXEC. This is usually in the format of a file, a numeric amper variable, or a string amper variable.
To define an inbound layer for the Report FOCEXEC using the ESRI Configuration Utility:
Note: In this example, an inbound layer is defined to the Report FOCEXEC called Food Supermarket County Report (food_supermarkets_by_county.fex).
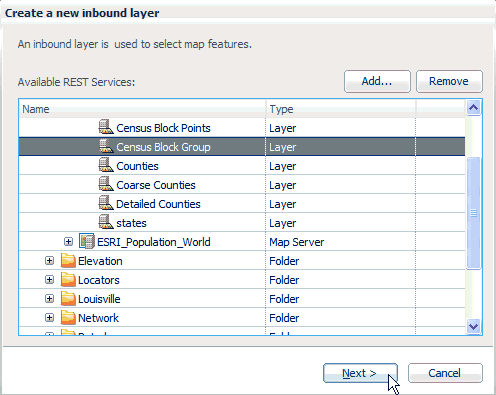
The Create a new inbound layer dialog opens, as shown in the following image.
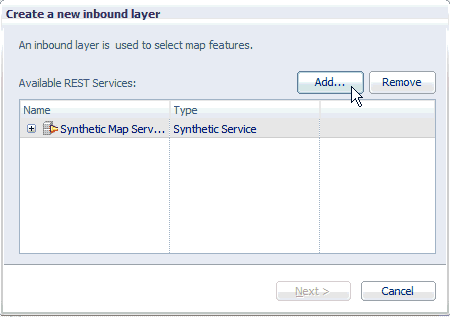
You must first configure a connection to an available ArcGIS Server.
The REST Service Connection Information dialog opens, as shown in the following image.
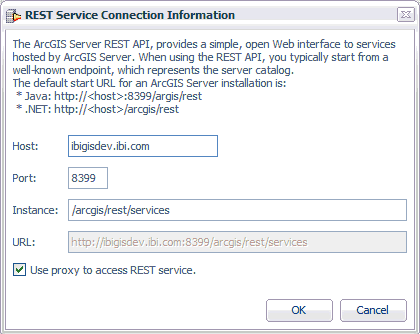
The Use proxy to access REST service check box provides you with the option to enable or disable usage of the proxy.jsp file to navigate to a REST endpoint when adding a new map service. This option is enabled by default.
If the Use proxy to access REST service check box is selected, then the proxy.jsp file on the application server must be changed to add the URL to the map server. If the Use proxy to access REST service check box is not selected, and the application server and the map server are not on the same machine, then requests to the map server will fail and an error message indicating a network error is generated. This is the result of a default setting in web browsers, which prevents cross-domain Ajax calls. This setting can be changed in the security settings section of your web browser configuration.
Note: If you are using Microsoft Internet Explorer Version 10 and the Use proxy to access REST service check box is not selected, the following dialog box is displayed.
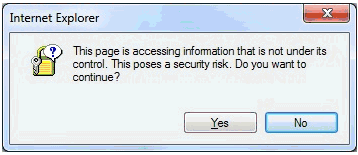
If you click Yes, then Microsoft Internet Explorer allows you to access the map service without the proxy.jsp. If you click No, an error message indicating Access is denied is displayed.
If you are using Google Chrome and the Use proxy to access REST service check box is not selected, an error message indicating A network error is displayed. If you are using Mozilla Firefox 24 and the Use proxy to access REST service check box is not selected, an error message indicating Failure is displayed. As a workaround, you must select the Use proxy to access REST service check box and edit the proxy.jsp to add a REST endpoint to your proxy list.
To edit the proxy.jsp file, navigate to the following directory:
<WF_HOME>\webapps\webfocus\tools\esri_config\proxy.jsp
Add your REST endpoint, as indicated by the following example:
String[] serverUrls = {
  //"<url>[,<token>]"
  //For ex. (secured server): "http://myserver.mycompany.com/arcgis/rest/services,ayn2C2iPvqjeqWoXwV
        6rjmr43kyo23mhIPnXz2CEiMA6rVu0xR0St8gKsd0olv8a"
  //For ex. (non-secured server): "http://sampleserver1.arcgisonline.com/arcgis/rest/services"
  "http://informat-65f86f:8399/arcgis/rest/services",
  "http://ibigisdev.ibi.com:8399/arcgis/rest/services",
  "http://ibigis10.ibi.com:8399/arcgis/rest/services",
  "http://tsssvz01:8399/arcgis/rest/services",  "http://sampleserver1.arcgisonline.com/arcgis/rest/services",
  "http://sampleserver2.arcgisonline.com/arcgis/rest/services" //NOTE - no comma after the last item
};
Note: As a best practice, do not include an ending forward slash (/) character when specifying an ArcGIS Server URL in the proxy.jsp file. If a forward slash character is specified, then you must ensure that the value entered in the Instance field of the REST Service Connection Information dialog also contains a forward slash at the end.
You are returned to the Create a new inbound layer dialog.
The Select Attributes dialog opens, which is populated with all of the attribute names from the layer that was selected.
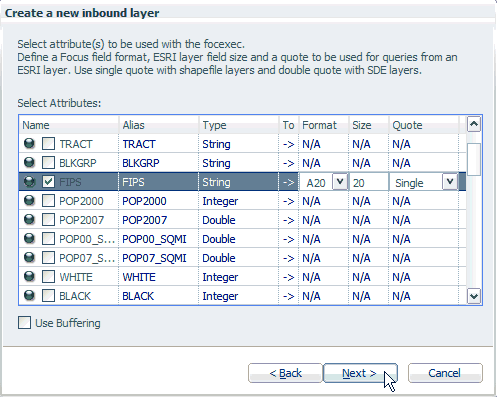
You can modify the Format, Size, and Quote value columns according to your requirements.
The Format column reflects the FOCEXEC format to be used for conversion. Valid FOCUS formats are used with a length (for example, A20).
The Size column reflects the length of the map service layer field.
The Quote column reflects the type of quote to use for querying the map service layer field. Use single quotes for shape file layers and double quotes for SDE layers.
The following dialog opens, which allows you to select the report column for selecting values from a FOCUS database.
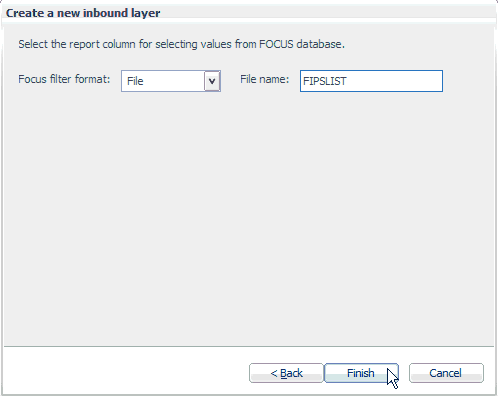
The available choices allow you to pass a sequential file of values, a string of alphanumeric values enclosed in single quotes and separated by "OR", or a string of numeric values separated by "OR".
The value that you provide in the File name field (for example, FIPSLIST) is used to name the filter variable or file that the adapter passes to WebFOCUS.
The inbound layer definition is listed in the Inbound Layers tab of the FOCEXECs configuration area, as shown in the following image.

The Properties table lists the available configuration properties for the inbound layer definition. The following table lists and describes these properties.
|
Property |
Description |
|---|---|
|
Location |
The location of the map layer. http://ibigis10.ibi.com:8399/arcgis/rest/services/ census_zip/MapServer/1 |
|
Attribute Names |
The selected attribute(s) for the inbound layer definition. FIPS |
|
Symbol |
Allows you to select an available symbol definition from the drop-down list that will be used to render the map illustrating which features have been selected. selectMapPolygon For more information on defining symbols, see How to Configure a New Symbol Definition. |
|
Callout Symbol |
Allows you to select a callout symbol style from the drop-down list to be used by your FOCEXEC. None |
|
Buffer Symbol |
Allows you to select a buffer symbol style from the drop-down list to be used by your FOCEXEC. None |
|
Focus Filter Format |
The current filter type that is being used by the inbound layer definition (File, String Amper, or Numeric Amper). File |
|
Filter File Name |
The filter variable or file for the inbound layer definition. FIPSLIST |
This section provides the syntax used by the Detailed Report FOCEXEC (stores_count_bustype.fex).
-* File stores_count_bustype.fex
JOIN
RETAIL_BLKGRPS.SEG01.FIPS IN RETAIL_BLKGRPS TO MULTIPLE
PREDICTIVESBLK.SEG01.FIPS IN PREDICTIVESBLK TAG J2 AS J2
END
TABLE FILE RETAIL_BLKGRPS
SUM
     J2.SEG01.PREDICTED_SALES AS 'PREDICTED SALES'
     RETAIL_BLKGRPS.SEG01.POP10_SQMI AS 'POPULATION 2000 PER SQ. MILE'
     RETAIL_BLKGRPS.SEG01.POP00_SQMI AS 'POPULATION 2010 PER SQ. MILE'
     MAX.RETAIL_BLKGRPS.SEG01.MED_AGE AS 'MEDIAN AGE'
     CNT.RETAIL_BLKGRPS.SEG01.STOREID AS 'STORE COUNT'
BY  LOWEST J2.SEG01.FIPS
ON TABLE SET DROPBLNKLINE ON
ON TABLE SET PAGE-NUM NOLEAD
ON TABLE SET EXPANDABLE ON
ON TABLE NOTOTAL
ON TABLE PCHOLD FORMAT HTML
ON TABLE SET HTMLCSS ON
ON TABLE SET STYLE *
     INCLUDE = endeflt,
$
     DEFMACRO=COND0001,
     MACTYPE=RULE,
     WHEN=N6 GE 100,
$
TYPE=REPORT,
$
     GRAPHTYPE=DATA,
     COLUMN=N6,
     GRAPHCOLOR='GREEN',
$
     GRAPHTYPE=DATA,
     COLUMN=N6,
     GRAPHCOLOR='RED',
     MACRO=COND0001,
$
TYPE=REPORT,
     LINES-PER-PAGE=UNLIMITED,
$
TYPE=DATA,
COLUMN=N1,
DRILLMENUITEM='Detailed Report',
FOCEXEC=rp_sales( \
FIPSLIST=N1 \
),
DRILLMENUITEM='Show in Map',
JAVASCRIPT=RunMyMapOutput( \
'FIPS' \
N1 \
'fex8' \
),
$
TYPE=TITLE,
COLUMN=N1,
DRILLMENUITEM='Detailed Report for Predicted Sales',
FOCEXEC=rp_sales( \
FIPSLIST=N1 \
),
DRILLMENUITEM='Show in the Map',
JAVASCRIPT=RunMyMapOutput( \
'FIPS' \
N1 \
'fex8' \
),
$
TYPE=REPORT,
OBJECT=MENU,
COLOR='WHITE',
HOVER-COLOR=RGB(66 70 73),
BACKCOLOR=RGB(102 102 102),
HOVER-BACKCOLOR=RGB(218 225 232),
BORDER-COLOR='WHITE',
$
TYPE=REPORT,
OBJECT=STATUS-AREA,
COLOR='WHITE',
BACKCOLOR=RGB(102 102 102),
$
TYPE=REPORT,
OBJECT=CURRENT-ROW,
HOVER-BACKCOLOR=RGB(218 225 232),
BACKCOLOR=RGB(200 200 200),
$
TYPE=REPORT,
OBJECT=CALC-AREA,
COLOR='WHITE',
BACKCOLOR=RGB(102 102 102),
$
TYPE=REPORT,
COLUMN=N2,
SQUEEZE=1.138889,
$
TYPE=REPORT,
COLUMN=N3,
SQUEEZE=0.680556,
$
TYPE=REPORT,
COLUMN=N4,
SQUEEZE=0.680556,
$
ENDSTYLE
END
To add a Map FOCEXEC using the ESRI Configuration Utility:
The ESRI Configuration Utility dialog opens, as shown in the following image.

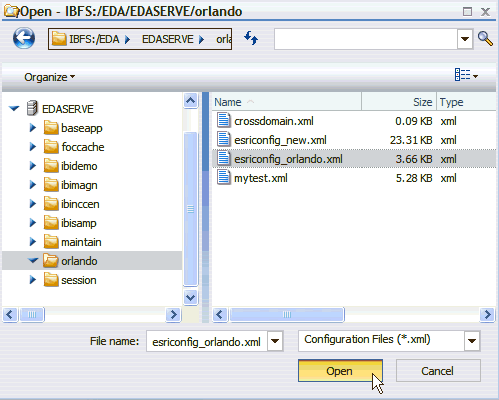
The Open dialog is displayed, as shown in the following image.
The ESRI Configuration Utility opens the selected esriconfig_orlando.xml definition file, as shown in the following image.
The Focexecs tab is selected by default.
The Create New Fex-Map Binding dialog opens, as shown in the following image.
The Open dialog is displayed.
You are returned to the Create New Fex-Map Binding dialog, as shown in the following image.
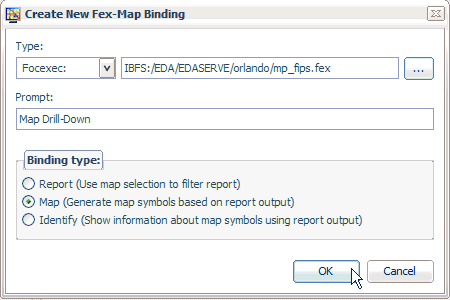
Notice that the path to the selected Map FOCEXEC (for example, mp_fips.fex) is now added to the Fex file path field.
Note: To explore the syntax and structure used for this Map FOCEXEC (mp_fips.fex), see Sample Map FOCEXEC.
The new Map FOCEXEC (called Map Drill-Down) is added to the Focexecs pane in the ESRI Configuration Utility, as shown in the following image.
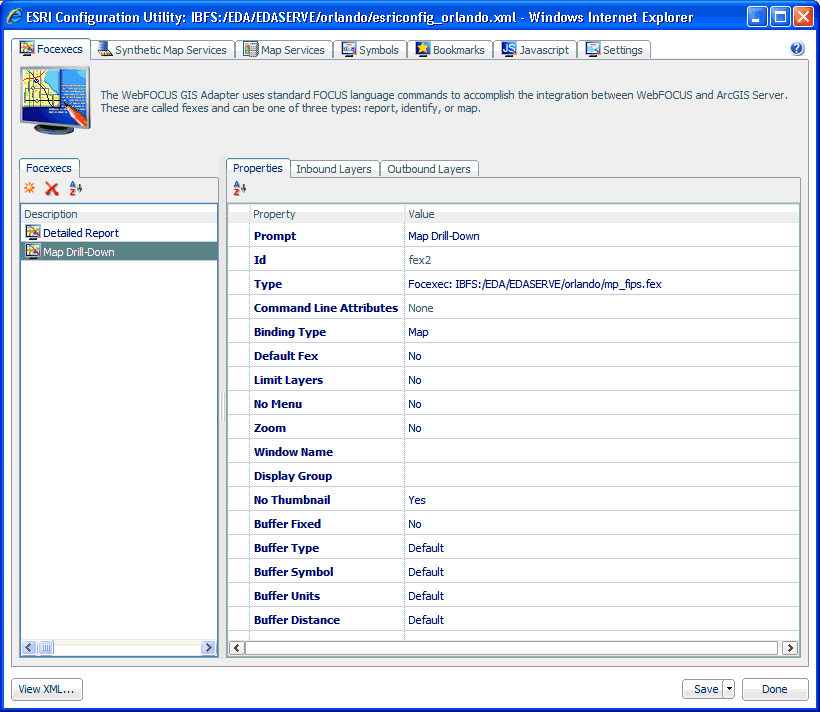
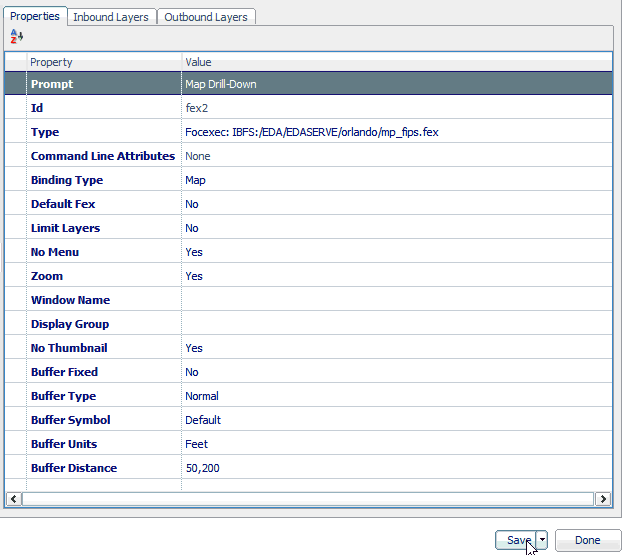
The Properties tab lists the available configuration properties for the Map FOCEXEC. Enter the configuration properties for the Map Drill-Down FOCEXEC, as listed in the following table.
|
Property |
Description |
|---|---|
|
Prompt |
The Prompt value that you specified in the Create New Fex-Map Binding dialog. Map Drill-Down |
|
Id |
An ID that is automatically assigned to the FOCEXEC based on the order it is added. fex2 |
|
Type |
The type (Focexec or Adhoc) and path to the selected Report FOCEXEC on the server. Focexec:IBFS:/EDA/EDASERVE/orlando/mp_fips.fex |
|
Command Line Attributes |
None |
|
Binding Type |
The type of FOCEXEC (Report, Map, or Identify), as indicated by the selection made from the Binding type area in the Create New Fex-Map Binding dialog. Map |
|
Default Fex |
Designates this Report FOCEXEC to be the report that is launched when no other is specified. No |
|
Limit Layers |
Displays layers that are only listed within the Outbound area. No |
|
No Menu |
Removes this procedure from the menu of the WebFOCUS GIS Viewer for Flex. Yes |
|
Zoom |
Zooms into the area that was selected in the WebFOCUS GIS Viewer for Flex. Yes |
|
Window Name |
Displays the report output in a new window. This option can be used for all report output formats that are not HTML, such as PDF and Excel. |
|
Display Group |
Assigns the Report FOCEXEC to a display group. This is reflected in the menu for reports. The menu hierarchy displays as Layer-Display Group-Prompt. |
|
No Thumbnail |
Yes |
|
Buffer Fixed |
Determines whether the buffer distances are preset or can be changed from the user interface. No |
|
Buffer Type |
The type of buffer to perform around the graphic or around selected features. Available values from the drop-down list include Feature, Sketch, Disabled, and Normal. Normal |
|
Buffer Symbol |
Allows you to select a Buffer symbol style from the drop-down list to be used by your Report FOCEXEC. Default |
|
Buffer Units |
The unit of measure used for buffering. Feet |
|
Buffer Distance |
The distance values used for buffering. This can be a list of comma-separated values. 50,200 |
For example:
The binding between the Map FOCEXEC and ArcGIS Server is achieved by defining an outbound layer. Outbound layers provide information from WebFOCUS to ArcGIS Server, and determine the linkage between a Map Layer attribute and WebFOCUS XML output. Outbound layers are required for WebFOCUS Map bindings. These layers visually represent results from a WebFOCUS Report using color, image, size, title, and text columns.
To define an outbound layer for the Map FOCEXEC using the ESRI Configuration Utility:
Note: In this example, an outbound layer is defined to the Map FOCEXEC called Map Drill-Down (mp_fips.fex).
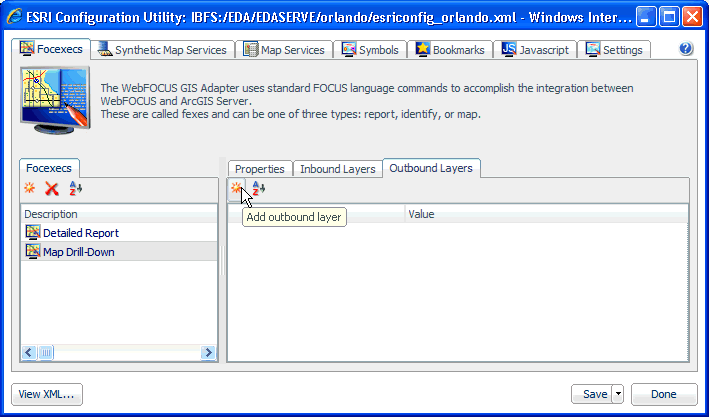
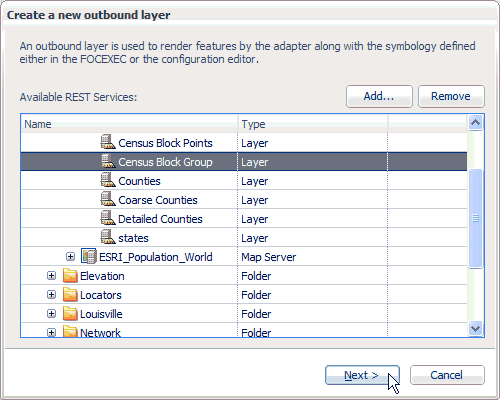
The Create a new outbound layer dialog opens, as shown in the following image.
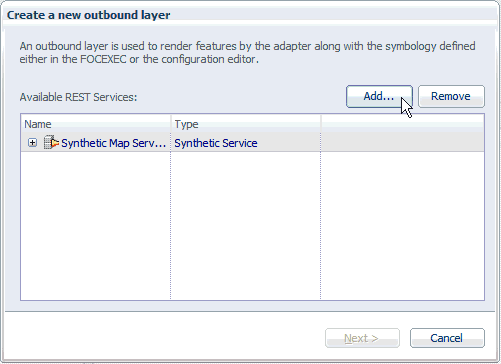
You must first configure a connection to an available ArcGIS Server.
The REST Service Connection Information dialog opens, as shown in the following image.
The Use proxy to access REST service check box provides you with the option to enable or disable usage of the proxy.jsp file to navigate to a REST endpoint when adding a new map service. This option is enabled by default.
If the Use proxy to access REST service check box is selected, then the proxy.jsp file on the application server must be changed to add the URL to the map server. If the Use proxy to access REST service check box is not selected, and the application server and the map server are not on the same machine, then requests to the map server will fail and an error message indicating a network error is generated. This is the result of a default setting in web browsers, which prevents cross-domain Ajax calls. This setting can be changed in the security settings section of your web browser configuration.
Note: If you are using Microsoft Internet Explorer Version 10 and the Use proxy to access REST service check box is not selected, the following dialog box is displayed.
If you click Yes, then Microsoft Internet Explorer allows you to access the map service without the proxy.jsp. If you click No, an error message indicating Access is denied is displayed.
If you are using Google Chrome and the Use proxy to access REST service check box is not selected, an error message indicating A network error is displayed. If you are using Mozilla Firefox 24 and the Use proxy to access REST service check box is not selected, an error message indicating Failure is displayed. As a workaround, you must select the Use proxy to access REST service check box and edit the proxy.jsp to add a REST endpoint to your proxy list.
To edit the proxy.jsp file, navigate to the following directory:
<WF_HOME>\webapps\webfocus\tools\esri_config\proxy.jsp
Add your REST endpoint, as indicated by the following example:
String[] serverUrls = {
  //"<url>[,<token>]"
  //For ex. (secured server): "http://myserver.mycompany.com/arcgis/rest/services,ayn2C2iPvqjeqWoXwV
        6rjmr43kyo23mhIPnXz2CEiMA6rVu0xR0St8gKsd0olv8a"
  //For ex. (non-secured server): "http://sampleserver1.arcgisonline.com/arcgis/rest/services"
  "http://informat-65f86f:8399/arcgis/rest/services",
  "http://ibigisdev.ibi.com:8399/arcgis/rest/services",
  "http://ibigis10.ibi.com:8399/arcgis/rest/services",
  "http://tsssvz01:8399/arcgis/rest/services",  "http://sampleserver1.arcgisonline.com/arcgis/rest/services",
  "http://sampleserver2.arcgisonline.com/arcgis/rest/services" //NOTE - no comma after the last item
};
Note: As a best practice, do not include an ending forward slash (/) character when specifying an ArcGIS Server URL in the proxy.jsp file. If a forward slash character is specified, then you must ensure that the value entered in the Instance field of the REST Service Connection Information dialog also contains a forward slash at the end.
You are returned to the Create a new outbound layer dialog.
The Select Attributes dialog opens, which is populated with all of the attribute names from the layer that was selected.
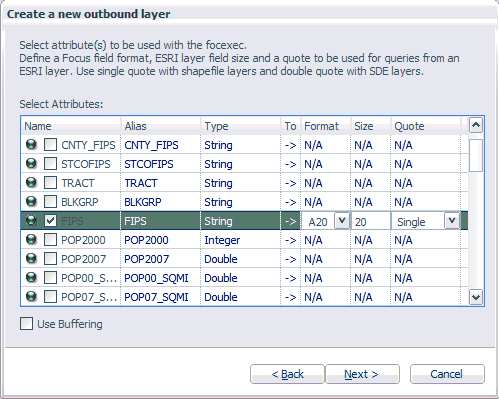
You can modify the Format, Size, and Quote value columns according to your requirements.
The Format column reflects the FOCEXEC format to be used for conversion. Valid FOCUS formats are used with a length (for example, A20).
The Size column reflects the length of the map service layer field.
The Quote column reflects the type of quote to use for querying the map service layer field. Use single quotes for shape file layers and double quotes for SDE layers.
The following dialog opens, which allows you to specify a FOCEXEC column name to be used for binding.

The new outbound layer definition is listed in the Outbound Layers tab of the FOCEXECs configuration area, as shown in the following image.
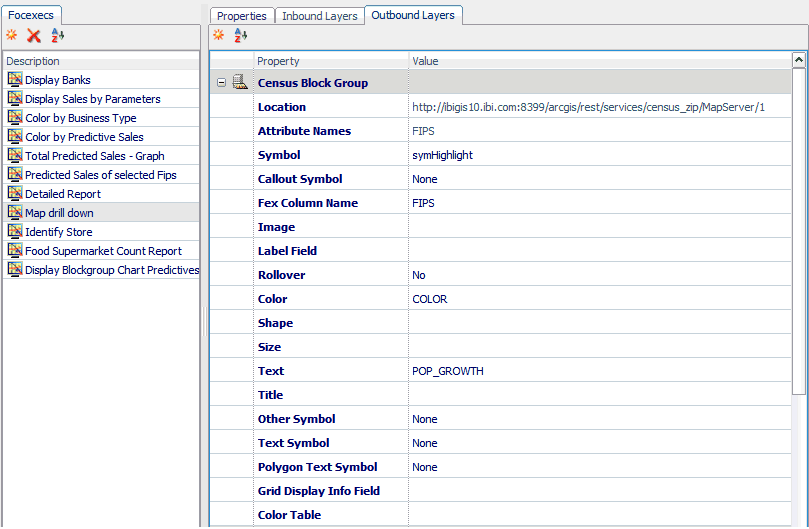
The Properties table lists the available configuration properties for the outbound layer definition. The following table lists and describes these properties.
|
Property |
Description |
|---|---|
|
Location |
The location of the map layer. http://ibigis10.ibi.com:8399/arcgis/rest/services/ census_zip/MapServer/1 |
|
Attribute Names |
The selected attribute(s) for the outbound layer definition. FIPS |
|
Symbol |
Allows you to select an available symbol definition from the drop-down list that will be used to render the map illustrating which features have been selected. symHighlight For more information on defining symbols, see How to Configure a New Symbol Definition. |
|
Callout Symbol |
Allows you to select a callout symbol style from the drop-down list to be used by your FOCEXEC. None |
|
Fex Column Name |
The specified FOCEXEC column name to be used for binding. FIPS |
|
Image |
Refers to a FOCUS Report Column to use for the IMAGE field. This image field can be used to symbolize point features. |
|
Label Field |
Refers to a FOCUS Report Column to use for labeling features on an outbound layer. |
|
Rollover |
Enables or disables rollover (mouse over) support for the outbound layer. No |
|
Color |
COLOR |
|
Shape | |
|
Size | |
|
Text |
POP_GROWTH |
|
Title | |
|
Other Symbol |
Allows you to select an additional symbol from the drop-down list. None |
|
Text Symbol |
Allows you to select an available text symbol from the drop-down list. None |
|
Polygon Text Symbol |
Allows you to select an available polygon text symbol from the drop-down list. None |
|
Grid Display Info Field |
Refers to a list of FOCUS Report Column(s) to be displayed in the Data View widget. |
|
Color Table |
Allows you to specify a color table to be used by the outbound layer. |
This section provides the syntax used by the Map Drill-Down FOCEXEC (mp_fips.fex).
-* File mp_fips.fex
-*-SET &FIPSLIST = 120950119021;
-SET &FIPSPARM = &FIPS;
TABLE FILE BLOCKGRP_DETAILS
SUM
     BLOCKGRP_DETAILS.SEG01.POP_GROWTH
     COMPUTE COLOR/A20 = IF BLOCKGRP_DETAILS.SEG01.POP_GROWTH GE 100 THEN 'RED'
ELSE IF  BLOCKGRP_DETAILS.SEG01.POP_GROWTH GE 80 THEN 'ORANGE'
ELSE IF BLOCKGRP_DETAILS.SEG01.POP_GROWTH GE 60 THEN '255,60,0'
ELSE IF  BLOCKGRP_DETAILS.SEG01.POP_GROWTH GE 40 THEN '240,144,14'
ELSE IF BLOCKGRP_DETAILS.SEG01.POP_GROWTH GE 20 THEN '225,208,26'
 ELSE IF BLOCKGRP_DETAILS.SEG01.POP_GROWTH GE 0 THEN '166,210,37'
 ELSE '128,128,128';
BY  LOWEST BLOCKGRP_DETAILS.SEG01.FIPS
WHERE BLOCKGRP_DETAILS.SEG01.FIPS EQ '&FIPSPARM';
ON TABLE SET PAGE-NUM NOLEAD
ON TABLE NOTOTAL
ON TABLE PCHOLD FORMAT HTML
ON TABLE SET HTMLCSS ON
ON TABLE SET STYLE *
     INCLUDE = endeflt,
$
TYPE=REPORT,
     OBJECT=MENU,
     COLOR='WHITE',
     HOVER-COLOR=RGB(66 70 73),
     BACKCOLOR=RGB(102 102 102),
     HOVER-BACKCOLOR=RGB(218 225 232),
     BORDER-COLOR='WHITE',
$
TYPE=REPORT,
     OBJECT=STATUS-AREA,
     COLOR='WHITE',
     BACKCOLOR=RGB(102 102 102),
$
TYPE=REPORT,
     OBJECT=CURRENT-ROW,
     HOVER-BACKCOLOR=RGB(218 225 232),
     BACKCOLOR=RGB(200 200 200),
$
TYPE=REPORT,
OBJECT=CALC-AREA,
COLOR='WHITE',
BACKCOLOR=RGB(102 102 102),
$
ENDSTYLE
END
| WebFOCUS |