Create the Income Statement in the Financial Report Painter

In this section:

You are now ready to begin row-by-row modeling of the income statement in the Financial Report Painter.

An income statement is made up of Revenue, Cost of Goods Sold, and Expenses.

Typically, it also calculates Gross Margin and Profit:

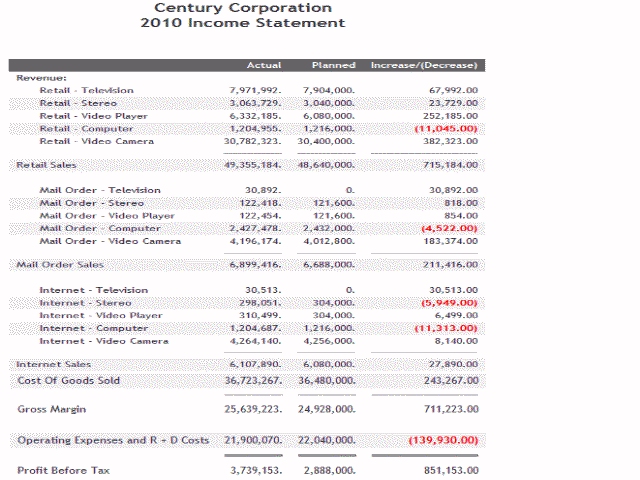
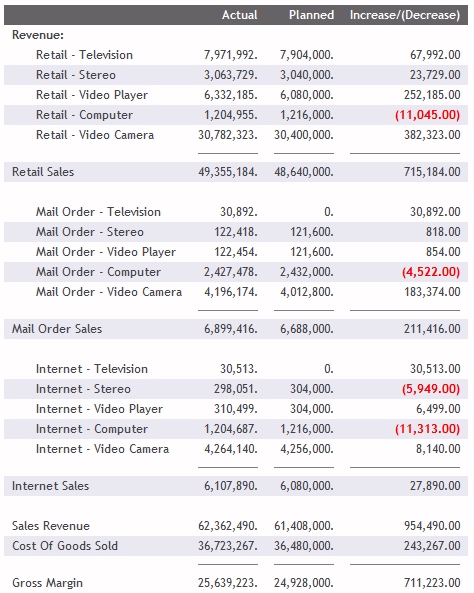
The following is the completed income statement you will be building. You may find it useful to refer to this output as you begin to replicate it in the following steps.

output


Top of page

x
Open the Financial Report Painter
  1. Select the Ledger Account field in Report Painter and click the For button.

    This changes the sorting mechanism for the ledger accounts field from one that sorts data by accounts in numeric order to one in which you can exercise row-by-row control of the account values. You will see the impact of this change in the rest of the tutorial.

  2. Click the Matrix tab from Report Painter.

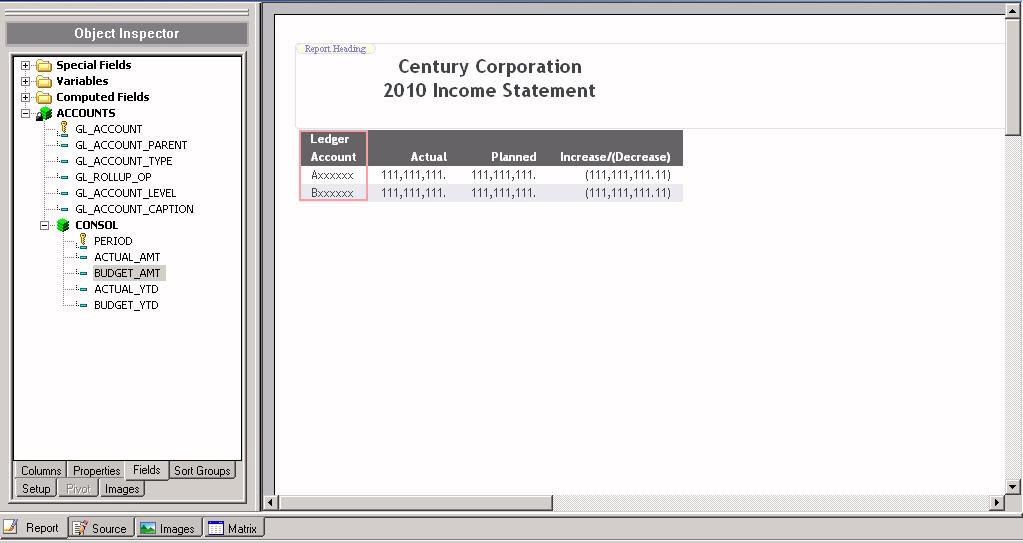
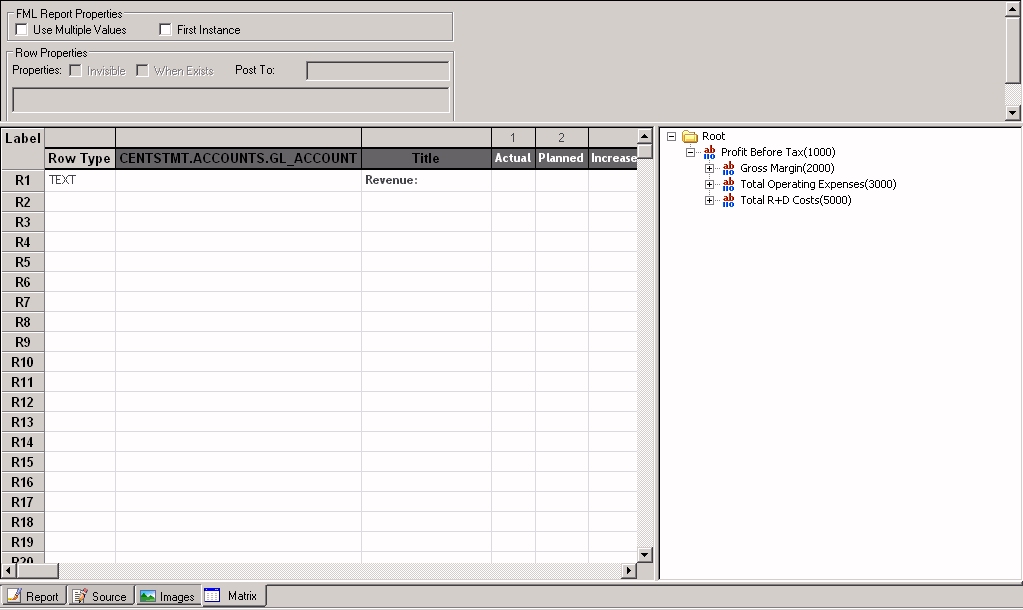
    The Financial Report Painter opens.

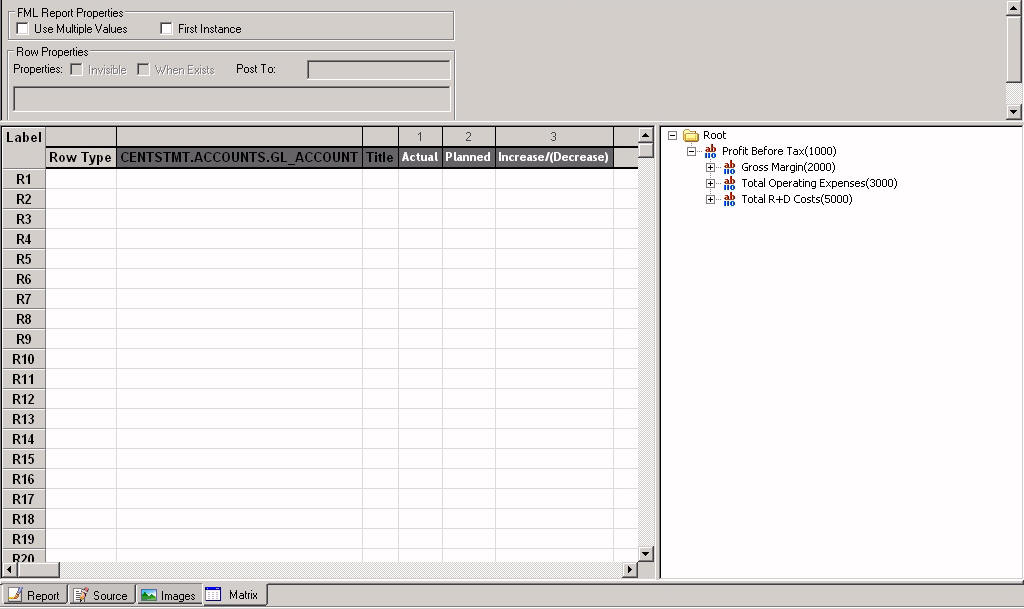
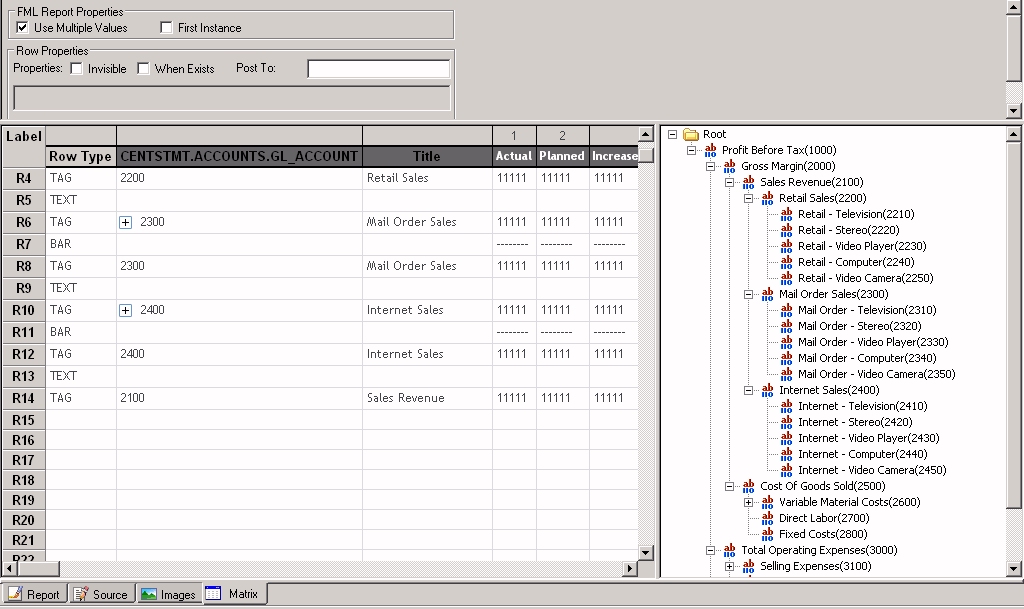
    Matrix. At the left of the Financial Report Painter is an area similar to a spreadsheet that displays the columns you specified in Report Painter, beginning with a column that will contain selected values of the For field, GL_ACCOUNT, followed by a column for the corresponding account titles. Although the report has no content at this point, each row is already identified by a default label (R1, R2 ...). You will populate these labeled rows. As you build the report, a row type will be associated with each row label.

    For field values panel. At the right is a panel that displays the Chart of Accounts values for the GL_ACCOUNT field. These values are shown as a hierarchical tree, based on the parent/child relationships defined in the ACCOUNTS segment of the CENTSTMT Master File. (See Data Detour: What Is the Nature of the Data You Will Be Using?). The plus (+) signs indicate that you can open the hierarchy values further.

    In this exercise, you will add selected data values of GL_ACCOUNT as rows in the income statement.

    You will also add free text rows, blank rows, and rows that contain underlines to set off calculations.


Top of page

x
Build the Income Statement
  1. You are going to create a report that itemizes revenues of various types, so start by adding a Text row to the matrix, titled Revenue.
    1. In row R1, right-click in the Row Type column and select Change Type to, and then Text.

      The TEXT dialog box opens.

    2. Under the Options tab, type the following:
      Revenue:
    3. Click OK.

      Revenue appears in the Title column on the matrix.

  2. Make the text row bold.
    1. Right-click Revenue and select Options.

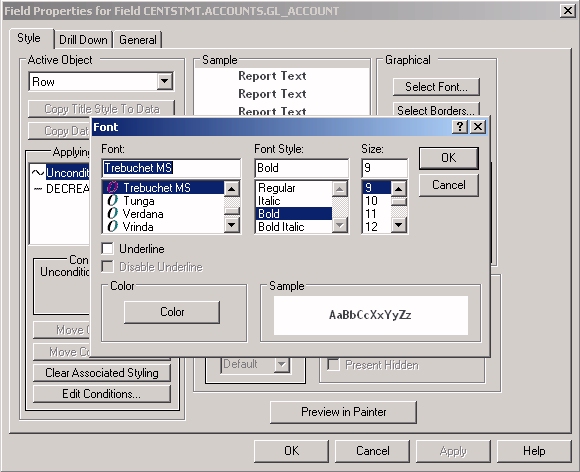
      The Field Properties dialog box opens at the Style tab.

    2. Make Row the active object (upper-left).

      Notice that in the Financial Report Painter you can style rows and cells, as well as columns, whereas in Report Painter, you can only style columns.

    3. Click Select Font under Graphical (upper-right).

      The Font dialog box opens.

    4. Choose Bold as the Font Style and click OK.
    5. Click OK on the Style tab to return to the matrix.

      Style tab

      The matrix appears as follows. Notice that row R1 is identified as a TEXT row type, and Revenue is bold, as requested.

      matrix

      You are now going to begin to add data values from the Chart of Accounts. The first step is expanding a section of the hierarchy to expose the levels of values.

  3. In the For field values panel, expand account 2000 (Gross Margin), then expand 2100 (Sales Revenue), then 2200 (Retail Sales).
  4. To complete the Revenue section of the report, you will add detailed information for each revenue category, followed by a summary row for each category, and finally a pre-consolidated row for all sales revenue.
    1. Start by dragging the account 2200 (Retail Sales) from the Chart of Accounts to row R2 in the GL_ACCOUNT column on the matrix.

      This value becomes red in the For field values panel to indicate that it has been used in the matrix.

      Notice that TAG is entered in the Row Type column. Tags represent the data values of the For field.

    2. Right-click account 2200 and select Row Properties.

      The TAG dialog box opens.

    3. Under Children, select Show only children from the drop-down list.

      Notice that Display children's caption is checked by default.

      Tag dialog box

      These selections indicate that you want to see values for the children of Retail Sales, (Retail - Television, Retail - Stereo, and so on), but not the value of Retail Sales itself.

      In addition, the captions (descriptive titles) for the children will appear in the output in place of their tag values.

    4. Click OK to return to the matrix.

      Notice that a plus (+) sign precedes 2200, indicating that it contains subordinate values that you can expand if you wish.

  5. To ensure that you can use the 2200 account and other values in more than one row of the matrix, click the Use Multiple Values check box in the FML Report Properties area above the matrix.
  6. Place an underscore under these values.
    1. In the Row Type column in row R3, right-click and choose Change Type to, and then Bar.

      The BAR dialog box opens.

    2. Click OK to accept the default underline character.

      Bar dialog box

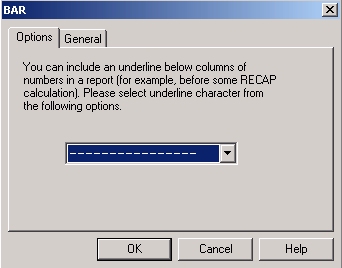
    Remember that the ability to add an underline or a text row at any point in a report is an important distinguishing feature of a WebFOCUS financial report.

  7. Drag account 2200 into row R4 on the matrix.
    1. Once again, right-click 2200 and select Row Properties to open the TAG dialog box.
    2. This time, accept the default option under Children, Show selected item.

      Tag dialog box

    3. Click OK.

      This matrix appears as follows, with the row R2 expanded to show its children.

      matrix

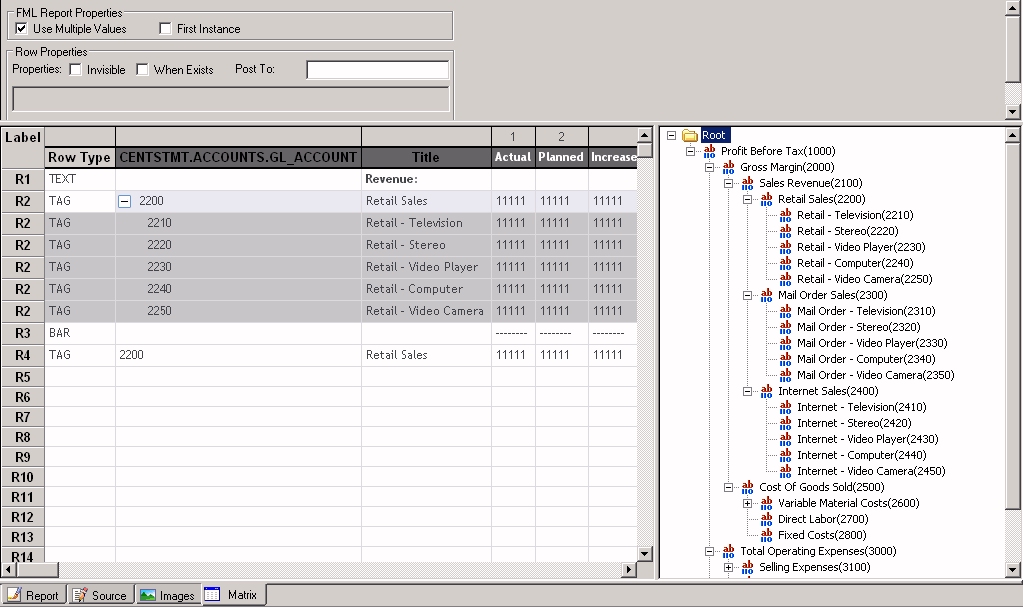
      The gray indicates that these rows are part of their parent and cannot be edited separately. Notice that they all have the same row label: R2.

  8. Save your work, then click Run to see the first part of the income statement.

    Run

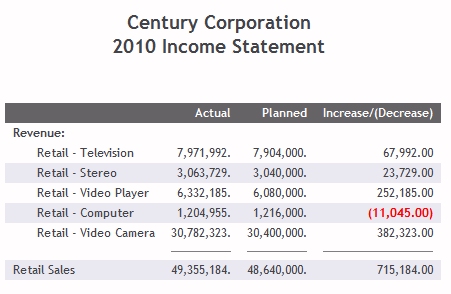
    Notice that the descriptive captions are displayed rather than the account numbers. Notice also that retail revenue for computers is negative, showing lower than expected sales.

  9. You are going to repeat this process for Mail Order Sales and Internet Sales.
    1. Start by adding a blank row between Retail Sales and Mail Order Sales.
    2. Right-click in row R5 and choose Change Type to, and then Text.

      The TEXT dialog box opens.

    3. You will use this dialog box to add a blank row, so simply click OK without typing any text.
  10. For Mail Order Sales:
    1. Drag the account 2300 from the Chart of Accounts into row R6 in the GL_ACCOUNT column on the matrix.
    2. Right-click 2300 and select Row Properties.

      The TAG dialog box opens.

    3. Under Children, select Show only children from the drop-down list.
    4. Leave Display children's caption checked and click OK.
    5. To add an underline, right-click in row R7 and choose Change Type to, and then Bar.
    6. When the BAR dialog box opens, click OK.
    7. Drag account 2300 into row R8 to create the summary row. Since the selection you want is the default (Show selected item), this is all you need to do. (You can also right-click 2300 to open the TAG dialog box and click OK to confirm the default.)
  11. For Internet Sales:
    1. Drag account 2400 from the Chart of Accounts into row R10. This is a quick way to create a blank row. Notice that TEXT appears in the Row Type column for row R9.
    2. Right-click 2400 and select Row Properties.

      The TAG dialog box opens.

    3. Under Children, select Show only children from the drop-down list.
    4. Leave Display children's caption checked and click OK.
    5. To add an underline, right-click in row R11 and choose Change Type to, and then Bar.
    6. When the BAR dialog box opens, click OK.
    7. Drag account 2400 into the matrix in row R12 to create the summary row. Since the selection you want is the default (Show selected item), this is all you need to do.
  12. Add a consolidated row for total Sales Revenue. Drag account 2100 (Sales Revenue) into row R14. Since you want to show the selected item, there is no need to open the TAG dialog box.

    Once again, a blank TEXT row is automatically added in row R13.

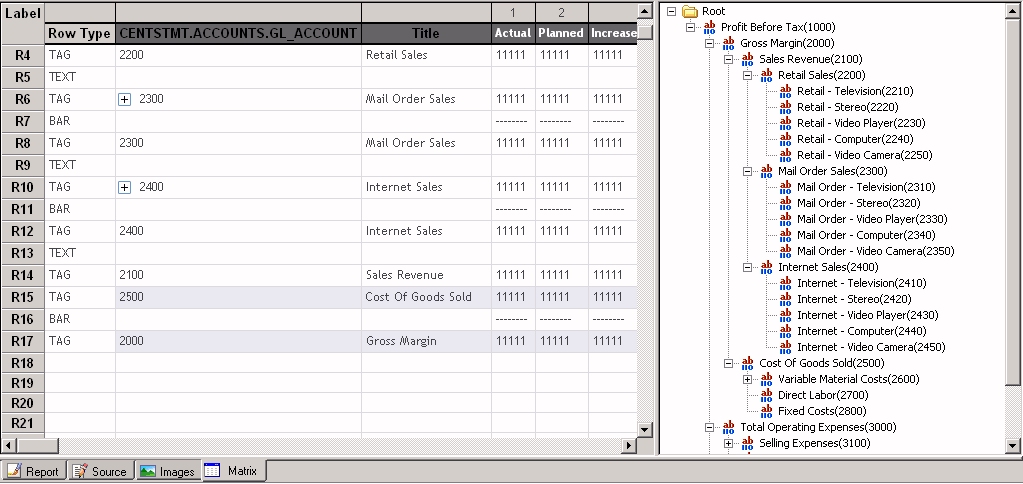
    The Financial Report Painter appears, as shown in the following image.

    Financial Report Painter

  13. Save your work, then click Run to see the output.

    Save

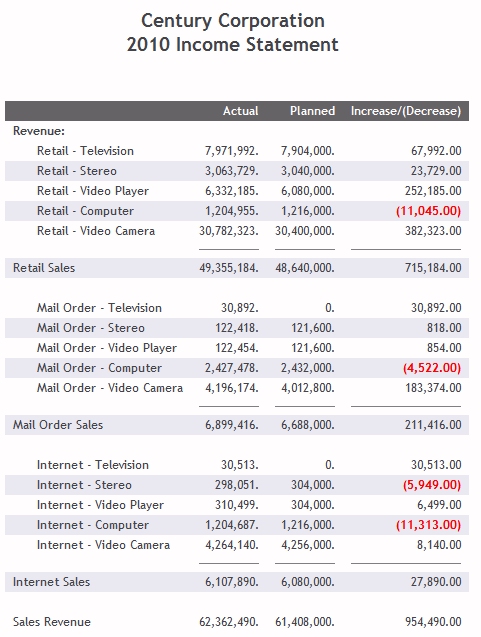
    Notice that computer sales are below expectations in all revenue categories. You have completed the Revenue rows in the income statement.

  14. You will now subtract Cost of Goods Sold from Sales Revenue to determine Gross Margin. Since these exist as consolidated values in the data mart, no calculation is required. You simply drag the accounts into the matrix.
    1. Start by dragging account 2500 (Cost of Goods Sold) into row R15.
    2. Make row R16 a bar row.
    3. Drag account 2000 (Gross Margin) into row R17. The new section of the matrix appears as shown in the following image.

      matrix

  15. Save your work, then run the income statement to see the effect.

    Run

  16. All that is left is to include Expenses and calculate Profits.
    1. Scroll down in the For field values panel to see Total Operating Expenses.
    2. Expand accounts 3000 (General and Admin Expenses) and 5000 (TotalR + DCosts) to see what comprises each one. (To make the list of For field values more manageable, you can collapse the revenue accounts.)
    3. Although expenses are broken down into several categories, you are really interested in total expenses so drag account 3000 into row R19. (R18 becomes a TEXT row.)
    4. Drag account 5000 into the same cell. Notice that both values appear in the GL_ACCOUNT column connected by the keyword OR, which, in Boolean logic, indicates that the two tag values will be summed.
  17. Modify the title so that it reflects the combined data.
    1. Instead of opening the TEXT dialog box, double-click the Title cell in row R19 to select it, then type the following directly into the input box above the matrix:
      Operating Expenses and R + D Costs
    2. Click outside the cell to confirm the change.
  18. Make R20 a bar row. This time, select the double line (==) in the BAR dialog box. (In HTML, it will appear as a broader single line.)
  19. Drag account 1000 (Profit Before Tax) into row R21.
  20. Finish the report with another double underline and save your work. The last section of the matrix looks like the following image:

    matrix

  21. Run the report one last time.

    The 2010 Income Statement for Century Corporation appears as follows:

    income statement

From the final income statement, Century Corp can attribute profits to sales success in various areas, as well as to success in keeping costs below budget in 2010. Now you can claim success in completing the Income Statement tutorial.


WebFOCUS