Configuring the Adapter for Axiom EPM

In this section:

x

Before configuring the adapter for Axiom EPM, you must first register the Axiom EPM application (AXIOMCAT) in the catalog path, add the underlying SQL adapter, and add the REST adapter for administration and security information retrieval.


Top of page

x
Creating the AXIOMCAT Application

How to:

Before you can configure the Axiom EPM adapter, the AXIOMCAT application must be created and added to the application path of the server. This can be done through the Web Console.


x
Procedure: How to Create the AXIOMCAT Application
  1. From the Web Console menu bar, select Applications.
  2. Right-click the Application Directories folder and select New, Application Directory.

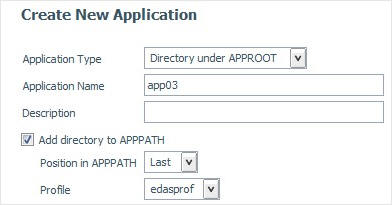
    The Create New Application window opens, as shown in the following image.

    Create New Application Window

  3. Change the Application Name to axiomcat. Make sure it is all in lowercase.
  4. Click OK.

Top of page

x
Adding the SQL Database Adapter

The Adapter for Axiom EPM is an enhanced version of the underlying data source adapter. The adapter must be added into the server configuration.

When you add an SQL adapter, there is no need to provide configuration parameters. Instead, these configuration parameters are supplied later when configuring connections to Axiom EPM data sources.


Example: Adding an Adapter

The Web Console provides graphical point and click tools to add and test the adapter.

  1. From Web Console menu bar, click Adapters.
  2. Expand the Available folder, if it is not already expanded.
  3. Expand the SQL group folder and a MS SQL Server or Oracle folder.
  4. Right-click a version and select Configure.

    The Add Adapter to Configuration pane opens.

  5. For Oracle, no configuration parameters are required. For MS SQL Server, supply any value for the mandatory Server parameter. It does not have to be a valid MS SQL server name. Myserver is adequate.
  6. Click Configure.

    The adapter is added to your server configuration.


Top of page

x
Adding the REST Adapter and Connection

How to:

The Adapter for Axiom EPM uses REST API calls to obtain metadata and security information from the Axiom EPM environment. To do this, a connection to Axiom needs to be configured.


x
Procedure: How to Configure the REST Adapter

You can configure the adapter from either the Web Console or the Data Management Console.

  1. From the Web Console menu bar, click Adapters.

    or

    From the Data Management Console, expand the Adapters folder.

    The Adapters folder opens.

  2. Expand the Available folder, if it is not already expanded.
  3. Expand the Procedures folder, right-click REST, and select Configure.

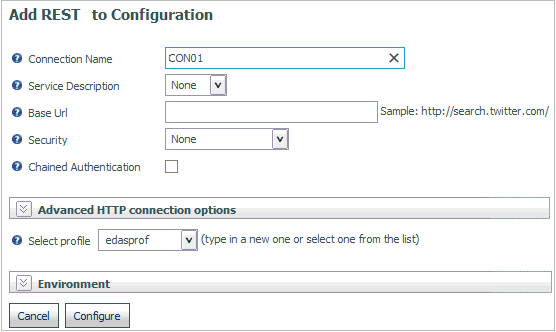
    The Add REST to configuration pane opens, as shown in the following image.

  4. Provide the following information:
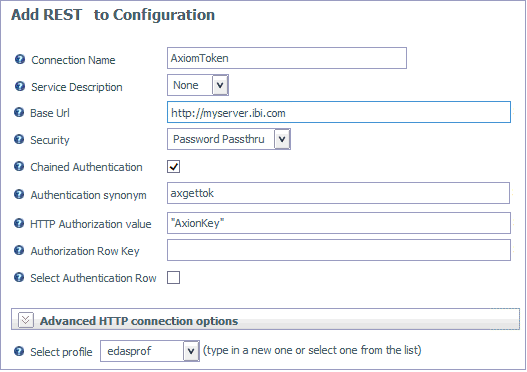
    Connection Name

    Enter the following value exactly as shown:

    AxiomToken

    Service Description

    None

    Base URL

    Enter the URL of the machine where the Axiom software is installed in the following format:

    http://machine.name.com
    Security

    Select Password Passthru from the drop-down menu.

  5. Select the Chained Authentication check box.

    Provide the following information:

    Additional Chained Authentication Information

    Authentication synonym

    Enter the following value in lowercase:

    axgettok 
    HTTP Authorization value

    Enter the following (including double quotation marks):

    "AxiomKey"
  6. Make sure the Select profile drop-down menu points to edasprof.

    The pane should now look like the following image, except for the Base URL, which will reflect an installation value.

  7. Click Configure.

Top of page

x
Adding the First Connection to Axiom EPM

How to:

Reference:

Although multiple Axiom EPM connections can be created, the first connection requires slightly different management steps. The reason for this is that before any connections to Axiom EPM data sources can occur, a base layer of application metadata is created and configured. This occurs transparently for the Administrator, but is a slightly different connection management process than when adding additional connections.

To create the first connection:


x
Procedure: How to Add the First Axiom EPM Connection
  1. Open the Web Console.
  2. From Web Console menu bar, click Adapters.
  3. Expand the Available folder, if it is not already expanded.
  4. Expand the ERP group folder.
  5. Right-click Axiom EPM, and select Configure.
  6. Click Configure.
  7. Click Next.

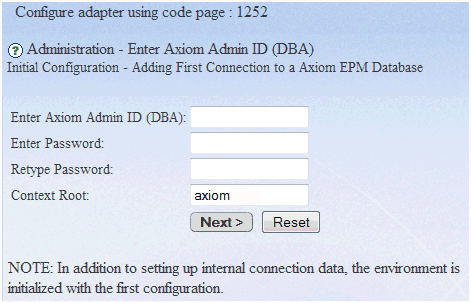
    xThe Administration - Enter Axiom Admin ID (DBA) opens, as shown in the following image.

  8. In the Enter Axiom Admin ID (DBA) field, enter the administrator ID that has access to all Axiom instances (and Tables) that you what to configure the adapter for.
  9. Enter and retype the password for the administrator ID in the corresponding fields.
  10. Accept the default in the Context Root field or enter a different one. This is the context root for the Axiom API. It is case sensitive and must match the value entered during the installation and configuration of the Axiom product. The default value is axiom.

    Note: This field is only shown when the adapter is first configured.

  11. Click Next

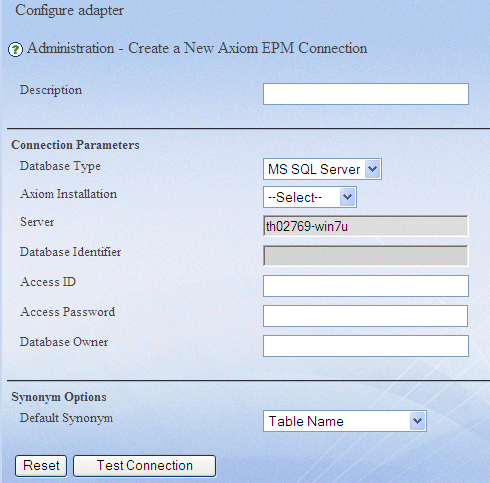
    The Administration - Create a New Axiom EPM Connection window opens.

  12. Type the necessary information, test the connection, and if successful, click Configure. If not successful, edit the information until the test is successful, then click Configure. For more information, see step 4 in How to Add an Axiom EPM Data Source Instance.

    Note: The Configure button becomes available once the connection test to the selected RDBMS is successful.

  13. Once the configuration finishes, click Next.

    Most of the parameters can be changed in the future, but the connection cannot be created without initially supplying correct data source connectivity information. For details on the required information, see Administration - Create a New Axiom EPM Connection Window.

    Tip: A worksheet is provided to assist you in gathering the information you will need to type on this screen. For details, see Axiom EPM Connection Worksheet.

    Once completed, you may begin managing your new Axiom EPM Connection by adding synonyms.


x
Reference: Administration - Create a New Axiom EPM Connection Window
x x

The Administration - Create a New Axiom EPM Connection window contains the following fields/options:

Description

Is a description that identifies the current server configuration.

Connection Parameters

Database Type

Is the Data source type. The options are: Oracle and MS SQL Server.

Axiom Installation

This drop-down box lists available Axiom installations. Select the installation that you will configure. Selecting this value will automatically set the values for the following two options (Server and Database Identifier).

Server

Name of the Database Server (for SQL Server only, not Oracle). This is automatically set by your selection for Axiom Installation.

Database Identifier

Is the data source identifier or system data source name. This is automatically set by your selection for Axiom Installation.

Access ID

Is the RDBMS login ID for data source connectivity. Typically, it is the same login ID Axiom EPM uses to access the data source. There are minimum data access requirements that the ID must have. For details, see Setting Up the Axiom EPM Access ID.

Access Password

Is a password associated with the access ID.

Database Owner

Is the data source owner identifier or the schema owner depending on your data source. The owner ID is used to fully qualify SQL requests passed to the data source. This allows multiple data source instances or schemas to exist in a single data source. Typical defaults are SYSADM on Oracle and dbo on Microsoft SQL Server.

Synonym Options

Default Synonym

Is the name of the synonym to default to when creating new metadata. The options are: Table Name, Table Name with Prefix, Table Name with Suffix.

Note: If you specify any of the options with Prefix or Suffix, the following additional input box is displayed.

Prefix/Suffix Default

Enter the prefix or suffix you wish to prepend or append to the name of the synonym. The maximum length for a Prefix/Suffix is nine characters.


x
Reference: Axiom EPM Connection Worksheet

Use the following worksheet to record connection configuration information and keep it for future reference.

Option Name

Response

Description

Description


Row.

Administrator (DBA)


Enter the administrator ID and password that has access to all instances and Tables that are required to be administered by the adapter. Must be consistent across multiple connections.

Database Type


Designation for RDBMS. The options are Oracle and MS SQL Server.

Axiom Installation


Is the installation that you will configure. Selecting this value from the drop-down list will automatically set the values for the following two options (Server and Database Identifier).

  • Server is the name of the Database Server (for SQL Server only, not Oracle). This is automatically set by your selection for Axiom Installation.
  • Database Identifier is the data source identifier or system data source name. This is automatically set by your selection for Axiom Installation.

Access ID


ID used by Axiom EPM to connect to the RDBMS.

Access Password


Password associated with the access ID.

Database Owner


Data source owner ID for the Axiom EPM data source.

Default Synonym


The name of the synonym to default to when creating new metadata.

  • Table Name
  • Table Name with Prefix
  • Table Name with Suffix

Note: If you specify any of the options with Prefix or Suffix, an additional input box is displayed for your Prefix or Suffix entry.

Prefix/Suffix Default


Enter the prefix or suffix you wish to prepend or append to the synonym name. The maximum length is nine characters.


WebFOCUS