Configuring Apache Tomcat

In this section:

The Developer Studio installation provided the option to install and configure Apache Tomcat for you. If you chose this option and the verification tool ran successfully, you do not need to manually configure Tomcat. However, if you are not familiar with Tomcat, you may wish to review this section to understand the configuration process.

Note:


Top of page

x
Tomcat Configuration Overview

To configure Tomcat, you tell Tomcat where Developer Studio files are located and the contexts in which to use them. For example, the WebFOCUS web application is installed with Developer Studio in:

drive:\ibi\DevStudio81\webapps\webfocus

Tomcat must know to serve files from the web application when it receives a request for the ibi_apps context path. For example:

http://localhost:8080/ibi_apps

Tomcat can be used as both a web server and application server, so Tomcat can also serve files outside of a web application after it knows their location and context. On a traditional web server, you create aliases. With Tomcat, an alias is treated like a context root, even when serving files outside of a web application.


Top of page

x
Configuring Tomcat

How to:

There are many ways to configure Tomcat. Information Builders recommends creating XML files under

<catalina_home>\conf\Catalina\localhost

where:

<catalina_home>

Is the actual location of your Tomcat installation directory. For example:

drive:\ibi\tomcat

or

C:\Program Files\Apache Software Foundation\tomcat x.x

Context roots can be created as specified in the following steps.


x
Procedure: How to Create Contexts for Apache Tomcat
  1. Stop Tomcat from the Windows Services window by right-clicking Apache Tomcat and choosing Stop.
  2. Navigate to the following directory in Windows Explorer or My Computer:
    <catalina_home>\conf\Catalina\localhost

    This directory can contain XML files that define contexts. If the Developer Studio installation installed and configured Tomcat for you, the following file should appear to define the ibi_apps context that deploys the webfocus directory:

    ibi_apps.xml

    If you are using stand-alone Tomcat, the following files should appear as well:

    approot.xml
    ibi_html.xml
    ibi_help.xml

    Note: The installation program silently creates the ibi_html.xml file. This file is installed to run applications that were created using an earlier version of Developer Studio that may have references to the ibi_html alias.

    If a custom alias was used for ibi_html, see How to Configure the ibi_html Alias.

    The XML files are named for the context root you would use to access the web application and should have the following syntax:

    <?xml version='1.0' encoding='utf-8'?>
    <Context docBase="path_To_WebApplication" path="/contextRoot">
    </Context>

    where:

    path_To_WebApplication

    Is the absolute path to the WAR file or directory you are deploying.

    contextRoot

    Is the context root.

    Note: They can optionally contain additional information, as explained in Tomcat documentation.

  3. If the ibi_apps.xml file does not exist, create it using Notepad. For example:
    <?xml version='1.0' encoding='utf-8'?>
    <Context docBase="C:\ibi\DevStudio81\webapps\webfocus" path="/ibi_apps">
    </Context>

    Be sure to specify the correct directory on your machine and change the context root if you are not using the default (ibi_apps).

  4. If you are using stand-alone Tomcat and approot.xml does not exist, create it using Notepad. For example:
    <?xml version='1.0' encoding='utf-8'?>
    <Context docBase="C:\ibi\apps" path="/approot">
    </Context>

    Be sure to specify the correct directory on your machine.

  5. If you are using stand-alone Tomcat and ibi_help.xml does not exist, create it using Notepad. For example:
    <?xml version='1.0' encoding='utf-8'?>
    <Context docBase="C:\ibi\DevStudio81\webapps\ibi_help" path="/ibi_help">
    </Context>

    Be sure to specify the correct directory on your machine.

  6. Restart Tomcat from the Services window.


x
Procedure: How to Configure the ibi_html Alias

The following procedure only applies to users who have installed earlier versions of Developer Studio and need to configure the ibi_html alias. As of Developer Studio 8, the ibi_html alias is no longer required. All content that was previously accessed through this alias can now be accessed through the ibi_apps alias.

If you select the option to configure Tomcat during the Developer Studio installation process, the ibi_html alias (ibi_html.xml) is created to ensure that older applications with hard coded references to the ibi_html alias will continue to run. The ibi_html.xml file is located in the following directory:

<tomcat_home>\conf\Catalina\localhost\ 

where:

<tomcat_home>

Is the root location where Apache Tomcat is installed.

Note:

  1. Stop Apache Tomcat.
  2. Make a copy of the ibi_apps.xml file, which is located in the following directory:
    <tomcat_home>\conf\Catalina\localhost\ 
  3. Rename the copy of ibi_apps.xml to ibi_html.xml, or a to your custom alias.
  4. Open the copied file in a text editor.

    The following code displays when you open the file.

    <?xml version='1.0' encoding='utf-8'?>
    <Context docBase="C:\ibi\DevStudio81\webapps\ibi_apps" path="/ibi_apps">
    </Context>
  5. Update the Context docBase path to include the full path of the ibi_html.war file.
  6. Update the path from /ibi_apps to /ibi_html.

    An example of the updated code is shown below.

    <?xml version='1.0' encoding='utf-8'?>
    <Context docBase="C:\ibi\DevStudio81\webapps\ibi_html.war" path="/ibi_html">
    </Context>
  7. Save your changes and close the file.
  8. Start Apache Tomcat.

    You can now use your ibi_html alias.


x
Procedure: How to Test the Tomcat Configuration
  1. Ensure that Tomcat has been restarted.
  2. Test the ibi_apps context by going to the following URL in a web browser:
    http://localhost:8080/ibi_apps/

    The WebFOCUS home page should appear. If you receive an error, see Troubleshooting Developer Studio.


Top of page

x
Additional Tomcat Configuration Options

Reference:

You should be aware of how to secure the Tomcat TCP ports, and how to reload web applications.


x
Reference: Tomcat Ports

By default, Tomcat uses the three TCP ports listed below:

Default Port

Name

Use

8080

HTTP Listener Port

You access Tomcat in a web browser using this port. For example:

http://localhost:8080
8009

Connector Port

Web servers can route servlet requests to Tomcat on this port. The Tomcat connector (plug-in) for IIS uses this port. Tomcat listens on this port even if no web server is connecting.

8005

Shutdown Port

Tomcat uses this port for internal operations and for shutting down.

If these ports are not available or you wish to change them, do the following:

  1. Open the following file in a text editor:
    <catalina_home>\conf\server.xml
  2. Search for the port numbers you wish to replace (8080, 8009, 8005) and replace them with the ports you wish to use.
  3. Save and exit the file.
  4. Restart Tomcat.

If you change defaults, substitute accordingly in procedures and examples. You also need to update the Developer Studio connection settings so it knows the correct Tomcat HTTP port if you change the default.


x
Reference: Reloading Web Applications

This is not a consideration if you just installed Tomcat with Developer Studio for the first time, only when installing a service pack or new release. When you upgrade Developer Studio or install a service pack, Tomcat must use the new web application rather than cached copies of the old version.


x
Reference: Additional Configuration Steps

Top of page

x
Apache Tomcat Application Server Unicode Configuration

To set up a Unicode environment, follow these steps:

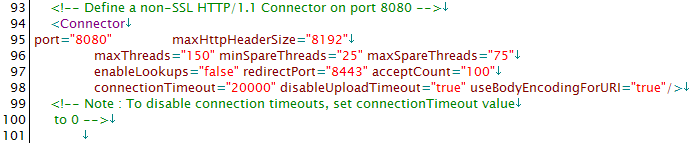
  1. Edit the server.xml file located under drive:\ibi\tomcat\conf.
  2. Add useBodyEncodingForURI="true" to the Connector, as shown in the following image.

    example of useBodyEncodingForURI="true" in the XML file

  3. Recycle the Tomcat Application Server to activate.

WebFOCUS