Reference: |
In the upper-left corner of the InfoAssist interface,
click the IA button ![]() to
open the Application main menu, as shown in the following image.
to
open the Application main menu, as shown in the following image.

You can run the following commands from the Application main menu:
If you open a Reporting Object through InfoAssist, and then click New, a new report is generated from the Reporting Object. You are prompted to choose the type of report you want to create from the Reporting Object.
When you open a new session of InfoAssist and then click New, a new report is created. You are prompted to choose a data source, as shown in the following image.

Pinned reports, charts,
dashboards, and documents are represented by a blue pin  icon.
Pinned items appear at the top of the list in alphabetical order.
icon.
Pinned items appear at the top of the list in alphabetical order.
Recent reports, charts, dashboards, and
documents are represented by a sideways blue pin  icon.
Recent items appear below the separator bar in the order in which
they were created, with the most recently created item at the top.
icon.
Recent items appear below the separator bar in the order in which
they were created, with the most recently created item at the top.
You can pin important reports, charts, dashboards, and documents to the top of the Recent Reports section of the Application main menu for quick and easy access. To promote a recent report to pinned report, click the sideways blue pin icon. The icon turns upright and the report is moved to the pinned report area of the Recent Items window, where it stays until it is unpinned.
To demote a pinned report, click the blue pin icon. The icon turns sideways and the report is moved below the separator bar.
A shortcut menu is available when right-clicking a recent item, as shown in the following image.

The options in the menu are:
The Open dialog box displays when you launch InfoAssist. It also displays when you join and blend data. You can use this dialog box to do the following:
Note: Previously specified search criterion are per session only and are not saved from session to session.
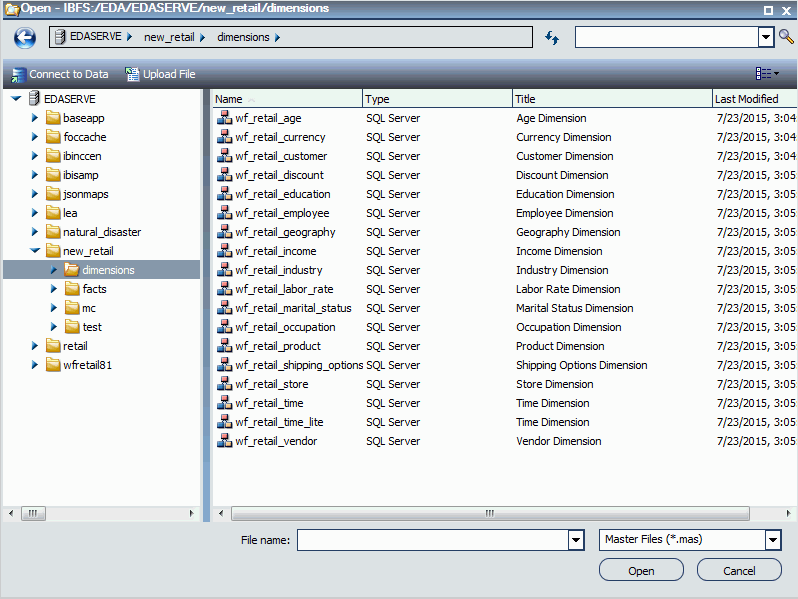
The Open dialog box is shown in the following image.
Note: When you launch InfoAssist, the Open dialog box displays. It contains a search field, which you can use to locate a specific Master (.mas) file. When you are working in a document and you click Open, the Open dialog box displays a list of procedures (.fex), however, a search field is not available.
The Open dialog box contains the following options:
Opens the Metadata tool, where you can configure a Data Adapter to connect to an existing database and create synonyms.
Opens the Upload tool, where you can upload user data from a machine to which you have access. This data can be used with WebFOCUS reporting.
Opens the selected Master File in InfoAssist.
Search for data sources within the selected folder and down within its hierarchy. To search, type your query into the search box in the upper-right corner of the Open dialog box. You can access previously specified search criteria using the drop-down list box in the search tool, as shown in the following image.
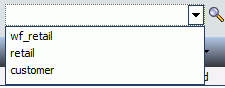
Note: Previously specified search criterion are per session only and are not saved from session to session.
| WebFOCUS |