In this section: How to: Reference: |
When you connect one object to another, DataMigrator
draws an arrow between them. These arrows, or connector
objects, specify the logic that governs what is executed
next in a process flow. The connection logic may be unconditional
or conditional, represented graphically by colored arrows. Conditional
logic is set by default. However, you can edit the connection to
change the nature of the condition or to make it unconditional.
The connections between the following objects are conditional
by default. You can change the conditions or make them unconditional:
- Email connects to
any other object type.
- Flow connects
to Flow, Parallel Group, Procedure, Email. (The conditions you can apply
are: OK, FAILURE, and a Custom condition.)
- Procedure connects
to Flow, Parallel Group, Procedure, Email. (The conditions you can
apply are: OK, FAILURE, and a Custom condition.)
- Wait connects
to Flow, Parallel Group, Procedure, Email. (The conditions you can apply
are: Wait satisfied and Timeout.)
x
Procedure: How to Edit a Connection Condition
Follow
these steps to edit a connection condition between a flow or a procedure
and one of the following object types: a flow, a Parallel Group,
a Procedure, or an Email.
-
Drag
the required objects into the process flow workspace.
-
Connect
the objects.
-
To view
or edit the connection condition, double-click the arrow connecting
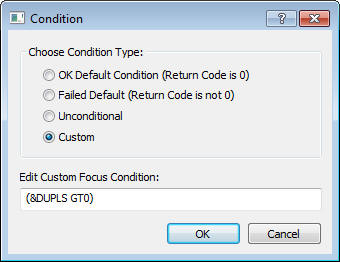
the two objects. The Condition window opens, as shown in the following image.
For
a single connection, OK is the default. For a second connection,
FAILED is the default.
-
Click
an option button to change the condition.
-
If you
wish to specify a Custom condition, click Custom.
The Edit Custom Focus Condition box becomes active.
Type the code for the condition you want to apply. Typically,
you use a global (&&) variable, DataMigrator variable, or
statistical variable in your custom conditions to test specific
conditions, return codes, or values based upon which branching will
occur.
-
Click OK to
close the condition box.
-
Click
the Save button to update the process flow.
Example: Creating a Custom Connection Condition
You
can set a custom condition for a connection between objects in a
process flow. In this case, a connection will become active if duplicate
rows are rejected while a data flow is run. The number of duplicates
will be included in an email that is sent if the condition is met.
Note: Your
DataMigrator Server must be configured for email notification to complete
this example. For details, see Configuring DataMigrator Server Operations.
- In the DMC,
right-click an application directory in the navigation pane, select New,
and then click Flow.
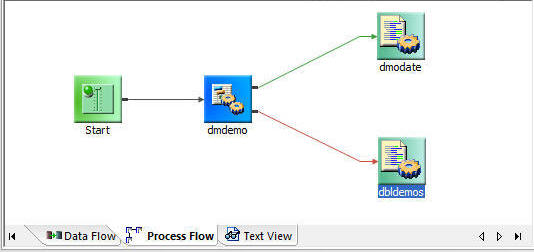
- Click the Process
Flow tab.
- Drag the DMDUPLG data
flow object from the ibisamp application directory in the navigation
pane into the workspace, to the right of the Start object.
- Create a connection
by right-clicking the Start object and dragging
to the DMDUPLG data flow object.
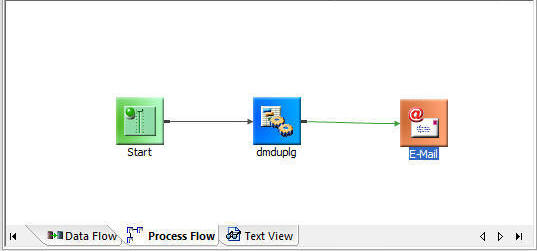
- On the Flow
tab, in the Insert group, drag an email object into the workspace,
to the right of the DMDUPLG data flow object.
- Create a connection
by right-clicking the DMDUPLG data flow object
and dragging to the email object.
The workspace should appear,
as shown in the following image:
- Double-click
the arrow between the DMDUPLG data flow object
and the email object.
or
Right-click the connection arrow
and click Edit Condition.
The Condition
window opens.
- Click the Custom radio
button.
The Edit Custom Focus Condition field becomes active.
- Type the following
in the Edit Custom Focus Condition box and click OK,
as shown in the following image.
(&DUPLS GT 0)
Note: Ensure
the Data Flow that was added to the Process Flow has the Run
as Stored Procedure properties setting enabled. This
will maintain the continuous connection, and will enable the reference
to the variables at run time.
- Right-click
the email object and click Properties.
The
Properties pane opens.
- In the Address
To box, type an email address. In the Subject box, type Duplicate Rows
Rejected.
- Type the following
in the Message Text box, as shown in the following image.
&DUPLS rows rejected
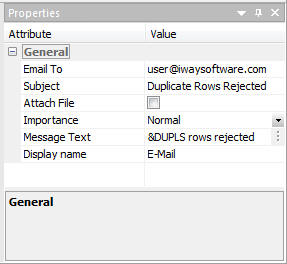
This
connection will become active if duplicate rows are rejected while
a data flow is run, and an email notification will be sent with
the number of duplicate rows.
x
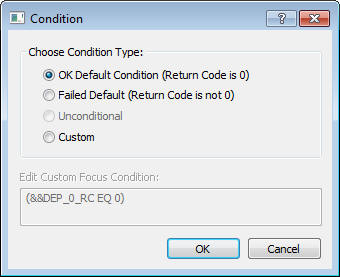
Reference: Condition Dialog Box
To access the Condition
dialog box shown in the following image, from the process flow workspace,
double-click a connection arrow between objects, or right-click
a connection arrow and click Edit Condition.
The
Condition dialog box has the following fields and options:
-
Choose Condition Type
-
Provides access to the following condition options:
-
OK Default Condition (Return Code is 0)
-
Executes the connection if the prior object executed successfully.
-
FAILED Default (Return Code is 0)
-
Executes the connection if the prior object failed to execute.
-
Unconditional (GOTO)
-
Executes the connection regardless of the success or failure
of the prior object. This option is only available when there is
only one connection.
-
Custom
-
Allows you to set a custom condition for the connector.
-
Edit Custom FOCUS Condition
-
The code for a custom condition. Enter a condition using
FOCUS dialog manager that evaluates to true or false.
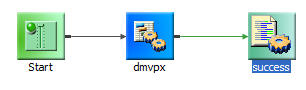
xBranching in a Process Flow
The ability to set connection logic enables you to create
branches within a process flow. You simply connect multiple objects
to the object from which you want the branching to begin.
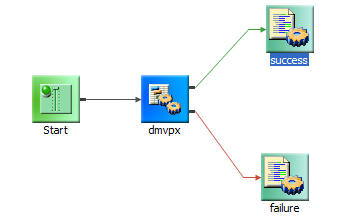
The branching process flow shown in the following image is built
in Exercise 2: Creating the Process Flow. It is strongly suggested that you complete
these exercises in order to create the branches shown here. As you
do so, you will become familiar with many aspects of data and process
flow design in the DMC.
x
Procedure: How to Create Branches in a Process Flow
-
Drag
an object into the workspace following the object from which you
want the branching to begin.
-
To build
the first branch, connect the object at the starting point for the branches
to the object you just dragged in. A green arrow is created by default.
-
To build
the second branch, drag another object into the workspace and connect
it to the object at the start of the branch. A red arrow is created
by default.
-
If you
wish to change the connection conditions for any branch, double-click
the arrow and edit the condition in the Conditions window. Then
click OK.
-
Click
the Save button to update the process flow.
Note: You
can also create branches using custom conditions. Note, however,
that while you can use multiple custom conditions to specify different
branches, you should not use custom conditions with OK and FAILED
conditions.
When multiple conditional arrows are used, the
first object where the condition is met is run.