In this section: How to: Reference: |
The Alert feature requires the following components:
- WebFOCUS Reporting Server. This server is responsible for processing the procedure, accessing and retrieving the requested data, and creating the report when the Alert test is triggered (true).
- Managed Reporting. This environment is used to create and manage Alerts.
An Alert consists of the following:
- Alert test
- Alert result
An Alert test is required to check whether or not a set of defined test conditions (rules) is met (true or false). An Alert test can be a WebFOCUS Test, which is a simple TABLE request that you create to define the condition to test for. Alternatively, an Alert test can be a Test for File Existence, which checks for the existence of a file that is accessible to the WebFOCUS Reporting Server to which the Alert test is submitted. The file does not need to be in the APP PATH. It just needs to be in a location where it can be found by the Reporting Server.
The Test for File Existence file does not need to be an actual file with an extension. Testing for the existence of a folder is also valid.
If the Alert test is triggered (true), returns records, the Alert result request is processed. You have the option of creating the result report or selecting an existing Managed Reporting report you are authorized to run.
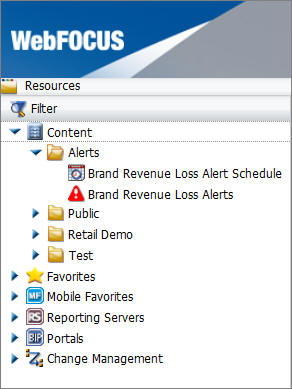
Alerts Created in the Browser
When you select a new Alert from the BI Portal or BI Dashboard, the WebFOCUS Alert Assist tool opens for the creation of components. Alert Assist is a Bindows™ application that is launched in a separate browser window.
The browser tab uses the generic name Alertn, where n is an index number starting at 1. All subsequent Alerts increase by 1. If you save the Alert, the dialog box is automatically set up with this generic name. However, you can change the name as desired.
If you select WebFOCUS Test in the browser, you are prompted to create the Alert test using InfoAssist. The version of InfoAssist that is invoked does not have field styling, heading, footing, or report options, such as OLAP and On-Demand Paging. The Alert test determines whether or not a specified condition is true. It is not the report that is displayed as the result of the Alert.
You can create the Alert result using InfoAssist, this time with all the available styling and report options. Alternatively, you can select an existing Managed Reporting report.
Note: It is recommended that you select an existing report for the Alert result request, as it is available to edit, run interactively, or schedule independently of the Alert. If you create the Alert result using InfoAssist within Alert Assist, you need to use Alert Assist and select the open option again to edit the request, because the Alert test and the report to be run are contained within the Alert procedure.
In the sample code that follows, both the Alert test and the report to be run (Alert result) are created with InfoAssist. To keep the sample code simple, styling and report options, such as report headings and conditional styling, are not included in this request.
Notice that after the first TABLE request, there is a –IF statement that checks if the number of lines in the Alert test is equal to zero (-IF &LINES EQ 0). This test condition determines if the second TABLE request, to execute the report, should be triggered (true).
If the number of lines is greater than zero, then there are records that satisfy the Alert test, and the report is run. If the number of lines is equal to zero, then there are no records that satisfy the Alert test, and the report is not run.
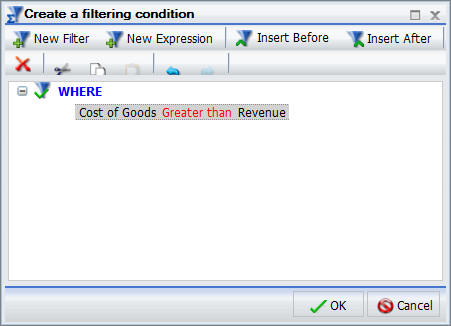
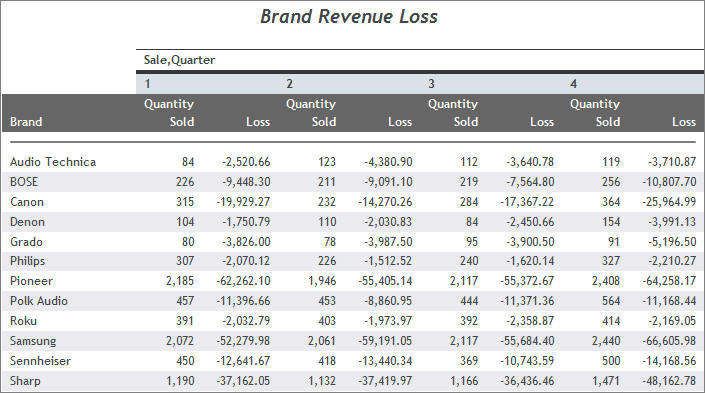
-* Created by Alert Assist
-* start of the test report
ENGINE INT CACHE SET ON
-DEFAULTH &WF_SUMMARY='Summary';
-DEFAULTH &WF_TITLE='WebFOCUS Report';
TABLE FILE ibisamp/wf_retail
SUM WF_RETAIL.WF_RETAIL_SALES.COGS_US
WF_RETAIL.WF_RETAIL_SALES.REVENUE_US
BY WF_RETAIL.WF_RETAIL_PRODUCT.PRODUCT_CATEGORY
BY WF_RETAIL.WF_RETAIL_PRODUCT.BRAND
WHERE WF_RETAIL.WF_RETAIL_SALES.COGS_US GT WF_RETAIL.WF_RETAIL_SALES.REVENUE_US;
ON TABLE HOLD
ON TABLE NOTOTAL
ON TABLE SET PAGE-NUM NOLEAD
ON TABLE SET SQUEEZE ON
ON TABLE SET EMPTYREPORT ON
ON TABLE SET HTMLCSS ON
ON TABLE SET HTMLENCODE ON
ON TABLE SET CACHELINES 100
END
-* end of the test report
-* start of the test
-RUN
-IF &LINES EQ 0 GOTO ALERTEXIT;
-* end of the test
-* start of the output report
ENGINE INT CACHE SET ON
-*COMPONENT=Define_wf_retail
DEFINE FILE ibisamp/wf_retail
Loss/D12.2=WF_RETAIL.WF_RETAIL_SALES.REVENUE_US - WF_RETAIL.WF_RETAIL_SALES.COGS_US ;
END
-DEFAULTH &WF_SUMMARY='Summary';
-DEFAULTH &WF_TITLE='WebFOCUS Report';
TABLE FILE ibisamp/wf_retail
SUM WF_RETAIL.WF_RETAIL_SALES.QUANTITY_SOLD
Loss
BY WF_RETAIL.WF_RETAIL_PRODUCT.BRAND
ACROSS WF_RETAIL.WF_RETAIL_TIME_SALES.TIME_QTR
WHERE WF_RETAIL.WF_RETAIL_SALES.COGS_US GT WF_RETAIL.WF_RETAIL_SALES.REVENUE_US;
ON TABLE SUBHEAD
"Brand Revenue Loss"
ON TABLE PCHOLD FORMAT HTML
ON TABLE NOTOTAL
ON TABLE SET CACHELINES 100
ON TABLE SET PAGE-NUM NOLEAD
ON TABLE SET SQUEEZE ON
ON TABLE SET HTMLCSS ON
ON TABLE SET HTMLENCODE ON
ON TABLE SET EMPTYREPORT ON
ON TABLE SET GRWIDTH 1
ON TABLE SET STYLE *
INCLUDE=IBFS:/FILE/IBI_HTML_DIR/javaassist/intl/EN/ENIADefault_combine.sty,$
TYPE=REPORT, TITLETEXT=&WF_TITLE.QUOTEDSTRING, SUMMARY=&WF_SUMMARY.QUOTEDSTRING, HFREEZE=OFF, $
TYPE=TABHEADING, LINE=1, JUSTIFY=CENTER, $
TYPE=TABHEADING, LINE=1, ITEM=1, OBJECT=TEXT, SIZE=14, STYLE=BOLD+ITALIC, $
ENDSTYLE
END
-* end of the output report
-* start of the options
-* end of the options
-ALERTEXIT
-* Finished by Alert Assist
- Sign in to WebFOCUS as an administrator or developer.
-
In the Resource
tree, right-click a folder, point to New,
and then click Alert.
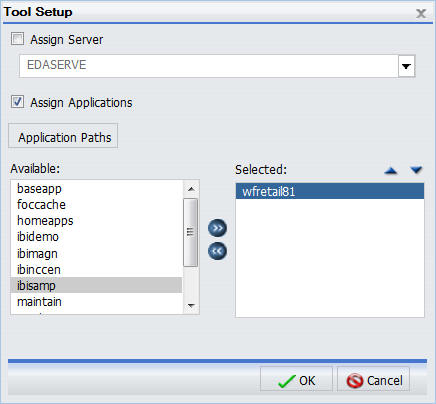
The Tool Setup dialog box opens. It provides options for selecting a Reporting Server and Application Paths.
Note: User access to the Tool Setup dialog box to specify Reporting Server properties is controlled by a WebFOCUS security privilege. For information on WebFOCUS security privileges, see the WebFOCUS Security and Administration manual.
-
Select a
Reporting Server and Application Paths when not using the default
Reporting Server specified in the WebFOCUS Client configuration
or the default application path for that Reporting Server, as shown
in the following image.
- Click OK.
- WebFOCUS Alert Assist opens.
When you create an Alert in the web browser, it invokes Alert Assist and then InfoAssist. Alert Assist has a user interface similar to InfoAssist. The following image shows the WebFOCUS Alert Assist interface.
Alert Assist Main Menu
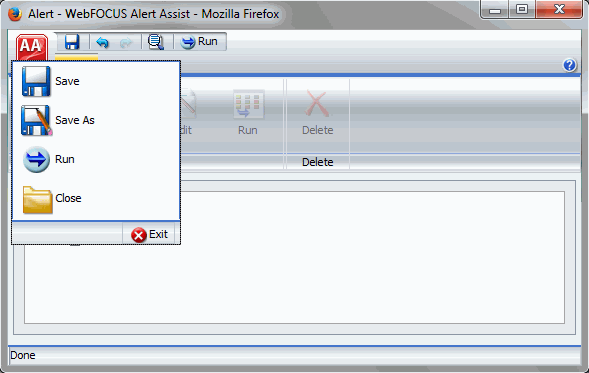
In the upper-left corner of the browser window is the Application button, which provides access to the Alert Assist Main Menu. This menu contains the Save, Save As, Run, Close, and Exit options. Some of these options are also on the Alert Assist Quick Access toolbar.
The following image shows the expanded Alert Assist Main Menu.
- Save
-
Saves the Alert. This option is disabled until both parts of the Alert are created.
- Save As
-
Saves the current Alert with a new name. The Save As dialog box displays a field where you can type the new name. This option is disabled until both parts of the Alert are created.
- Run
- Submits the Alert procedure to the Reporting Server. This option is active when both parts of the Alert have been created. The output always opens in a new browser.
- Close
-
Closes the current Alert and prompts you to save any changes.
- Exit
-
Exits the Alert Assist and prompts you to save any pending changes to the open Alert.
Alert Assist Quick Launch Toolbar
The Alert Assist Quick Launch toolbar contains the following buttons.
|
Button |
Description |
|---|---|
|
|
Saves the Alert. This option is disabled until both parts of the Alert are created. |
|
|
Reverts back by undoing one action. |
|
|
Moves forward by redoing one action. |
|
|
Displays the Alert procedure code in a read-only window. |
|
|
Submits the entire Alert procedure to the Reporting Server. This option is active when both parts of the Alert have been created. The output always opens in a new browser. |
Ribbon
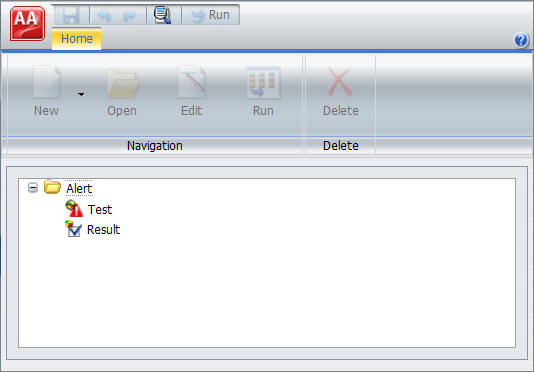
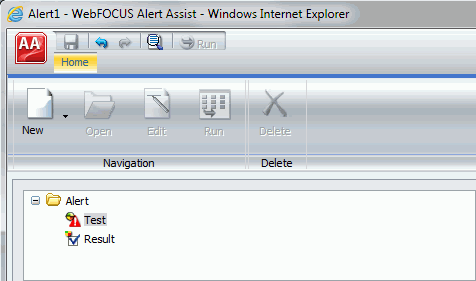
Under the Alert Assist Quick Access toolbar is a ribbon. When Alert Assist first opens, none of the ribbon options are activated.
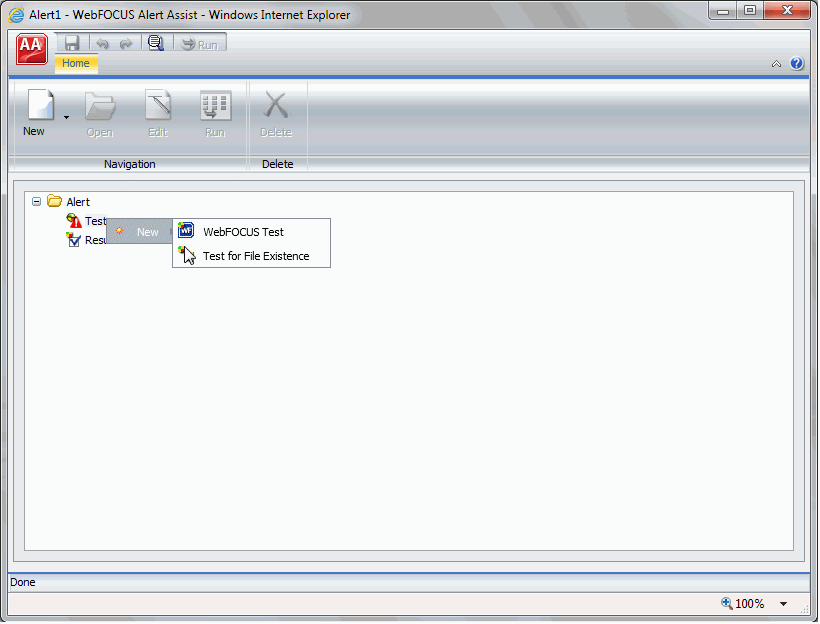
You must select the Test node or Result node to activate the New option, as shown in the following image.
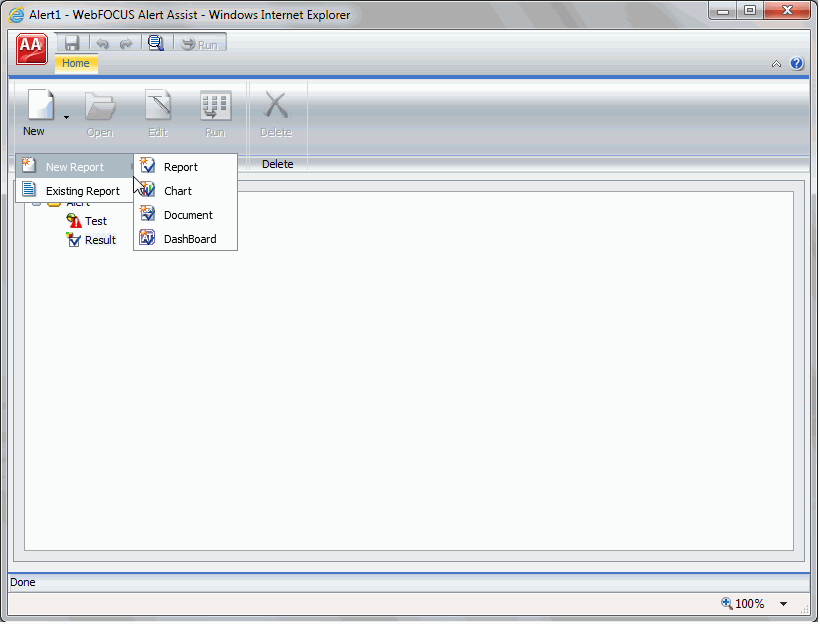
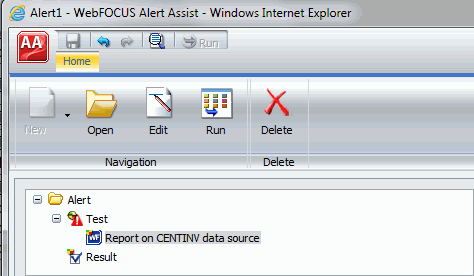
You must create a Test to activate the remaining options, as shown in the following image.
The ribbon contains the following options:
Navigation Group
- New
-
Displays a menu from which you can choose to create a new WebFOCUS report or WebFOCUS test, open an existing report, or test for file existence. This button is active when the Test node or Result node is selected. You can also find these options in the shortcut menus for the Test node and Result node.
- Open
-
Invokes InfoAssist so that you can make changes to the report when an Alert test or Alert result is selected. The Open option is only activated after a report test is created.
- Edit
-
Opens the report on FILENAME data source dialog box when an Alert test or Alert result is selected. You can then edit the report in a text editor.
- Run
-
Runs the report in a new browser window when an Alert test or Alert result is selected.
Delete Group
- Delete
-
Removes the report from the Test or Result node.
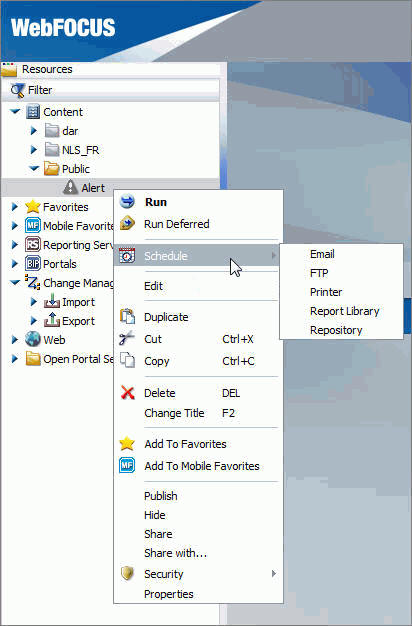
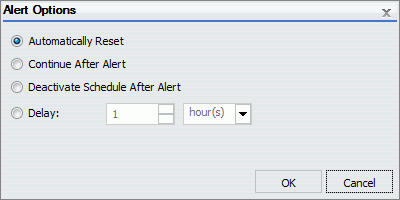
Authorized users can run an Alert test interactively and optionally schedule it to be distributed by ReportCaster.
The following image shows basic Alert processing.

- The Managed Reporting developer, using Alert Assist or the Alert Wizard, creates an Alert test and designs the report that is run if the Alert condition is true.
- If the Alert test is true, the WebFOCUS Reporting Server runs the Alert result.
- If the Alert test is false, the Alert result is not run.
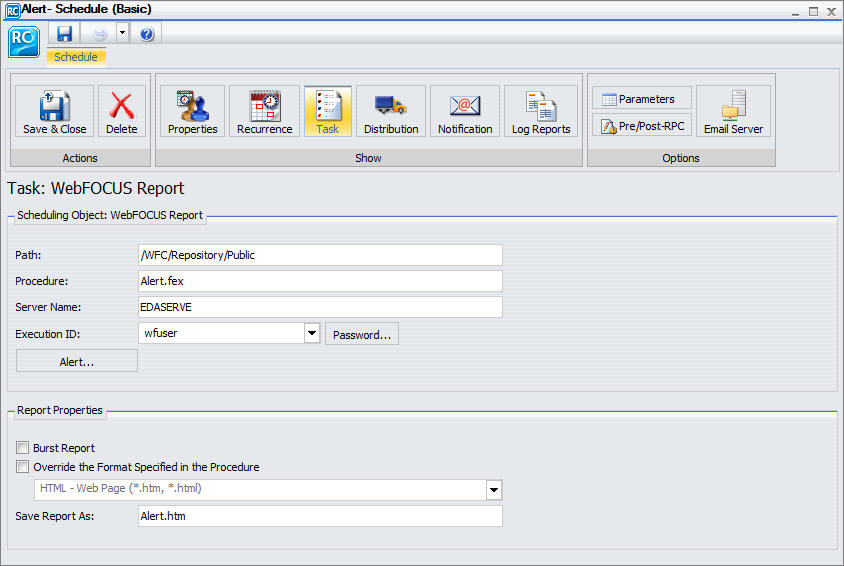
The following image shows scheduled Alert processing.

- The Managed Reporting developer, using Alert Assist or the Alert Wizard, creates an Alert test and designs the report that is run if the Alert condition is true.
- If desired, an Alert schedule is created using ReportCaster.
- The ReportCaster Distribution Server checks for scheduled jobs in the WebFOCUS Repository.
- When the ReportCaster
Distribution Server processes a scheduled Alert procedure, it is
submitted to the Reporting Server to evaluate if the Alert test
is true.
- If the Alert test is false, the Alert is returned to the queue for the next scheduled time.
- If the Alert test is true, the Reporting Server runs the Alert result and returns the results to the ReportCaster Distribution Server. The ReportCaster Distribution Server distributes the Alert result to the recipients, as specified in the schedule.