In this section: |
From the Environments Tree panel, you can:
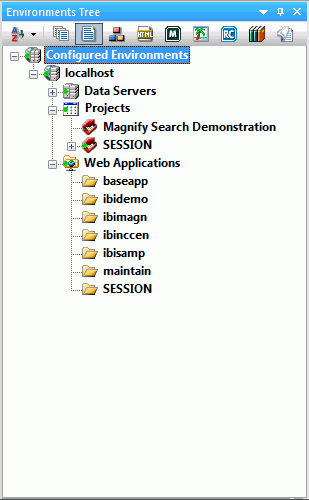
The Environments Tree panel is shown in the following image.
The Environments Tree panel opens with App Studio.
For more information on customizing the Environments Tree panel, see Using the Panel Customization Options.
The Environments Tree toolbar contains the buttons and menus that you need to navigate, filter, and sort the information that appears in the Configured Environments tree.
Presents options for viewing items (for example, alphabetical sorting or grouping), as described in the following table.
|
Option |
Name |
Function |
|---|---|---|
|
|
View items sorted in Alphabetical order |
Sorts the files alphabetically from A to Z. |
|
|
View items sorted in reverse Alphabetical order |
Sorts the files alphabetically from Z to A. |
|
|
View items sorted in Chronological order |
Sorts the files by the last saved time, in descending order. |
|
|
View items sorted in reverse Chronological order |
Sorts the files by the saved time, in ascending order. |
|
|
View Items grouped by File Type |
Sorts the files by file type. |
|
|
Respect Sort Order Property |
Respects the Sort Order property value specified in the File/Folder Properties panel. This is the default. |
|
|
View items by Title |
Displays the files by title and sorts the files by title. If an item does not have a title, its name is shown. |
|
|
View items by Name |
Displays the files by name and sorts the files by name. If an item does not have a title, its name is shown. |
|
Refresh View |
Refreshes all of the files and folders that you see in the Configured Environments tree. Refresh View also shows the dependencies of the file or folder that you have selected. | |
|
|
Show All files |
Filters the tree to show all file types. |
|
|
Show only Procedure files |
Filters the tree to show only this file type. |
|
|
Show only Master files |
Filters the tree to show only this file type. |
|
|
Show only HTML files |
Filters the tree to show only this file type. |
|
|
Show only Maintain files |
Filters the tree to show only this file type. |
|
|
Show only Image files |
Filters the tree to show only this file type. |
|
|
Show only ReportCaster files |
Filters the tree to show only this file type. |
|
|
Show only Library files |
Filters the tree to show only this file type. |
|
|
Other files |
Filters the tree to show other file types. |
In this section: |
The Configured Environments tree displays the WebFOCUS Environments, Data Servers, Projects, and Web Applications nodes. If you have the Managed Reporting version of App Studio and WebFOCUS Release 8.0 Version 05 or higher installed on your machine, or configured a remote WebFOCUS 8 environment, a repository node also appears.
If a node under the Configured Environments Tree has been populated and contains content, a green dot is shown on the node icon. If a node has been populated and does not contain any content, a red dot is shown on the node icon. If a node has not been populated, App Studio does not know if there is any content in that node and no dot is shown on the node icon. If you create a new content in a node with a red dot on it, that node now has content in it and will change to a green dot. If you delete all content in a node with a green dot, that node now has no content in it and will change to a red dot.
Note: By default, the Configured Environments tree sorts files and folders by title. If you change the sorting options to View Items by Name, the names of your files and folders will display. Whether you display content by title or by name, the Content, Data Servers, Projects, and Web Applications nodes do not display differently.
You can expand the nodes on the Configured Environments tree to view your configured environments, projects, folders, and application files. Use the filtering commands on the toolbar to sort files alphabetically, display by name or title, or include the associated paths.
From the Configured Environments tree, you can manage content for each of your WebFOCUS environments. This includes creating new folders or files, opening existing files, and copying files. Right-click a node, folder, or file to view the shortcut menu of options. You can also open files by double-clicking them.
You can also use the Refresh Descendants option to refresh a specific application or folder. Right-click the application or folder that you want to refresh, and then click Refresh Descendants.
Note:
You can use the shortcut menu on any file, select New, and click the type of content you want to create, to create new content in the same location.
If a Master File is located in a nested folder (for example, folder xyz is within folder abc), you must first use the Reporting Server Console to map the nested application folder as a new application.
You can copy files from your desktop to the Configured Environments Tree.
From the Configured Environments node, you can access the following shortcut menu option:
Add. Opens the WebFOCUS Environments Properties dialog box where you can add additional environments.
From your WebFOCUS environment, in the Environments Tree panel, you can access the following shortcut menu options:
Sign In. Allows you to sign in to your WebFOCUS environment. This option is only available if you are not already signed in to your WebFOCUS environment.
Sign Out. Allows you to sign out of your WebFOCUS environment. This option is only available if you are already signed in to your WebFOCUS environment.
Note: You can copy files that are not in App Studio and paste them in the Configured Environments tree to use those files when creating your application.
For more information, see WebFOCUS Environment Properties.
The Data Servers node lists each Reporting Server that the WebFOCUS Client can access. This node expands to display the files that you can use to develop WebFOCUS applications successfully.
The process of populating the application paths of the files in the Data Servers node is done on a background thread. While this background thread is running, you can navigate on the tree, open a folder, and create files. However, you will be unable to save a new file, or do anything that requires a path list, such as create a new style sheet, until the background thread completes. This section of the Configured Environments tree, which is visible, will populate.
From a data server, you can access the following shortcut menu options:
Manage Adapters. Opens the Select Server Node dialog box from which you can configure a new adapter or edit the settings of an existing adapter.
From the Applications folder, you can access the following shortcut menu options:
New Application. Creates a new application folder.
Configure Application Path. Opens the Application Path dialog box from which you can create applications, add applications to the search path, map and reorder applications, delete applications or mappings from the path.
From an application folder or a file, you can access the following shortcut menu options:
New. Creates a new folder or file. The following shortcut menu options are available when pointing to New:
Procedure. Creates a new procedure folder in the your current application folder.
Report. Creates a new report.
SQL Report. Creates a new SQL report.
Chart. Creates a new chart.
SQL Chart. Creates a new SQL chart.
HTML/Document. Creates a new HTML page or document.
XML Document with ESRI Configuration. Creates a new XML document using an ESRI configuration.
Application. Creates a new application folder in your current application folder.
Duplicate. Creates a copy of the selected file in the Data Servers node.
Paste. Pastes the cut or copied folder or file.
Rename. Changes the name of the selected folder or file.
Delete. Deletes the selected folder or file. You will be prompted to confirm your deletion. Click No if you do not want to delete an item, or click Cancel to abort the delete operation. If you choose to abort the delete operation while deleting a list of items, Cancel will prevent all subsequent items from being deleted.
For more information, see How to Add a New Project.
You can use the Projects node to develop content if, during installation, you used a serial number that allows project development. The Projects node is part of the Configured Environments tree. It helps you organize, develop, maintain, and deploy WebFOCUS applications as a project.
Projects does not require the web-tier APPROOT and the Reporting Server APPROOT to match. This is only necessary if you are developing content that requires the use of the Reporting Server. An example of content that uses the Reporting Server would be an HTML Page that runs procedures
If the APPROOTs do not match you will still see the Projects node and can create new projects. However, the content you create can only be saved on the web tier and cannot access Reporting Server files. An example of this type of content would be an HTML page that does not run procedures.
You can clear the option, Start local Reporting Server, in the App Studio Options dialog box, and if you try to create Reporting Server content, such as a report, you will receive an error when selecting a Master File.
You can specify a Reporting Server to use for project development in the Environments List dialog box.
From the Projects node, you can access the following shortcut menu options:
New Project. Creates a directory in which you store your procedures. Opens the New Project dialog box which facilitates the creation of your new project.
From a project folder, you can access the following shortcut menu options:
Rename. Changes the name of the selected folder or file.
Delete. Deletes the selected folder or file. You will be prompted to confirm your deletion. Click No if you do not want to delete an item, or click Cancel to abort the delete operation. If you choose to abort the delete operation while deleting a list of items, Cancel will prevent all subsequent items from being deleted.
Properties. Displays the folder properties in the File/Folder Properties panel.
Refresh Descendants. Refreshes the contents of the application or folder in the Configured Environments tree to omit deleted files, and show new files and updated file information, such as date, time, and size.
New. Creates a new file. The following shortcut menu options are available when pointing to New:
Procedure. Creates a new procedure folder in the your current application folder.
Report. Creates a new report.
SQL Report. Creates a new SQL report.
Chart. Creates a new chart.
SQL Chart. Creates a new SQL chart.
HTML/Document. Creates a new HTML page or document.
Synonym. Creates a new Master File after you have selected a configured adapter, or configure a new adapter.
Synonym via Metadata Canvas. Creates a new Master File in the Metadata canvas.
Define Function Library. Creates a user-defined function library. Any user-defined functions created in this library are available for use in any content created within the same folder as the library. After the creation of the first function, you can create additional functions or edit existing ones. Once the initial function library is created, future additions or modifications are done through the Procedure View panel.
For more information, see How to Add a New Project.
The Content node is storage space for data or information, and allows you to use App Studio to administer and develop against a Managed Reporting environment. The Content node lets you manage resources and applications on remote servers, as well as on your local machine if you have performed a full installation of App Studio. You can create and edit application files on all remote servers from one easily accessible interface. You can also create and administer reports for Managed Reporting from a Windows application rather than a web browser.
From a Content node, you can access the following shortcut menu options:
Impact Analysis. Enables you to generate a list that identifies the procedures that access a specific Master File or field within a Master File.
New Folder. Creates new folder.
Mode Manager. Allows you to edit private files, if you have the proper authorization setting.
Security. Enables you to control user permissions, which limit what development areas a user can access.
ReportCaster Explorer. Opens the ReportCaster Explorer.
Refresh Descendants. Refreshes the contents of the application or folder in the Configured Environments tree to omit deleted files, and show new files and updated file information, such as date, time, and size.
From a folder or file, in the Content node, you can access the following shortcut menu options:
Impact Analysis. Enables you to generate a list that identifies the procedures that access a specific Master File or field within a Master File.
New. Creates a new file. The following shortcut menu options are available when pointing to New:
Procedure. Creates a new procedure folder in your current application folder.
Report. Creates a new report.
SQL Report. Creates a new SQL report.
Chart. Creates a new chart.
SQL Chart. Creates a new SQL chart.
HTML/Document. Creates a new HTML page or document.
Visualization. Creates a new chart, map, or grid.
Alert. Creates a new alert.
Reporting Object. Creates a new reporting object.
URL. Creates a new URL.
Cascading Style Sheet. Creates a new cascading style sheet.
WebFOCUS StyleSheet. Creates a new WebFOCUS style sheet.
Text Document. Creates a new text document.
Schedule. Creates a new schedule.
Distribution List. Creates a new distribution list.
Library Access List. Creates a new library access list.
Folder. Creates a new folder.
Publish/Unpublish. Allows or suppresses public access to every file within the selected folder.
Hide/Show. Hides or shows every file in the selected folder, to users who are permitted to access the folder. You can specify which users can see this content by changing the Do not show on user’s list property in the File/Folder Properties panel.
Security. Enables you to control user permissions, which limit what development areas a user can access.
Duplicate. Creates a copy of the selected file in the Content node.
Copy/Paste. Copies or pastes a folder or file.
Rename. Changes the name of the selected folder or file.
Delete. Deletes the selected folder or file. You will be prompted to confirm your deletion. Click No if you do not want to delete an item, or click Cancel to abort the delete operation. If you choose to abort the delete operation while deleting a list of items, Cancel will prevent all subsequent items from being deleted.
ReportCaster Explorer. Opens the ReportCaster Explorer.
Properties. Displays the folder properties in the Content node.
Refresh Descendants. Refreshes the contents of the application or folder in the Configured Environments tree to omit deleted files, and show new files and updated file information, such as date, time, and size.
Note: For more information on publishing and unpublishing folders and items within the repository, see the WebFOCUS Security and Administration manual.
The Web Applications node allows you to open files with the Text Editor, or the mode you used to create them.
Note: Based on the file type, different options may display.
From the Web Applications node, you can access the following shortcut menu options:
New Application. Creates a new application folder.
Refresh Descendants. Refreshes the contents of the application or folder in the Configured Environments tree to omit deleted files, and show new files and updated file information, such as date, time, and size.
From an application folder, you can access the following shortcut menu options:
Rename. Changes the name of the selected folder or file.
Delete. Deletes the selected application folder. You will be prompted to confirm your deletion. Click No if you do not want to delete an item, or click Cancel to abort the delete operation. If you choose to abort the delete operation while deleting a list of items, Cancel will prevent all subsequent items from being deleted.
New. Creates a new file. The following shortcut menu options are available when pointing to New:
HTML File. Creates a page in html format. You can import existing HTML content, as well.
JavaScript File. Creates a new JavaScript file from which you can create original JavaScript.
Cascading Style Sheet. Creates a base template from which you can create a unique cascading style sheet (CSS).
Properties. Displays the folder properties in the File/Folder Properties panel.
Refresh Descendants. Refreshes the contents of the application or folder in the Configured Environments tree to omit deleted files, and show new files and updated file information, such as date, time, and size.
From a file, you can access the following shortcut menu options:
Open. Opens the file.
Edit in Windows Associated Tool. Edits the file in your Windows associated tool.
Print. Prints the file.
New. Creates a new file. The following shortcut menu options are available when pointing to New:
HTML File. Creates a page in html format. You can import existing HTML content, as well.
JavaScript File. Creates a new JavaScript file from which you can create original JavaScript.
Cascading Style Sheet. Creates a base template from which you can create a unique cascading style sheet (CSS).
Duplicate. Creates a copy of the selected file in the Web Applications node.
Copy. Copies the selected file to the clipboard where you can paste it to a different node.
Rename. Changes the name of the selected file.
Delete. Deletes the selected application folder. You will be prompted to confirm your deletion. Click No if you do not want to delete an item, or click Cancel to abort the delete operation. If you choose to abort the delete operation while deleting a list of items, Cancel will prevent all subsequent items from being deleted.
Properties. Displays the folder properties in the File/Folder Properties panel.
Population is a check to see what content, if any, is contained within a node in the Configured Environments tree. Node population occurs when you select a node in the Configured Environments tree. The node icon will be different depending on whether population has occurred. If a node contains files after population a green dot appears on the node icon. If a node does not contain files after population, a red dot appears on the node icon.
|
Icon |
Description |
|---|---|
|
|
If a node has not been populated. |
|
|
If a node has been populated and contains content. |
|
|
If a node has been populated and does not contain files. |
If a node has been populated and contains content, deleting that content will change the green dot to a red dot. Conversely, if a node has been populated and contains no content, creating content in that node will change the red dot to a green dot.
The following shortcut menu options are available for a Master File:
Note: When a Master File is opened in the Text Editor canvas or the Metadata canvas, all other open options from the shortcut menu are unavailable.
In addition to opening files through the Application menu, or from the Quick Access Toolbar, you can also open files from the development areas in the Configured Environments tree.
Note: Files can only be opened in one area of App Studio at a time to ensure that your changes are not overwritten by another opened version of the file. However, you are able to open a file in App Studio and in a Windows Associated Tool at the same time. To ensure that your changes are saved properly, you should only modify one opened version of the file at a time.
In addition to opening editable files through the Configured Environments tree, you can also view file types that are not editable in App Studio. Viewable file types include:
To view a file, right-click it and select View from the context menu, or double-click it. The file opens in the program you associate it to on your computer.
Note: The above file types appear in the Configured Environments tree when you click the Show all content files button from the Environments Tree toolbar.
As you set up access to WebFOCUS environments, your settings are retained in a file named wfscom.xml. WebFOCUS environment settings are typically stored in the following locations.
Windows 7:
drive:\Users\user_id\
     AppData\Roaming\Information Builders\wfscom.xml
where:
Is your Windows user ID.
Note:
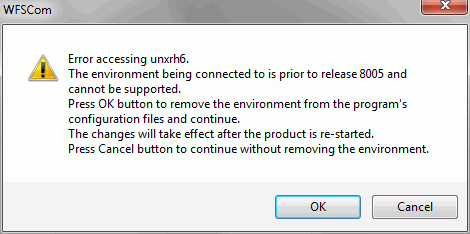
You can choose to remove this environment from your configuration files or leave the environment, and continue to develop against other environments that you configure. If you choose to remove the environment from your configuration files, you must restart App Studio.
A WebFOCUS environment consists of a web server, a WebFOCUS Client, and a Reporting Server. Adding WebFOCUS environments lets you create and manage multiple environments, such as development, test, and production instances.
To add a WebFOCUS environment, do the following:
The following procedure provides the information you need to add a WebFOCUS Environment.
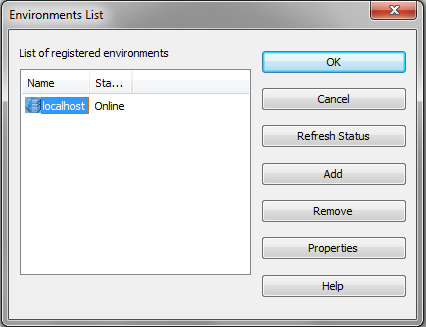
The Environments List dialog box opens, as shown in the following image. This dialog box lists all WebFOCUS environments defined for App Studio.
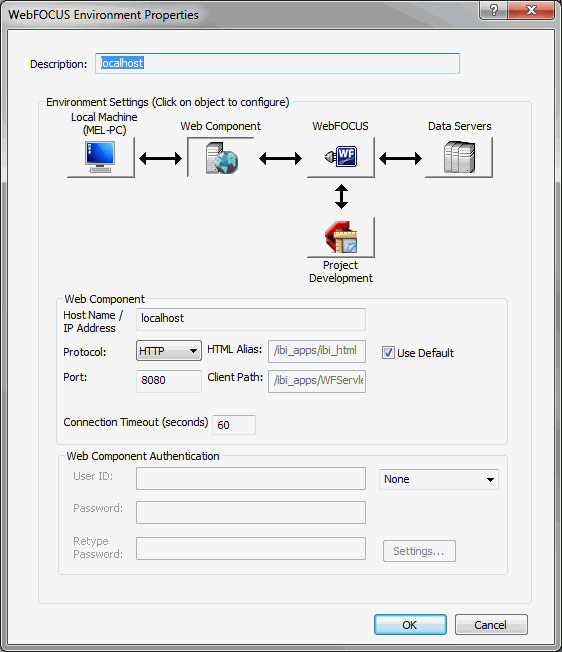
The WebFOCUS Environment Properties dialog box opens, as shown in the following image.
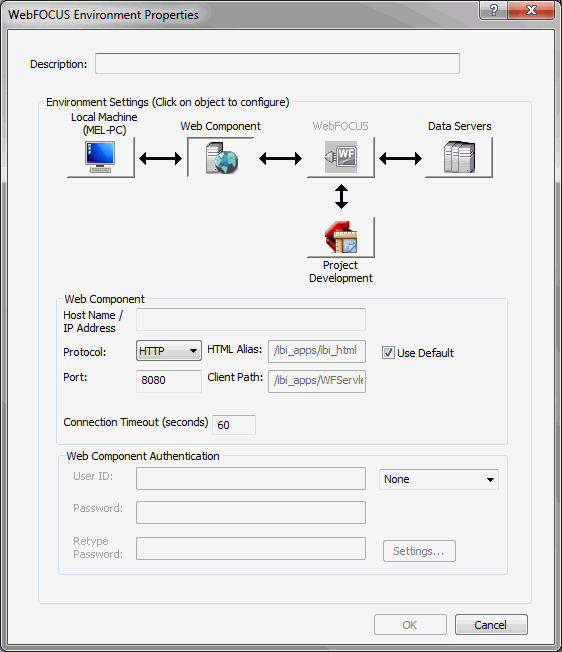
At the top of the dialog box is the Description field, followed by the Environments Settings area. The Environments Settings area contains a series of buttons that represent components in a WebFOCUS environment, and the required parameter fields to configure that environment. When you configure an environment, the areas below the buttons can change according to the parameters that are required.
Note: The description cannot contain special characters, such as ., /, \, ?, *, and others. A message with characters not allowed appears if one of the restricted characters is detected during validation.
For some environments, once you specify the web server, all other settings default. If the WebFOCUS environment you are accessing does not use default settings, or the components require authentication, click the appropriate button in the Environment Settings area to provide the parameters. The areas that follow explain the parameters available for each component.
Note: WebFOCUS environment properties must be supplied in a specific order. For example, if web server security is enabled, you cannot set the WebFOCUS Client script name until you have provided valid web server credentials. Similarly, you cannot retrieve a list of Reporting Servers until you have provided a valid WebFOCUS Client Path.
As you select a component button in the WebFOCUS Environment Properties dialog box, App Studio ensures that it has the necessary information before it displays the properties of that component in the lower part of the dialog box. If the required information is not available, you cannot proceed to the next component.
The WebFOCUS Logon - WebFOCUS dialog box, shown in the following image, opens and prompts you for a WebFOCUS ID and password.
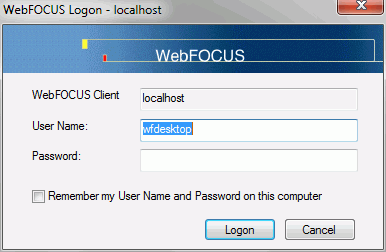
The WebFOCUS logon dialog box populates the ID wfdesktop, by default. This user ID is configured with WebFOCUS and allows self-service development: development from the Projects, Data Servers, and Web Applications area.
Access to the Repository is restricted, and you cannot create new content with this user ID. You can only see and run published content.
There is a check box option on the logon dialog box for remembering the ID or password. By default, it is not selected. If you select this box, your credentials are stored and encrypted in the wfscom.xml file, the local configuration file that stores information processed by the App Studio communication layer.
To clear stored credentials, open the WebFOCUS Environment Properties dialog box and select the environment that users need to make changes. Click WebFOCUS Client. Under WebFOCUS Credentials, delete the User ID and Password information, and then clear the Supply Credentials check box.
Note: A logon dialog box can also open for connection to the web server, application server, or Reporting Server, depending on the security implemented in the WebFOCUS environment that is being accessed.
Local Machine properties are optional. Click the Local Machine button to access the WebFOCUS Environment Caching area. Select the options in this area to cache remote directory and file information, and enable file-content caching.
The following image shows the WebFOCUS Environment Caching area of the WebFOCUS Environment Properties dialog box. The file content caching location path is for a Windows 7 machine.
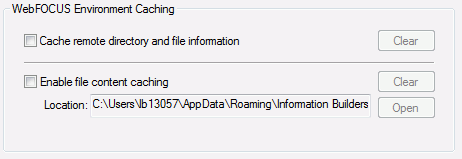
In caching, copies of files or information stored on a remote machine are temporarily stored on your local App Studio machine. App Studio then works with the locally stored files.
Caching speeds App Studio performance because remote machines are not accessed and queried every time you request information. This is especially useful when accessing mainframes or when a network connection is slow.
However, caching should not be used when multiple developers are working with the same files because they could overwrite changes made by other developers. By default, caching is not enabled.
Two properties are available:
App Studio retrieves information and files the first time you request them and then caches them locally. App Studio then uses the cached copies until App Studio is restarted, or you click the Clear buttons for each level.
Note:
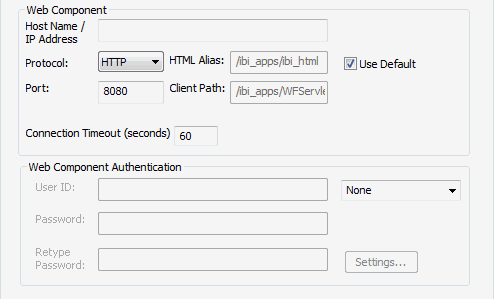
The Web Components button is typically selected by default. Web Component properties specify how App Studio accesses the web server. The web server must be identified before any other components. The following image shows the Web Component area of the WebFOCUS Environment Properties dialog box.
The following properties are available:
/ibi_apps/ibi_html
where:
Is customizable.
Is constant.
/ibi_apps/WFServlet
where:
Is customizable.
Is constant.
If the WebFOCUS environment uses a non-default context path, clear the Use Default check box and provide the correct Client Path. For example:
/ibi_apps8/WFServlet
If the Client Path is incorrect for the environment, you receive an error when you click the WebFOCUS button at the top of the page, or when you click OK to exit and save your changes.
If you do not know your path, ask your WebFOCUS Administrator or check the WebFOCUS Administration Console of the environment to which you want to connect. The Client Path settings for the environment are located under Utilities and Client Selection.
Use Default. Specifies that the default ibi_html alias is used. Keep this option selected unless you change the HTML Alias value.
Note:
HTML Alias:
/ibi_apps8/ibi_html
Client Path:
/ibi_apps8/WFServlet
Note: ClearTrust, SiteMinder, WebSEAL, and Oracle Access Manager require templates. Sample templates are provided with the WebFOCUS product. For more information, see the WebFOCUS Security and Administration manual.
As of Release 8.1 Version 05M, App Studio provides support for the following new single sign on (SSO) providers, when developing against WebFOCUS environments that are configured to use these providers for pre-authentication:
The Environments list dialog box opens.
The WebFOCUS Environment Properties dialog box opens.
A Web Logon form opens, as shown in the following image.
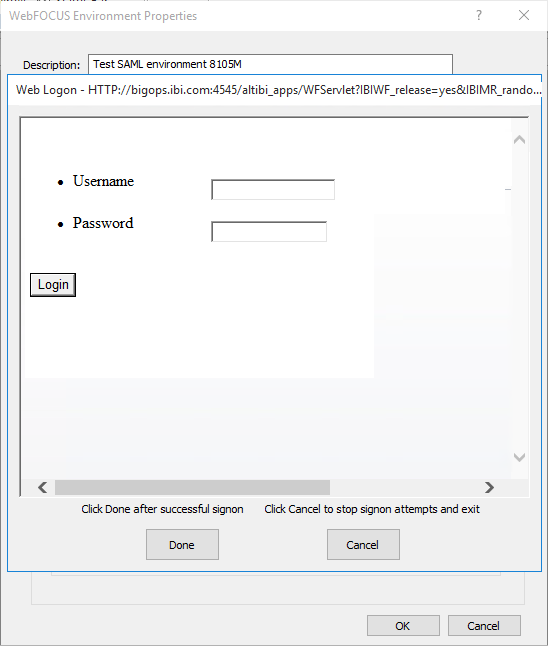
If the connection is successful, a message similar to the following image appears.
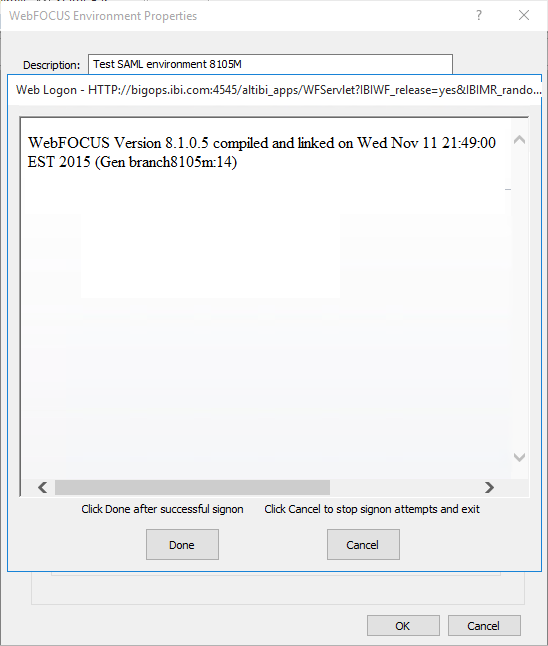
Note: If the connection is not successful, click Cancel, and ensure that you are connecting to a properly configured WebFOCUS environment that uses SAML or CAS.
The new WebFOCUS environment appears in the Environments Tree panel.
During configuration of the environment, if you are using HTTPS and certificates are self-signed, you are prompted with confirmation messages that need to be accepted to proceed.
Note:
When you click the WebFOCUS button, App Studio makes a connection to your web server to retrieve information about the WebFOCUS environment. Therefore, you have to first specify Web Component properties, and your web server must be running. The following image shows the WebFOCUS area of the WebFOCUS Environment Properties dialog box.
You are prompted to sign in to WebFOCUS to verify your configuration. You will also be prompted to sign in to WebFOCUS if you click OK to exit the dialog box.
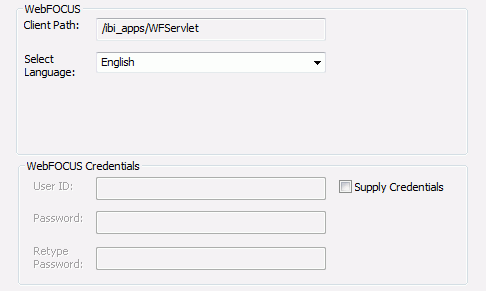
The following properties are available:
When the correct WebFOCUS Client Path is provided, you can specify properties for the remaining component.
Managed Reporting and ReportCaster properties are not available in this version of App Studio.
You can set authentication and view available Reporting Servers by clicking the Data Servers button. When you select Data Servers, App Studio connects to the WebFOCUS Client and retrieves a list of servers from its communication configuration file (odin.cfg).
The following image shows the WebFOCUS Data Servers area of the WebFOCUS Environment Properties dialog box.
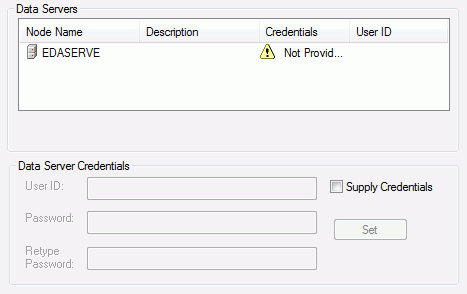
The following property is available:
Note: These properties only apply to self-service application development, and when performing project development.
If you use remote Project-based development and your remote environment has multiple Reporting Servers, click the Project Development button to specify which server to use when processing requests. This server is referred to as the Project Development Server. The Project Development Server and the WebFOCUS Client must be installed on the same machine or use the same Application Root directory (APPROOT directory) as each other.
The following image shows the Project Development Server area of the WebFOCUS Environment Properties dialog box.
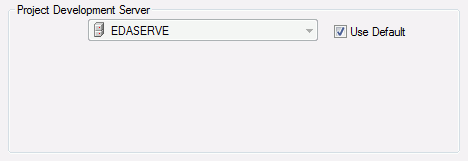
The following property is available:
The Environments List dialog box opens, as shown in the following image.
The WebFOCUS Environment Properties dialog box opens, as shown in the following image.
To add a project to the Projects node:
The Create a Project wizard opens.
In the Create a Project - Step 1 of 2 dialog box, you can:
The location and name of the new project displays at the bottom of the dialog box.
A message displays if the directory does not exist.
The Create a Project - Step 2 of 2 dialog box opens.
From this dialog box, you can add other directories to the project path. Project files in those directories are visible to the project and are accessible for development.
Repeat this step to add more directories to the project path.
The new project now appears under the Projects node.
You can update the directory folders associated with a Project after you create it by right-clicking the Project and selecting Properties. The Properties dialog box opens, click the Paths tab. In the Related Application Paths area, you can add, delete, and reorder the directory folders. Click OK to accept the changes.
If you have the manage private resources permission, you can use Mode Manager to view and edit private files. To enable Mode Manager, right-click on the Repository node and click Mode Manager. Your view refreshes, displaying all private files in the Repository. You can open and make changes to these private files as needed. When you are finished, right-click on the Repository node and click Mode Normal. Your view refreshes, hiding the private files in the Repository node.
Note: When a file in the Repository is marked as shared, and you do not have permission to save the original file, you will only be allowed to use the Save As command to save the file. This will allow you to save the file under a different name, leaving the original file untouched.
| WebFOCUS |


