External links in the WebFOCUS Visual Discovery Workbench
AE can be accessed as follows:
-
External Links Button in the Project Toolbar. The
Workbench AE Project toolbar now includes an External Link Launch
button combined with a drop-down list to present and execute external
links, as shown in the following image.

Only external links
assigned to the overall project are listed here. You can select an
external link from the drop-down list and then click the External
Link Launch button to execute the selected external link. The External
Link Launch button combined with a drop-down list is enabled only
when external links have been assigned to the project and are available
across all pages.
The External Link Launch button is a part
of the Workbench AE Project toolbar by default, but can be customized.
To view this toolbar, right-click in the menu toolbar and select Project.
You can also deselect Project to remove the
Project toolbar from view. This can be customized further by using
the Add or Remove buttons.
-
External Links Button in the Chart Toolbar. Each chart
now includes an External Link Launch button combined with a drop-down
list on the toolbar, which lists associated external links that
can be executed, as shown in the following image.
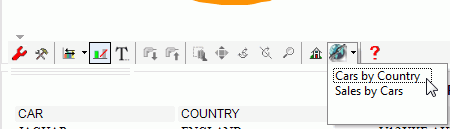
The drop-down list
of external links includes only those external links that are assigned
to the specific chart, or to all charts. If an external link is
set to all charts, then this option is automatically available,
even upon future chart creation. The External Link Launch button
in the chart toolbar is disabled by default and is enabled only
when external links have been assigned to the chart, either specifically
or globally. You can associate multiple external links with a single
chart, and an external link can be associated with multiple charts
if required.
-
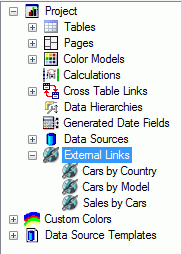
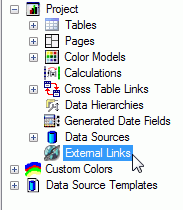
External Links Node in the Project Workshop.
There is a new External Links node added
in the Workbench AE Project Workshop, as shown in the following
image.
This node provides
an interface to add, modify, or delete external links, as well as view
high-level details about all external links associated with the
current project. This information is stored within Visual Discovery
AE project files when they are saved or published.
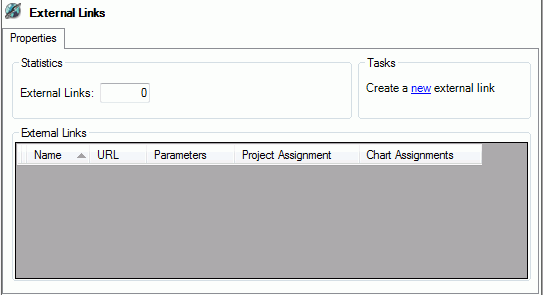
x
The Workbench AE Project Workshop element contains the
External Links node. This provides an interface to add, modify,
or delete external links as well as view high level details about
all external links associated with the current project.
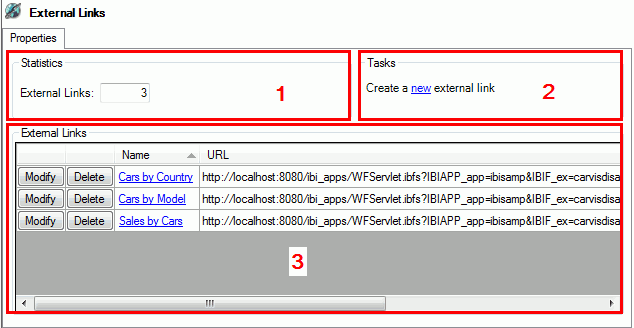
-
Statistics. Displays how many external links are
associated with the current project.
-
Tasks. Lists available actions that can be performed
on external links. For example, you can click new to create
a new external link.
-
External Links. Lists high-level details about each
external link associated with the current project. This includes
the Modify and Delete buttons, as well as the name of the external
link, URL, how many parameters are defined, whether the external
link is assigned to the overall project, and the total number of
assigned charts.
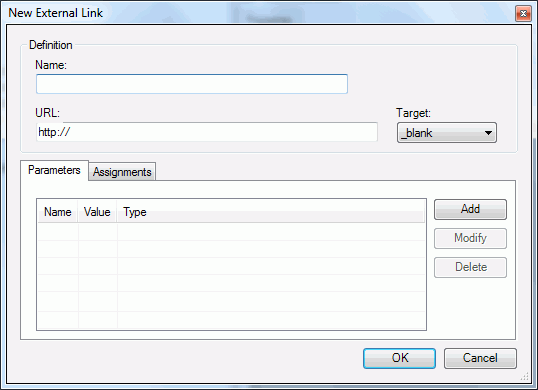
x
The New External Link dialog box allows you to build
an external link that is parameterized by any managed data source,
and assign it to a project or chart.
x
Procedure: How to Create an External Link
-
In the left pane of the Workbench AE
Project Workshop, click External Links, as
shown in the following image.
The External Links
dialog box opens in the workspace area, as shown in the following
image.
-
In the Tasks area, click new.
The New External Link dialog box opens, as shown in the
following image.
-
In the Definition area, perform the following steps:
-
Type a name for the new external link in
the Name field.
A name is the string used to present and describe the external
link in the External Links node within the Workbench AE Project
Workshop, and the External Link Launch button combined with a drop-down
list that can be viewed in the Workbench AE, and Server AE environments.
Note: As
a best practice, define a name that indicates the type of information
that you expect to see when drilling out on an external link.
-
Type the URL of the external link in the URL field.
The URL is the absolute URL path assigned to the external
link, which is executed when selected from the External Link Launch
button combined with a drop-down list that is available in the Workbench
AE and Server AE environments. HTTP, HTTPS, FTP, FTPS, and other
URL formats are accepted.
-
Select a target from the Target drop-down list, which
is the browser location that will be used to open the selected external
link.
The following target types are available:
- _blank (selected by default)
- _parent
- _self
- _top
Note: The target type is only used
when executing external links from within the Server AE. Server
AE and Workbench AE will execute external links in the latest active
default browser, or automatically launch the default browser.
-
The Parameters tab in the New External Link dialog box
manages and lists the name and value pairs appended to external
links when selected from the External Link Launch button combined
with a drop-down list that is available in the Workbench AE and
Server AE environments.
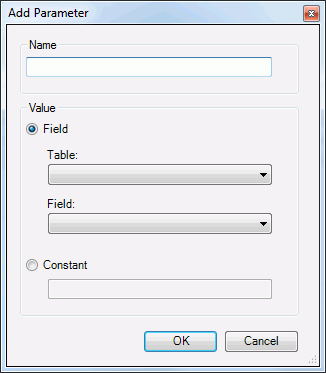
To create new parameters, click the Add button
to open the Add Parameter dialog box, as shown in the following
image.
Perform the following
steps:
-
Enter a name in the Name field, which is
the text assigned to the name portion of the name and value pair.
Note: If no name is provided, then the field that
is selected from the Field drop-down list will be specified as the
name.
-
Specify a value in the Value area as a string to be
assigned to the value portion of the name and value pair. The value
can be a field or a constant.
-
Field. Assigns the field-level row value for
the selection state of the project, based on the selected data source
(Table) and column (Field). Select the required values
from the corresponding drop-down lists.
Note: It is recommended
to match the selection state of a Visual Discovery AE project to
any subsequent URL-based application by passing fields that make
a record unique. When using non-unique fields, consideration must
be taken in mapping selection states to the external link URL-based
application accordingly.
Note: Depending on the data
type that is defined for a field, data values referenced by external
links are specifically constructed when they are passed to the subsequent
URL-based application. For example, strings and dates are passed enclosed
within single apostrophe characters, and are separated by an OR operator.
Data types of type integer and double are not enclosed by single
apostrophe characters, but are still separated an OR operator.
Empty and null values for all data types are represented by MISSING.
-
Constant. Specifies a static string.
-
The Assignments tab in the New External Link dialog box
manages and lists how external links are associated with the entire
project, any given chart, or across all charts.
Perform the following steps:
-
Select the Project check box
to assign an external link to the overall project. The external
link is then added as an option listed in the External Link Launch
button combined with a drop-down list.
-
Select Specific Charts or All
Charts to assign external links to a specific chart
or to all charts. The external link is then listed in the External
Link Launch button combined with a drop-down list for the corresponding
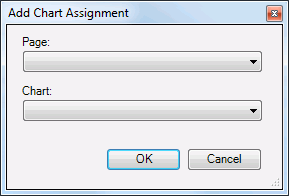
chart. To assign the external link to a specific chart, click Add.
Note: When assigning external links, external links
at the project level must not be combined with external links for
all charts. It is recommended to create two external links, one
for the project level and the other for the charts level.
The
Add Chart Assignment dialog box is displayed, as shown in the following image.
-
From the Page drop-down list, select the page number
in which the chart is located.
-
From the Chart drop-down list, select the specific chart.
-
Click OK.
The external link is now displayed in the chart toolbar
to which it was assigned.
The external link is now created and can be accessed
from the External Link Launch button combined with a drop-down list
in the Project toolbar, Chart toolbar, or the External Links node
in the Workbench AE Project Workshop.
x
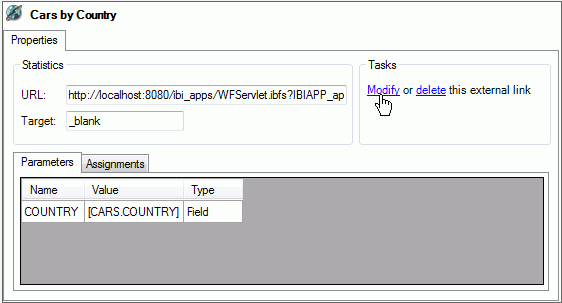
After an external link is created, the external link
and all of its associated and assigned parts can be viewed on the
external link properties page. This page is accessible from the
External Links node added in the Workbench AE Project Workshop (left pane),
or by selecting the name of the external link as a hyperlink from
the list of external links (right pane).
x
Procedure: How to View an External Link
-
In the Workbench AE Project Workshop,
expand the External Links node in the left
pane.
-
Click the external link you would like to view in the
left pane, or the name of the external link as a hyperlink in the
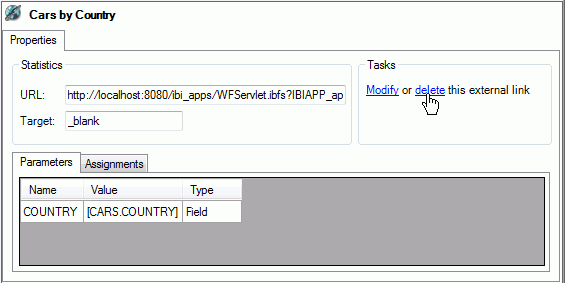
right pane, as shown in the following image.

The external link
properties page is displayed, which provides all of the details
for the selected external link, as shown in the following image.
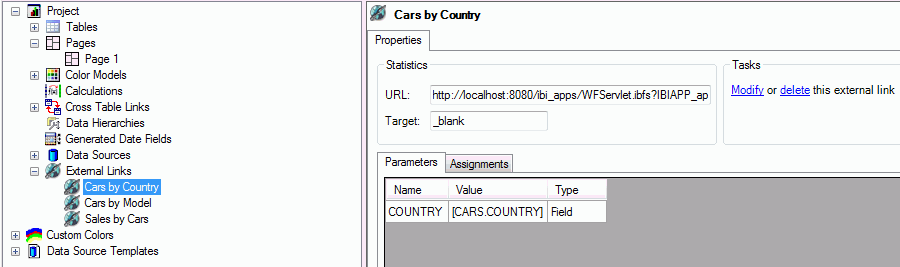
This page allows you
to modify or delete the external link.
x
All external links can be modified at any time. When
modified, the same interface used to create the external link is
presented in a Modify External Link dialog box where every property
of the external link can be updated. To modify an external link,
click the Modify button next to an external
link in the main page of the Workbench AE Project Workshop or the Modify link
on the external link properties page.
x
Procedure: How to Modify an External Link
External links can be modified using one of
the following methods:
- In the main page of the Workbench
AE Project Workshop (External Links node). See steps 1 and 2.
- On a specific external link properties page. See steps 3 and 4.
-
In the main page of the Workbench AE Project Workshop,
click External Links in the left pane.
All of the available external links are displayed in the
right pane, as shown in the following image.
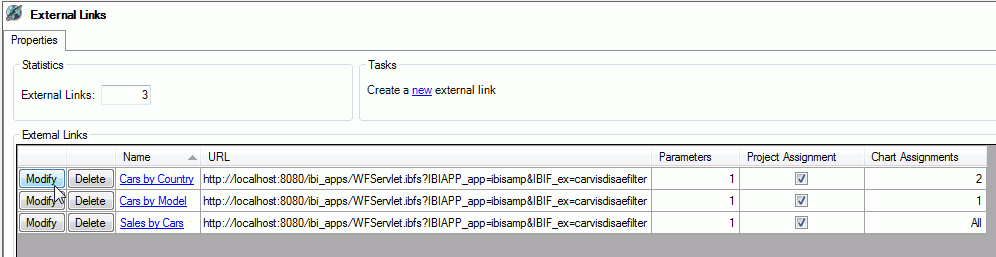
-
Click the Modify button for a
corresponding external link that is listed.
-
In the left pane, click the specific external link that
you want to modify.
The specific external link properties page is displayed,
as shown in the following image.
-
In the Tasks area, click the Modify hyperlink.
The Modify External Link dialog box opens, as shown in
the following image.
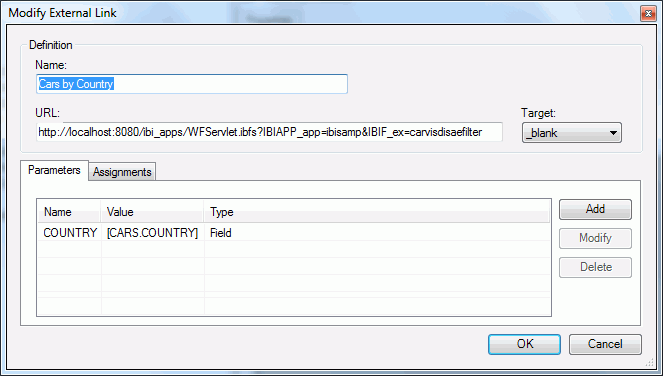
-
Modify the properties of the selected external link as required.
-
Click OK when you are done.
x
An external link can be permanently deleted at any time.
Note: The delete action cannot be undone.
x
Procedure: How to Delete an External Link
External links can be deleted using one of
the following methods:
- In the main page of the Workbench
AE Project Workshop (External Links node). See steps 1 and 2.
- On a specific external link properties page. See steps 3 and 4.
-
In the main page of the Workbench AE Project Workshop,
click External Links in the left pane.
All of the available external links are displayed in the
right pane, as shown in the following image.
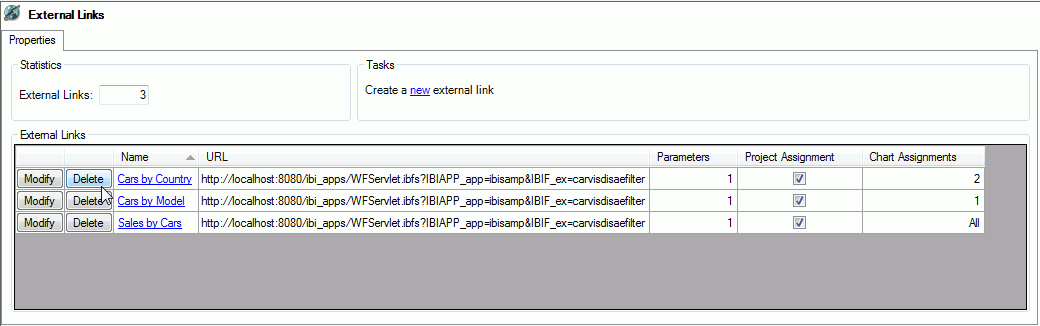
-
Click the Delete button for a
corresponding external link that is listed.
-
In the left pane, click the specific external link that
you want to modify.
The specific external link properties page is displayed,
as shown in the following image.
-
In the Tasks area, click the delete hyperlink.
The Confirm Deletion dialog box opens, as shown in the
following image.
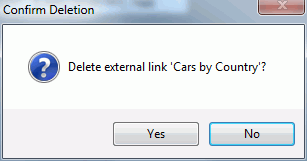
-
Click Yes to permanently delete
the selected external link.
x
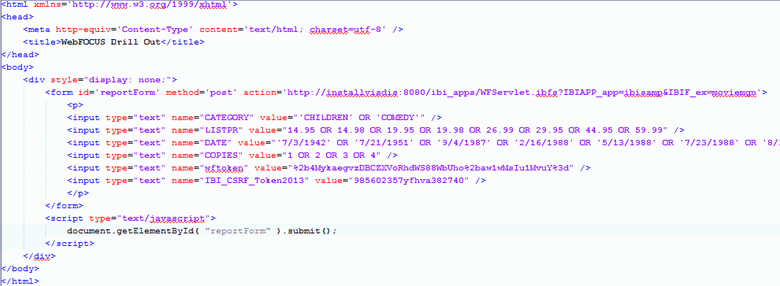
As part of the Visual Discovery AE HTTP Post request,
all external link parameters, and WebFOCUS tokens, are embedded
as fields.
Constructing external link parameter values are specifically
based on the external links parameter field data type defined in
the in-memory data source. Any value that is NULL or MISSING will
be represented by the reserved string MISSING (not enclosed with
single apostrophes). When multiple records are selected the multiple
values represented for a single field are concatenated, and separated
by OR.
-
Dates. Date values are enclosed by single apostrophes.
Syntax:
<field>='<value>'
For
example:
DATE='02/09/1959'
DATE=''
Multiple
values are represented as:
<field>='<value>' OR '<value>' OR '<value>'... OR '<value>'
For
example:
DATE='02/09/1959’ OR ‘07/30/1982’ OR MISSING OR ''
-
Doubles. Double values are not enclosed by single apostrophes.
Syntax:
<field>=<value>
For
example:
LISTPR=19.95
LISTPR=MISSING
Multiple
values are represented as:
<field>=<value> OR <value> OR <value>...
For
example:
LISTPR=19.95 OR 24.95 OR 14.98 OR MISSING
-
Integers. Integer values are not enclosed by single apostrophes.
Syntax:
<field>=<value>
For
example:
COPIES=2
COPIES=MISSING
Multiple
values are represented as:
<field>=<value> OR <value> OR <value>... OR <value>
For
example:
COPIES=2 OR 3 OR MISSING
-
Strings. String values are enclosed by single apostrophes.
Syntax:
<field>='<value>'
For
example:
CATEGORY='TRAIN/EX'
CATEGORY=''
Multiple
values are represented as:
<field>='<value>' OR '<value>' OR '<value>'... OR '<value>'
For
example:
CATEGORY='TRAIN/EX' OR '' OR MISSING OR 'COMEDY'
Note: Single
apostrophes found in a string will ultimately be replaced and passed
with two single apostrophes (for example, value=’That’’s Life’).
-
WFToken. Updates the embedded/encoded
timestamp with the current time.
Syntax:
wftoken=<updated encrypted wftoken>
For
example:
wftoken= %2b4MykaegvzDBCZXVoRhdWS88WbUho%2baw1wMsIu1MvuY%3d
-
CSRF Token. Cross-site Request Forgery (CSRF) token enhances security.
Syntax:
<IBI_CSRF_Token_Name>=<IBI_CSRF_Token_Value>
For
example:
IBI_CSRF_Token2013=985602357yfhva382740