Working With Visual Discovery Controls on the Web
Anyone viewing Visual Discovery analytic dashboards
on the web can alter the selection of data or the display of controls
without requiring Developer Studio or any programming skills. You
can select data, restore excluded data, change the display, such as
orientation or sort order, or save the control as a GIF image for
use in an external report.
x
On your Visual Discovery analytic dashboard on the web,
click inside a control and drag your cursor until part of the data
is captured by an outline. Release the cursor to complete the selection.
You will see the selection change the appearance not only of the
control in which you made the selection, but in all the Visual Discovery
controls on the dashboard.
To change the shape of the selection tool, select the control
and click ActiveX Properties. Click the Selecting tab and
choose a new selector shape. For more information, see Selecting Tab.
x
Once you have selected data on your Visual Discovery
analytic dashboard on the web, the excluded data is grayed out or
simply not present, depending on the options preselected by the
Dashboard creator. If the excluded data is grayed out, you can
restore it in the following ways:
- Clicking a
gray section replaces the current selection.
- Pressing Ctrl
+ click adds the new section to the current selection.
- Dragging the
selector shape across the control selects a new set of data.
If the excluded data disappears from
the control, you can restore it by:
- Selecting the grayed-out data in another
control.
- Right-clicking the control and selecting Show
unselected to keep the selection area the same while
displaying unselected data.
- Right-clicking
the control and selecting Select, then Select
All to restore all data to the selection.
x
To change the orientation, label display, sort order,
or glyph choice for any Visual Discovery control, right-click the
control and select the appropriate item. For pie charts, you can
also change the rotation, the measure of explosion, or the weighting.
For access to the complete set of control options, right-click
the control and click Properties.
xSaving a Control as an Image
To save a control as an image, right-click the control
and click Save image. Specify the destination
and file name to save the control as a GIF file.
xSaving the State of Analysis
A bookmark is a combination of display characteristics, such
as the selection state (data that is selected, unselected, or excluded)
and the colors used in the control. The Visual Discovery bookmark
feature allows you to save a specific state in your analysis, so you
can return to it at a later time without recreating it from the
beginning.
To save the current state of your analysis, select the control,
click ActiveX Properties, and access the
BookMarks tab in the Visual Discovery Properties dialog box. In
the input field, type a name for the bookmark and click Create and OK.
The new bookmark will be available from the Bookmarks option on
the pop-up menu for the control.
x
The
following image shows the BookMarks tab in the Visual Discovery
Properties dialog box.
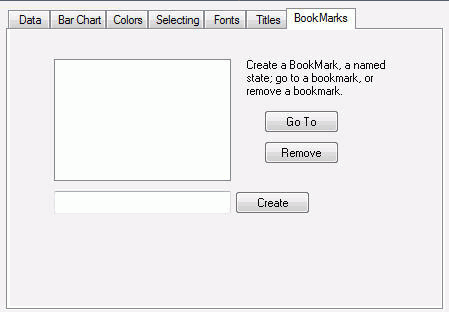
-
Create
-
This bookmarks the current view of the control on a webpage
so that you can return to it at a later date. Type a name and click Create.
-
Go To
-
Select a bookmark and click Go To to
return to that view of the control.
-
Remove
-
Select a bookmark and click Remove to
delete the bookmark.