How to: |
You can set either EDAPATH or APP PATH logic in the Reporting Server global profile (EDASPROF.PRF), a user profile, or a procedure. For either kind of logic, make sure that the following files are accessible by the Reporting Server:
- Procedures.
- WebFOCUS StyleSheets.
- Custom HTML display pages called by the -HTMLFORM command.
- Images embedded in report output.
The directories in which the preceding files reside must be included on EDAPATH or APP PATH, depending on the logic used.
If you create a user interface page with a text editor and deploy your project files with the Deploy Wizard, make sure that the path created by the Deploy Wizard on the Reporting Server is defined in EDAPATH.
For details on the path created for deployed files, see Partitioning and Deploying Project Files in the Creating Reporting Applications With Developer Studio manual. Also, see your Reporting Server configuration documentation on specifying files.
If you create a user interface page with a text editor and deploy your project files with the Deploy Wizard, do the following.
In the interface page, set the variable IBIAPP_app as follows:
<INPUT TYPE="HIDDEN" NAME="IBIAPP_app" VALUE="app_directory">where:
- app_directory
Is the directory on the Reporting Server to which procedures are deployed.
After you deploy a procedure using APP PATH logic, you can execute it only from the specified APP PATH directory. You cannot change the location of the project without changing the value of the variable IBIAPP_app.
For a full description of all commands related to APP PATH logic, see Managing Applications.
For details on the path created for deployed files, see Partitioning and Deploying Project Files in the Creating Reporting Applications With Developer Studio manual. Also, see your Reporting Server configuration documentation on specifying files.
Note: For information on where to store the files created in this example, see Defining and Allocating WebFOCUS Files.
- In a project named
SALESDIR, create a procedure named SALESSE. It reports on total
unit and dollar sales in the Southeast for a category requested
by the user.
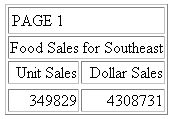
Procedure: SALESDIR.FEX
TABLE FILE GGSALES
HEADING
"&CATEGORY Sales for Southeast"
SUM UNITS AND DOLLARS
WHERE (CATEGORY EQ '&CATEGORY') AND (REGION EQ 'Southeast');
END
- Using a third-party
text editor such as Notepad, manually code a launch page named LAUNCHSE.
It contains a form that uses the Servlet to call WebFOCUS to run SALESSE.
A one-line text box prompts the user for a value for CATEGORY.
The launch page contains code that sets the variable IBIAPP_app to the directory (SALESDIR) in which the procedure (SALESSE) resides after deployment by the Deploy Wizard.
Launch Page: LAUNCHSE.HTML
<HTML>
<HEAD>
<TITLE> WebFOCUS Report </TITLE>
</HEAD>
<BODY>
<H4 ALIGN=CENTER>Sales Report for Southeast Region</H4>
<HR>
<FORM ACTION="/ibi_apps/WFServlet" METHOD="get">
<INPUT TYPE="HIDDEN" NAME="IBIAPP_app" VALUE="SALESDIR"><INPUT NAME="IBIF_ex" VALUE="salesse" TYPE="hidden"> <P ALIGN=LEFT NOWRAP><PRE> <B>Enter category: </B><INPUT NAME="CATEGORY" TYPE="text" SIZE="6"> </PRE></P> <INPUT NAME="submit" TYPE=SUBMIT VALUE="Run Report"> <INPUT NAME="reset" TYPE=RESET VALUE="Clear Form"> </FORM> </BODY> </HTML>
- Deploy the procedure and launch page using the Deploy Wizard. See Partitioning and Deploying Project Files in the Creating Reporting Applications With Developer Studio manual for details.
- Run the launch page
in your browser. It will look similar to this:
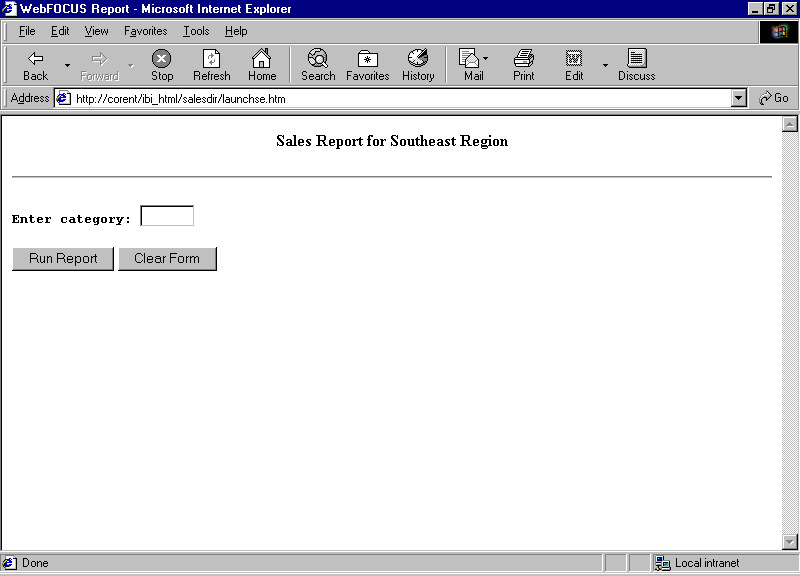
- In the Enter category
field, type:
Food
- Click Run
Report to receive the report.