By default, an HTML report contains horizontal and vertical grid
lines. You can remove the grid lines or adjust their use on a horizontal
(BY) sort field. Grid characteristics apply to an entire HTML report,
not to individual components of a report.
You can emphasize headings, footings, and column titles in a
report by adding borders and grid lines around them.
Borders: In an HTML, PDF, EXL2K,
or PS report, you can use BORDER attributes in a StyleSheet to specify
the weight, style, and color of border lines. If you wish, you can
specify formatting variations for the top, bottom, left, and right
borders. BORDERS only work with the following syntax because they
can only be implemented with internal cascading style sheets:
ON TABLE SET HTMLCSS ON
For an example, see Inserting and Formatting a Border.
The BORDERALL StyleSheet attribute supports a heading or footing
grid with borders around each individual heading or footing cell
in PDF report output. Using this attribute along with BORDER attributes
for individual objects in a heading or footing enables you to create borders
around individual items.
Currently, with SQUEEZE=ON, the right margin border for subheadings
and subfootings is defined based on the maximum width of all heading,
footing, subheading, and subfooting lines. The length of subheading
and subfooting lines is tied to the lengths of the page heading
and page footing, not to the size of the data columns in the body
of the report. You can use the ALIGN-BORDERS=BODY attribute in a
StyleSheet to align the subheadings and subfootings with the report
body on PDF report output instead of the other heading elements.
Grids: In an HTML report, you can use the GRID attribute
in a StyleSheet to turn grid lines on and off for the entire report.
When used in conjunction with internal cascading style sheets, GRID
produces a thin grid line rather than a thick double line (the HTML
default). In PDF reports you can use the HGRID and VGRID attributes
to add horizontal or vertical grid lines and adjust their density.
Note: The SET GRID parameter, which applies to graphs,
is not the same as the GRID StyleSheet attribute.
x
Reference: Grid Display Attributes
|
Attribute
|
Description
|
Applies to
|
|---|
GRID |
Controls grid display.
|
HTML
|
HGRID |
Controls horizontal
grid display and grid line density.
|
PDF
PS
|
VGRID |
Control vertical grid display and grid line
density.
|
PDF
PS
|
Note: When viewing PDF reports with the
Adobe Reader, GRID lines may appear thinner than specified if the
view is not set to 100%. For example, if you view the document at
the 50% setting, some GRID lines may be thinner than others.
x
Syntax: How to Control Grid Display in HTML Reports
[TYPE=REPORT,] GRID= option, $
where:
- TYPE=REPORT
Applies the grid to the entire report. Not required, as it
is the default.
- option
Is one of the following:
ON applies
a grid to a report. Does not apply grid lines to cells underneath
a BY field value until the value changes. Column titles are not underlined.
ON is the default value.
OFF disables the
default grid. Column titles are underlined. You can include blank
lines and underlines. You cannot wrap cell data. With this setting, a
report may be harder to read.
FILL applies
grid lines to all cells of a report. Column titles are not underlined.
x
Syntax: How to Add and Format Borders
To request a uniform border, use this
syntax:
TYPE=type, BORDER=option, [BORDER-STYLE=line_style,]
    [BORDER-COLOR={color|RGB(r g b)},] $
To specify different characteristics
for the top, bottom, left, and/or right borders, use this syntax:
TYPE=type, BORDER-position=option,
   [BORDER[-position]-STYLE=line_style,]
   [BORDER[-position]-COLOR={color|RGB(r g b)},] $
where:
- type
Identifies the report component to which borders are applied.
See Identifying a Report Component in a WebFOCUS StyleSheet for valid values.
- option
Can be one of the following values:
ON turns borders on.
ON generates the same line as MEDIUM.
Note: The
MEDIUM line setting ensures consistency with lines created with
GRID attributes.
OFF turns
borders off. OFF is the default value.
LIGHT specifies
a thin line.
MEDIUM identifies
a medium line. ON sets the line to MEDIUM.
HEAVY identifies
a thick line.
width specifies the
line width in points, where 72 pts=1 inch. Note that this option
is not supported with Excel 2003, which does not have an option
for specifying a number to precisely set the border width (thickness)
in points.
Tip: Line width specified in points is displayed
differently in HTML and PDF output. For uniform appearance, regardless
of display format, use LIGHT, MEDIUM, or HEAVY.
- position
Specifies which border line to format. Valid values are:
TOP, BOTTOM, LEFT, RIGHT.
You can specify a position qualifier
for any of the BORDER attributes. This enables you to format line
width, line style, and line color individually, for any side of
the border.
- line_style
Sets the style of the border line.
WebFOCUS StyleSheets support all of the standard cascading style
sheet line styles. Several 3-dimensional styles are available only
in HTML, as noted by asterisks. Valid values are:
Style | Description |
|---|
NONE | No border is drawn. |
SOLID | Solid line. |
DOTTED | Dotted line. |
DASHED | Dashed line. |
DOUBLE | Double line. |
GROOVE* | 3D groove. (Not supported with Excel 2003,
which has no option for specifying this type of border.) |
RIDGE* | 3D ridge. (Not supported with Excel 2003,
which has no option for specifying this type of border.) |
INSET* | 3D inset. |
OUTSET* | 3D outset. |
- color
Is one of the preset color values.
The default value is BLACK.
If the display or output device
does not support colors, it substitutes shades of gray. For a complete
list of available color values, see Formatting Report Data.
- RGB
Specifies the font color using a mixture of red, green, and blue.
- (r g b)
Is the desired intensity of red, green, and blue, respectively.
The values are on a scale of 0 to 255, where 0 is the least intense
and 255 is the most intense. Using the three color components in
equal intensities results in shades of gray.
Note: Format
EXL2K does not support the GRID=ON parameter.
Example: Inserting and Formatting a Border
This request generates an HTML report
with a heavy red dotted line around the entire report heading.
TABLE FILE GGSALES
SUM BUDUNITS UNITS BUDDOLLARS DOLLARS
BY CATEGORY
ON TABLE SUBHEAD
"</1 Sales Report"
"**CONFIDENTIAL**"
"December 2002 </1"
ON TABLE SET PAGE-NUM OFF
ON TABLE SET ONLINE-FMT HTML
ON TABLE SET HTMLCSS ON
ON TABLE SET STYLESHEET *
TYPE=REPORT, GRID=OFF, $
TYPE=TABHEADING, STYLE=BOLD, JUSTIFY=CENTER, BORDER=HEAVY,
     BORDER-COLOR=RED, BORDER-STYLE=DOTTED, $
ENDSTYLE
END
The output is:

Tip: You
can use the same BORDER syntax to generate this output in a PDF or
PS report.
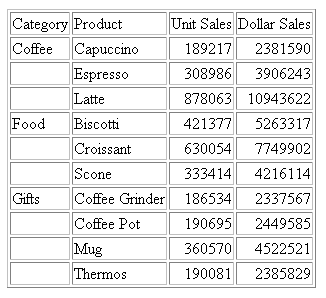
Example: Displaying the Default Grid on an HTML Report
This request uses the default setting
GRID=ON.
TABLE FILE GGSALES
SUM UNITS DOLLARS
BY CATEGORY BY PRODUCT
ON TABLE SET PAGE-NUM OFF
END
The cells underneath the sort field CATEGORY do
not have grid lines until the value changes (for example, from Coffee
to Food):
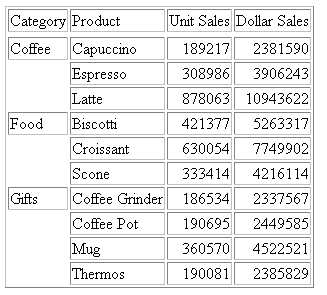
Example: Applying Grid Lines to All Cells of an HTML Report
This request uses GRID=FILL to apply
grid lines to all cells, including those underneath the sort field
CATEGORY.
TABLE FILE GGSALES
SUM UNITS DOLLARS
BY CATEGORY BY PRODUCT
ON TABLE SET PAGE-NUM OFF
ON TABLE SET STYLE *
TYPE=REPORT, GRID=FILL, $
ENDSTYLE
END
All cells have grid lines:
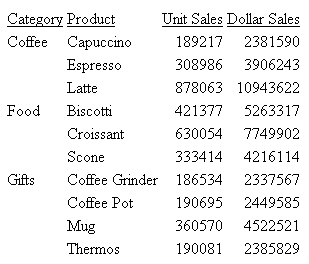
Example: Removing a Grid From an HTML Report
This request uses GRID=OFF to remove
the default grid from a report.
TABLE FILE GGSALES
SUM UNITS DOLLARS
BY CATEGORY BY PRODUCT
ON TABLE SET PAGE-NUM OFF
ON TABLE SET STYLE *
TYPE=REPORT, GRID=OFF, $
ENDSTYLE
END
Column titles are underlined:
x
Syntax: How to Insert Inner and Outer Borders Within Headings or Footings in PDF Reports
BORDERALL
is the quickest way to add borders to the entire heading grid. Individual
borders can be removed by explicitly turning the border off in individual
items using BORDER, BORDER-LEFT, BORDER-RIGHT, BORDER-TOP, and BORDER-BOTTOM.
For a given item that is bordered by BORDERALL, BORDER-LEFT=OFF
presents the item with no left border, but the defined border style
is retained for top, bottom, and right borders.
Three levels of borders for headings
and footings are supported:
- Individual cell borders.
BORDER-LEFT,
BORDER-RIGHT, BORDER-TOP, and BORDER-BOTTOM can be used to set the
individual components of the external border of the heading or a
selected item or cell.
- All outer borders.
BORDER=
is used to set the external borders within a heading or footing.
- All outer and internal
borders.
BORDERALL is used to apply border characteristics to
both the internal and external borders of the selected heading or
footing.
Note: BORDERALL applies to the entire
heading or footing element. It cannot be used for individual lines
or items within a heading or footing element.
To turn on all external and internal
borders (a border grid):
TYPE=headfoot, BORDERALL=option, [BORDER-STYLE=line_style,] [BORDER-COLOR={color|RGB(rgb)},] $where:
- headfoot
Is the type of heading or footing. Valid values are TABHEADING,
TABFOOTING, HEADING, FOOTING, SUBHEAD, and SUBFOOT.
Note: BORDERALL
applies to the entire heading or footing element. It cannot be
used for individual lines or items within a heading or footing element.
To request a uniform border, use this
syntax:
TYPE=headfoot, BORDER=option
To specify different characteristics
for the top, bottom, left, and/or right borders, use this syntax:
TYPE=headfoot, BORDER-position=option,
   [BORDER[-position]-STYLE=line_style,]
   [BORDER[-position]-COLOR={color|RGB(rgb)},] $
where:
- headfoot
Identifies the heading, footing, subheading, or subfooting
to which borders are applied.
- option
Can be one of the following values:
ON turns borders on.
ON generates the same line as MEDIUM.
Note: The MEDIUM
line setting ensures consistency with lines created with GRID attributes.
OFF turns
borders off. OFF is the default value.
LIGHT specifies
a thin line.
MEDIUM identifies a medium
line. ON sets the line to MEDIUM.
HEAVY identifies
a thick line.
width specifies
the line width in points, where 72 pts=1 inch. Note that this option
is not supported with Excel 2003, which does not have an option
for specifying a number to precisely set the border width (thickness)
in points.
Tip: Line width specified in points is displayed
differently in HTML and PDF output. For uniform appearance, regardless
of display format, use LIGHT, MEDIUM, or HEAVY.
- position
Specifies which border line to format.
Valid values are: TOP, BOTTOM, LEFT, RIGHT.
You can specify
a position qualifier for any of the BORDER attributes. This enables you
to format line width, line style, and line color individually, for
any side of the border.
- line_style
Sets the style of the border line. WebFOCUS StyleSheets support
all of the standard cascading style sheet line styles. Several three-dimensional
styles are available only in HTML, as noted by asterisks. Valid
values are:
Style | Description |
|---|
NONE | No border is drawn. |
SOLID | Solid line. |
DOTTED | Dotted line. |
DASHED | Dashed line. |
DOUBLE | Double line. |
GROOVE* | 3D groove. (Not supported with Excel 2003, which
has no option for specifying this type of border.) |
RIDGE* | 3D ridge. (Not supported with Excel 2003,
which has no option for specifying this type of border.) |
INSET* | 3D inset. |
OUTSET* | 3D outset. |
Note: All line types supported for PDF
can be used for individual internal borders with HEADALIGN=BODY.
- color
Is one of the preset color values.
The default value is BLACK.
If the display or output device
does not support colors, it substitutes shades of gray. For a complete
list of available color values, see the Color Values in a Report.
- RGB
Specifies the font color using a mixture of red, green, and blue.
- (rgb)
Is the desired intensity of red, green, and blue, respectively.
The values are on a scale of 0 to 255, where 0 is the least intense
and 255 is the most intense. Using the three color components in
equal intensities results in shades of gray.
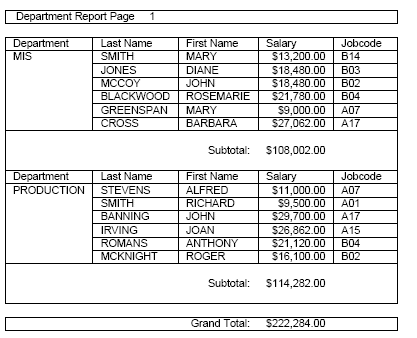
Example: Controlling Borders Within Heading and Footing Elements in PDF Report Output
The following request against the EMPLOYEE
data source has a page heading, a subheading, a subfooting, and
a report footing:
TABLE FILE EMPLOYEE
HEADING
" Department Report Page <TABPAGENO "
PRINT LAST_NAME AS ''
FIRST_NAME AS ''
CURR_SAL AS ''
CURR_JOBCODE AS ''
BY DEPARTMENT AS ''
WHERE CURR_SAL NE 0.0
ON TABLE PCHOLD FORMAT PDF
ON DEPARTMENT SUBFOOT
" "
"Subtotal:<ST.CURR_SAL"
" "
ON DEPARTMENT SUBHEAD
"Department <+0>Last Name <+0>First Name <+0>Salary<+0>Jobcode <+0>"
ON TABLE SUBFOOT
"Grand Total:<ST.CURR_SAL"
ON TABLE SET HTMLCSS ON
ON TABLE SET STYLE *
TYPE=REPORT, FONT=ARIAL, BORDER=ON, SQUEEZE=ON, $
TYPE=REPORT, COLUMN=CURR_JOBCODE,SQUEEZE=.75, $
TYPE = SUBHEAD, HEADALIGN=BODY, BORDERALL=ON,$
TYPE = SUBFOOT, HEADALIGN=BODY,$
TYPE = SUBFOOT, LINE=2, ITEM=1, COLSPAN=3, JUSTIFY=RIGHT,$
TYPE = SUBFOOT, LINE=2, ITEM=2, JUSTIFY=RIGHT,$
TYPE = TABFOOTING, HEADALIGN=BODY,$
TYPE = TABFOOTING, ITEM=1, COLSPAN=3, JUSTIFY=RIGHT,$
TYPE = TABFOOTING, ITEM=2, JUSTIFY=RIGHT,$
END
The REPORT component has BORDER=ON, so the page
heading has an external border.
The subheading has BORDERALL=ON
and HEADALIGN=BODY, so the subheading grid aligns with the body
grid, and each item within the subhead is presented as fully bordered individual
cells.
The StyleSheet aligns the subfooting elements with
the body of the report, and has the salary subtotal on the second
line aligned and justified with the CURR_SAL column.
The table
footing has a border around the entire footing because the REPORT component
specifies BORDER=ON. The grand total is aligned and justified with
the CURR_SAL column on the report.
The
output is:
x
Syntax: How to Align Subheading and Subfooting Margins With the Report Body
Currently,
with SQUEEZE=ON, the right margin border for subheadings and subfootings
is defined based on the maximum width of all heading, footing, subheading,
and subfooting lines. The length of subheading and subfooting lines
is tied to the lengths of the page heading and page footing, not
to the size of the data columns in the body of the report.
You
can use the ALIGN-BORDERS=BODY attribute in a StyleSheet to align
the subheadings and subfootings with the report body on PDF report
output instead of the other heading elements.
You can align
subheading and subfooting margins with the report body either by
adding the ALIGN-BORDERS=BODY attribute to the StyleSheet declaration
for the REPORT component, or placing it in its own declaration without
a TYPE attribute.
[TYPE=REPORT,] ALIGN-BORDERS={OFF|BODY} ,$where:
- OFF
Does not align the right margin of subheadings and subfootings
with the report body.
- BODY
Specifies that the width of subheading and subfooting lines
is independent of heading, footing, tabheading, and tabfooting lines,
and that the right border of the report body will be aligned by
either extending subheading and subfooting lines (if they are narrower
than the data columns) or extending the data columns (if the data
columns are narrower than the maximum width of subheadings and subfootings).
x
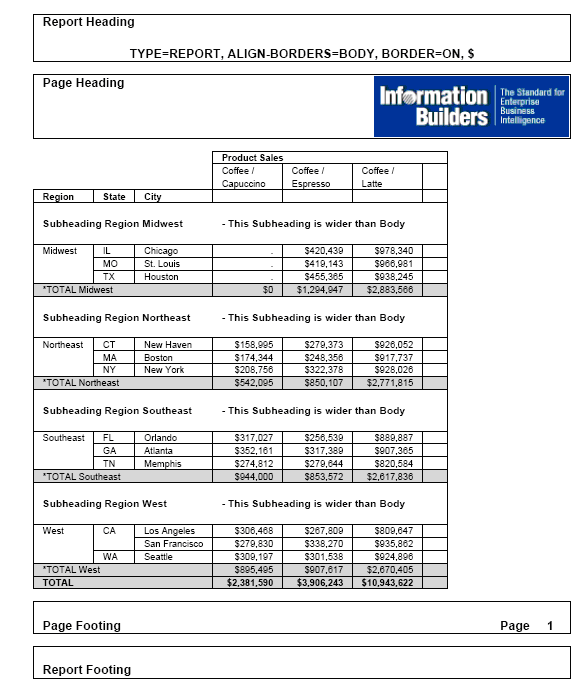
Reference: Considerations for Aligning Subheading and Subfooting Margins With the Report Body
Without
the ALIGN-BORDERS=BODY attribute, the width of the subheading and
subfooting lines is determined by the largest width of all of the
headings and footings (report, page, subheadings, and subfootings).
The following image illustrates report
output without the ALIGN-BORDERS=BODY attribute.

When the body lines are wider than the
subheading and subfooting lines, the border and backcolor of the
subheading and subfooting lines are expanded to match the width
of the data lines, as shown on the following report output.
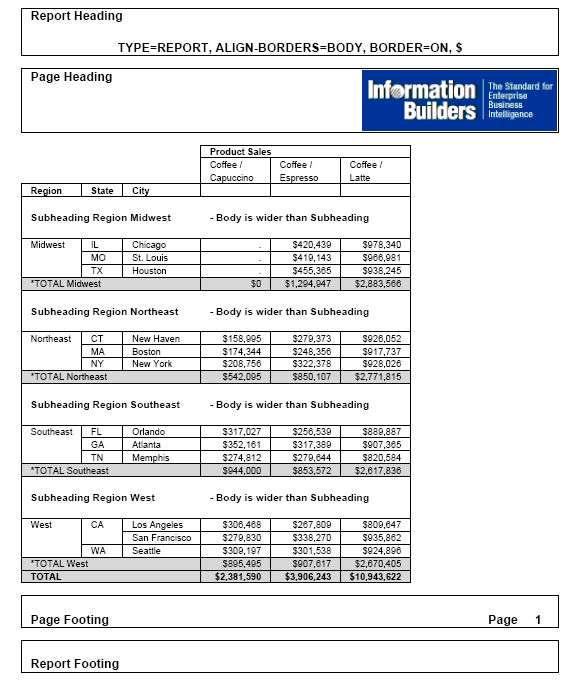
If the subheading and subfooting lines
are longer than the body lines, an additional filler cell is added
to each data line to allow the defined borders and backcolor to
fill the width defined by the subheading and subfooting lines, as
shown on the following report output.
ALIGN-BORDERS=BODY has been designed
to work on:
- Single panel reports
(reports that do not panel horizontally).
- Paneled reports where
HEADPANEL has been turned on for all of the subheadings and subfootings
defined in the report.
Setting HEADPANEL ON causes the headings
and footings from the first page of a Paneled report to replicate
on the subsequent panels. If HEADPANEL is not used, content can
be placed in the Paneled headings by explicitly positioning items
within the headings using the StyleSheet attribute POSITION. In
these situations, ALIGN-BORDERS=BODY is ignored.
Therefore,
if HEADPANEL is turned on at the REPORT level and not explicitly
turned off for any of the individual subheadings or subfootings,
or if it is explicitly turned on for all subheadings and subfootings,
ALIGN-BORDERS=BODY will align the borders of all subheadings and
subfootings to the data. Otherwise, the borders will continue to
exhibit the default behavior of aligning with the page headings
and footings.
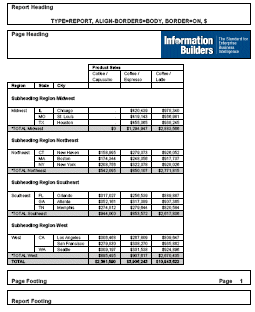
Example: Aligning Subheading and Subfooting Margins in a Single Panel PDF Report
The following request against the GGSALES
data source has a report heading, report footing, page heading,
page footing, and a subheading for each region. The margins of the subheadings
and subfootings are not aligned (ALIGN-BORDERS=OFF ,$):
DEFINE FILE GGSALES
SHOWCATPROD/A30 = CATEGORY || (' / ' | PRODUCT);
END
TABLE FILE GGSALES
SUM
     DOLLARS/I8M AS ''
BY REGION
BY ST
BY CITY
ACROSS SHOWCATPROD AS 'Product Sales'

ON REGION SUBHEAD
" "
"Subheading <+0>Region <REGION<+0> "
" "
ON REGION SUBTOTAL AS '*TOTAL'
ON TABLE SUBHEAD
"Report Heading"
" "
"TYPE=REPORT, ALIGN-BORDERS=OFF, BORDER=ON, $"
HEADING
"Page Heading "
" "
" "
" "
FOOTING
" "
"Page Footing<+0>Page <TABPAGENO "
ON TABLE SUBFOOT
" "
"Report Footing"
WHERE CATEGORY EQ 'Coffee';
ON TABLE SET PAGE-NUM OFF
ON TABLE PCHOLD FORMAT PDF
ON TABLE SET HTMLCSS ON
ON TABLE SET STYLE *
TYPE=REPORT,
FONT='ARIAL',
SIZE=9,
LEFTMARGIN=.75,
RIGHTMARGIN=.5,
TOPMARGIN=.1,
BOTTOMMARGIN=.1,
ALIGN-BORDERS=OFF,
BORDER=ON,
SQUEEZE=ON,$
$
TYPE=TITLE,
STYLE=BOLD,
$
TYPE=TABHEADING,
SIZE=12,
STYLE=BOLD,
$
TYPE=TABHEADING,
LINE=3,
JUSTIFY=CENTER,
$
TYPE=TABFOOTING,
SIZE=12,
STYLE=BOLD,
$
TYPE=HEADING,
SIZE=12,
STYLE=BOLD,
$
TYPE=HEADING,
IMAGE=smplogo1.gif,
POSITION=(+4.6000000 +0.03000000),
JUSTIFY=RIGHT,
$
TYPE=FOOTING,
SIZE=12,
STYLE=BOLD,
$
TYPE=FOOTING,
LINE=2,
ITEM=2,
OBJECT=TEXT,
POSITION=6.3,
SIZE=12,
STYLE=BOLD,
$
TYPE=SUBHEAD,
SIZE=10,
STYLE=BOLD,
$
TYPE=SUBHEAD,
LINE=2,
ITEM=3,
OBJECT=TEXT,
POSITION=2.5,
$
TYPE=SUBFOOT,
SIZE=10,
STYLE=BOLD,
$
TYPE=SUBTOTAL,
BACKCOLOR=RGB(210 210 210),
$
TYPE=ACROSSVALUE,
SIZE=9,
WRAP=ON,
$
TYPE=ACROSSTITLE,
STYLE=BOLD,
$
TYPE=GRANDTOTAL,
BACKCOLOR=RGB(210 210 210),
STYLE=BOLD,
$
ENDSTYLE
ENDThe output shows that
the subheading margins align with the heading, not with the report
body.

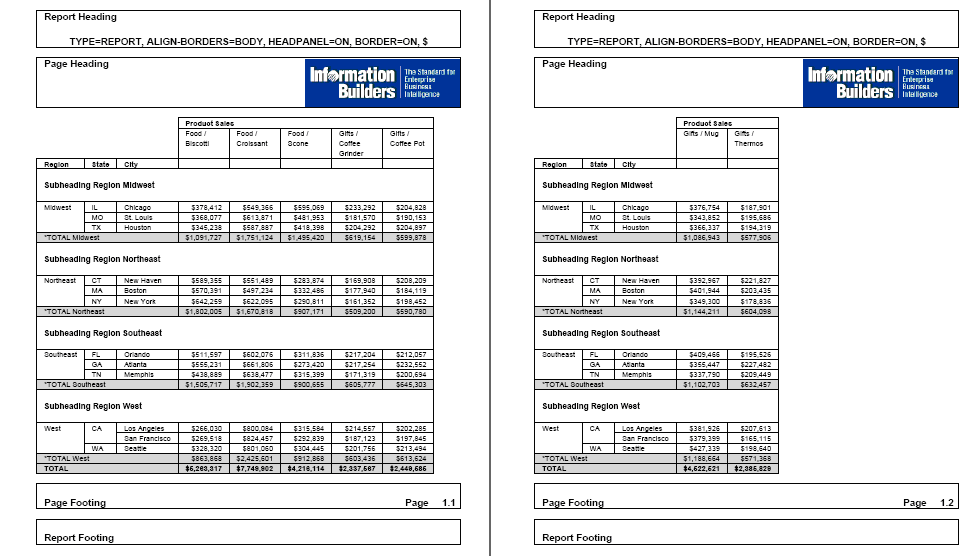
Now change the ALIGN-BORDERS attribute
to ALIGN-BORDERS=BODY and rerun the request. The subheadings now
align with the report body, as shown in the following image.
Example: Aligning Subheading and Subfooting Margins in a Multi-Panel Report
The following request has HEADPANEL=ON
for all headings and footings. It also has the ALIGN-BORDERS=BODY
attribute:
SET BYPANEL=ON
DEFINE FILE GGSALES
SHOWCATPROD/A30 = CATEGORY || (' / ' | PRODUCT);
END
TABLE FILE GGSALES
SUM
     DOLLARS/I8M AS ''
BY REGION
BY ST
BY CITY
ACROSS SHOWCATPROD AS 'Product Sales'

ON REGION SUBHEAD
" "
"Subheading <+0>Region <REGION<+0> "
" "
ON REGION SUBTOTAL AS '*TOTAL'
ON TABLE SUBHEAD
"Report Heading"
" "
"TYPE=REPORT, ALIGN-BORDERS=BODY, HEADPANEL=ON, BORDER=ON, $"
HEADING
"Page Heading "
" "
" "
" "
FOOTING
" "
"Page Footing<+0>Page <TABPAGENO "
ON TABLE SUBFOOT
" "
"Report Footing"
WHERE CATEGORY NE 'Coffee';
ON TABLE SET PAGE-NUM OFF
ON TABLE PCHOLD FORMAT PDF
ON TABLE SET HTMLCSS ON
ON TABLE SET STYLE *
UNITS=IN,
SQUEEZE=ON,
ORIENTATION=PORTRAIT,
$
TYPE=REPORT,
FONT='ARIAL',
SIZE=9,
LEFTMARGIN=.75,
RIGHTMARGIN=.5,
TOPMARGIN=.1,
BOTTOMMARGIN=.1,
HEADPANEL=ON,
ALIGN-BORDERS=BODY,
BORDER=ON,
$
TYPE=TITLE,
STYLE=BOLD,
$
TYPE=TABHEADING,
SIZE=12,
STYLE=BOLD,
$
TYPE=TABHEADING,
LINE=3,
JUSTIFY=CENTER,
$
TYPE=TABFOOTING,
SIZE=12,
STYLE=BOLD,
$
TYPE=HEADING,
SIZE=12,
STYLE=BOLD,
$
TYPE=HEADING,
IMAGE=smplogo1.gif,
POSITION=(+4.6000000 +0.03000000),
JUSTIFY=RIGHT,
$
TYPE=FOOTING,
SIZE=12,
STYLE=BOLD,
$
TYPE=FOOTING,
LINE=2,
ITEM=2,
OBJECT=TEXT,
POSITION=6.3,
SIZE=12,
STYLE=BOLD,
$
TYPE=SUBHEAD,
SIZE=10,
STYLE=BOLD,
$
TYPE=SUBHEAD,
LINE=2,
ITEM=3,
OBJECT=TEXT,
POSITION=2.5,
$
TYPE=SUBFOOT,
SIZE=10,
STYLE=BOLD,
$
TYPE=SUBTOTAL,
BACKCOLOR=RGB(210 210 210),
$
TYPE=ACROSSVALUE,
SIZE=9,
WRAP=ON,
$
TYPE=ACROSSTITLE,
STYLE=BOLD,
$
TYPE=GRANDTOTAL,
BACKCOLOR=RGB(210 210 210),
STYLE=BOLD,
$
ENDSTYLE
ENDThe output shows that
the subheadings are aligned with the data on each panel.
x
Syntax: How to Add and Adjust Grid Lines (PDF or PS)
This syntax applies to a PDF or PS report.
TYPE=type, {HGRID|VGRID}={ON|OFF|HEAVY}, $where:
- type
Identifies the report component to which grid lines are applied.
See Identifying a Report Component in a WebFOCUS StyleSheet for valid values.
- HGRID
Specifies horizontal grid lines.
- VGRID
Specifies vertical grid lines.
- ON
Applies light grid lines.
- OFF
Suppresses grid lines. OFF is the default value.
- HEAVY
Applies heavy grid lines.
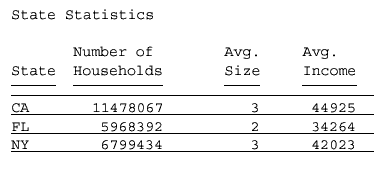
Example: Applying Grid Lines to Report Data (PDF)
This request applies light, horizontal
grid lines to report data.
SET ONLINE-FMT = PDF
TABLE FILE GGDEMOG
HEADING
"State Statistics"
" "
SUM HH AS 'Number of,Households' AVGHHSZ98 AS 'Avg.,Size'
MEDHHI98 AS 'Avg.,Income'
BY ST
WHERE ST EQ 'CA' OR 'FL' OR 'NY'
ON TABLE SET PAGE-NUM OFF
ON TABLE SET STYLE *
TYPE=DATA, HGRID=ON, $
END
In the PDF report, the
lines make it easier to distinguish the data by state: