Configuration and Monitoring
This section provides detailed descriptions of new configuration
and monitoring features.
xCheck Boxes Added to Kill Data Service Agents
The Data Services Agents page now includes check boxes
to enable you to kill one or more agent.
Select the check box next to each agent, and click Kill
Selected Agents, as shown in the following image.
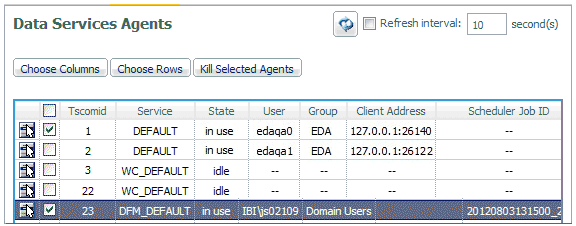
The running agent is terminated, ending any current connection
to that agent. If a request is then issued from such a connection,
an error message is returned. After an agent is terminated, the
Data Services Agents pane refreshes automatically. The corresponding row
of the terminated agent remains, and the State is listed as stopping until
the row eventually disappears. You can also click Refresh
Now to update the pane and remove the row.
xIncluding Subject, Importance, and Body Information in Emails
Emails sent on the start, completion, or failure of
a procedure can now include subject, importance, and body information.
x
Procedure: How to Include Subject, Importance, and Body Information in Emails
You
can set up email for procedures from the Web Console or the Data
Management Console (DMC).
-
From the Web Console menu bar, click Applications,
or from the DMC, expand the Server node folder.
On the Web Console, the Applications page opens.
-
Expand an application folder.
-
Right-click a procedure, select Schedule/E-mail,
and then Manage.
The Manage Schedule and E-mail for procedure page opens.
-
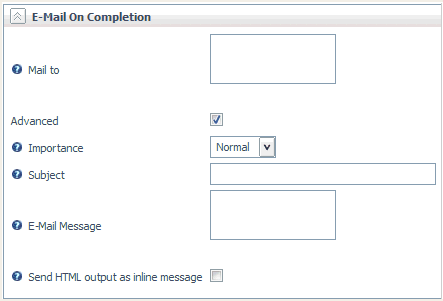
Select the Advanced check box
in the E-Mail On Start or E-mail On Completion section.
Additional parameters become available, as shown in the
following screen.
-
To provide advanced parameters:
-
Click Set or Set and
Test Run.
xSupport for Unlimited Connection Queue Size
Unlimited connection queue size is now available from
the Data Service Properties page. Set the maximum_q parameter
to -1 for unlimited queue size.
x
Procedure: How to Set the Connection Queue Size to Unlimited
-
From the menu bar, select Workspace.
-
In the navigation pane, open the Data Services folder.
-
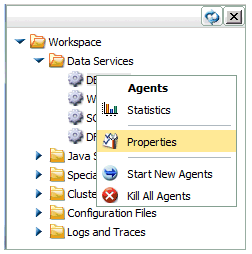
In the navigation pane, right-click a Data Service and
select Properties, as shown in the following
image.
The Data Service properties
page opens.
-
Select on from the Queuing drop-down
menu.
-
Enter -1 in the maximum_q field,
as shown in the following image.

-
Click Save.
xRestoring Defaults for Application Settings and Scheduler Properties
A Restore Defaults button has
been added to the Application Settings and Scheduler Configuration
pages. It enables you to revert configuration values to the server
defaults.
xCreating Backup Copies of Server Configuration Files
Backup copies of the server configuration files can
now be saved to provide restore points when the files are changed
through the Web Console or the Data Management Console.
Note: This feature is not currently available on PDS servers.
x
Procedure: How to Create Backup Copies of Configuration File
-
From the menu bar, select Workspace.
-
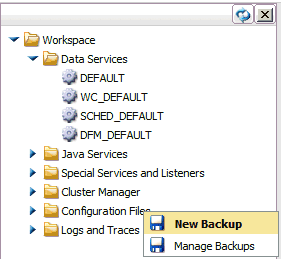
Right-click the Configuration Files folder
and select New Backup, as shown in the following
image.
A confirmation message
opens.
-
Click OK.
The Configuration Files Backup page opens, as shown in
the following image.
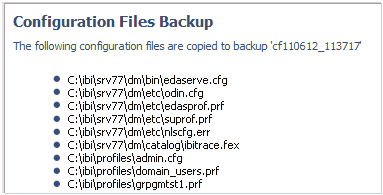
A folder with the
backup files is created. The folder name uses a cf prefix, followed by
the date and time, separated with an underscore. For example, cf110612_113717 is
a backup created on November 6, 2012 at 11:37 am.
The
configuration files that are backed up can include:
- Administration (admin.cfg).
- Workspace (edaserve.cfg).
- Server Profile (edasprof.prf).
- Trace Profile (ibitrace.fex).
- Communication (odin.cfg).
- FDS Profile (suprof.prf).
- NLS setting (nlscfg.err).
- User, group, role, and service profiles (*.prf).
x
Procedure: How to Restore Server Configuration Files From a Backup Folder
-
From the menu bar, select Workspace.
-
Right-click the Configuration Files folder
and select Manage Backups.
The Configuration Files Backup page opens.
-
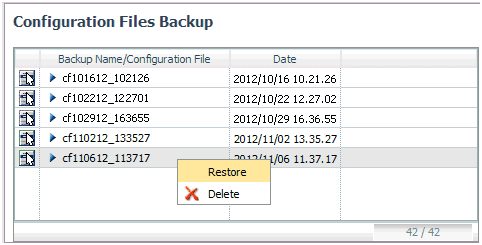
Right-click a backup folder and select Restore, as
shown in the following image.
-
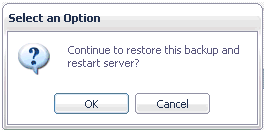
When the confirmation message is displayed, as shown
in the following image, click OK.
xSupport for Procedures That Retrieve Email Addresses and User IDs
An email retrieval procedure can now be entered in the Mail To field
on the Manage Schedule and E-Mail and Submit with E-Mail (Run with Options)
pages, as well as the E-Mail field on the
Customize New Event Routing page.
The procedure will be run to retrieve a list of email addresses
or user IDs for recipients of the email.
If the procedure generates a list of user IDs, the email addresses
will be retrieved from the user IDs registered in admin.cfg or in
the LDAP directory for a server running with LDAP security. The
syntax for entering the procedure in the Mail to or
E-Mail field option is:
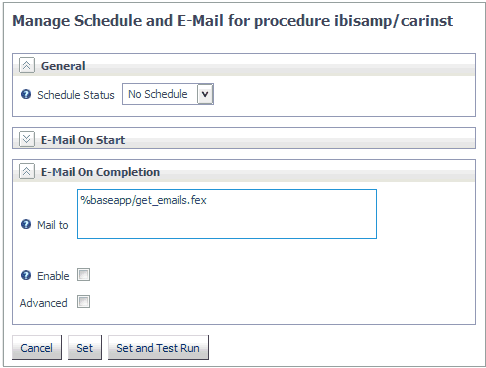
%baseapp/get_emails.fex
The following image shows an email-retrieval fex that will run
on completion of the procedure.
xAdding Reports to a Custom Page
You can now add a procedure that generates a report
to a Custom Page. The option is available from the Add
Procedure button. The procedure is executed when the
custom page is opened.
You can also edit custom pages that were created in earlier releases
to include procedures. All Workspace pages previously added will
be maintained.
x
Procedure: How to Add a Report to a Custom Page
-
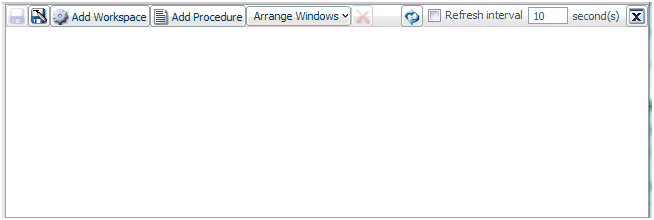
From the Application page, select New and Custom
Page.
The Custom Page workspace opens, as shown in the following
image.
-
To add the procedure, click Add Procedure.
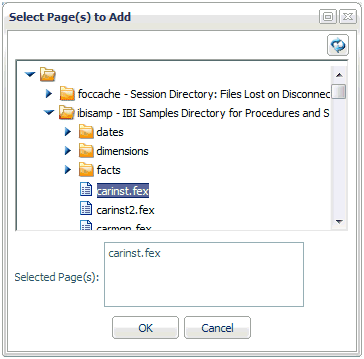
The Select Page(s) to Add dialog box opens, showing the
application folders.
-
Open an application folder and click a procedure.
The procedure is added to the Selected Page(s) field, as
shown in the following image.
-
Click OK.
The procedure is added to the custom page.
-
You can continue adding procedures or monitor pages.
When you are finished, use the Arrange Windows button
to position them.
-
Click the Save As
 button.
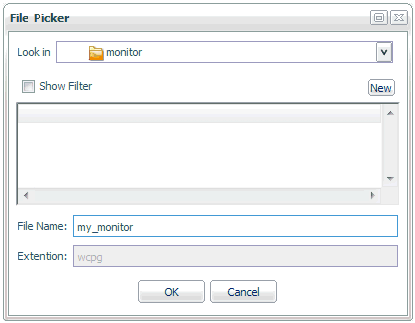
The File Picker page opens.
-
Select an Application folder from the Look
in drop-down menu, enter a name in the File
Name field, and click OK.
xLimiting the Size of edaprint.log on PDS Servers
On PDS servers, you can now limit the size of edaprint.log
using the edaprint_max_lines and edaprint_max_days parameters. This
allows you to delete the log from the JES spool when a limit has
been reached.
The edaprint_max_lines and edaprint_max_days configuration parameters
are supported in PDS deployment mode when DD EDAPRINT is allocated
to the JES spool (SYSOUT=class).
These parameters are available from the Workspace page by opening
the Logs and Traces folder, right-clicking Workspace Logs,
and selecting Properties.
The Workspace Logs Properties page opens, as shown in the following
image.
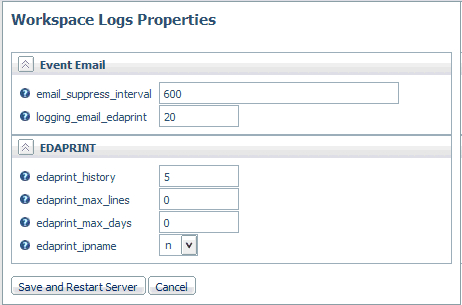
The edaprint_max_lines parameter defines the maximum number of
lines in an edaprint.log before it is archived, and a new edaprint.log
is started.
The edaprint_max_days parameter defines the maximum number of
days from the time the server is started before an edaprint.log
is archived and a new edaprint.log is started.


 button.

